

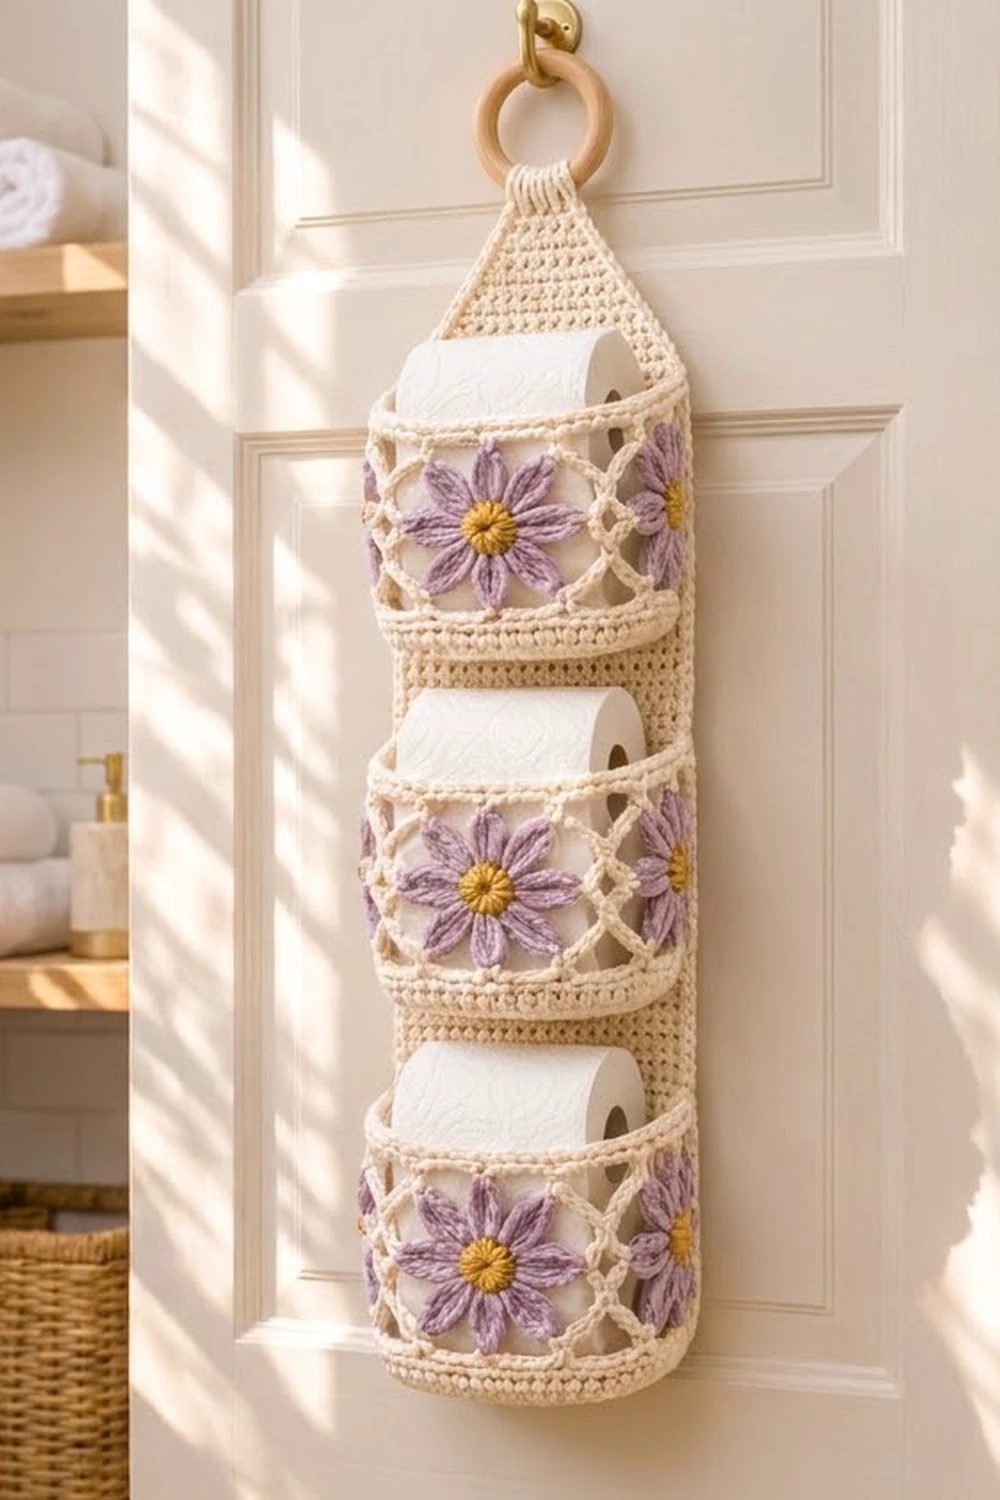
The Lavender Lattice Hanging Toilet Paper Holder stores three spare rolls on the back of a bathroom door or on a wall hook. A long cream panel hangs from a wooden ring, and three soft pockets are sewn down its front, one above the other.
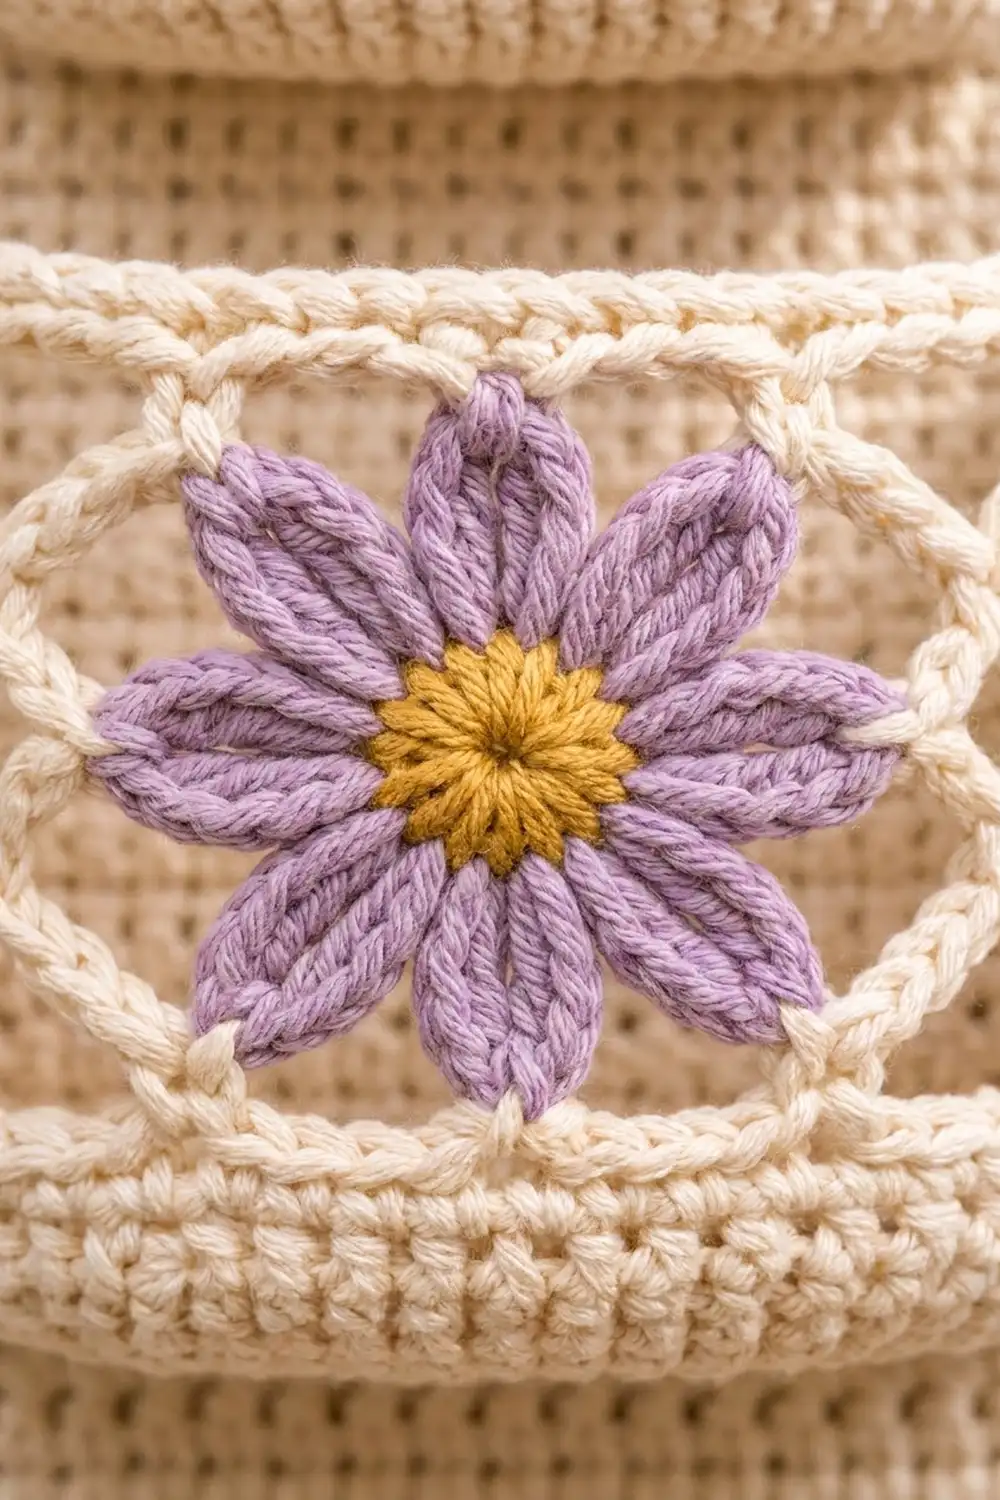
Each pocket has a solid base, an open lattice band and a firm rim. Lavender flowers with mustard-gold centers sit in the lattice, so the holder looks cottage-style and stays useful.
This pattern uses US crochet terms. The finished panel measures 6 in (15.2 cm) wide and 25.75 in (65.4 cm) long, not counting the ring. Each pocket stands 4.25 in (10.8 cm) tall.
You will crochet the panel in rows, the pockets in the round from an oval base, and the flowers as small separate motifs. Then you add a border to the panel, sew the flowers onto the pockets, sew the pockets to the panel and fold the tab over the ring.
Finished Size and Construction
- Finished panel size: 6 in × 25.75 in (15.2 cm × 65.4 cm)
- Skill level: Intermediate
- Terminology: US crochet terms
- Yarn weight: Worsted (#4) cotton
- Hook: 4.5 mm (US 7)
- Number of pieces: 16 (1 panel, 3 pockets, 12 flowers)
- Layout: 3 pockets stacked vertically on 1 panel
- Pocket size: 15 in (38.1 cm) around × 4.25 in (10.8 cm) tall; base about 5.75 in × 3 in (14.6 cm × 7.6 cm)
- Panel size before border: 5.5 in × 25.5 in (14.0 cm × 64.8 cm)
- Border depth: 0.25 in (0.6 cm)
Materials
Use a smooth, firm worsted-weight cotton or cotton blend. Cotton holds its shape in a damp bathroom and doesn’t stretch much under the weight of the rolls. Avoid very fuzzy yarns, because fuzz blurs the lattice.
- Cream (main color): 220 g / 375 m (410 yd)
- Lavender (petals): 40 g / 68 m (74 yd)
- Mustard gold (flower centers): 10 g / 17 m (19 yd)
These quantities include a margin of about 15% for gauge swatching and differences in tension.
Tools:
– 4.5 mm (US 7) crochet hook
– Wooden ring, 2.75 in (7.0 cm) outer diameter
– 6 locking stitch markers
– Tapestry needle
– Scissors
– Measuring tape
– Rust-proof pins and a blocking mat
Abbreviations (US Terms)
- ch – chain
- sl st – slip stitch
- sc – single crochet
- hdc – half double crochet
- dc – double crochet
- inc – 2 sc in the same stitch
- sc2tog – single crochet 2 together
- BLO – back loop only
- sk – skip
- st(s) – stitch(es)
- rnd – round
Special stitch – Petal: Ch 5. Working back down the chain: sl st in the 2nd ch from the hook, sc in the next ch, hdc in the next ch, dc in the last ch. This makes a slim, tapered petal about 0.85 in (2.2 cm) long.
Gauge and Checkpoints
Gauge: 16 sc × 18 rows = 4 in (10.2 cm) in sc worked in rows.
That works out to 4 sts per inch (2.5 cm) and 4.5 rows per inch.
Test one piece first. Make a single pocket base (Rnds 1–6) before you start the panel, because it is the quickest accurate gauge check.
Checkpoints:
– Pocket Rnd 6: 60 sts, about 5.75 in × 3 in (14.6 cm × 7.6 cm), with a perimeter of 15 in (38.1 cm).
– Pocket after Rnd 19: 4.25 in (10.8 cm) tall.
– Panel after Row 1: 22 sts, 5.5 in (14.0 cm) wide.
– Panel after Row 90: 20 in (50.8 cm) long.
– Panel after the border: 6 in (15.2 cm) wide.
If your piece is too big, go down 0.5 mm in hook size. If it is too small, go up 0.5 mm. Don’t add or remove stitches, because the joining math depends on these exact counts.
Backing Panel
Use cream.
Foundation: Ch 23.
Row 1: Sc in the 2nd ch from the hook and in each ch across. Turn. (22 sts)
Rows 2–90: Ch 1, sc in each st across. Turn. (22 sts)
Checkpoint: the panel is 5.5 in × 20 in (14.0 cm × 50.8 cm).
Tapered Top
Row 91: Ch 1, sc2tog, sc in the next 18 sts, sc2tog. Turn. (20 sts)
Row 92: Ch 1, sc in each st across. Turn. (20 sts)
Rows 93–108: Repeat Rows 91–92 eight more times. Each decrease row removes 2 sts, giving 18, 16, 14, 12, 10, 8, 6 and finally 4 sts after Row 107. Row 108 is a plain row. (4 sts)
Checkpoint: the taper is 18 rows, or 4 in (10.2 cm), and ends at a point 1 in (2.5 cm) wide.
Hanging Tab
Rows 109–122: Ch 1, sc in each st across. Turn. (4 sts)
The tab is 14 rows, or 3.1 in (7.9 cm) long. Don’t fasten off yet; the border continues from here.
Pockets
Use cream. Make 3.
Oval Base
Foundation: Ch 15.
Rnd 1: Sc in the 2nd ch from the hook, sc in the next 12 ch, 3 sc in the last ch. Rotate and work along the underside of the chain: sc in the next 12 ch, 2 sc in the last ch (the same ch as the first sc). Join with a sl st to the first sc. (30 sts: 12 on each straight side, 3 at each end)
From here, the 12 straight stitches on each side are always worked plain, and all increases happen at the curved ends. Place a marker at the first stitch of each curved end and move it up every round.
Rnd 2: Ch 1. Sc in each straight st and inc in each of the 3 sts at each end. Join. (36 sts; 6 sts at each end)
Rnd 3: Ch 1. At each end, work (sc 1, inc) 3 times; sc in the straight sts. Join. (42 sts)
Rnd 4: Ch 1. At each end, work (sc 2, inc) 3 times; sc in the straight sts. Join. (48 sts)
Rnd 5: Ch 1. At each end, work (sc 3, inc) 3 times; sc in the straight sts. Join. (54 sts)
Rnd 6: Ch 1. At each end, work (sc 4, inc) 3 times; sc in the straight sts. Join. (60 sts)
Checkpoint: the base is 5.75 in × 3 in (14.6 cm × 7.6 cm) and lies flat.
Sides
Rnd 7: Ch 1, sc BLO in each st around. Join. (60 sts) Working into the back loop only turns the edge upward to form the wall.
Rnds 8–10: Ch 1, sc in each st around. Join. (60 sts)
This makes the lower band, about 0.9 in (2.3 cm) tall.
Mark the 20 back stitches: the 12 straight stitches on one long side plus the 4 stitches on either side of them. These are the stitches that will be sewn to the panel.
Lattice Band
Rnd 11: Ch 1, sc in the first st, ch 7, sk 4 sts. Sc in the next st, ch 7, sk 4 sts. Repeat from * 10 more times. Join to the first sc. (12 ch-7 loops)
Each repeat uses 5 stitches, and 12 × 5 = 60.
Rnd 12: Sl st in each of the next 4 ch to reach the center of the loop. Ch 1, sc in the same loop, ch 7. Sc in the next loop, ch 7. Repeat from * 10 more times. Join to the first sc. (12 loops)
Because each sc sits in the middle of the loop below, the chains form diamond openings.
Rnd 13: Repeat Rnd 12. (12 loops)
Checkpoint: the lattice band is about 2.25 in (5.7 cm) tall, and the pocket still measures 15 in (38.1 cm) around. If the lattice flares, your chains are too loose.
Rim
Rnd 14 (conversion round): Ch 1, work 5 sc in each ch-7 loop around. Join. (60 sts = 12 loops × 5 sc)
Rnds 15–18: Ch 1, sc in each st around. Join. (60 sts)
Rnd 19: Sl st loosely in each st around. Join. (60 sl sts) Fasten off and weave in the ends.
Checkpoint: the pocket is 4.25 in (10.8 cm) tall: 0.9 in (2.3 cm) for the lower band, 2.25 in (5.7 cm) for the lattice and 1.1 in (2.8 cm) for the rim.
Flowers
Make 12.
Center: With gold, make a magic ring. Work 8 sc in the ring and pull it closed. Join with a sl st. Fasten off. (8 sts; about 0.6 in / 1.5 cm across)
Petals: With lavender, join with a sl st in any center sc. Work 1 Petal, then sl st in the next center sc. Repeat from * 7 more times. The last sl st lands in the joining stitch. (8 petals)
Fasten off, leaving a 10 in (25.4 cm) tail for sewing.
Checkpoint: the flower is 2.25 in (5.7 cm) across, the same height as the lattice band.
Make All Pieces
- Cream: 1 backing panel, 3 pockets
- Gold: 12 flower centers
- Lavender: 12 petal rounds (4 per pocket)
Layout, top to bottom:
        ( wooden ring )
             /\
            /  \   taper + tab
           |    |  4 in (10.2 cm) clear space
           | P3 |  pocket 3
           |    |  1.5 in (3.8 cm) gap
           | P2 |  pocket 2
           |    |  1.5 in (3.8 cm) gap
           | P1 |  pocket 1
           |____|  0.5 in (1.3 cm) to bottom edge
Border
Work the border on the panel before you join any pieces.
Border gauge: Work 1 sc per row-end on the long edges. The panel has 4.5 rows per inch, so the edge gets 4.5 sc per inch, which matches the row gauge. Each sc sits on its own row end, so the edge neither ruffles nor pulls in.
Rnd 1: Continue from the tab. Turn the work to its side and sc down the tab, taper and long side. Then work across the bottom and back up the other side as follows:
– Tab side: 14 sc (1 per row)
– Taper side: 18 sc (1 per row)
– Long side: 90 sc (1 per row)
– Bottom: 2 sc in the corner st, sc in the next 20 sts, 2 sc in the corner st (24 sc, including both corners)
– Long side: 90 sc
– Taper side: 18 sc
– Tab side: 14 sc
– Tab top: 2 sc in the first st, sc in the next 2 sts, 2 sc in the last st (6 sc, including both corners)
Join. (274 sts = 24 + 90 + 90 + 18 + 18 + 14 + 14 + 6)
Rnd 2: Sl st in each st around. Join. (274 sl sts) Fasten off.
Why the math works: The bottom has 22 stitches. Each of the 2 corner stitches gets 1 extra sc, so 22 + 2 = 24. The corners are counted only once, as part of the bottom. The tab top follows the same logic: 4 + 2 = 6. On the long edges and taper, every row gets exactly one stitch.
The sc round adds 0.25 in (0.6 cm) on each side, so the panel grows from 5.5 in (14.0 cm) to 6 in (15.2 cm) wide. The body is now 20.25 in (51.4 cm) long including the bottom border.
Joining
Attach the flowers first. On each pocket, the Rnd 12 sc stitches are where the loops meet. Count 6 evenly spaced positions by using every other Rnd 12 sc. Two of these positions fall within the marked back stitches, so skip them. Center one flower at each of the 4 remaining positions, pin it so it fills the diamond and overlaps the bands slightly, and stitch around the gold center and each petal tip with the lavender tail.
Method: Whipstitch with cream yarn and a tapestry needle, working through both loops.
Placement: Measure up from the bottom edge of the bordered panel:
– Pocket 1: base line at 0.5 in (1.3 cm), rim at 4.75 in (12.1 cm)
– Pocket 2: base line at 6.25 in (15.9 cm), rim at 10.5 in (26.7 cm)
– Pocket 3: base line at 12 in (30.5 cm), rim at 16.25 in (41.3 cm)
This leaves 4 in (10.2 cm) of clear panel above the top pocket.
Stitch-to-stitch logic: The panel row has 22 body stitches between its border stitches. Center the pocket by leaving body stitch 1 and body stitch 22 free. Sew the 20 marked back stitches of the pocket’s Rnd 18 to panel stitches 2–21 of one row, one pocket stitch to one panel stitch. Then sew the 20 back stitches of Rnd 7 to stitches 2–21 of the row at the base line. The pocket walls are straight columns, so these two sets of 20 stitches line up vertically. Finally, tack the two outer back columns (panel stitches 2 and 21) between rim and base so the sides can’t gape.
Tension: Pull each whipstitch snug but not tight. The seam should be as long as the panel row it sits on: 20 sts = 5 in (12.7 cm).
Ring: Fold the last 7 tab rows over the wooden ring to the back of the panel and whipstitch them to the 7 rows below. This leaves a 1.5 in (3.8 cm) visible tab.
Size checkpoint: The panel is still 6 in (15.2 cm) wide with no puckering behind the pockets. It measures 25.75 in (65.4 cm) from the bottom edge to the top of the fold.
Final Blocking
- Lightly mist the whole holder with cool water.
- Lay it flat with the pockets facing up, and pin the panel to 6 in × 25.75 in (15.2 cm × 65.4 cm).
- Stuff each pocket loosely with a clean towel or a spare roll so it dries round.
- Ease each flower’s petals open with your fingers.
- Let it dry completely, which takes about 24 hours.
- Unpin it and hang it from the ring.
Final Quality-Control Checklist
- The panel is 22 sts wide before the border and 6 in (15.2 cm) wide after it.
- The border has 274 sts and the corners lie flat.
- Every pocket has 60 sts, 12 lattice loops and stands 4.25 in (10.8 cm) tall.
- There are 4 flowers per pocket, centered in diamonds and secure at every petal tip.
- Pocket seams are 20 sts each and centered with 1 free stitch on each side.
- The gaps between pockets measure 1.5 in (3.8 cm).
- The tab is sewn firmly and the ring is secure.
- All ends are woven in.
Troubleshooting
- The base cups instead of lying flat: You missed an increase. Recount to 60 stitches at Rnd 6.
- The base ruffles: You added an increase on a straight side. Each straight side must stay at 12 stitches.
- The lattice sags: Your chains are too loose. Make the chains with a 4.0 mm hook.
- The pocket is too tight for a roll: Your gauge is tight. Go up 0.5 mm in hook size and remake the pocket.
- The panel edge waves: You worked 2 sc in some row ends. Work exactly 1 sc per row.
- The pockets droop forward: Tack the side columns more firmly between the rim and base seams.
Care
Hand-wash in cool water with mild soap, press out the water in a towel and dry flat. Reshape the pockets while the holder is damp.
Final Notes
The measurement chain is simple. Gauge of 4 sts per inch gives a pocket of 60 sts, or 15 in (38.1 cm) around. The panel is 22 sts, 5.5 in (14.0 cm) wide, before the border and 6 in (15.2 cm) wide after it. Each pocket’s 20-stitch seam takes up panel stitches 2–21. Three 4.25 in (10.8 cm) pockets with 1.5 in (3.8 cm) gaps fit within a 20.25 in (51.4 cm) body. If each checkpoint matches, the finished holder will match too.
Happy crocheting!