

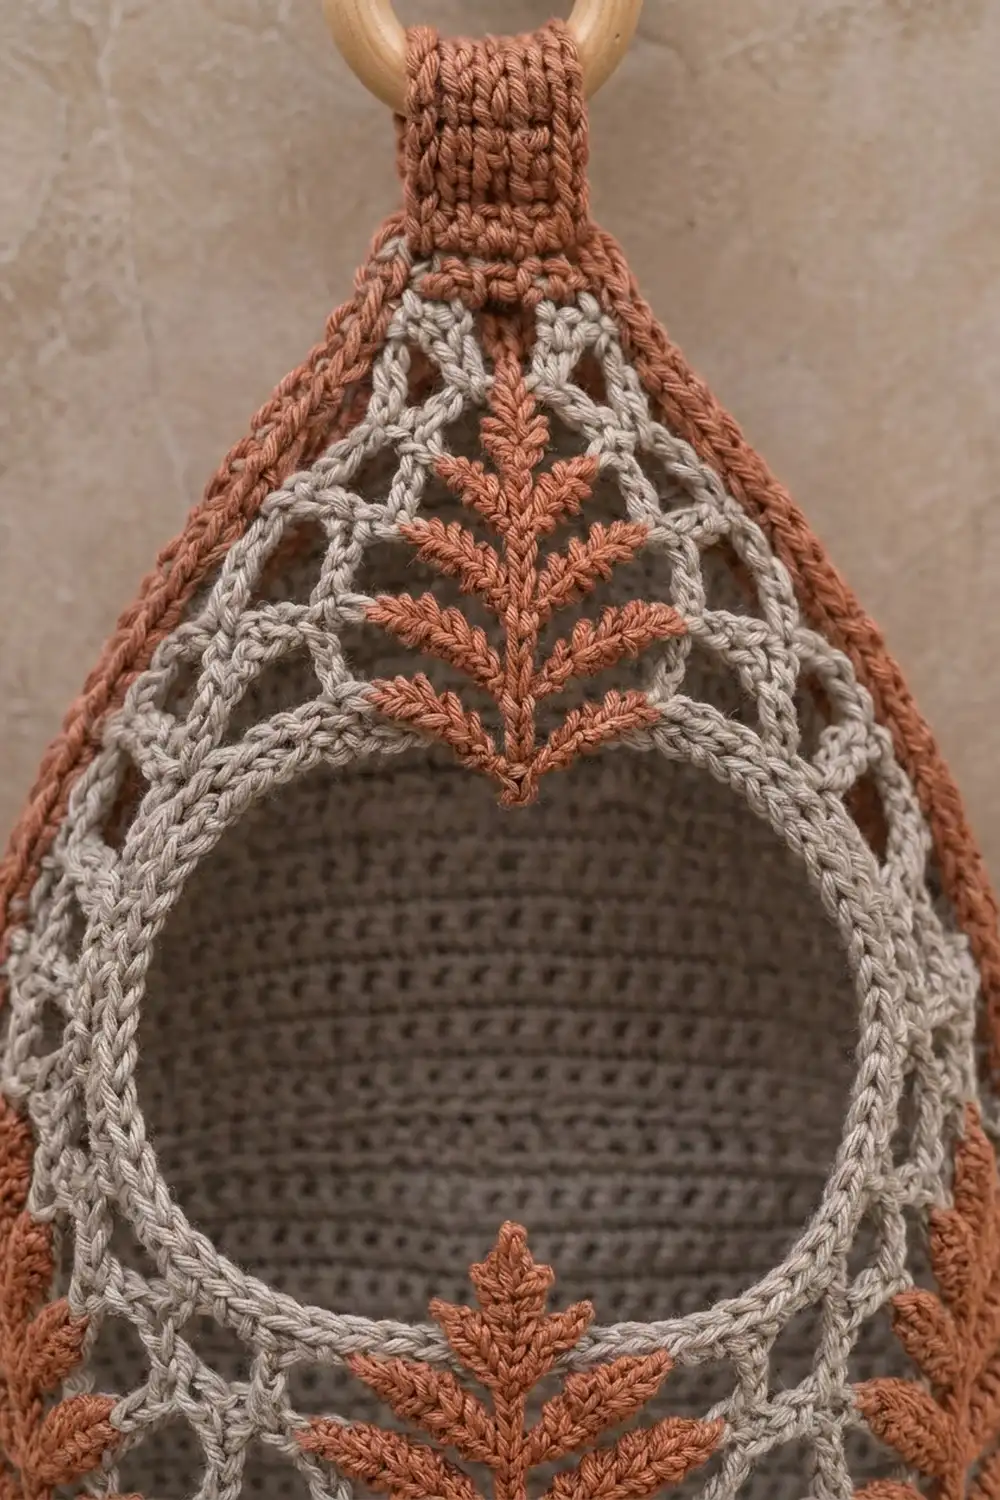
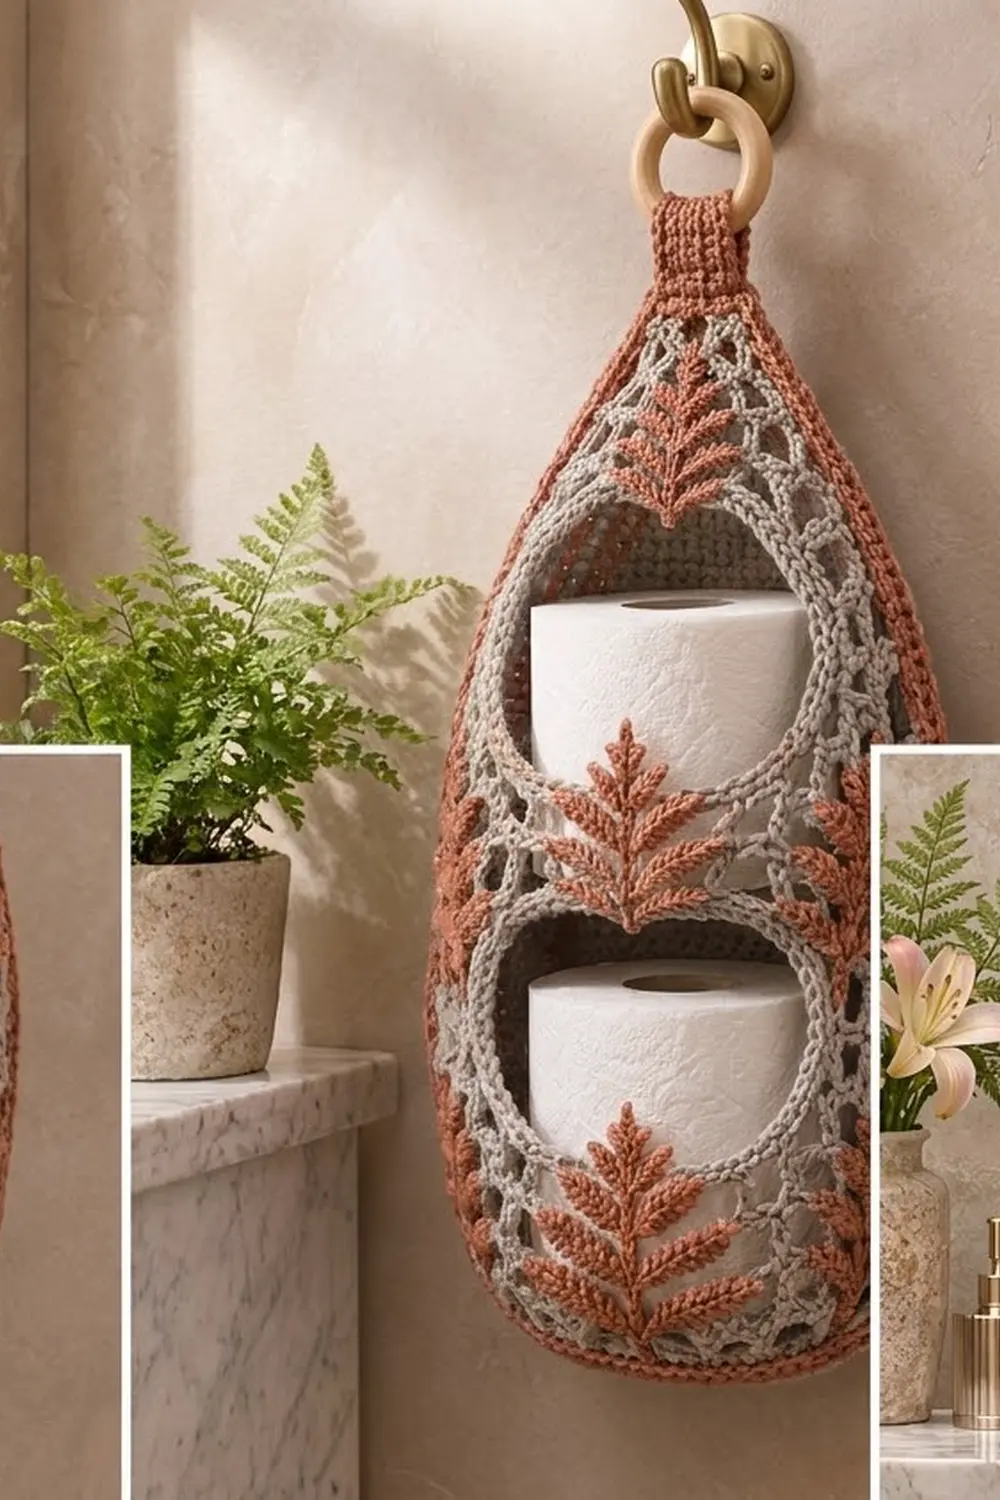
This hanging holder stores two spare rolls in a soft teardrop. A gray chain-loop lace front sits over a solid gray back. Seven terracotta fern sprigs climb the front, and a ribbed tab loops over a wooden ring so it can hang from a towel hook or wall hook.
The palette is warm: gray mesh, terracotta ferns and edging, and natural wood. The style is somewhere between boho and cottage, so it suits a neutral bathroom.
This pattern uses US crochet terms. The finished holder measures 9 in (22.9 cm) wide and 20.5 in (52.1 cm) tall without the tab. It is about 22 in (55.9 cm) tall to the top of the tab loop.
Construction overview: You’ll make the back panel in single-crochet rows. Next you’ll make the front panel in a diamond net, splitting it twice to form two openings, and add a gray rim around each opening. Then you’ll make and sew on the ferns. A terracotta border joins front to back, and a separate tab attaches the ring.
Finished Size and Construction
- Finished size: 9 in × 20.5 in (22.9 cm × 52.1 cm), without the tab
- Skill level: Intermediate
- Terminology: US
- Yarn weight: Worsted (#4)
- Hooks: 4.5 mm (G) for the back, rims, border and tab; 5.0 mm (H) for the front net and ferns
- Number of pieces: 1 back, 1 front, 7 ferns (3 large, 4 small), 1 tab
- Layout: front stacked on back, edges matched
- Panel size before border: 8 in × 19.5 in (20.3 cm × 49.5 cm)
- Border depth: 0.5 in (1.3 cm) on every side
Materials
Use a smooth worsted cotton or cotton blend. Cotton holds its shape when stretched around rolls and copes well with bathroom humidity.
- Gray: 90 g, about 170 m (back, front net, opening rims)
- Terracotta: 30 g, about 55 m (ferns, border, tab)
- 4.5 mm (G) and 5.0 mm (H) crochet hooks
- 1 wooden ring, 2.5 in (6.4 cm) outer diameter
- Tapestry needle, stitch markers, rust-proof pins
- Tape measure, blocking mat, spray bottle
The quantities include a margin of about 15%.
Abbreviations (US Terms)
- ch: chain
- sl st: slip stitch
- sc: single crochet
- hdc: half double crochet
- dc: double crochet
- sc2tog: single crochet 2 together
- BLO: back loop only
- rev sc: reverse single crochet (crab stitch)
- sk: skip
- st(s): stitch(es)
- RS / WS: right side / wrong side
Special stitch: Leaflet (ch N). Ch N. Sl st in the 2nd ch from the hook, then work the stitches listed into the remaining N−1 ch. Sl st into the same stem ch you started from.
Net rows: Each net row is either an increase (I) row or a decrease (D) row.
– I row (adds 1 loop): Ch 1, turn. Sc in the edge sc, ch 5, sc in the next loop; repeat across. Ch 5, sc in the last edge sc.
– D row (removes 1 loop): Ch 1, turn. Sl st to the center of the first loop and sc in it, ch 5, sc in the next loop; repeat across.
Gauge and Checkpoints
- Back (4.5 mm hook): 16 sc and 16 rows = 4 in (10.2 cm)
- Front net (5.0 mm hook, lightly stretched): 4 loops and 8 rows = 4 in (10.2 cm). That is 1 loop = 1 in (2.5 cm) and 1 row = 0.5 in (1.3 cm).
Make the back first and treat it as your gauge test. The front is shaped to match it row for row.
- Back after Row 9: 8 in (20.3 cm) wide
- Back after Row 64: 16 in (40.6 cm) tall
- Back after Row 78: 19.5 in (49.5 cm) tall
- Front after Row 5: 8 in (20.3 cm) wide, 2.5 in (6.4 cm) tall
- Front after Row 21: 10.5 in (26.7 cm) tall
- Front after Row 39: 19.5 in (49.5 cm) tall
If your piece is too big, go down half a hook size. If it is too small, go up half a size. On the net, ch 4 loops give a smaller mesh and ch 6 loops a larger one. Keep the row counts the same either way.
Back Panel (Gray, 4.5 mm Hook)
Foundation: Ch 17.
Row 1: Sc in the 2nd ch from the hook and in each ch across. Turn. (16 sc)
Rows 2–9: Ch 1, 2 sc in the first st, sc in each st to the last st, 2 sc in the last st. Turn.
Row totals: Row 2: 18; Row 3: 20; Row 4: 22; Row 5: 24; Row 6: 26; Row 7: 28; Row 8: 30; Row 9: 32 sc.
Rows 10–64: Ch 1, sc in each st across. Turn. (32 sc)
Rows 65–76: Ch 1, sc2tog, sc in each st to the last 2 sts, sc2tog. Turn.
Row totals: Row 65: 30; Row 66: 28; Row 67: 26; Row 68: 24; Row 69: 22; Row 70: 20; Row 71: 18; Row 72: 16; Row 73: 14; Row 74: 12; Row 75: 10; Row 76: 8 sc.
Rows 77–78: Ch 1, sc in each st across. Turn. (8 sc)
Fasten off. The back measures 8 in × 19.5 in (20.3 cm × 49.5 cm). Its top edge is 2 in (5.1 cm) wide.
Front Panel (Gray, 5.0 mm Hook)
Foundation: Ch 18.
Row 1: Sc in the 2nd ch from the hook, ch 5, sk 3 ch, sc in the next ch; repeat 3 more times. (4 loops, 5 sc)
Row 2 (I): 5 loops.
Row 3 (I): 6 loops.
Row 4 (I): 7 loops.
Row 5 (I): 8 loops.
Lower Opening (Rows 6–15)
First strip, Row 6 (D): Ch 1, turn. Sc in loop 1, ch 5, sc in loop 2. (1 loop) Leave the remaining loops unworked.
First strip, Rows 7–15: Alternate I and D rows over this strip only. Odd rows give 2 loops and even rows give 1 loop. Row 15 ends with 2 loops. Fasten off.
Second strip: Skip loops 3–6 of Row 5. Join yarn in loop 8, the far edge loop.
Row 6: Sc in loop 8, ch 5, sc in loop 7. (1 loop)
Rows 7–15: Work as for the first strip. Row 15 ends with 2 loops at the outer edge. Don’t fasten off.
The opening is now 5 loops wide and 10 rows tall: 5 in × 5 in (12.7 cm × 12.7 cm) before the rim.
Row 16 (D, bridge): Ch 1, turn. Sc in loop 1 of the second strip, ch 5, sc in loop 2. Ch 25 for the bridge. On the first strip, sc in loop 1, ch 5, sc in loop 2. (7 loops: 1 + 5 bridge loops + 1)
Row 17 (I): Sc in the edge sc, ch 5, sc in the strip loop. Then ch 5, sc in the 3rd, 8th, 13th, 18th and 23rd bridge ch in turn. Ch 5, sc in the other strip loop, ch 5, sc in the edge sc. (8 loops, 9 sc)
Middle Band
Row 18 (D): 7 loops.
Row 19 (I): 8 loops.
Row 20 (D): 7 loops.
Row 21 (I): 8 loops.
Upper Opening and Taper
Rows 22–31: Work the same as Rows 6–15.
Row 32: Work the same as Row 16. (7 loops)
Row 33 (D): 6 loops.
Row 34 (D): 5 loops.
Row 35 (D): 4 loops.
Row 36 (I): 5 loops.
Row 37 (D): 4 loops.
Row 38 (D): 3 loops.
Row 39 (D): 2 loops.
Fasten off. The front measures 8 in × 19.5 in (20.3 cm × 49.5 cm) when lightly stretched. Rows 1–5 match back Rows 1–10, and the taper (Rows 33–39) matches back Rows 65–78.
Opening Rims (Gray, 4.5 mm Hook)
Work each opening separately with the RS facing. Join in a lower corner of the opening.
Rnd 1: Work 5 sc in each of the 4 skipped loops along the bottom (20). Work 25 sc up the side, alternating 2 sc and 3 sc into the 10 row-ends. Work 25 sc along the bridge, 1 in each ch. Work 25 sc down the other side as before. Sl st to the first sc. (95 sc)
Rnd 2: Ch 1. Sc in each st around, working sc2tog at each of the 4 corners. Sl st to join. (91 sc)
Fasten off. Each rimmed opening measures about 4.5 in (11.4 cm) across and stretches to fit a standard roll.
Ferns (Terracotta, 5.0 mm Hook)
Large Fern (Make 3)
Ch 18.
- Tip: Sl st in the 2nd ch from the hook, sc in the next ch, hdc in the next ch.
- Sl st in the next 2 ch.
- Pair 1: Make 2 leaflets (ch 4): sl st, sc, hdc.
- Sl st in the next 2 ch.
- Pair 2: Make 2 leaflets (ch 5): sl st, sc, hdc, dc.
- Sl st in the next 2 ch.
- Pair 3: Make 2 leaflets (ch 6): sl st, sc, hdc, dc, dc.
- Sl st in the next 2 ch.
- Pair 4: Make 2 leaflets (ch 7): sl st, sc, hdc, hdc, dc, dc.
- Sl st in the next 2 ch.
- Pair 5: Make 2 leaflets (ch 8): sl st, sc, hdc, hdc, dc, dc, dc.
- Sl st in the last 4 ch. Leave a 12 in (30.5 cm) tail.
Stem check: tip 3 + 4 sl st pairs (8) + 2 + 4 + skipped ch 1 = 18 ✓.
Size: 3 in × 2.25 in (7.6 cm × 5.7 cm).
Small Fern (Make 4)
Ch 14.
- Tip: Sl st in the 2nd ch from the hook, sc in the next ch, hdc in the next ch.
- Sl st in the next 2 ch, then make Pair 1 (ch 4 leaflets).
- Sl st in the next 2 ch, then make Pair 2 (ch 5 leaflets).
- Sl st in the next 2 ch, then make Pair 3 (ch 6 leaflets).
- Sl st in the last 4 ch.
Size: 2.25 in × 1.5 in (5.7 cm × 3.8 cm).
Make All Pieces
| Piece | Qty | Color |
|---|---|---|
| Back panel | 1 | Gray |
| Front panel with rims | 1 | Gray |
| Large fern | 3 | Terracotta |
| Small fern | 4 | Terracotta |
| Tab | 1 | Terracotta |
Placement on the front:
              [ TAB ]
            [ LARGE 1 ]          taper, Rows 33–39
        (  UPPER OPENING  )
   [SMALL]               [SMALL] side strips, Rows 22–31
            [ LARGE 2 ]          band, Rows 16–21
        (  LOWER OPENING  )
   [SMALL]               [SMALL] side strips, Rows 6–15
            [ LARGE 3 ]          bottom, Rows 1–5
Open each leaflet pair into a V, with the tips pointing up. Center the large ferns on the panel. The middle fern’s tips touch both rims. The bottom fern’s tip overlaps the lower rim by about 0.5 in (1.3 cm).
Angle each small fern about 20° outward, with its stem roughly 0.75 in (1.9 cm) in from the side edge. Pin each fern, then whipstitch along the stem and the underside of each leaflet, catching only the net.
Joining
Lay the back WS up, then lay the front on top RS up. Line up the outer edges and pin every 1 in (2.5 cm).
The join is Border Rnd 1, worked through both layers. Each border sc goes through one back stitch or row-end and the nearest point on the front edge:
– Sides: about 2 border sc per front row-end
– Bottom: 4 sc per front foundation loop
– Top: 4 sc per Row 39 loop
Keep the tension snug but not tight. The net should lie flat, with no ripples and no pulling. After Rnd 1, the holder should measure 8.5 in × 20 in (21.6 cm × 50.8 cm).
Border (Terracotta, 4.5 mm Hook)
Border gauge: 1 sc per back stitch or row-end. Each round adds 0.25 in (0.6 cm).
Rnd 1 (joining): Join in the bottom-right foundation st.
– Bottom: 3 sc in the first st, sc in the next 14 sts, 3 sc in the last st (20).
– Side: 1 sc in each row-end of Rows 2–77 (76).
– Top: 3 sc in the first st of Row 78, sc in the next 6 sts, 3 sc in the last st (12).
– Side: 1 sc in each row-end of Rows 77 down to 2 (76).
Sl st to the first sc. (184 sc)
Rnd 2: Ch 1. Rev sc in each st around (184). Join and fasten off.
Why the math works: The back’s gauge is square, so 1 sc per stitch and 1 sc per row-end lie flat. The side counts already include their corner stitches: the corners belong to the bottom and top counts. Because rev sc is worked 1 per stitch, Rnd 2 adds height without adding width. That gives 8 in + 2 × 0.5 in = 9 in (22.9 cm) wide and 19.5 in + 1 in = 20.5 in (52.1 cm) tall.
Tab and Ring
Ch 7.
Row 1: Sc in the 2nd ch from the hook and in each ch across. (6 sc)
Rows 2–16: Ch 1, sc BLO in each st across. (6 sc)
The tab is 1.5 in × 4 in (3.8 cm × 10.2 cm). Fold it through the ring. Sandwich the top 2 in (5.1 cm) of the holder between the ends, with 1 in (2.5 cm) on the front and 1 in on the back. Whipstitch through all layers.
Final Blocking
- Mist the holder until it is damp, not soaked.
- Pin it flat to 9 in × 20.5 in (22.9 cm × 52.1 cm).
- Open the net diamonds evenly with your fingers.
- Shape the openings into ovals. Pin the rims to 4.5 in (11.4 cm).
- Fan out the fern leaflets into Vs.
- Leave it to dry completely before unpinning.
Final Quality-Control Checklist
- The back measures 8 in × 19.5 in (20.3 cm × 49.5 cm) before the border.
- The front loop counts match each row listed above.
- Both rims have 91 sc.
- All 7 ferns are sewn down securely.
- Border Rnd 1 has 184 sc.
- The tab is sewn through every layer.
- A roll slides in through each opening and stays in place.
Troubleshooting
- Net is too short: Your loops are too tight. Go up a hook size or use ch 6 loops.
- Front ripples at the border: Work fewer catches into the front edge. Keep the back count.
- Opening is too small: Undo the rims and work Rnd 2 without the corner sc2tog.
- Ferns curl: Steam them before sewing, then block them pinned flat.
- Holder tilts: Center the tab over the middle 6 top stitches.
Care
Hand wash in cool water. Reshape the holder and dry it flat. Don’t hang it until it is fully dry.
Final Notes
These are the measurements to check at each stage:
– Back: 16 sc wide at the bottom, 32 sc (8 in / 20.3 cm) at the widest, 8 sc at the top, 78 rows (19.5 in / 49.5 cm).
– Front: Row by row, its 4 to 8 loops match that outline.
– Rims: 91 sc.
– Border: 184 sc, 0.5 in (1.3 cm) deep, for a finished size of 9 in × 20.5 in (22.9 cm × 52.1 cm).
Happy crocheting!