

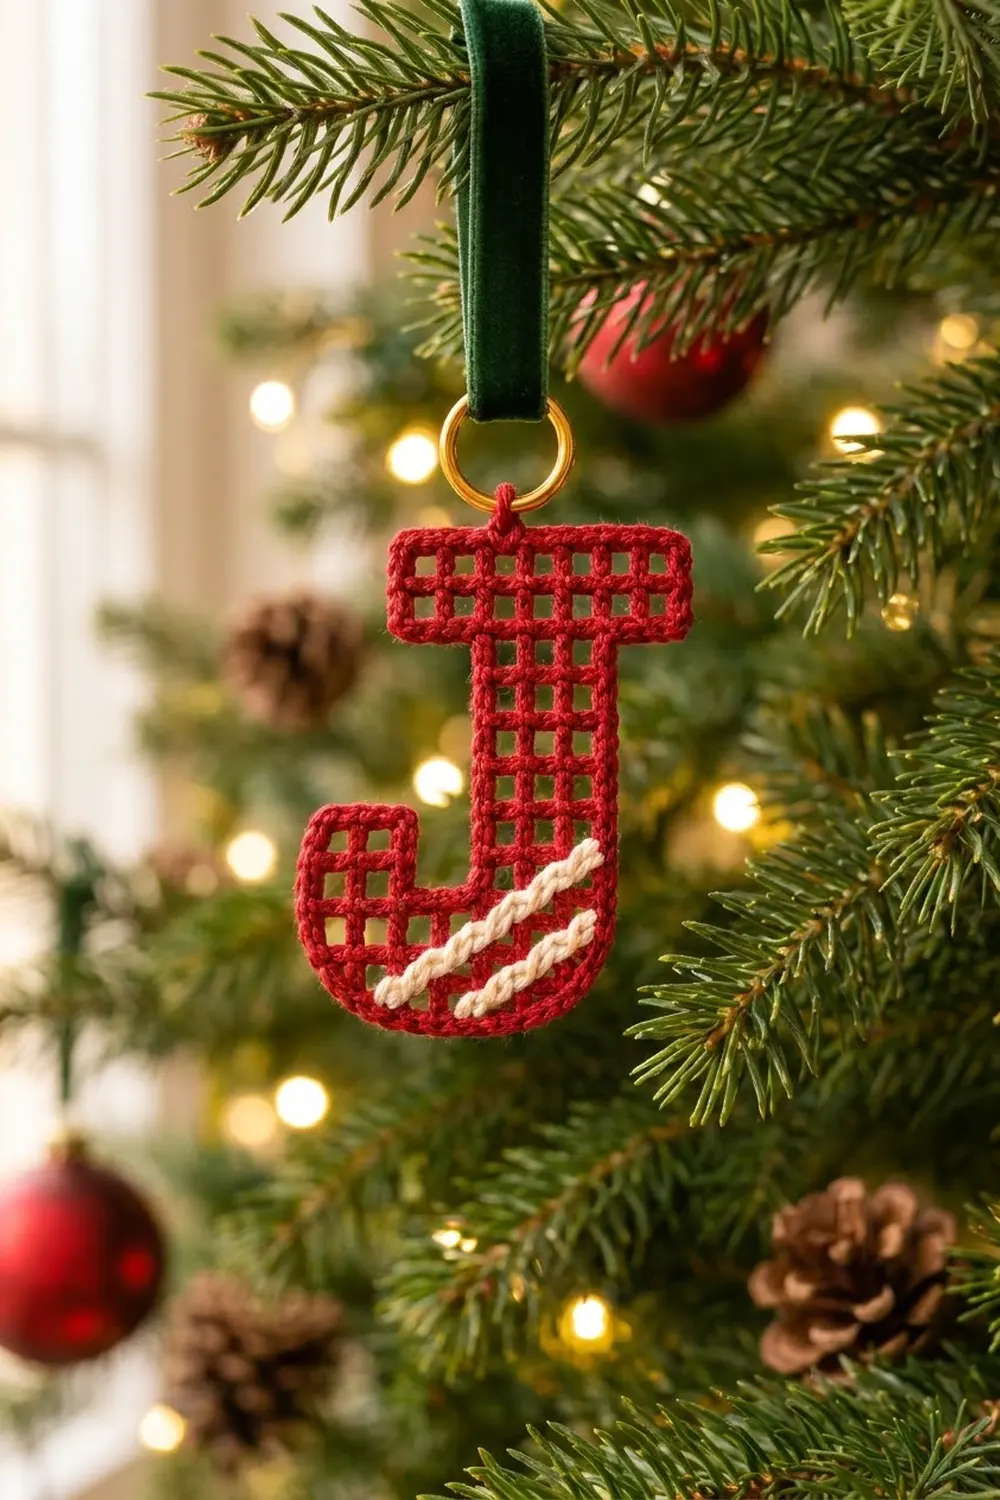
This little ornament is a capital letter “J” worked in filet crochet. Square open mesh in bright red cotton gives it a light, lacy grid. A crisp single crochet edge keeps the outline sharp, and two cream stripes across the curve make it look like a candy cane.
It’s a quick personalized gift. Hang it on the tree, tie it to a present, or clip it to a bag with the gold ring. The style is graphic and clean, and it reads well from across the room.
This pattern uses US crochet terms. The finished ornament measures 3.75 in (9.5 cm) wide by 5.75 in (14.6 cm) tall, not counting the ring.
Construction is simple. You work the bowl and stem from the bottom up, add the crossbar with mesh increases, and then work the short tip of the J separately. Next comes a single round of single crochet around the whole letter. The cream stripes are slip-stitched onto the surface last, followed by the hanging loop and blocking.
Finished Size and Construction
- Finished size: 3.75 in × 5.75 in (9.5 cm × 14.6 cm)
- Skill level: Easy to intermediate (you need to know filet mesh and mesh increases)
- Terminology: US crochet terms
- Yarn weight: DK / light worsted (#3) cotton
- Hook: 3.5 mm (E-4)
- Number of pieces: 1 (single motif)
- Layout: A 7-mesh-wide by 11-row-tall filet grid in the shape of a “J”
- Piece size before border: 3.5 in × 5.5 in (8.9 cm × 14.0 cm)
- Border depth: 0.125 in (0.3 cm) on every side, 1 round
- Size after border: 3.75 in × 5.75 in (9.5 cm × 14.6 cm)
Materials
Use a smooth mercerized or combed cotton in DK weight. Cotton keeps the mesh squares crisp and holds its shape when blocked. Avoid fuzzy or very stretchy yarns, because they blur the grid.
- Red (main color): 12 g, about 30 m (33 yd)
- Cream (stripes): 3 g, about 7.5 m (8 yd)
These quantities include a margin for your gauge swatch and tails.
Tools:
– 3.5 mm (E-4) crochet hook
– Tapestry needle
– 1 in (2.5 cm) gold metal ring
– Scissors
– Blocking board or foam mat
– Rust-proof pins
– Spray bottle with water
– Ruler or tape measure
Abbreviations (US Terms)
- ch – chain
- sl st – slip stitch
- sc – single crochet
- dc – double crochet
- trtr – triple treble crochet
- sc2tog – single crochet 2 together
- sk – skip
- sp – space
- beg – beginning
- RS / WS – right side / wrong side
Special stitches
- Mesh: One open square, made as dc, ch 2, dc. Neighboring mesh share their dc “posts.” A row of n mesh has n + 1 posts and 3n + 1 stitches.
- trtr (triple treble): Yo 4 times, insert hook, yo and pull up a loop, then [yo, pull through 2 loops] 5 times. Use it for the end-of-row mesh increase.
- Surface slip stitch: Hold the yarn behind the work. Insert the hook from front to back through a mesh hole, pull up a loop, and draw it through the loop on your hook.
Gauge and Checkpoints
Gauge: 4 mesh × 4 rows = 2 in × 2 in (5.1 cm × 5.1 cm). Each mesh is 0.5 in (1.3 cm) wide and each row is 0.5 in (1.3 cm) tall.
Make a test swatch first. Ch 17, dc in the 8th ch from the hook, then [ch 2, sk 2 ch, dc in next ch] 3 times. Work 3 more rows of 4 mesh, then pin and measure. Every measurement in this pattern comes from this gauge, so check it before you start.
Checkpoints:
– After Row 2: 3 in (7.6 cm) wide × 1 in (2.5 cm) tall.
– After Row 9: the stem is 1.5 in (3.8 cm) wide and the piece is 4.5 in (11.4 cm) tall.
– After Row 11: 3.5 in × 5.5 in (8.9 cm × 14.0 cm).
– After the border: 3.75 in × 5.75 in (9.5 cm × 14.6 cm).
Too big? Go down to a 3.25 mm hook. Too small? Go up to a 3.75 mm hook. If your squares are wider than they are tall, try a slightly taller dc: pull the first loop up a little higher.

Main Pattern: The Letter J
Throughout this pattern, “left” and “right” mean as seen from the RS. Columns are numbered 1 to 7 from left to right, and rows are numbered from the bottom up.
Bowl (Rows 1–2)
With red, ch 23.
Row 1 (RS): Dc in the 8th ch from the hook, then [ch 2, sk 2 ch, dc in next ch] 5 times. Turn. (6 mesh, 7 posts, 19 stitches.)
The first 7 skipped chains do two jobs. The 3 nearest the hook form the right-edge post plus its ch-2, and the next 2 are the skipped foundation chains.
Row 2 (WS): Ch 5 (counts as dc + ch 2 here and throughout), sk the ch-2 sp, dc in next dc. Work [ch 2, dc in next dc] 4 times, then ch 2 and dc in the top of the edge post (the 3rd skipped ch counted from the free end of Row 1). Turn. (6 mesh.)
Checkpoint: 3 in (7.6 cm) wide × 1 in (2.5 cm) tall.
Stem (Rows 3–9)
Row 3 (RS): Ch 5, sk sp, dc in next dc, [ch 2, dc in next dc] twice. Turn. (3 mesh, 4 posts, 10 stitches.) These are columns 4–6. Leave the other 3 mesh of Row 2 unworked.
Row 4 (WS): Ch 5, dc in next dc, ch 2, dc in next dc, ch 2, dc in 3rd ch of beg ch-5. Turn. (3 mesh.)
Rows 5–9: Repeat Row 4. (3 mesh in each row.)
Row 9 is a RS row, so it ends at the left edge of the stem. Do not fasten off.
Checkpoint: The stem is 1.5 in (3.8 cm) wide and the piece is 4.5 in (11.4 cm) tall.
Crossbar (Rows 10–11)
Row 10 (WS, increase row):
1. Ch 14 and dc in the 9th ch from the hook.
2. Ch 2, sk 2 ch, dc in next ch.
3. Ch 2, sk 2 ch, dc in the same stitch at the base of the ch-14. This adds 3 mesh on the left (columns 1–3).
4. Work [ch 2, dc in next dc] 3 times across the stem (columns 4–6).
5. Ch 2, then work a trtr into the base of the last dc. This adds 1 mesh on the right (column 7).
Turn. (3 + 3 + 1 = 7 mesh, 8 posts, 22 stitches.)
Row 11 (RS): Ch 5, sk sp, dc in next dc, [ch 2, dc in next dc] 5 times, ch 2, dc in the 12th ch of the ch-14 (the top of the left edge post). (7 mesh.) Fasten off.
Tip of the J (Rows 3–4, left side)
With the RS facing, find the 3rd post from the left on top of Row 2. Join red there with a sl st.
Tip Row 3 (RS): Ch 5, sk sp, dc in next dc, ch 2, dc in 3rd ch of Row 2’s beg ch-5. Turn. (2 mesh, columns 1–2.)
Tip Row 4 (WS): Ch 5, dc in next dc, ch 2, dc in 3rd ch of beg ch-5. (2 mesh.) Fasten off.
Column 3 stays open above Row 2, which makes the notch inside the hook of the J.
Mesh total: 6 + 6 + (7 × 3) + 2 + 2 + 7 + 7 = 51 mesh.
Checkpoint: 3.5 in × 5.5 in (8.9 cm × 14.0 cm). Weave in all ends now.
Border
Border gauge: 6 sc per in (2.5 cm). That is 3 sc for every mesh along a top or bottom edge, and 3 sc for every row along a side edge.
How to place the stitches:
– Along top and bottom edges: Work 1 sc in each post and 2 sc in each ch-2 space (or each foundation space).
– Along side edges: Work 3 sc evenly around each dc row end.
– Outward corners (8 total): Work 1 extra sc into the corner point.
– Inward corners (4 total): Work the last sc of one edge and the first sc of the next edge together as sc2tog.
Round 1 (RS): Join red with a sl st at the top-left corner and ch 1. Work clockwise, with these counts per edge (corner adjustments not included):
| Edge | Units | Sc |
|---|---|---|
| Top of crossbar | 7 mesh | 21 |
| Right end of crossbar | 2 rows | 6 |
| Underside of crossbar, right | 1 mesh | 3 |
| Right side of stem and bowl | 9 rows | 27 |
| Bottom of bowl | 6 mesh | 18 |
| Left side of bowl and tip | 4 rows | 12 |
| Top of tip | 2 mesh | 6 |
| Right side of tip | 2 rows | 6 |
| Bottom of notch | 1 mesh | 3 |
| Left side of stem | 7 rows | 21 |
| Underside of crossbar, left | 3 mesh | 9 |
| Left end of crossbar | 2 rows | 6 |
Sl st to the first sc. Do not fasten off yet.
Total: 138 edge sc, plus 8 for the outward corners, minus 4 for the inward corners = 142 stitches.
Why the math works: Each mesh and each row measures 0.5 in (1.3 cm), and each 0.5 in (1.3 cm) gets 3 sc. That matches the 6 sc per in (2.5 cm) border gauge, so the edges stay flat. The 8 outward and 4 inward corners give a net of +4, which is the same as the 4 extra corner stitches a plain rectangle would need. The corners turn without ruffling or cupping.
Hanging Loop
Sl st along the top edge to the 11th sc, which is the center of the crossbar. Then:
1. Ch 3.
2. Drop the loop from your hook. Insert the hook through the gold ring from front to back, pick up the dropped loop, and pull it through the ring.
3. Ch 3 more.
4. Sl st into the same sc.
The loop is about 0.75 in (1.9 cm) long. Fasten off and weave in the end.
Cream Candy Stripes
Use cream held double. Cut a 24 in (61.0 cm) length and fold it in half. Holes are given as (column, row).
Lower stripe:
1. Start at the bottom border, directly below the post between columns 3 and 4. Pull up a loop through the border.
2. Surface sl st through holes (4,1), (5,2), and (6,3).
3. Finish with a surface sl st through the right border at the Row 4 level.
That is 4 surface sl sts.
Upper stripe:
1. Start at the bottom border, directly below the post between columns 1 and 2.
2. Surface sl st through holes (2,1), (3,2), (4,3), (5,4), and (6,5).
3. Finish through the right border at the Row 6 level.
That is 6 surface sl sts.
Keep each stitch the length of one diagonal so the grid doesn’t pucker. Pull the ends to the WS and weave them into the red posts.
Final Blocking
- Lightly mist the ornament until it is evenly damp.
- Lay it RS up on the blocking board.
- Pin the four crossbar corners first. Set the crossbar to 3.75 in (9.5 cm) wide.
- Pin the bottom of the bowl so the total height is 5.75 in (14.6 cm).
- Set the bowl to 3.25 in (8.3 cm) wide and the stem to 1.75 in (4.4 cm) wide.
- Use a pin tip to nudge each mesh square into shape.
- Let it dry completely, at least 6 hours.
Final Quality-Control Checklist
- There are 51 mesh in total and every one is square.
- Columns 1–2 above Row 2 hold the tip, and column 3 stays open as the notch.
- The border has 142 stitches and lies flat at every corner.
- Both cream stripes are parallel and lie flat.
- The ring hangs at the top center and the ornament hangs straight.
- All ends are woven in on the WS.
- The finished size is 3.75 in × 5.75 in (9.5 cm × 14.6 cm).
Troubleshooting
- Squares look like rectangles: Your dc height doesn’t match your chain tension. Adjust how high you pull up the first loop, or loosen your ch-2 spaces.
- Crossbar slants: Your Row 10 increases are too tight. Chain more loosely, then block firmly.
- Border ruffles: Use 2 sc per row end instead of 3 on long side edges, or go down half a hook size for the border.
- Border cups or pulls in: Check that you added the extra sc at every outward corner.
- Stripes pucker: Your surface stitches are too short. Unpick them and rework with looser loops.
- Ornament tilts when hung: Move the hanging loop to the true center sc.
Care
Hand wash in cool water and lay flat to dry. Reblock with pins if the squares lose their shape.
Final Notes
Here is how the measurements build on each other:
– Each mesh is 0.5 in (1.3 cm).
– 7 mesh × 11 rows makes 3.5 in × 5.5 in (8.9 cm × 14.0 cm).
– The 142-stitch border adds 0.125 in (0.3 cm) on each side, for 3.75 in × 5.75 in (9.5 cm × 14.6 cm).
If you match the gauge swatch, everything else follows. Change the stripe color or make a whole set of initials to match. Happy crocheting!