

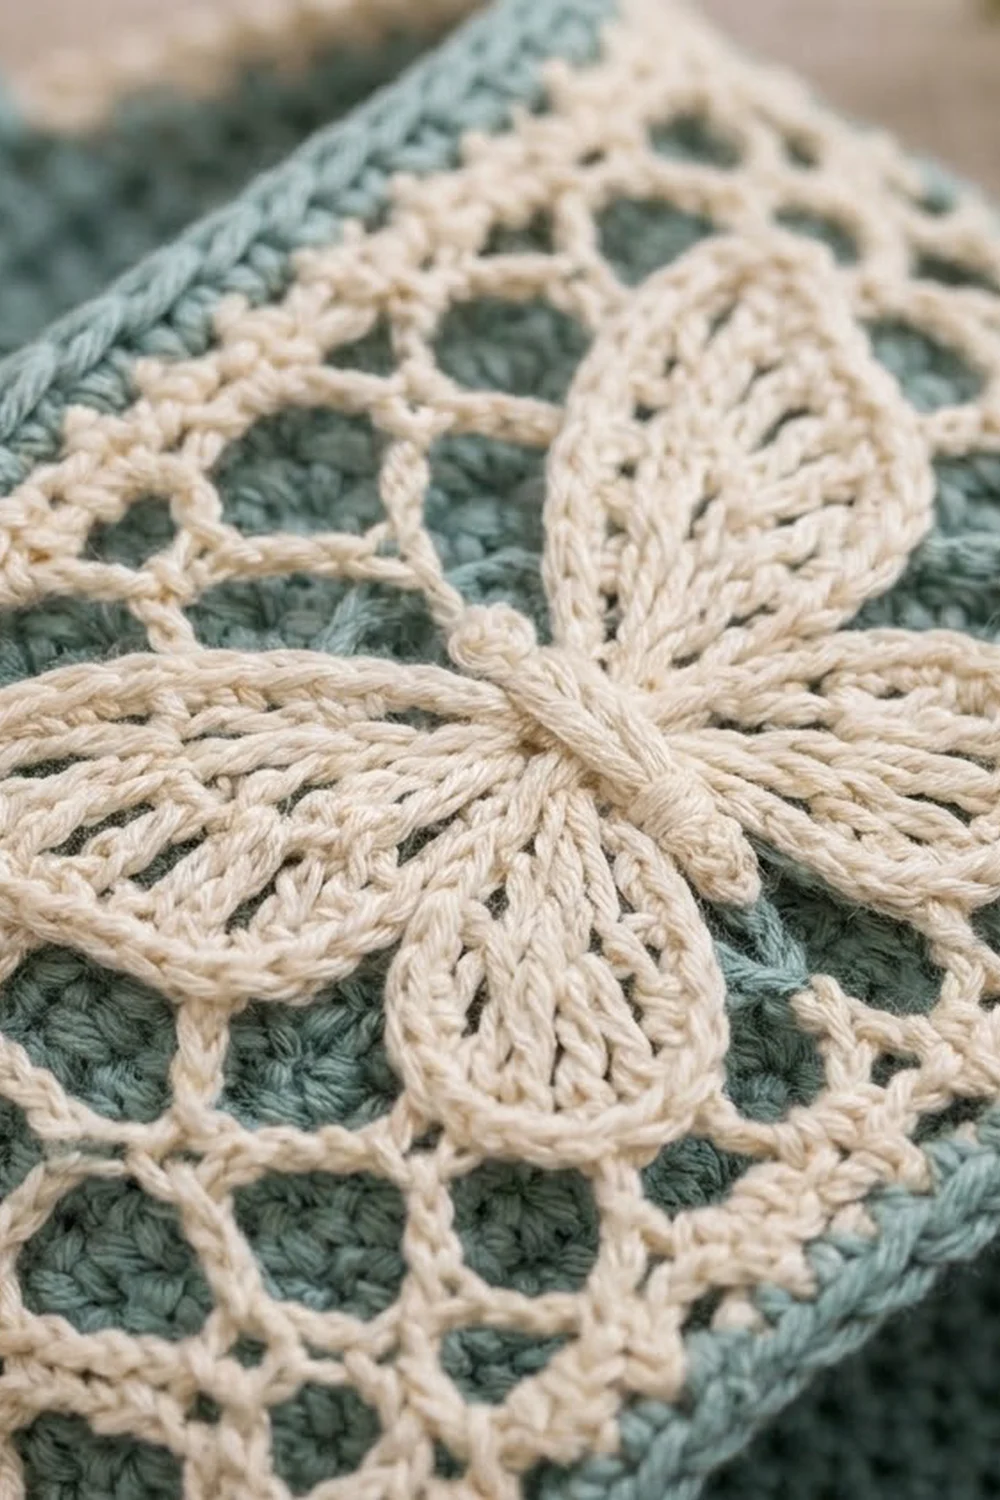
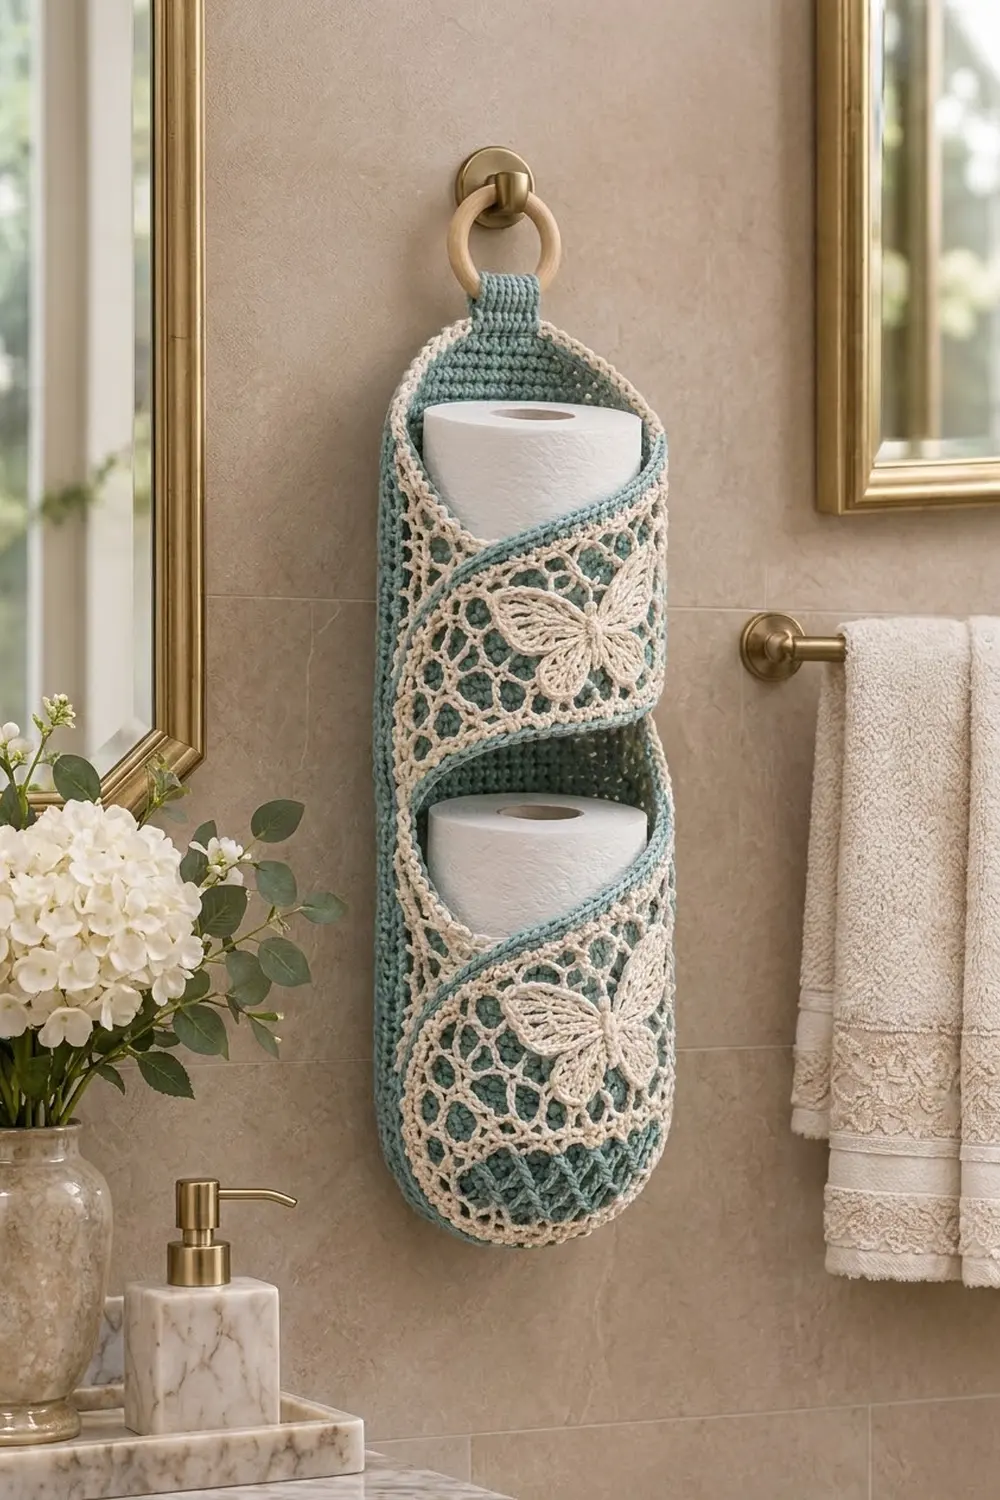
This hanging holder keeps two spare rolls neatly on the wall. A long teal back panel hangs from a wooden ring. Two cupped pockets wrap around the rolls, each with a cream lace layer over a teal lining and a raised cream butterfly in the center.
The palette is soft and calm: dusty teal and cream cotton. The pocket openings slope from low on the left to high on the right, which gives the holder a gentle spiral look. Each opening is finished with a small beaded picot edge.
The pattern uses US crochet terms. The finished holder measures about 6.5 in (16.5 cm) wide and 20.5 in (52.1 cm) tall in the body, or 22 in (55.9 cm) to the top of the folded tab.
You will make one back panel with a tab, two pocket linings, two lace layers and two butterflies. Then you edge each part, sew everything together, and finish the outer edge with a cream crab stitch round.
Finished Size and Construction
- Finished size: 6.5 in x 20.5 in (16.5 cm x 52.1 cm) body; 22 in (55.9 cm) including the tab
- Skill level: Intermediate
- Terminology: US
- Yarn weight: Worsted (#4) cotton
- Hooks: 4.5 mm (US 7) for the main parts; 4.0 mm (US G-6) for the butterflies
- Number of pieces: 7 (1 back panel, 2 linings, 2 lace layers, 2 butterflies)
- Layout: 1 back panel with 2 pockets stacked on it
- Back panel before border: 6 in x 20 in (15.2 cm x 50.8 cm)
- Pocket lining: 10 in (25.4 cm) wide; 6 in (15.2 cm) tall on the high side and 4 in (10.2 cm) on the low side
- Border depth: about 0.25 in (0.6 cm)
Materials
Choose a smooth, firm cotton or cotton blend. It holds its shape and stands up to bathroom humidity. The amounts below assume roughly 170 m per 100 g.
- Teal: 150 g (255 m)
- Cream: 75 g (128 m)
Both quantities include about a 15% margin.
Tools:
– 4.5 mm (US 7) and 4.0 mm (US G-6) hooks
– Wooden ring, 2 in (5.1 cm) across
– Tapestry needle
– Stitch markers
– Rust-proof pins
– Measuring tape
– Scissors
Abbreviations (US Terms)
- ch – chain
- sl st – slip stitch
- sc – single crochet
- hdc – half double crochet
- dc – double crochet
- tr – treble crochet
- sk – skip
- sp – space
- st(s) – stitch(es)
- rnd – round
- RS – right side
Picot: ch 3, sl st in the 3rd ch from the hook.
Crab stitch (reverse sc): working from left to right, insert the hook in the next st to the right, yarn over, pull up a loop, yarn over, and pull through 2 loops.
Gauge and Checkpoints
Sc gauge (4.5 mm hook): 16 sc x 18 rows = 4 in (10.2 cm).
Lace net gauge: 13 ch-4 loops = 10 in (25.4 cm) wide; 4 net rows = 2 in (5.1 cm) tall.
Test with one pocket lining first, because it is a small part. Its width after Row 5 must be 10 in (25.4 cm). If it is wider, go down a hook size. If it is narrower, go up a size.
The checkpoints are given inside each section. Measure flat and without stretching.
Back Panel (Teal, 4.5 mm)
Row 1 (RS): Ch 17, sc in 2nd ch from hook and in each ch across. (16 sc)
Rows 2–5: Ch 1, turn, 2 sc in the first st, sc across to the last st, 2 sc in the last st. (18, 20, 22, 24 sc)
Checkpoint: the panel is 6 in (15.2 cm) wide.
Rows 6–86: Ch 1, turn, sc in each st across. (24 sc)
Checkpoint: after Row 45 the panel is 10 in (25.4 cm) tall. Place a marker in Row 44, because the upper pocket attaches there.
Rows 87–90: Ch 1, turn, sc2tog, sc across to the last 2 sts, sc2tog. (22, 20, 18, 16 sc)
Checkpoint: the panel is 20 in (50.8 cm) tall.
Tab
Row 91: Turn, sk the first 4 sts, join in the next st, ch 1, sc in the same st and in the next 7 sts. Leave the last 4 sts unworked. (8 sc)
Rows 92–104: Ch 1, turn, sc in each st across. (8 sc)
The tab is about 3.1 in (7.9 cm) long. Fasten off and leave a 12 in (30.5 cm) tail.
Pocket Lining (Make 2, Teal, 4.5 mm)
Row 1: Ch 25, sc in 2nd ch from hook and across. (24 sc)
Rows 2–5: Ch 1, turn, 2 sc in each of the first 2 sts, sc across to the last 2 sts, 2 sc in each of the last 2 sts. (28, 32, 36, 40 sc)
These increases curve the bottom into a cup.
Rows 6–18: Ch 1, turn, sc across. (40 sc)
Checkpoint: the lining is 4 in (10.2 cm) tall.
Rows 19–26 form the slanted opening. Lay the piece RS up, with the end where Row 19 finishes on the left; that is the low side. If your Row 19 finishes on the right, swap the odd-row and even-row instructions below so the slope still runs down to the left.
Odd rows 19, 21, 23, 25: Ch 1, turn, sc across, leaving the last 4 sts unworked.
Even rows 20, 22, 24, 26: Ch 1, turn, sl st in the first 4 sts (these do not count as sts), sc in the remaining sts.
Stitch counts for Rows 19–26: 36, 32, 28, 24, 20, 16, 12, 8 sc.
Row 27: Ch 1, turn, sc across. (8 sc)
Checkpoint: the high side is 6 in (15.2 cm) tall and the low side is 4 in (10.2 cm). Fasten off.
Lace Layer (Make 2, Cream, 4.5 mm)
Row 1: Ch 41, sc in 2nd ch from hook and across. (40 sc)
Row 2: Ch 1, turn, sc in the first st, ch 4, sk 2, sc in the next st 13 times. (13 loops)
Rows 3–6: Ch 5, turn, sc in the first loop, ch 4, sc in the next loop 12 times. (13 loops)
Checkpoint: the lace is about 2.75 in (7.0 cm) tall.
Rows 7–10 slope the lace the same way as the lining. Mirror them if needed, as you did for the lining.
Row 7: Ch 5, turn, sc in the first loop, ch 4, sc in the next loop 9 times. Leave 3 loops unworked. (10 loops)
Row 8: Turn, sl st in each ch across the first 3 loops (12 sl st), ch 5, sc in the next loop, ch 4, sc in the next loop 6 times. (7 loops)
Row 9: Ch 5, turn, sc in the first loop, ch 4, sc in the next loop 3 times. Leave 3 loops unworked. (4 loops)
Row 10: Turn, sl st across the first 2 loops (8 sl st), ch 5, sc in the next loop, ch 4, sc in the last loop. (2 loops)
Checkpoint: the lace is about 4.75 in (12.1 cm) tall. Fasten off.
Butterfly (Make 2, Cream, 4.0 mm)
Rnd 1: Ch 4, sl st to form a ring. Ch 1, work 8 sc in the ring, sl st to the first sc. (8 sc)
Rnd 2: Ch 1, sc in the same st, ch 3, sk 1, sc in the next st 3 times, ch 3, sk 1, sl st to the first sc. (4 sc, 4 ch-3 sps)
Rnd 3: Work into the 4 spaces in order: upper-left wing, upper-right wing, lower-right wing, lower-left wing.
- Upper wings: in each of the first 2 sps, work (sc, hdc, dc, 3 tr, ch 3, 3 tr, dc, hdc, sc). (11 sts and 1 tip sp per wing)
- Lower wings: in each of the last 2 sps, work (sc, hdc, 2 dc, ch 2, 2 dc, hdc, sc). (8 sts and 1 tip sp per wing)
Work a sl st in each Rnd 2 sc between the wings; these sl sts are not counted. (38 sts)
Rnd 4 (outline): Sc in each st. In each tip sp, work (2 sc, ch 2, 2 sc). Sl st in each sl st between the wings.
That gives 38 sc worked 1 per stitch plus 16 extra sc in the tips, for 54 sc. Each upper wing has 15 sc and each lower wing has 12 sc. Fasten off.
Body: Ch 9, sc in 2nd ch from hook and across. (8 sc)
The body is 2 in (5.1 cm) long. Sew it vertically over the center ring so it sits on top of the wings.
Antennae: Thread a 3 in (7.6 cm) strand under the top of the body. Knot each end and trim to 0.75 in (1.9 cm).
Checkpoint: the butterfly is about 3.5 in (8.9 cm) wide and 2.75 in (7.0 cm) tall.
Make All Pieces
- Teal: 1 back panel with tab and 2 linings
- Cream: 2 lace layers and 2 butterflies
Layout, top to bottom:
[ tab + ring ]
[ back panel rows 72–90 ]
[ UPPER POCKET: back panel rows 44–71 ]
[ gap: back panel rows 32–43 ]
[ LOWER POCKET: back panel rows 1–31 ]
Pocket Assembly and Edging
- Lay the lace RS up on the lining. Line up lace Row 1 along lining Row 5, and match the slopes and the side edges.
- Ease the lace to fit, then baste its edges to the lining with cream yarn.
- Center the butterfly horizontally, about 2.5 in (6.4 cm) above lace Row 1. Sew it through both layers around the inner part of the wings so the outlines stay raised.
Pocket Rnd 1 (cream, both layers where the lace is present): Sc evenly around the pocket, with ch 1 at each of the 4 corners. The corner ch-1s are not counted. Work these counts per side:
- Opening edge: 8 sc across Row 27, then 32 sc in the exposed stitches of the slope plus 9 sc in the row ends of Rows 19–27, for 49 sc
- Low side: 1 sc per row end of Rows 1–18 (18 sc)
- Bottom: 1 sc per foundation ch (24 sc)
- High side: 1 sc per row end of Rows 1–27 (27 sc)
That gives 118 sc and 4 ch-1 corner sps.
Pocket Rnd 2 (picot crest, opening edge only): Join in the ch-1 sp at the top of the high side. Ch 1, sc in the first sc, sc in the next 2 sc, picot 24 times. Sl st in the ch-1 sp at the top of the low side.
That uses all 49 sts (1 + 24 x 2) and makes 24 picots. Fasten off.
Back Panel Edging
Back Rnd 1 (teal): Sc evenly around the panel, skipping the tab:
- Left side: 1 sc per row end (90)
- Right side: 1 sc per row end (90)
- Bottom: 1 sc per foundation ch (16)
- Top: 4 sc on each side of the tab (8)
That gives 204 sc.
Joining
Method: Use a teal sc seam with the wrong sides together and the pocket in front. Work 1 sc through 1 pocket sc and 1 back sc each time. Skip the pocket’s corner ch-1 sps. Each seam stitch replaces the 2 stitches it joins one for one, so the outer stitch count does not change.
Lower pocket:
– Bottom: the 24 pocket bottom sc join to the back panel’s 16 bottom sc plus the border sc of Rows 1–4 on each side (16 + 4 + 4 = 24).
– Low side: the 18 low-side sc join to the left border sc of back panel Rows 5–22.
– High side: the 27 high-side sc join to the right border sc of Rows 5–31.
Upper pocket:
– Bottom: whipstitch the 24 bottom sc to the 24 sts of marked Row 44 on the panel’s face, one stitch to one stitch.
– Low side: sc-seam the 18 low-side sc to the left border sc of Rows 45–62.
– High side: sc-seam the 27 high-side sc to the right border sc of Rows 45–71.
Tension: keep the seam as relaxed as the fabric. Each pocket is 10 in (25.4 cm) wide on a 6 in (15.2 cm) panel. The extra width makes the bulge, so don’t pull it flat.
Checkpoint: a standard roll, about 4.5 in (11.4 cm) wide, should slide into each pocket easily.
Tab: Fold the tab through the ring and whipstitch Row 104 to the back of Row 90.
Border
Border gauge: each back panel edge stitch matches 1 row or 1 stitch, so the edge has 4.5 sts per inch vertically and 4 per inch horizontally. That matches the fabric and keeps the edge flat.
Final Rnd (cream crab stitch): Join at the bottom center. Work 1 crab stitch in each of the 204 edge sts, using the seam stitches wherever the pockets are attached:
- left side: 90
- right side: 90
- bottom: 16
- top: 4 on each side of the tab
Sl st to the first st and fasten off.
Why the math works: Back Rnd 1 has exactly 1 st per row or stitch. Every seam stitch replaces the pair it joins, and the crab stitch round adds nothing. So the border still has 204 stitches, and the body stays at 6.5 in x 20.5 in (16.5 cm x 52.1 cm).
Final Blocking
- Spray the holder lightly with water until it is damp, not soaked.
- Pin the back panel flat at 6.5 in x 20.5 in (16.5 cm x 52.1 cm).
- Put a rolled towel or a spare roll inside each pocket to shape the curve.
- Pin the picots outward along each opening.
- Pin each butterfly’s 4 wing tips to points, and shape the wings over a fingertip.
- Let it dry completely, about 24 hours.
Final Quality-Control Checklist
- [ ] The back panel is 6.5 in (16.5 cm) wide and 20.5 in (52.1 cm) tall.
- [ ] Each pocket has 118 sc in Rnd 1 and 24 picots.
- [ ] Both openings slope down to the left.
- [ ] Back Rnd 1 and the crab stitch round each have 204 sts.
- [ ] Each butterfly outline has 54 sc and 4 tips.
- [ ] The tab is sewn securely and the ring hangs straight.
- [ ] All ends are woven in through same-color stitches.
Troubleshooting
- Lace is shorter than the lining: block the lace damp and stretch it lengthwise before basting.
- Pocket gapes at the top: work Rnd 1 on the opening edge with a 4.0 mm hook.
- Back panel curls: loosen the tension on the border round, or block it again under weight.
- Butterfly cups upward: you skipped the sl sts between the wings in Rnd 3; add them.
- Seams pucker: rework them 1:1 and don’t skip edge stitches.
- Holder tilts: check that the tab is centered over the middle 8 sts.
Care
Hand wash in cool water and lay it flat to dry, reshaping the pockets while damp. Do not tumble dry.
Final Notes
Your sc gauge of 16 sts = 4 in (10.2 cm) sets every size in this pattern:
- The 24-st back panel is 6 in (15.2 cm) wide and the 90 rows are 20 in (50.8 cm) tall.
- The edging brings the body to 6.5 in x 20.5 in (16.5 cm x 52.1 cm).
- The 40-st linings are 10 in (25.4 cm) wide and curve around a roll.
- Every seam joins one stitch to one stitch, so the 204-st border closes without fudging.
Check each measurement as you go, and the holder will hang straight and hold its rolls neatly.
Happy crocheting!