

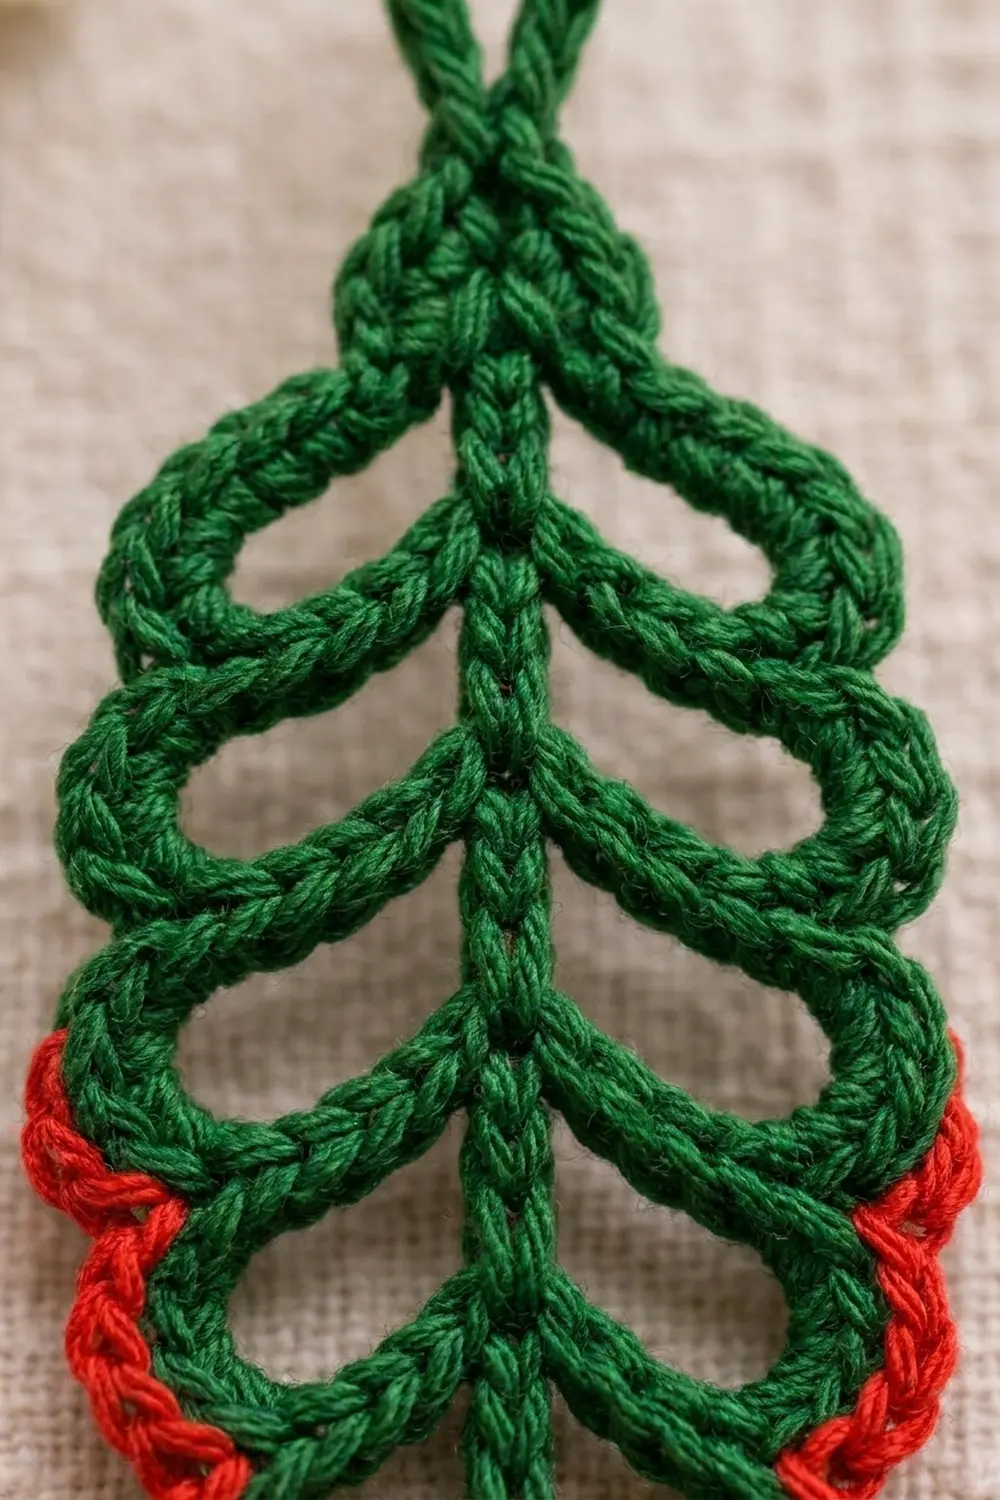
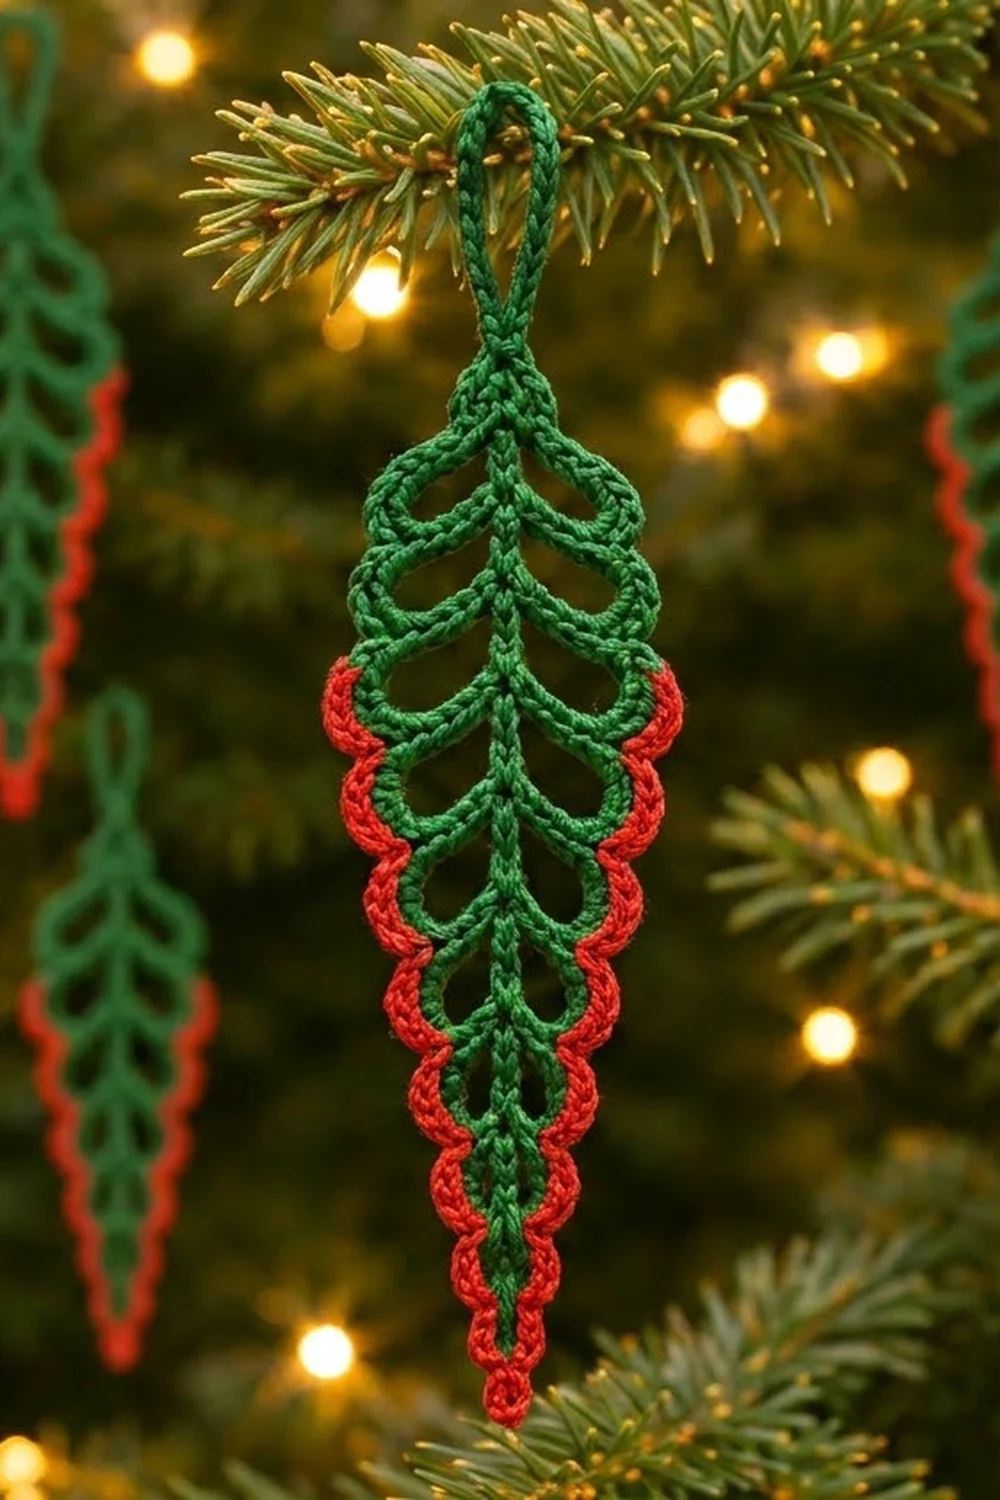
The Holly Feather Leaf is a slim, lacy hanging ornament built from open chain arches stacked along a central spine. Each arch is covered in single crochet, so the finished piece looks like it was shaped from a braided cord. It reads as a feather, a leaf or a stylized fir branch, depending on where you hang it.
The main color is deep Christmas green. A bright red slip-stitch outline follows the scalloped edge of the lower arches and wraps around the tip, while the top arches stay plain green. That contrast gives the leaf a clear point and looks great against a real tree.
This pattern uses US crochet terms. The finished ornament measures 6 in (15.2 cm) long including the hanging loop, with a leaf body of 5 in (12.7 cm) and a width of 1.75 in (4.4 cm) at the widest point.
Construction is quick and seamless. You chain the hanging loop, work a slip-stitch spine downward, then add chain arches down one side, around the tip, and back up the other side. A green single-crochet round covers every arch, and a red slip-stitch round outlines the lower part. It’s all one piece, so there’s no sewing.
Finished Size and Construction
- Finished size: 6 in (15.2 cm) long overall, 1.75 in (4.4 cm) wide
- Leaf body: 5 in (12.7 cm) long; hanging loop adds 1 in (2.5 cm)
- Skill level: Easy / advanced beginner
- Terminology: US crochet terms
- Yarn weight: Fingering weight (#1) mercerized cotton
- Hook: 2.25 mm (US B-1)
- Number of pieces: 1 (single ornament, worked in one piece)
- Layout: Central spine with 8 arches per side, 16 arches total
- Width before border: 1.5 in (3.8 cm)
- Border depth: 0.125 in (0.3 cm) per side, adding 0.25 in (0.6 cm) to the total width
Materials
Yarn: Use a smooth, tightly plied mercerized cotton in fingering weight (#1), about 170 m per 50 g. Mercerized cotton holds the arches crisp and shows off the cord-like texture. Avoid fuzzy or very soft acrylics, because the open loops will droop.
- Color A – Christmas Green: 5 g, about 15 m (16.4 yd)
- Color B – Bright Red: 2 g, about 5 m (5.5 yd)
Tools:
– 2.25 mm (US B-1) crochet hook
– Tapestry needle
– Small scissors
– Locking stitch markers (at least 8)
– Blocking board or foam mat, rust-proof pins
– Spray bottle with water, or a light spray starch
Quantities include a safety margin of about 30% for your gauge swatch and weaving in ends.
Abbreviations (US Terms)
- ch – chain
- sl st – slip stitch
- sc – single crochet
- st(s) – stitch(es)
- FLO – front loop only
- BLO – back loop only
- sp – space
Special stitch – Arch: “Arch [ch N] to st X” means: ch N, then sl st into the stated spine stitch X. The chain bows outward and forms one open loop between the two spine points.
Gauge and Checkpoints
Gauge: 8 ch = 1 in (2.5 cm) with a 2.25 mm hook, measured relaxed and not stretched.
Test first: ch 16 and measure. It should be 2 in (5.1 cm) long. If it is longer, go down to a 2.0 mm hook. If it is shorter, go up to a 2.5 mm hook.
Checkpoints:
1. Hanging loop: a ch-16 ring hangs about 1 in (2.5 cm) long when pinched flat.
2. Spine: 40 sl sts = 5 in (12.7 cm).
3. After both sides of arches: about 1.5 in (3.8 cm) wide at the top arches.
4. After the green covering round: about 1.75 in (4.4 cm) wide.
5. After the red outline: width does not change; red lies on top of the edge.
If too big: your chains are loose. Tighten your grip on the working yarn or drop a hook size. Long arches will sag if the chain is loose.
If too small: the spine will pucker and the arches will look cramped. Go up a hook size and relax your tension.
Pattern
Part 1: Hanging Loop and Spine (Color A)
Foundation: With Color A, ch 16, sl st in first ch to form a ring. (Hanging loop made: 16 ch.)
Spine chain: Ch 41 out from the ring.
Spine row: Sl st in back bump of 2nd ch from hook and in each ch back toward the ring. (40 sl sts)
You are now at the top of the spine, next to the hanging loop. Number the spine sts from the top: st 1 is next to the ring and st 40 is at the tip.
Mark: Place markers in spine sts 5, 10, 15, 20, 25, 30, 35 and 40. These are your arch anchor points.
Checkpoint: the spine measures 5 in (12.7 cm) and lies straight. If it twists, roll it flat between your fingers before you continue.
Part 2: Side A Arches (Color A)
Work all Side A sl sts into the FLO of the spine sts. This leaves the back loops free for Side B.
- Arch 1: ch 14, sl st in st 5.
- Arch 2: ch 14, sl st in st 10.
- Arch 3: ch 12, sl st in st 15.
- Arch 4: ch 12, sl st in st 20.
- Arch 5: ch 10, sl st in st 25.
- Arch 6: ch 10, sl st in st 30.
- Arch 7: ch 8, sl st in st 35.
- Arch 8: ch 6, sl st in st 40.
Side A total: 14 + 14 + 12 + 12 + 10 + 10 + 8 + 6 = 86 ch in 8 arches
Arch 1 spans 4 spine sts (st 1 to st 5). Each other arch spans 5 spine sts. The arches get shorter as you go down, which makes the taper.
Part 3: Tip Loop (Color A)
Tip: Ch 3, sl st in BLO of st 40. (Tip loop: 3 ch)
This small loop makes the sharp point at the bottom of the leaf.
Part 4: Side B Arches (Color A)
Work all Side B sl sts into the BLO of the spine sts, moving back up toward the hanging loop. This mirrors Side A.
- Arch 8: ch 6, sl st in st 35.
- Arch 7: ch 8, sl st in st 30.
- Arch 6: ch 10, sl st in st 25.
- Arch 5: ch 10, sl st in st 20.
- Arch 4: ch 12, sl st in st 15.
- Arch 3: ch 12, sl st in st 10.
- Arch 2: ch 14, sl st in st 5.
- Arch 1: ch 14, sl st in BLO of st 1.
Side B total: 86 ch in 8 arches
Body total: 86 + 3 + 86 = 175 ch in 17 loops (16 arches + 1 tip loop)
Sl st in the base of the hanging loop. Do not fasten off.
Checkpoint: pin out the body lightly. Matching arches should mirror each other across the spine, and the widest point (Arch 1 and Arch 2) should be about 1.5 in (3.8 cm) across.
Border
The border has two rounds. A green covering round turns each chain arch into a firm, cord-like loop, and a red outline goes over the lower edge.
Border gauge: One sc per chain in each arch. The sc lies over the arch and adds about 0.125 in (0.3 cm) of thickness to each outer edge.
Border Round 1 – Green Covering (Color A)
You are at the top of Side A. Work every sc into the arch space (around the chain), not into individual chains. At each spine junction, go straight on into the next arch space without working a stitch at the junction. This keeps the scalloped dip between arches.
Side A:
– Arch 1: 14 sc
– Arch 2: 14 sc
– Arch 3: 12 sc
– Arch 4: 12 sc
– Arch 5: 10 sc
– Arch 6: 10 sc
– Arch 7: 8 sc
– Arch 8: 6 sc
Side A count: 86 sc
Tip loop: 4 sc in the ch-3 tip loop. (4 sc) (This is a trim count: 3 sc worked 1-per-chain + 1 extra sc to sharpen the point.)
Side B: Work Arches 8 through 1 with the same counts in reverse: 6, 8, 10, 10, 12, 12, 14, 14. Side B count: 86 sc
Round 1 total: 86 + 4 + 86 = 176 sc
Sl st into the base of the hanging loop, then fasten off and weave in the end along the spine.
Why the math works: each arch gets exactly one sc per chain, so the sc packs the arch fully without stretching it or making it ruffle. The single extra sc at the tip turns a round loop into a point. Width grows by 0.125 in (0.3 cm) per side: 1.5 in + 0.25 in = 1.75 in (3.8 cm + 0.6 cm = 4.4 cm).
Border Round 2 – Red Outline (Color B)
This round covers only Arches 4 to 8 on each side plus the tip. Arches 1 to 3 stay green.
Join Color B with a sl st in the BLO of the first sc of Side A, Arch 4. Work 1 sl st in the BLO of every sc. Keep each sl st loose enough to lie on top of the edge without pulling it in.
Side A (Arches 4–8): 12 + 10 + 10 + 8 + 6 = 46 sl sts
Tip: 1 sl st in BLO of each of the 4 tip sc. (4 sl sts)
Side B (Arches 8–4): 6 + 8 + 10 + 10 + 12 = 46 sl sts
Round 2 total: 46 + 4 + 46 = 96 sl sts
Fasten off. Weave the red tails behind the green covering so they stay hidden.
Why the math works: every red sl st sits on exactly one green sc, so the red line follows the scallops one-to-one. Working in the BLO makes the red sit on the outer rim and leaves the green front loop showing on the face. Sl sts add almost no width, so the final size stays at 1.75 in (4.4 cm).
Final Blocking
- Lightly spray the ornament with water until it is evenly damp, but not dripping.
- Lay it face up on a gridded blocking board.
- Pin the top of the hanging loop and the tip point first, 5 in (12.7 cm) apart for the leaf body.
- Pin the spine straight along one grid line.
- Pin the widest point of Arch 1 on each side so the total width is 1.75 in (4.4 cm).
- Pin the outer curve of each lower arch so both sides mirror each other evenly, tapering toward the tip.
- Shape the hanging loop into a neat teardrop, 1 in (2.5 cm) long.
- For a stiffer ornament, mist with light spray starch.
- Let it dry completely, at least 4 hours, before unpinning.
Final Quality-Control Checklist
- [ ] Overall length is 6 in (15.2 cm); leaf body is 5 in (12.7 cm)
- [ ] Width at the widest point is 1.75 in (4.4 cm)
- [ ] 8 arches on each side, mirrored across the spine
- [ ] Arch sizes taper evenly from top to tip
- [ ] Green covering round has 176 sc
- [ ] Red outline runs from Arch 4 on one side, around the tip, to Arch 4 on the other side (96 sl sts)
- [ ] Arches 1–3 on both sides are fully green
- [ ] Tip forms a clean point
- [ ] Hanging loop is centered and straight above the spine
- [ ] All tails are woven in and invisible from the front
Troubleshooting
The spine curls into a spiral. Your sl sts are too tight. Use a larger hook for the spine row only, or work into the back bump more loosely.
Arches ruffle after the sc round. You have more sc than chains in an arch. Recount: each arch needs exactly one sc per chain.
Arches look stretched or cup inward. You have too few sc, or the sc are too tight. Rework with the exact count and a relaxed hand.
Sides don’t match. Check that each Side B arch is anchored in the same spine st as its Side A partner. Markers make this easy.
Red outline pulls the edge in. Your sl sts are too tight. Rip back and work them loosely, or use a hook one size larger for Round 2.
Tip is rounded instead of pointed. Make sure you worked 4 sc (not 3) in the tip loop, and pin the point firmly when blocking.
Care
Hand wash in cool water with mild soap, press out water in a towel, and re-block flat to dry. Store flat or hanging, away from crushing weight.
Final Notes
The whole ornament depends on one simple measurement chain. Gauge of 8 ch = 1 in (2.5 cm) gives a 40-stitch spine of 5 in (12.7 cm). Eight tapering arches per side (86 ch each) give a width of 1.5 in (3.8 cm). The 176-sc green covering adds 0.125 in (0.3 cm) per side, for a final width of 1.75 in (4.4 cm). The 96-sl-st red outline finishes the lower edge without changing the size, and the 16-ch hanging loop adds 1 in (2.5 cm), for 6 in (15.2 cm) overall.
Check your gauge, count each arch, and block carefully, and you’ll have a crisp, festive leaf ready for the tree. Make one in an evening, or a few to hang together.
Happy crocheting!