

This little ornament is a capital letter E in filet crochet. It’s worked in warm mustard-gold cotton, and three small white snowflakes are stitched down its spine. The open mesh lets tree lights shine through, and a corded single crochet edge gives the letter a clean outline. A crocheted loop at the top center makes it ready to hang.
The palette is simple: golden yellow for the letter and bright white for the snowflakes. Together they look festive and a little vintage. The ornament works as a monogram gift tag, a stocking marker or one letter in a name spelled across the tree.
This pattern uses US crochet terms. The finished ornament measures 3.2 in wide × 4.7 in tall (8.1 cm × 11.9 cm), not counting the hanging loop. The loop adds about 1.2 in (3.0 cm).
You work the letter from bottom to top in rows of filet mesh. Decreases are made by stopping short at the end of a row. Increases are made by adding a chain extension at the end of a row. One round of single crochet outlines the whole shape and forms the hanging loop. Finally, you crochet three snowflakes in thread and sew them on.
Finished Size and Construction
- Finished size: 3.2 in × 4.7 in (8.1 cm × 11.9 cm), plus a 1.2 in (3.0 cm) loop
- Skill level: Easy-intermediate (confident beginners who know filet mesh)
- Terminology: US crochet terms
- Yarn weight: Super Fine (#1) fingering cotton; snowflakes in size 10 crochet thread
- Hook: 2.25 mm (US B-1) for the letter; 1.5 mm (US 8 steel) for the snowflakes
- Number of pieces: One letter piece plus three sewn-on snowflake appliqués
- Layout: A single E, 10 meshes wide × 15 rows tall
- Piece size before border: 3.0 in × 4.5 in (7.6 cm × 11.4 cm)
- Border depth: One round of sc, about 0.1 in (0.3 cm) per side
Materials
Yarn advice: Use a mercerized cotton or a cotton blend. It holds crisp mesh squares and takes starch well. Wool and acrylic make softer, fuzzier squares that don’t stay as sharp.
- Mustard/golden yellow fingering cotton: 10 g (about 35 m)
- White size 10 crochet thread: 3 g (about 10 m)
These quantities include a margin of about 25% for swatching and tails.
Tools:
- 2.25 mm (US B-1) crochet hook
- 1.5 mm (US 8 steel) crochet hook
- Tapestry needle and a fine, sharp sewing needle
- White sewing thread (optional, for attaching the snowflakes)
- Rust-proof pins and a blocking mat or foam board
- Spray bottle; fabric stiffener or starch (optional)
- Scissors and a ruler
Abbreviations (US Terms)
- ch – chain
- sl st – slip stitch
- sc – single crochet
- dc – double crochet
- sk – skip
- sp – space
- st(s) – stitch(es)
- RS – right side
Special stitch – Mesh: One open filet square, made of a dc post plus a ch-1 space. A row of n meshes has n + 1 dc posts and n ch-1 spaces.
Turning chain: At the start of every row, ch 4. This counts as the first dc plus a ch-1 space.
Gauge and Checkpoints
Gauge: 10 meshes × 10 rows = 3.0 in × 3.0 in (7.6 cm × 7.6 cm) on the 2.25 mm hook. Each mesh is 0.3 in (0.8 cm) square.
Border gauge: 10 sc = 1 in (2.5 cm) along any edge.
Make a swatch before you start the letter. Chain 23, work Row 1 below, then repeat Row 2 until you have 10 rows. Measure the swatch flat after a light steam. If it’s too big, go down a hook size. If it’s too small, go up a hook size. If the meshes come out taller than they are wide, pull up less on each yarn-over.
Checkpoints while working the letter:
- After Row 3: 3.0 in (7.6 cm) wide, 0.9 in (2.3 cm) tall
- After Row 6: 1.8 in (4.6 cm) tall; spine 0.9 in (2.3 cm) wide
- After Row 9: 2.7 in (6.9 cm) tall; middle arm 2.1 in (5.3 cm) wide
- After Row 12: 3.6 in (9.1 cm) tall
- After Row 15: 3.0 in × 4.5 in (7.6 cm × 11.4 cm)
If any checkpoint is off by more than 0.2 in (0.5 cm), start again with a different hook.
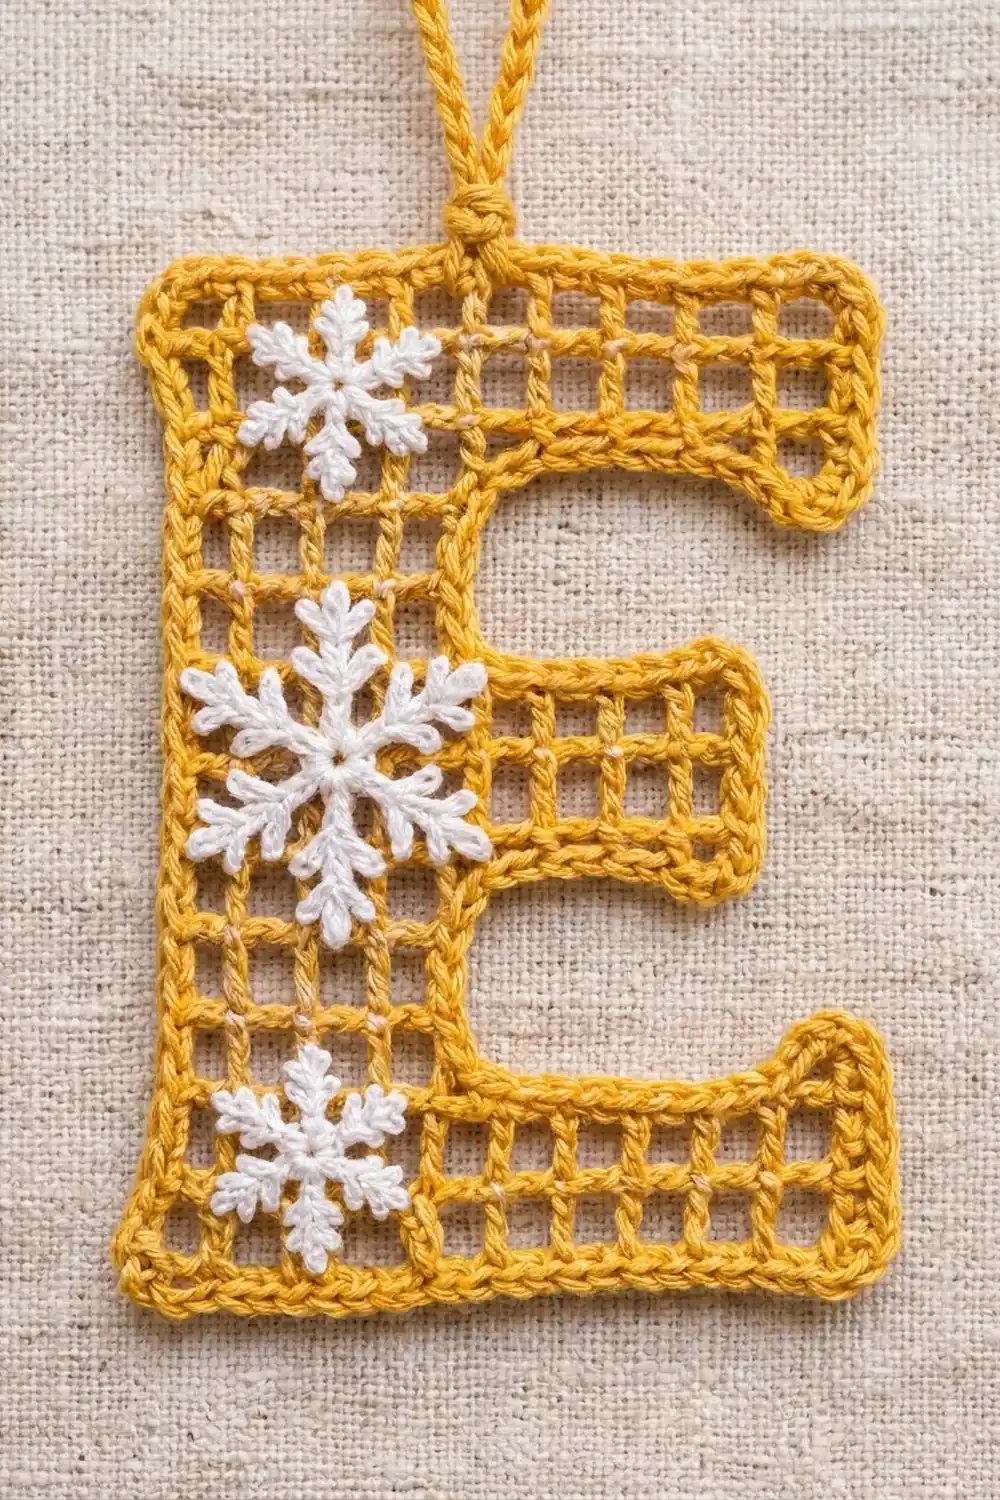
The Letter E (Filet Mesh)
With yellow and the 2.25 mm hook, ch 23.
Row 1 is worked from right to left and is the RS. The spine forms along the left edge as you look at the RS.
Row 1 (RS): Dc in 5th ch from hook (the 4 skipped ch count as dc and ch-1 sp). Ch 1, sk 1 ch, dc in next ch. Repeat from * to * 8 more times. Turn. (11 dc, 10 ch-1 sp = 10 meshes)
Row 2: Ch 4 (counts as dc and ch-1 sp), sk first ch-1 sp, dc in next dc. Ch 1, dc in next dc. Repeat from * to * 7 more times, then ch 1, dc in 3rd ch of turning ch-4. Turn. (10 meshes)
Row 3: Repeat Row 2. This row ends at the left edge. (10 meshes)
Row 4 (decrease to spine): Ch 4, sk first ch-1 sp, dc in next dc. Ch 1, dc in next dc. Repeat from * to * once more. Turn, leaving the remaining 7 meshes unworked. (4 dc, 3 ch-1 sp = 3 meshes)
Row 5: Ch 4, sk first ch-1 sp, dc in next dc, ch 1, dc in next dc, ch 1, dc in 3rd ch of turning ch-4. Turn. (3 meshes)
Row 6: Repeat Row 5. This row ends at the right edge of the spine. Don’t turn yet. (3 meshes)
Increase for middle arm: Ch 10 more, then turn.
Row 7: Dc in 5th ch from hook. Ch 1, sk 1 ch, dc in next ch. Repeat from * to * once more. Ch 1, sk last ch, dc in the end dc of Row 6. Ch 1, dc in next dc. Repeat from * to * once more, then ch 1, dc in 3rd ch of turning ch-4. Turn. (8 dc, 7 ch-1 sp = 7 meshes: 4 new meshes on the chain + 3 spine meshes)
Row 8: Ch 4, sk first ch-1 sp, dc in next dc. Ch 1, dc in next dc. Repeat from * to * 5 more times, ending in 3rd ch of turning ch-4. Turn. (7 meshes)
Row 9: Repeat Row 8. This row ends at the left edge. (7 meshes)
Row 10 (decrease to spine): Work as for Row 4, but leave 4 meshes unworked. Turn. (3 meshes)
Rows 11–12: Work as for Row 5. Row 12 ends at the right edge of the spine. Don’t turn. (3 meshes each row)
Increase for top bar: Ch 16 more, then turn.
Row 13: Dc in 5th ch from hook. Ch 1, sk 1 ch, dc in next ch. Repeat from * to * 4 more times. Ch 1, sk last ch, dc in end dc of Row 12. Ch 1, dc in next dc. Repeat from * to * once more, then ch 1, dc in 3rd ch of turning ch-4. Turn. (11 dc, 10 ch-1 sp = 10 meshes: 7 new + 3 spine)
Rows 14–15: Work as for Row 2. Row 15 ends at the top-left corner. Don’t fasten off. (10 meshes each row)
Chain check: Each added mesh needs 2 chains, plus 2 more for the turning post. That gives 2 × 4 + 2 = 10 chains for the middle arm and 2 × 7 + 2 = 16 chains for the top bar. The existing spine dc serves as the final post, so it needs no extra chain.
Border and Hanging Loop
Border gauge: 10 sc = 1 in (2.5 cm). That’s 3 sc for each 0.3 in (0.8 cm) mesh edge, whether the edge runs horizontally or vertically.
Placement rules:
- Row-end edges (vertical): 3 sc around each row-end post.
- Top and bottom edges (horizontal): 2 sc in each ch-1 sp (or skipped foundation/extension ch) and 1 sc in each interior dc (or at the base of each interior dc).
- Outer corners: 3 sc in the corner stitch.
- Inner corners: Skip the junction stitch where the spine meets an arm. This keeps the inside corners crisp.
Rnd 1 (RS): Ch 1. Turn the piece so you can work down the left edge, then continue counterclockwise:
- Left edge, Rows 15–1: 45 sc
- Bottom-left corner: 3 sc
- Bottom edge: 29 sc
- Bottom-right corner: 3 sc
- Bottom bar end, Rows 1–3: 9 sc
- Corner: 3 sc
- Top of bottom bar: 20 sc; skip junction
- Spine side, Rows 4–6: 9 sc; skip junction
- Underside of middle arm: 11 sc
- Corner: 3 sc
- Middle arm end, Rows 7–9: 9 sc
- Corner: 3 sc
- Top of middle arm: 11 sc; skip junction
- Spine side, Rows 10–12: 9 sc; skip junction
- Underside of top bar: 20 sc
- Corner: 3 sc
- Top bar end, Rows 13–15: 9 sc
- Corner: 3 sc
- Top edge: 29 sc, making the loop at the center (see below)
- Top-left corner: 3 sc in top of last dc of Row 15
Sl st to first sc. (234 sc, not counting the loop)
Hanging loop: When you reach the center dc of the top edge (the 6th post, with 5 meshes on each side), sc in it. Ch 20 and sl st into that same sc. Work 30 sc into the ch-20 loop, sl st into the same base sc and continue the border. After you join Rnd 1, fasten off and leave a 6 in (15.2 cm) tail.
Why the math works: Each mesh edge is 0.3 in (0.8 cm) and gets 3 sc, which matches 10 sc per inch. A horizontal edge of m meshes gets 2m sc in the spaces plus 1 sc in each of the m − 1 interior posts, for 3m − 1 sc. Its end posts are either corner stitches or skipped junctions. That gives 29 sc for 10 meshes, 20 for 7 and 11 for 4. Vertical edges get 3 sc per row: 45 for 15 rows and 9 for 3 rows.
The total is 120 horizontal + 90 vertical + 24 corner (8 × 3) = 234 sc. The border adds 0.1 in (0.3 cm) per side, so 3.0 in × 4.5 in becomes 3.2 in × 4.7 in (8.1 cm × 11.9 cm).
Snowflake Appliqués (Make 3)
Use white thread and the 1.5 mm hook.
Small Snowflake (Make 2) – about 0.8 in (2.0 cm) across
Ch 4, sl st in first ch to form a ring.
Rnd 1: Ch 1, 12 sc in ring, sl st in first sc. (12 sc)
Rnd 2: Sc in next sc, ch 7, sl st in 4th ch from hook (tip picot), [ch 3, sl st in same ch] twice, sl st in each of next 3 ch, sc in next sc. Repeat from * to * 5 more times. Sl st in first sc. (12 sc, 6 arms, each with a 3-picot tip)
Fasten off and leave an 8 in (20.3 cm) tail.
Large Snowflake (Make 1) – about 1.2 in (3.0 cm) across
Ch 4, sl st in first ch to form a ring.
Rnd 1: Ch 1, 12 sc in ring, sl st in first sc. (12 sc)
Rnd 2: Ch 1, 2 sc in each sc around, sl st in first sc. (24 sc)
Rnd 3: Sc in next 2 sc, ch 11, sl st in 4th ch from hook, [ch 3, sl st in same ch] twice, sl st in each of next 3 ch, [ch 4, sl st in same ch] twice (side branches), sl st in each of next 4 ch, sc in next 2 sc. Repeat from * to * 5 more times. Sl st in first sc. (24 sc, 6 arms, each with a 3-picot tip and a V-shaped pair of side branches)
Fasten off and leave an 8 in (20.3 cm) tail.
Placement
Stack the snowflakes one above another along the spine on the RS:
- Top: One small snowflake, centered on the spine within the top bar (Rows 13–15, meshes 1–3)
- Middle: The large snowflake, centered on the spine at Row 8, with its arms slightly overlapping the start of the middle arm
- Bottom: One small snowflake, centered on the spine within the bottom bar (Rows 1–3, meshes 1–3)
Block the snowflakes before sewing them on. Tack each one down at the center and at every arm tip with its tail or with white sewing thread. Catch only the yellow dc posts.
Final Blocking
- Weave in all ends along the border sc, not through the open mesh.
- Wet the letter and the snowflakes, or spray them until damp.
- Pin the letter flat. Put a pin at each of the 8 outer corners, then add more along the long edges.
- Measure the letter. It should be 3.2 in × 4.7 in (8.1 cm × 11.9 cm). Adjust the pins until every mesh is square.
- Pin each snowflake open, with one pin at each arm tip.
- For a firmer ornament, brush on diluted fabric stiffener or use spray starch.
- Let everything dry completely, about 12 hours.
- Unpin and sew on the snowflakes.
Final Quality-Control Checklist
- The letter measures 3.2 in × 4.7 in (8.1 cm × 11.9 cm).
- All meshes are square, about 0.3 in (0.8 cm).
- The top and bottom bars are 10 meshes wide, the middle arm is 7 and the spine is 3.
- Each bar and each gap is exactly 3 rows tall.
- The border totals 234 sc, and the inner corners are sharp.
- The loop sits at the top center and is about 1.2 in (3.0 cm) tall.
- The snowflakes are centered on the spine in the order small, large, small.
- No ends show through the mesh.
Troubleshooting
- Meshes are rectangles: Adjust how tall you pull up your dc, or your chain tension, until the squares match gauge.
- Arm edges slant: Check that Rows 7 and 13 start from the full ch-10 or ch-16 extension.
- Border ruffles: Use a hook one size smaller for the border round.
- Border pulls in: Make sure every outer corner has 3 sc.
- Inner corners bulge: You worked into a junction stitch. Remove that sc.
- Snowflakes curl: Block them separately before sewing.
- Loop twists: Spread the 30 sc evenly around the chain.
Care
Hand wash in cool water with mild soap, reshape and dry flat. Re-starch if needed, and store the ornament flat in tissue.

Final Notes
Every measurement in this pattern starts from a 0.3 in (0.8 cm) square mesh. Ten meshes and 15 rows make a 3.0 in × 4.5 in (7.6 cm × 11.4 cm) letter. Three sc per mesh edge gives a 234-sc border that adds 0.1 in (0.3 cm) per side, for a finished size of 3.2 in × 4.7 in (8.1 cm × 11.9 cm). If your meshes are square at gauge and you match each checkpoint, the letter will come out the right size.
Happy crocheting!