

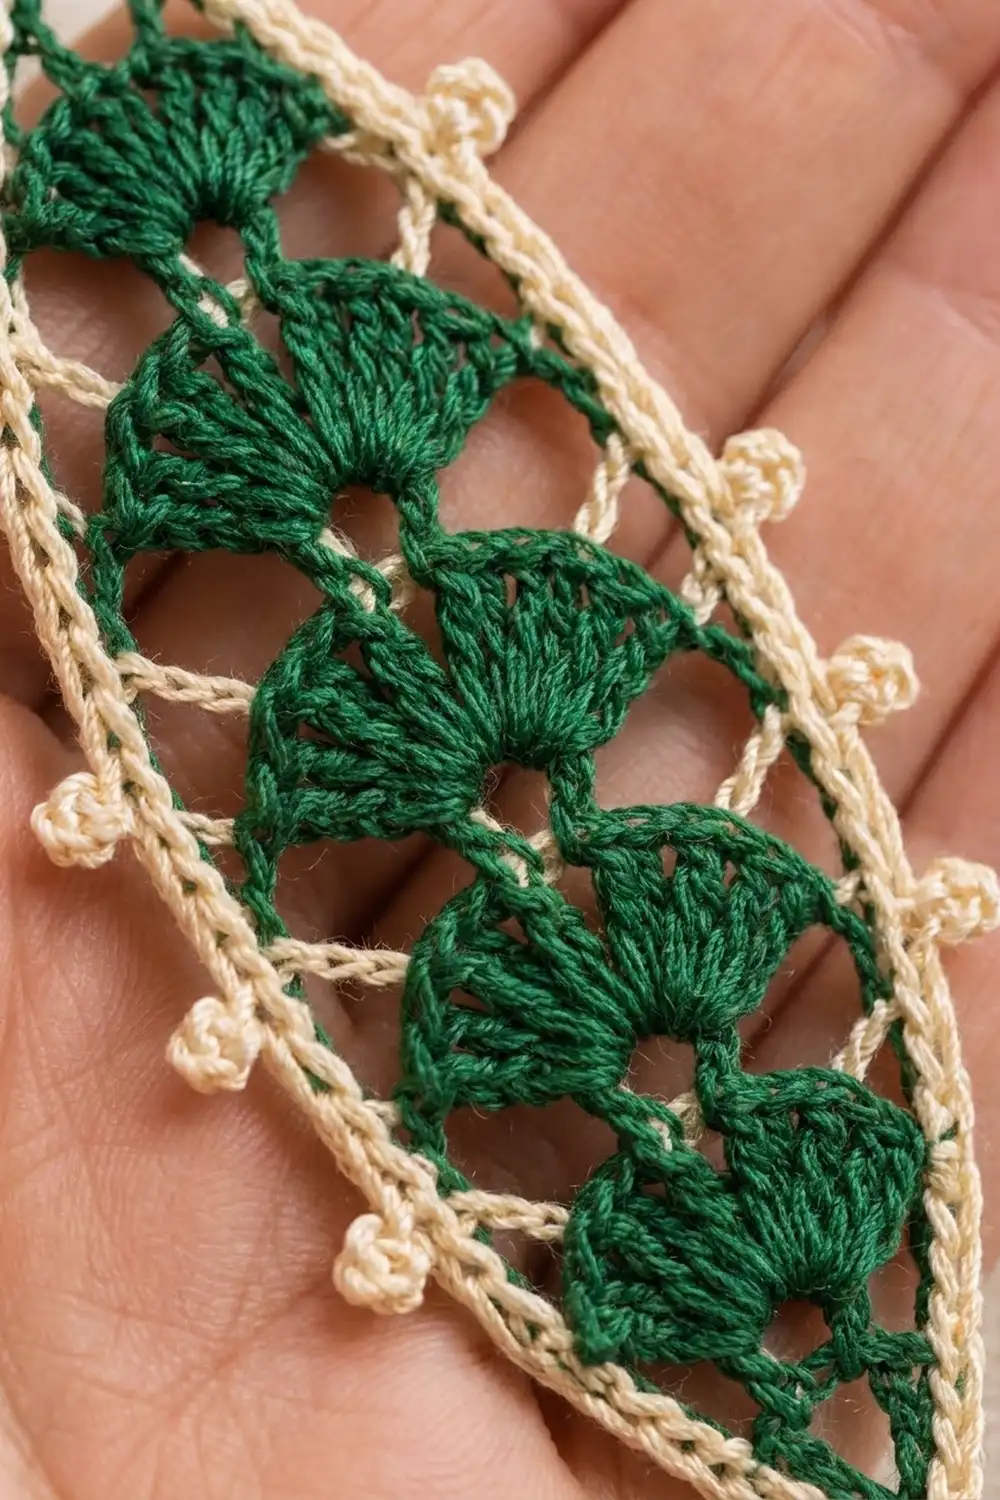
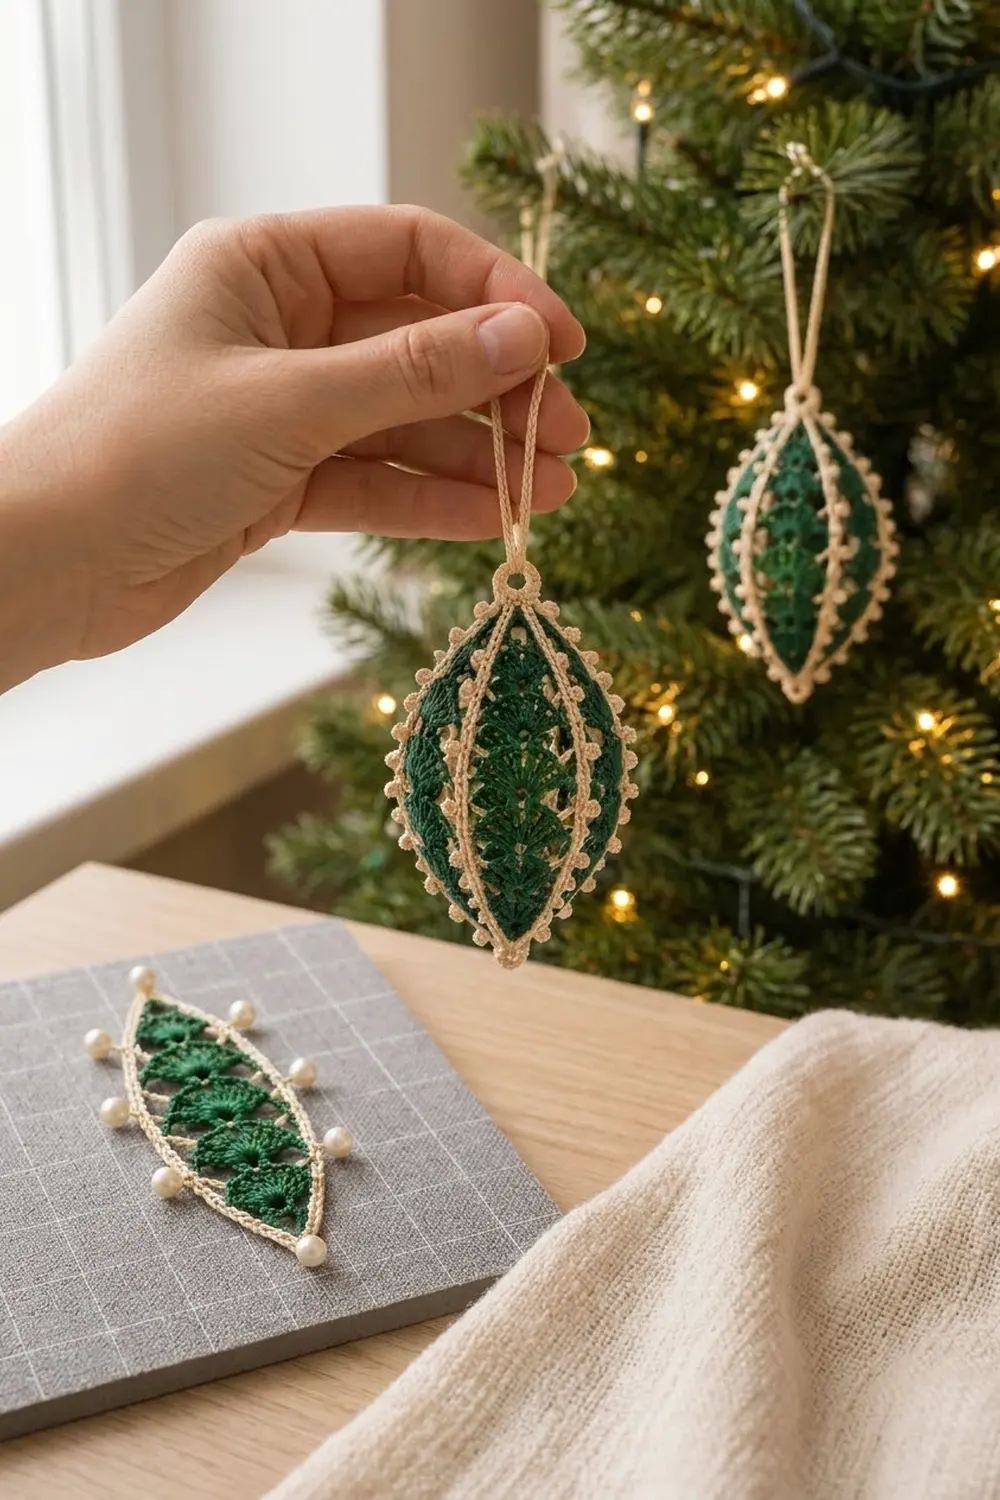
The Evergreen Fan Lantern is a small hollow lace ornament made from four pointed panels. Each panel has a column of deep green fans that start small, get bigger toward the middle, and taper again, held inside a fine cream-and-green frame. When the four panels are joined, the cream picot seams form raised ridges that catch the light like strings of tiny beads.
The palette is classic: forest green and warm cream. The finished ornament looks like vintage thread lace but works up quickly in size 3 crochet thread. Hang it on a tree, tie it onto a gift, or make a set in different greens.
This pattern uses US crochet terms. The finished body measures 3.5 in (8.9 cm) tall from tip to tip and about 1.9 in (4.8 cm) across, or 2.25 in (5.7 cm) across the picot tips. With the top and bottom rings, it measures about 4.25 in (10.8 cm), plus a 2.5 in (6.4 cm) hanging loop.
Construction is simple. You crochet a column of five fans in rows, then work three rounds around it to make a pointed lens-shaped panel. You make four panels, join them along their long edges with a picot seam, close each tip with a small collar, and stiffen the ornament over a form.
Finished Size and Construction
- Finished body size: 3.5 in (8.9 cm) tall x 1.9 in (4.8 cm) diameter
- Total length with rings: 4.25 in (10.8 cm), plus a 2.5 in (6.4 cm) hanging loop
- Skill level: Intermediate
- Terminology: US
- Yarn weight: Size 3 crochet thread (Lace / 0)
- Hook: 2.0 mm steel hook
- Number of pieces: 4 identical panels
- Layout: 4 panels joined side by side into a closed ring (3D)
- Single panel size: 3.5 in (8.9 cm) tall x 1.5 in (3.8 cm) wide, blocked flat
- Size before border: 3.5 in (8.9 cm) tall x 1.9 in (4.8 cm) diameter, with both tips open
- Border depth: picots stand out 0.125 in (0.3 cm); tip collars and rings add about 0.75 in (1.9 cm) to the total length
Materials
Choose a mercerized cotton crochet thread in size 3. Mercerized cotton holds starch well, keeps the fans crisp, and has a soft sheen. Avoid fuzzy or very stretchy fibers, because the ornament depends on firm, clear edges.
- Color A, Forest Green: 10 g, about 28 m (31 yd)
- Color B, Cream: 15 g, about 42 m (46 yd)
Quantities include a margin of about 25% for gauge swatches and joining tails.
Tools:
- 2.0 mm steel crochet hook
- Tapestry needle (small eye)
- Scissors
- Rust-proof pins and a blocking mat
- Fabric stiffener or heavy spray starch
- A 2 in (5.1 cm) egg-shaped form, small balloon, or plastic egg for shaping
- Stitch markers (optional)
Abbreviations (US Terms)
- ch – chain
- sl st – slip stitch
- sc – single crochet
- dc – double crochet
- sc2tog – single crochet 2 together
- sp(s) – space(s)
- st(s) – stitch(es)
- WS – wrong side
Special stitch – Picot: Ch 3, sl st in 3rd ch from hook.
Fan: A group of dc all worked into the same stitch. The pattern uses 5-dc, 7-dc, and 9-dc fans.
Gauge and Checkpoints
Gauge: 9 sc = 1 in (2.5 cm) in size 3 thread with a 2.0 mm hook.
Make one full panel before you make the other three. Check it against these measurements:
- After Row 3 of the fan column: the 9-dc fan measures 0.75 in (1.9 cm) across its top edge.
- After Row 5: the fan column measures 2 in (5.1 cm) tall.
- After Round 1: the panel measures 3 in (7.6 cm) tip to tip when gently stretched.
- After Round 2: 3.25 in (8.3 cm) tall x 1.25 in (3.2 cm) wide.
- After Round 3 (blocked): 3.5 in (8.9 cm) tall x 1.5 in (3.8 cm) wide.
If your panel is too big, change to a 1.75 mm hook. If it is too small, change to a 2.25 mm hook. Height mostly depends on your dc, so if only the height is off, check how tall your dc are rather than changing everything.
Panel (Make 4)
Fan Column
Work in rows with Color A. The fans all open upward and stack on top of each other. Each new fan goes into the center dc of the fan below it.
Foundation: With A, ch 4.
Row 1: 4 dc in 4th ch from hook (the skipped 3 ch count as the first dc). (5 dc – Fan 1)
Row 2: Ch 3 (does not count as a st), turn, skip first 2 dc, 7 dc in next dc (the center dc). (7 dc – Fan 2)
Row 3: Ch 3, turn, skip first 3 dc, 9 dc in next dc (center dc). (9 dc – Fan 3)
Row 4: Ch 3, turn, skip first 4 dc, 7 dc in next dc (center dc). (7 dc – Fan 4)
Row 5: Ch 3, turn, skip first 3 dc, 5 dc in next dc (center dc). (5 dc – Fan 5)
Fasten off A. The ch-3 turning loops sit behind the fans and stay unworked. You now have 5 fans with a total of 33 dc, and each fan has one outermost st on each side of the column.
Round 1 – Cream Struts
Round 1: Join B with sc in the outermost dc on either side of Fan 5. Ch 6, sc in the outermost dc on the opposite side of Fan 5 (top tip sp made). [Ch 4, sc in the outermost st of the next fan down this side] 4 times (Fans 4, 3, 2, 1). Ch 6, sc in the outermost st on the other side of Fan 1 (bottom tip sp made). [Ch 4, sc in the outermost dc of the next fan up] 3 times (Fans 2, 3, 4). Ch 4, sl st in first sc.
(10 sc, 8 ch-4 sps, 2 ch-6 tip sps)
Fasten off B. These ch-4 struts are the thin cream lines between the fans and the frame.
Round 2 – Green Frame
Round 2: Join A in the top ch-6 sp. Ch 1, (3 sc, ch 2, 3 sc) in same sp. [Sc in next sc, 5 sc in next ch-4 sp] 4 times, sc in next sc. (3 sc, ch 2, 3 sc) in bottom ch-6 sp. [Sc in next sc, 5 sc in next ch-4 sp] 4 times, sc in next sc. Sl st in first sc.
(62 sc and 2 ch-2 tip sps: 6 sc at each tip, 25 sc along each long side)
Between the two tip ch-2 sps, each long side now has 31 sc (3 tip sc + 25 side sc + 3 tip sc). Fasten off A.
The (3 sc, ch 2, 3 sc) groups pull the ch-6 spaces into sharp points, which gives the panel its pointed top and bottom.
Round 3 – Cream Outline
Round 3: Join B in the top ch-2 sp. Ch 1, (sc, ch 2, sc) in same sp, sc in each of next 31 sc, (sc, ch 2, sc) in bottom ch-2 sp, sc in each of next 31 sc. Sl st in first sc.
(66 sc and 2 ch-2 tip sps)
This is a trim round, so the count is 62 sc worked 1 per existing st, plus 4 sc added at the tips (2 per tip), for 66 sc.
Per-side count: Each long side has 33 sc. That is the 31 sc worked into Round 2, plus 1 tip sc at each end. These 33 sc already include the tip stitches on that side, so do not count them again.
Fasten off, leaving a 6 in (15.2 cm) tail. Weave in all other ends now.
Make All Pieces
Make 4 identical panels. Each panel uses both colors:
- Color A (Forest Green): Fan column and Round 2, 4 panels total
- Color B (Cream): Round 1 and Round 3, 4 panels total
Block each panel flat to 3.5 in (8.9 cm) x 1.5 in (3.8 cm) before joining. This makes the seams much easier to match.
Layout (viewed from the outside, unrolled flat):
 S4   |  P1  |  S1  |  P2  |  S2  |  P3  |  S3  |  P4  |  S4
(to P1)                                              (to P1)
P = panel, S = seam. Seam 4 joins Panel 4 back to Panel 1 and closes the ring.
Joining
Join with a picot single crochet seam using Color B. The seam stands up on the outside of the ornament as a cream ridge.
Stitch-to-stitch logic: Each long side has 33 sc. Hold two panels with their WS together and match the sides stitch for stitch, tip to tip. Work every sc through one st from each panel, so 33 sts on one side meet 33 sts on the other.
Seam: Join B with sc through both top tip sc (the sc next to each top ch-2 sp). Sc through both layers in next 2 sts. [Picot, sc through both layers in next 3 sts] 10 times.
(33 sc and 10 picots per seam)
The math: 3 sc + (10 x 3 sc) = 33 sc, which uses every stitch on the side exactly once. The 10 picots are spaced evenly with 3 sc between each pair. Fasten off, leaving a 4 in (10.2 cm) tail.
Order: Join Panel 1 to Panel 2 (Seam 1), Panel 2 to Panel 3 (Seam 2), and Panel 3 to Panel 4 (Seam 3). For Seam 4, bring the free side of Panel 4 to the free side of Panel 1 to close the ring, and work the seam from the outside the same way.
Keep the ch-2 spaces at the tips free. You will use them for the collars.
Tension: Keep the seam sc snug but not tight. If the seam pulls, the panel will curl and the fans will pucker. If it is loose, the ridge will wave. Each seam should be the same length as the panel side, 3.5 in (8.9 cm) tip to tip, measured straight.
Size checkpoint: The joined ornament should measure 3.5 in (8.9 cm) tall and about 6 in (15.2 cm) around at the widest point, not counting picots. That is a diameter of 1.9 in (4.8 cm).
Border: Tip Collars, Rings, and Hanging Loop
The ornament’s “border” is the finishing at the two open tips. It uses the same gauge, 9 sc = 1 in (2.5 cm), with Color B.
Top Collar and Ring
Round 1: Join B in any top tip ch-2 sp. Ch 1, 3 sc in same sp, 3 sc in each of the other 3 top tip ch-2 sps. Sl st in first sc.
(12 sc: 3 sc per panel x 4 panels)
Round 2: Ch 1, [sc2tog] 6 times. Sl st in first st.
(6 sts)
Ring: Ch 7, sl st in first ch of the ch-7 to form a ring. Work 12 sc into the ring, sl st in first sc.
(12 sc)
Hanging Loop: Ch 45, sl st in the sc on the opposite side of the ring. Fasten off and weave in.
Bottom Collar and Ring
Round 1: Join B in any bottom tip ch-2 sp. Ch 1, 3 sc in each of the 4 bottom tip ch-2 sps. Sl st in first sc.
(12 sc)
Round 2: Ch 1, [sc2tog] 6 times. Sl st in first st.
(6 sts)
Ring: Ch 5, sl st in first ch to form a ring. Work 8 sc into the ring, sl st in first sc.
(8 sc)
Fasten off and weave in.
Why the math works: The ornament has 4 panels, and each panel has exactly one ch-2 space at each tip. So each collar starts with 4 x 3 = 12 sc, with no extra stitches at the seams. Round 2 halves that to 6 sts, which closes the opening neatly under the ring. The top ring is about 0.375 in (1.0 cm) across, and the bottom ring is about 0.25 in (0.6 cm). The 45-ch loop hangs about 2.5 in (6.4 cm) when folded.
Final Blocking
- Mix the fabric stiffener according to its label, or prepare heavy spray starch.
- Soak the ornament fully, then press out the extra liquid in a towel. Do not wring it.
- Slip your 2 in (5.1 cm) form inside through the lace, or put a small balloon inside and inflate it until the ornament is 1.9 in (4.8 cm) across.
- Line up the seams so they run straight from tip to tip.
- Pinch each picot into a small round bead and lift each fan so it opens evenly.
- Check that the body is 3.5 in (8.9 cm) tall, then let it dry completely, at least 24 hours.
- Remove the form, or let the air out of the balloon and pull it out.
Final Quality-Control Checklist
- Each panel has 5 fans in this order: 5, 7, 9, 7, 5 dc.
- Each panel has 62 sc in Round 2 and 66 sc in Round 3.
- Each long side has 33 sc, and each seam has 33 sc and 10 picots.
- All 4 seams are straight and the same length, 3.5 in (8.9 cm).
- Each collar has 12 sc in Round 1 and 6 sts in Round 2.
- The ornament is 1.9 in (4.8 cm) across and stands symmetrically.
- All ends are woven in and trimmed.
Troubleshooting
The fans lean to one side. Make sure each new fan is in the true center dc. Count the skipped stitches again.
The panel tips are rounded, not pointed. Check that you worked (3 sc, ch 2, 3 sc) in each ch-6 tip space in Round 2. Pin the tips sharply while blocking.
The seams don’t line up. Count 33 sc on each side before joining. Place a marker at the middle stitch (the 17th sc) of each side and match the markers.
The ornament looks lopsided. One panel may be larger than the others. Block all four panels to the same size before joining.
The collar has a hole. Tighten Round 2 of the collar and weave the tail through the 6 sts once more before working the ring.
Picots look flat. Pinch them into shape while the stiffener is still wet.
Care
Dust gently with a soft brush. If it gets dirty, hand wash it in cool water, then stiffen and shape it again over the form.
Final Notes
Here is the full measurement chain. Your gauge is 9 sc = 1 in (2.5 cm). The fan column measures 2 in (5.1 cm) tall. Three rounds bring each panel to 3.5 in (8.9 cm) x 1.5 in (3.8 cm), with 33 sc on each long side. Four panels joined with 33-sc picot seams make an ornament 3.5 in (8.9 cm) tall and 1.9 in (4.8 cm) across. Two 12-sc collars and rings bring the total to 4.25 in (10.8 cm). If you check each step, the finished lantern will hang straight and even.
Happy crocheting!