

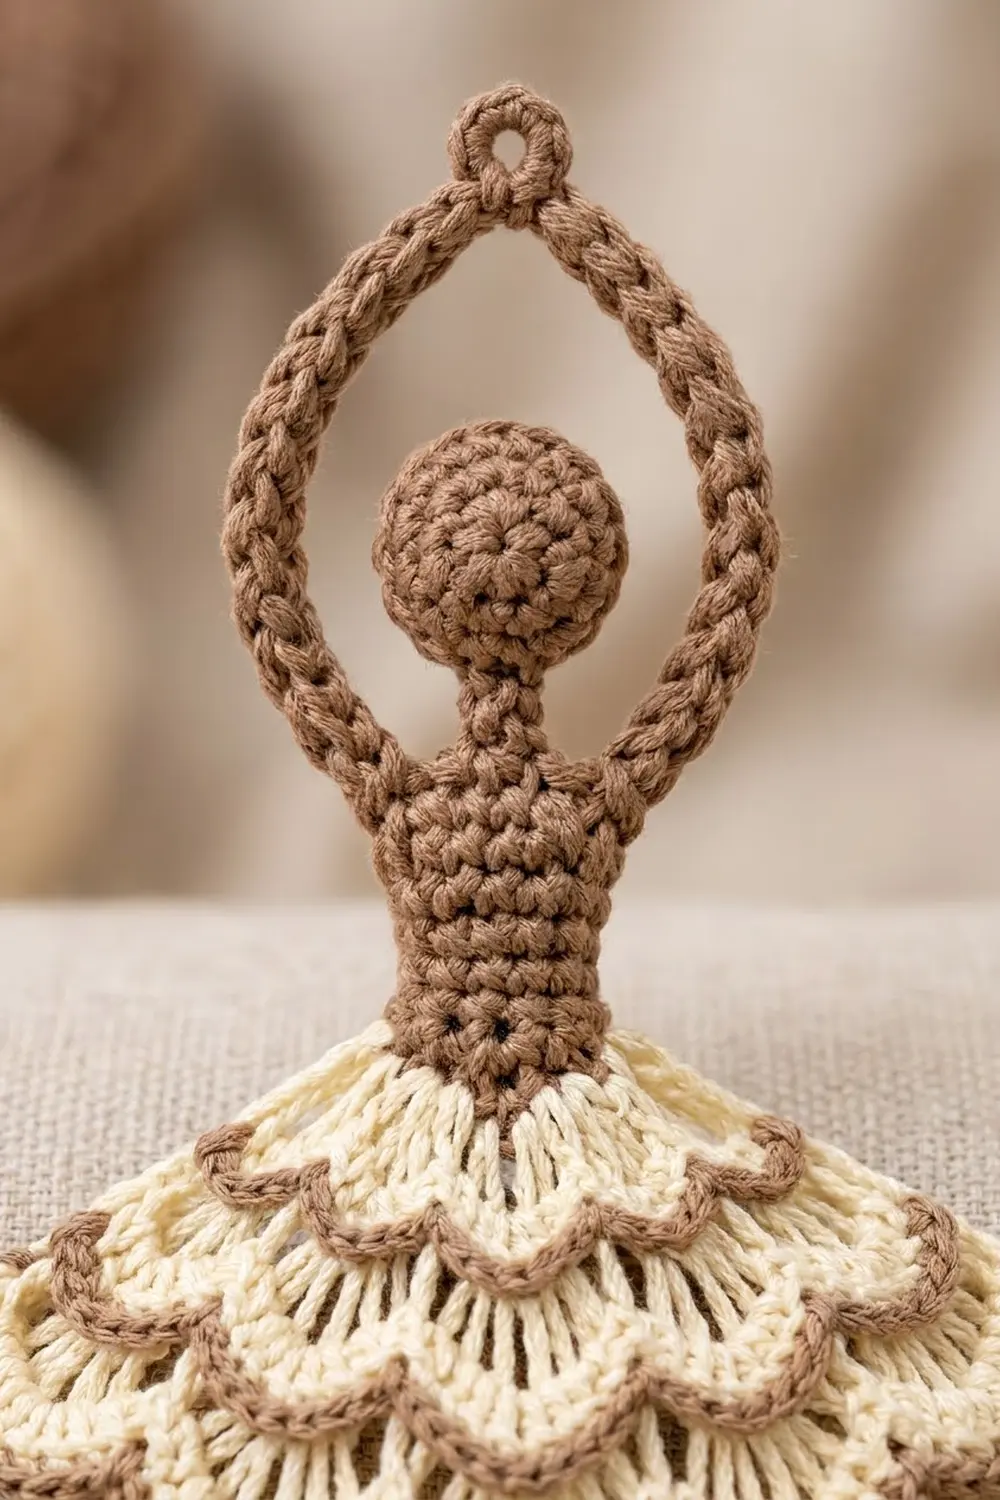
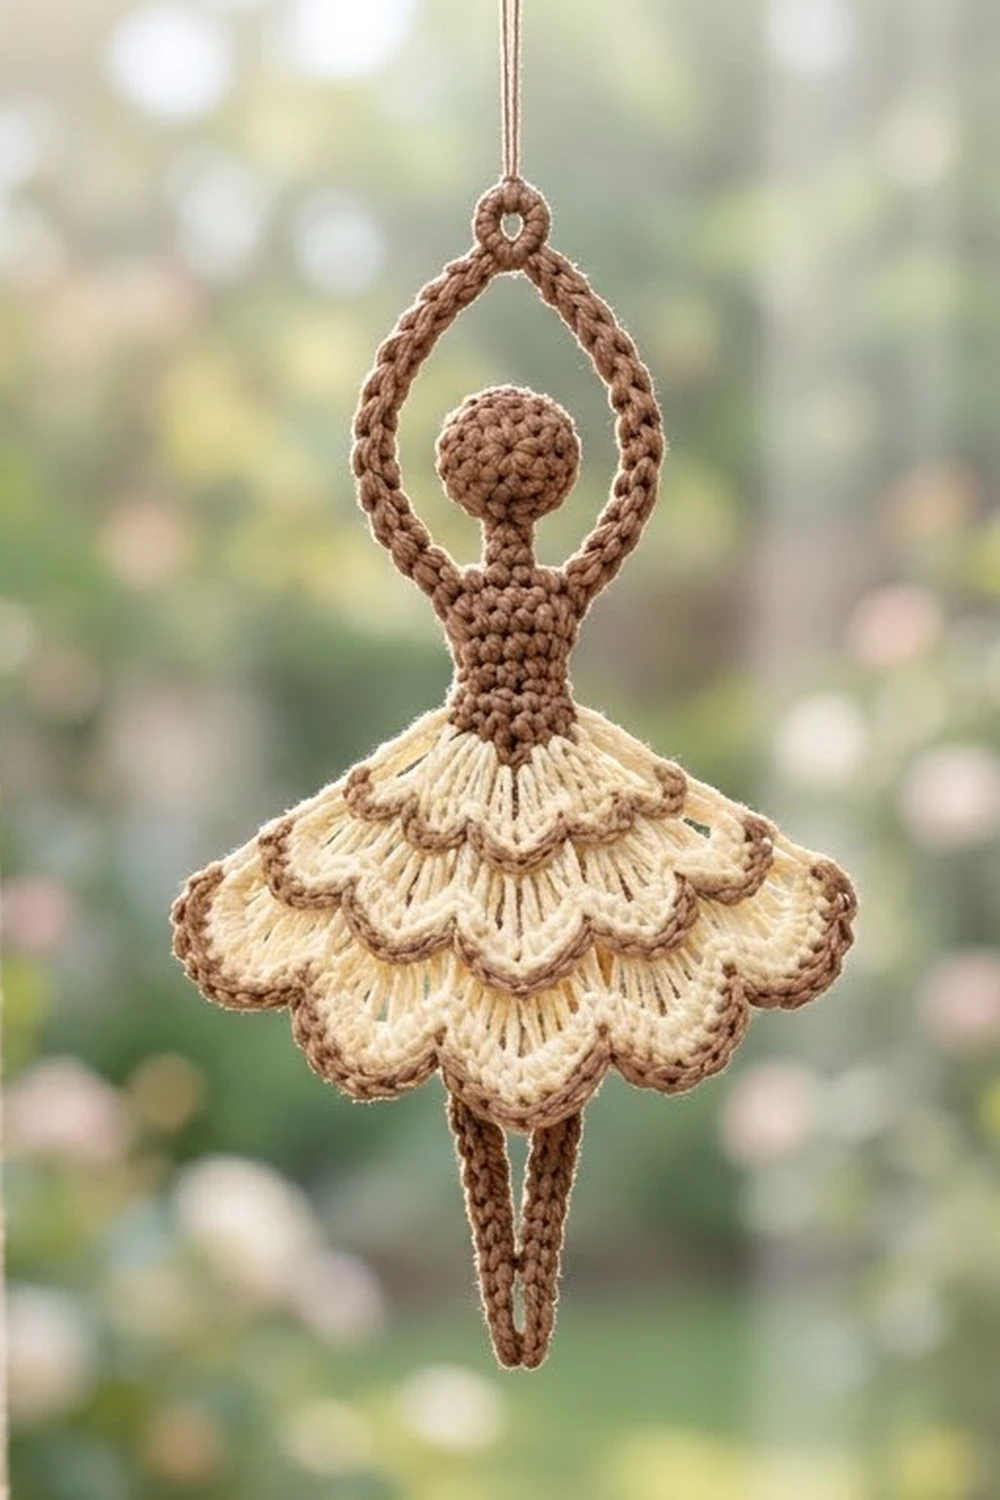
This little dancer is a flat ballerina motif with her arms raised in a smooth oval over her head. Her round head, fitted bodice, arms and pointed legs are worked in a warm mocha brown. Her three-tier tutu is soft cream, and each scalloped tier is outlined in mocha so the layers stand out.
The style is light and graphic, a bit like a cut-paper silhouette. The arms meet in a small ring at the top, so the motif is ready to hang. Use it as an ornament, a gift tag or a nursery decoration, or string several on chains if you like. This pattern covers one single motif.
The pattern uses US crochet terms. The finished motif measures about 7 in (17.8 cm) tall and 4.5 in (11.4 cm) wide across the bottom tier of the tutu.
Construction is one continuous piece. You start with the head as a flat circle, then work the bodice in rows straight down from it. The skirt base is worked in rows of double crochet. Two of those rows leave free loops on the right side, and you work the top two tutu tiers into them. The bottom tier is worked into the last base row. To finish, you add the mocha tier edgings, the legs and the arm loop.
Finished Size and Construction
- Finished size: 7 in (17.8 cm) tall x 4.5 in (11.4 cm) wide
- Skill level: Intermediate (front/back loop work, working into free loops)
- Terminology: US
- Yarn weight: DK (#3) cotton
- Hook: 3.5 mm (E-4)
- Number of pieces: 1 (worked continuously, with color changes)
- Layout: Single motif, no joining
- Piece size: 7 in (17.8 cm) x 4.5 in (11.4 cm)
- Tutu width before border: 4.1 in (10.4 cm)
- Border depth: about 0.2 in (0.5 cm) of mocha edging on each tier
Materials
Use a smooth, mercerized or matte DK cotton. Cotton keeps the scallops crisp and the stitches well defined, and it blocks flat. Avoid fuzzy yarns, because they hide the tier edges.
- Color A, Mocha brown: 8 g (about 20 m) for the head, bodice, edgings, legs and arms
- Color B, Cream: 6 g (about 15 m) for the skirt base and the three tutu tiers
These quantities include a margin of about 25% for your test motif and weaving in ends.
Tools:
– 3.5 mm (E-4) crochet hook
– Tapestry needle
– 2-3 stitch markers
– Scissors
– Blocking mat, rustproof pins and a spray bottle
Abbreviations (US Terms)
- ch – chain
- sl st – slip stitch
- sc – single crochet
- hdc – half double crochet
- dc – double crochet
- tr – treble crochet
- sc2tog – single crochet 2 together
- BLO / FLO – back loop only / front loop only
- st(s) – stitch(es)
- RS / WS – right side / wrong side
Special stitch – Shell: work the stated number of dc or tr into one single stitch. A “5-dc shell” is 5 dc in the same stitch.
Free loop: the unused loop left behind on the RS when the next row is worked in one loop only.
Gauge and Checkpoints
- sc gauge: 20 sts x 22 rows = 4 in (10.2 cm)
- dc gauge: 20 sts x 10 rows = 4 in (10.2 cm)
So 5 sts = 1 in (2.5 cm), each sc row is about 0.18 in (0.5 cm), and each dc row is 0.4 in (1.0 cm).
Make one complete motif as your test piece. It uses very little yarn, so it is your best gauge check. Measure at each stage:
- After Head Round 3: diameter 1.1 in (2.8 cm)
- After Bodice Row 3: shoulder width 1.4 in (3.6 cm)
- After Bodice Row 8: bodice length 1.45 in (3.7 cm), waist width 1 in (2.5 cm)
- After Skirt Row S4: width 3.8 in (9.7 cm)
- After Tier 3: tutu width 4.1 in (10.4 cm)
- Finished: 7 in (17.8 cm) x 4.5 in (11.4 cm)
If your head is larger than 1.2 in (3.0 cm), go down to a 3.25 mm hook. If it is smaller than 1 in (2.5 cm), go up to a 3.75 mm hook. Getting the head and bodice right first keeps the whole figure in proportion.
Head
With A, make a magic ring.
Round 1: Ch 1, 6 sc in ring, join with sl st to first sc. (6 sts)
Round 2: Ch 1, 2 sc in each st around, join. (12 sts)
Round 3: Ch 1, sc in next st, 2 sc in next st; repeat from * 6 times, join. (18 sts)
Pull the ring closed tightly. The head is a firm, flat disc 1.1 in (2.8 cm) across. Do not fasten off. The join point is now the bottom of the head (the chin).
Bodice
Work in rows straight down from the head. Row 1 is a RS row.
Row 1 (RS, neck): Ch 1, sc in the same st as the join and in the next 2 sts, turn. (3 sts)
Row 2: Ch 1, 2 sc in first st, sc in next st, 2 sc in last st, turn. (5 sts)
Row 3 (shoulders): Ch 1, 2 sc in first st, sc in next 3 sts, 2 sc in last st, turn. (7 sts)
Rows 4-5: Ch 1, sc in each st across, turn. (7 sts)
Row 6: Ch 1, sc2tog, sc in next 3 sts, sc2tog, turn. (5 sts)
Row 7: Ch 1, sc in each st across, turn. (5 sts)
Row 8 (WS, waist): Ch 1, sc in each st across. Change to B in the last st, turn. (5 sts)
Fasten off A, leaving a short tail. The bodice widens from the neck to the shoulders, then tapers to a 1 in (2.5 cm) waist.
Skirt Base
The base rows are worked in B. Rows S2 and S3 are worked in one loop only. That leaves free loops on the RS for Tiers 1 and 2. The ch 3 at the start of each row counts as the first dc.
Row S1 (RS): Ch 3, dc in the same st, 2 dc in each of the next 4 sts, turn. (10 sts)
Row S2 (WS): Working in FLO, ch 3, dc in next 2 sts, 2 dc in next st; repeat from * 3 times, turn. (13 sts: 1 + 3 x 4)
The FLO is the loop closest to you while the WS faces you. The 10 back loops of S1 stay free on the RS.
Row S3 (RS): Working in BLO, ch 3, dc in next st, 2 dc in next st, dc in next st; repeat from * 4 times, turn. (17 sts: 1 + 4 x 4)
The 13 front loops of S2 stay free on the RS.
Row S4 (WS): Working in both loops, ch 3, dc in next 3 sts, 2 dc in next st, dc in next 7 sts, 2 dc in next st, dc in last 4 sts. (19 sts)
Check: 1 + 3 + 1 + 7 + 1 + 4 = 17 sts used, and 1 + 3 + 2 + 7 + 2 + 4 = 19 sts made. The base should be 3.8 in (9.7 cm) wide.
Tutu Tiers
Each tier uses a repeat of (skip 1, shell, sc). Each repeat takes up 3 stitches, plus 1 starting sc. That is why the base counts are 10, 13 and 19: each one equals 1 + 3 x the number of scallops.
Tier 3 (bottom tier): Ch 1, turn so the RS faces you. Sc in first st, skip 1 st, 7-dc shell in next st, sc in next st; repeat from * 6 times. Fasten off. (6 scallops; 49 sts: 1 + 6 x 8)
Tier 2 (middle tier): Turn the motif upside down, with the RS facing and the waist pointing toward you. Join B in the first free loop of Row S2 at the right-hand end. Sc in the same loop, skip 1 loop, 5-tr shell in next loop, sc in next loop; repeat from * 4 times. Fasten off. (4 scallops; 25 sts: 1 + 4 x 6)
Tier 1 (top tier): Keep the motif upside down. Join B in the first free loop of Row S1. Sc in the same loop, skip 1 loop, 5-dc shell in next loop, sc in next loop; repeat from * 3 times. Fasten off. (3 scallops; 19 sts: 1 + 3 x 6)
Turn the motif right side up and let Tiers 1 and 2 fall downward. Tier 1 hangs over the top of Tier 2. Tier 2’s taller tr scallops cover Row S3 and most of S4, and they overlap the top of Tier 3. This gives the stacked, layered tutu.
Border: Mocha Tier Edging
The border is a single row of mocha sc along the scalloped edge of each tier. It uses the same sc gauge, 5 sts = 1 in (2.5 cm), and adds about 0.2 in (0.5 cm) of depth. Work each tier with the RS facing. Hold each tier flat while you work, so the edging follows the scallops and doesn’t pull them.
Edging E3 (Tier 3): Join A in the first sc of Tier 3. Sc in each st across, working 2 sc in the 4th (center) dc of each 7-dc shell. Fasten off. (55 sts: 49 + 6)
Edging E2 (Tier 2): Lift Tier 1 out of the way. Join A in the first sc of Tier 2. Sc in each st across, working 2 sc in the 3rd (center) tr of each shell. Fasten off. (29 sts: 25 + 4)
Edging E1 (Tier 1): Join A in the first sc of Tier 1. Sc in each st across, working 2 sc in the 3rd (center) dc of each shell. Fasten off. (22 sts: 19 + 3)
Why the math works: Every tier stitch gets exactly 1 sc. The only extra stitch is 1 per scallop, placed at the peak where the curve is widest. So each edging count is the tier count plus the number of scallops. That keeps the outline flat at the points without ruffling the gentle dips at the sc. With E3, the tutu grows from 4.1 in (10.4 cm) to 4.5 in (11.4 cm).
Legs
Edging E3 has 55 sts. Stitch 28 is the exact center, and it sits over the center sc of Tier 3, between scallops 3 and 4.
With RS facing, join A in st 28 of E3.
Leg 1: Ch 7, sl st in 2nd ch from hook, sc in next 2 ch, hdc in next 2 ch, dc in last ch, sl st in st 28. (6 sts)
Leg 2: Ch 7, sl st in 2nd ch from hook, sc in next 2 ch, hdc in next 2 ch, dc in last ch, sl st in st 28 again. (6 sts) Fasten off.
Each leg tapers from the dc at the hip to a pointed sl st toe. Each one is 1.2 in (3.0 cm) long, and together they form a slim V.
Arms and Hanging Ring
The arms are a sturdy cord made of a chain plus a row of sc.
Row A1: With RS facing, join A at the outer end of Bodice Row 3 on the left shoulder. Ch 15 for the left arm, then ch 6 more and sl st in the 6th ch from hook to form the ring. Ch 15 for the right arm, then sl st in the outer end of Bodice Row 3 on the right shoulder.
Row A2: Ch 1, turn. Sc in each of the 15 ch of the right arm, 10 sc in the ring, then sc in each of the 15 ch of the left arm. Sl st in the left shoulder and fasten off. (40 sts: 15 + 10 + 15)
Each arm is 3 in (7.6 cm) long. The two arms curve up and around the head with a small gap, then meet at the ring. The arm span is about 2.4 in (6.1 cm) at its widest.
Final Blocking
- Weave in all ends along stitches of the same color: mocha tails into the bodice or edgings, cream tails behind the skirt base.
- Lightly spray the motif until damp, but not soaked.
- Pin the head and bodice straight along a vertical center line.
- Shape the arms into a smooth, symmetrical oval around the head, with even gaps on both sides. Pin the ring at the top.
- Pin each scallop of Tier 3 at its peak, keeping the tutu 4.5 in (11.4 cm) wide.
- Arrange Tiers 1 and 2 so they lie flat and centered over the lower tiers. Pin their peaks lightly.
- Pin the legs into a narrow V with pointed toes.
- Let it dry completely, at least 6 hours. Then remove the pins.
Final Quality-Control Checklist
- Head is a flat 1.1 in (2.8 cm) disc with a tight center
- Bodice has 7 sts at the shoulders and 5 sts at the waist
- Base row counts are 10, 13, 17, 19
- Tiers have 3, 4 and 6 scallops, from top to bottom
- Edging counts are 22, 29 and 55 sts
- Legs come from the exact center of the hem and are equal in length
- Arms are 40 sc, symmetrical, with an open ring at the top
- Finished size is 7 in (17.8 cm) x 4.5 in (11.4 cm)
- All ends woven in invisibly
Troubleshooting
Tutu ruffles or cups: Your shells are too loose. Go down half a hook size for the tiers only, or work 6-dc shells on Tier 3.
Free loops are hard to find: You may have worked S2 or S3 through both loops. Check that the RS shows a clear ridge of loops at the tops of S1 and S2.
Tier 1 doesn’t reach Tier 2: Pull up each dc loop slightly taller, or use (2 dc, tr, 2 dc) shells.
Edging pulls the scallops tight: Add 1 more sc at each scallop peak, and keep the edging loose.
Arms twist: Work Row A2 into the same side of every chain, then block the arms flat.
Legs uneven: Recount both legs. Each one has 6 sts, and both join in st 28.
Care
Hand wash in cool water with mild soap, press out the water in a towel, and dry flat. Reshape the scallops and arms while the motif is damp.
Final Notes
The measurement chain is simple. A 1.1 in (2.8 cm) head leads to a 1.4 in (3.6 cm) shoulder and a 1 in (2.5 cm) waist. The skirt base grows to 3.8 in (9.7 cm), Tier 3 brings the tutu to 4.1 in (10.4 cm), and the mocha edging finishes it at 4.5 in (11.4 cm). Add the 3 in (7.6 cm) arms and the 1.2 in (3.0 cm) legs, and your dancer stands 7 in (17.8 cm) tall. Check each stage as you go, and she will come out balanced and graceful.
Happy crocheting!