

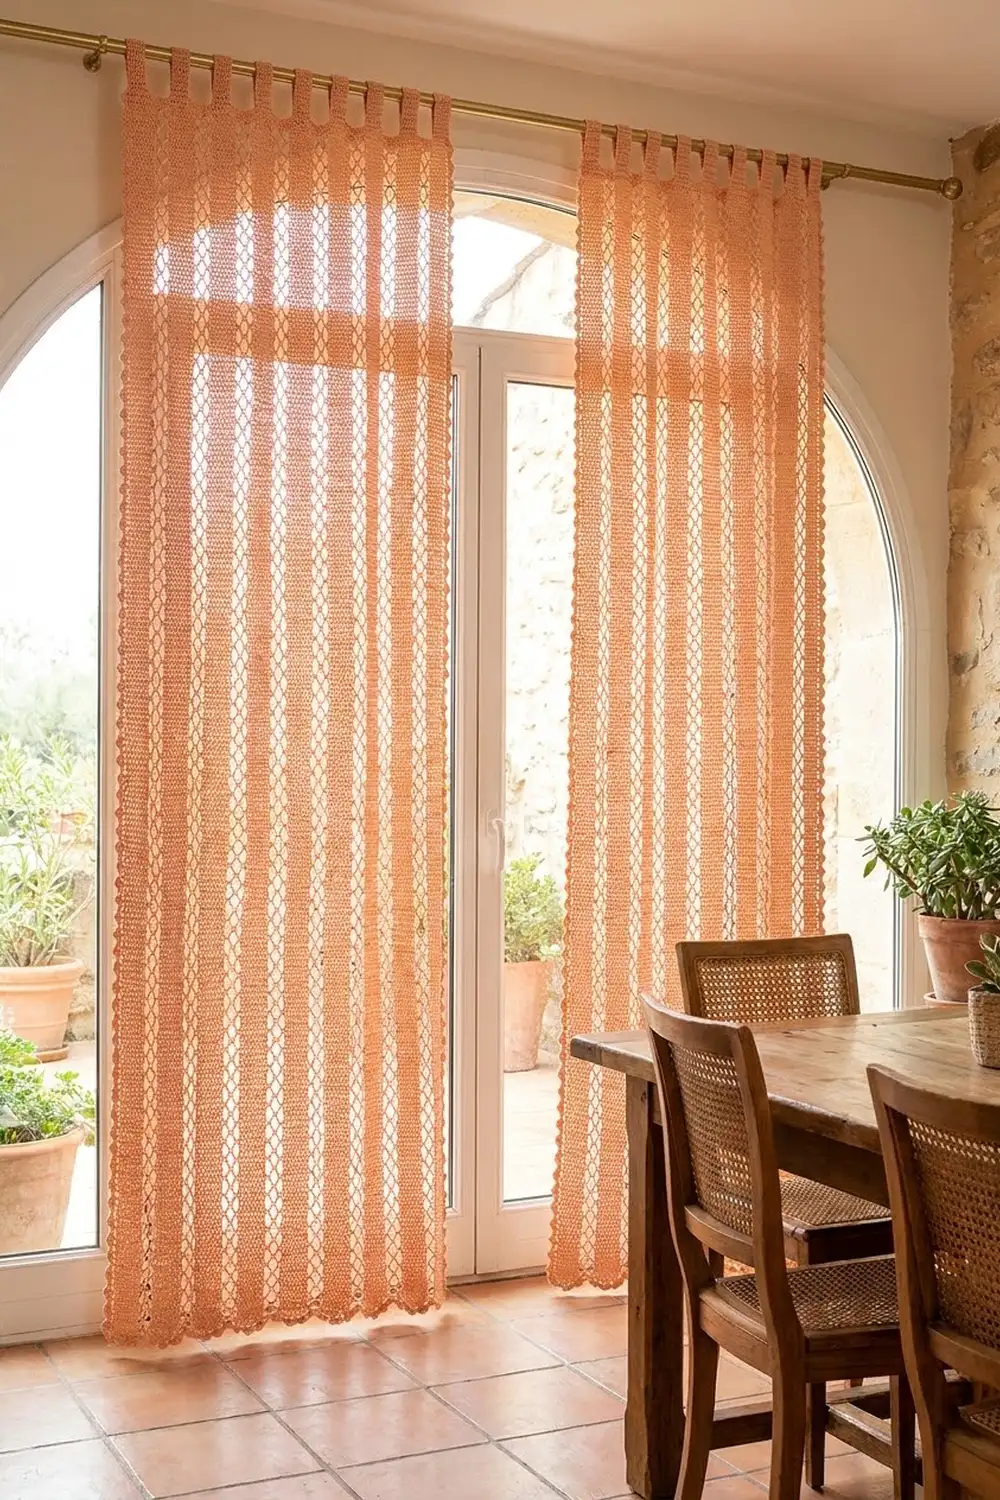
This curtain panel is built from soft, wavy ribbons of lace. Ten narrow strips of solid double crochet curve gently from top to bottom, and an airy zigzag chain mesh ties them together. Light comes through the mesh, and the ribbons give the panel its rhythm and structure.
The sample uses one warm apricot-peach cotton, so the texture does all the work. A small scalloped picot edge finishes the hem, and flat crochet tabs at the top slide straight onto a curtain rod. The look is relaxed and Mediterranean. It suits a sunny doorway or a tall window.
The pattern uses US crochet terms. One finished panel measures 26.75 in (67.9 cm) wide and 82 in (208.3 cm) long from the top band to the hem. The tab loops add 3 in (7.6 cm) above that. For a pair like the one in the photo, make two identical panels.
Construction is simple and modular. You work ten wave strips in rows and lace them together side by side with a chain zigzag. Then you add a scalloped hem border and a top tab band. The only sewing is folding the tabs.
Finished Size and Construction
- Finished panel size: 26.75 in (67.9 cm) wide x 82 in (208.3 cm) long, plus 3 in (7.6 cm) tab loops
- Skill level: Intermediate
- Terminology: US crochet terms
- Yarn weight: DK / light (#3) cotton or cotton blend
- Hook: 4.0 mm (G-6)
- Number of pieces: 10 wave strips per panel
- Layout: 10 strips side by side in a single row (1 x 10)
- Piece size: each strip is 2 in (5.1 cm) wide including edge loops and 80.5 in (204.5 cm) long
- Size before border: 26.75 in (67.9 cm) x 80.5 in (204.5 cm)
- Border depth: 1 in (2.5 cm) scalloped hem; 0.5 in (1.3 cm) top band
Materials
Choose a smooth mercerized or matte cotton in DK weight. Cotton drapes well, shows the stitch texture clearly, and holds its shape in a sunny window. Avoid fuzzy yarns, because they blur the mesh.
- Apricot / peach: 600 g (about 1,500 m) per panel, based on 50 g / 125 m balls
These quantities include a margin of roughly 15 percent for swatching and tension differences. Double the amount for a pair of panels.
Tools:
- 4.0 mm (G-6) crochet hook
- Tapestry needle
- Stitch markers
- Rust-proof pins and blocking mats or a large towel-covered surface
- Spray bottle
- Measuring tape
Abbreviations (US Terms)
- ch: chain
- sc: single crochet
- hdc: half double crochet
- dc: double crochet
- sk: skip
- st(s): stitch(es)
- RS: right side
Special stitch (edge loop): Some rows begin with “ch 5 (counts as dc + ch-2 edge loop)”. This makes a small chain loop at the start of the row. The first 3 ch act as the row’s first dc, and the extra 2 ch bow out to form the loop.
Side A and side B: After the set-up row of a strip, the edge where your hook rests is side A. The opposite edge is side B. Odd rows start at side A and even rows start at side B.
Gauge and Checkpoints
- 16 dc = 4 in (10.2 cm) wide
- 16 sc = 4 in (10.2 cm) wide; 20 sc rows = 4 in (10.2 cm)
- One strip body (6 dc) = 1.5 in (3.8 cm) wide; with edge loops = 2 in (5.1 cm)
- One 20-row wave repeat = 8 in (20.3 cm) long, measured along the strip after light blocking
Work one complete strip before anything else. It is your real gauge swatch.
Checkpoints:
- After the set-up row: 6 sts measuring 1.5 in (3.8 cm).
- After the first wave repeat: about 8.5 in (21.6 cm) including the set-up row, with one clear S-curve.
- After five repeats: 40.5 in (102.9 cm).
- Finished strip: 80.5 in (204.5 cm).
If the strip is too wide or too long, go down 0.5 mm in hook size. If it is too narrow or too short, go up 0.5 mm. Width matters most, because the top band and hem counts depend on 0.25 in (0.6 cm) per stitch.
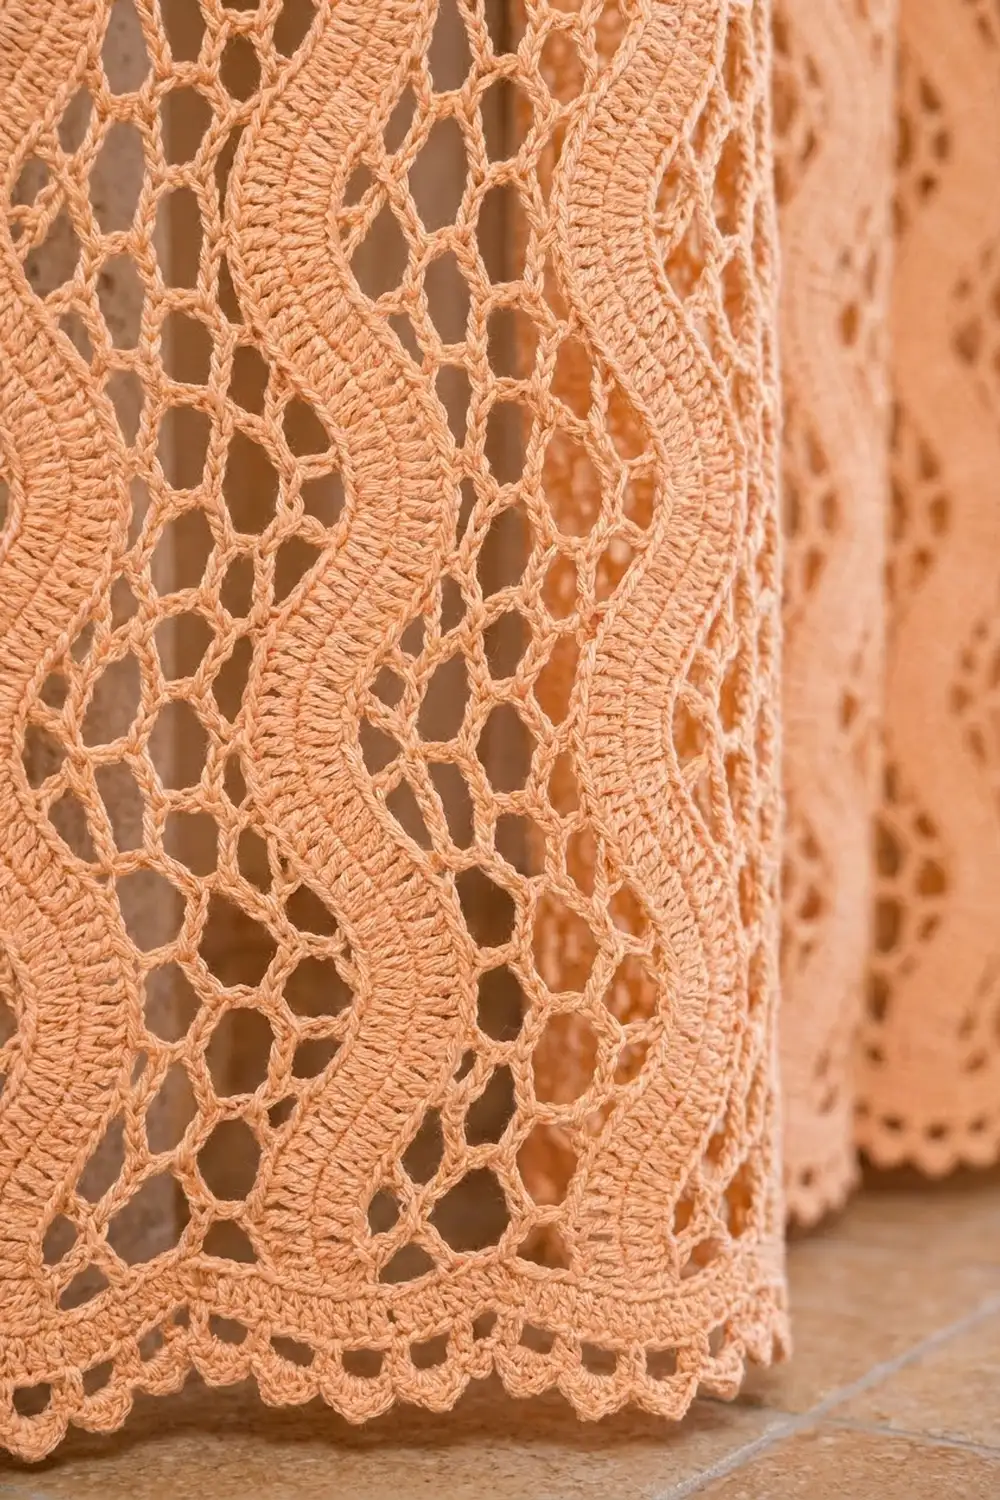
Wave Strip (make 10)
Set-up row: Ch 8, dc in 4th ch from hook and in each of next 4 ch. (6 sts: beginning ch-3 counts as first dc, plus 5 dc.) Your hook is now at side A.
The wave comes from curve rows. A curve row is tall at the edge where it begins and short at the edge where it ends. When you repeat it on one edge, that edge gets longer and the strip bends away from it.
Straight row: Ch 5 (counts as dc + ch-2 edge loop), turn, sk first st, dc in each of next 5 sts. (6 sts, 1 edge loop.)
Curve row: Ch 5 (counts as dc + ch-2 edge loop), turn, sk first st, dc in next st, hdc in each of next 2 sts, sc in each of next 2 sts. (6 sts, 1 edge loop.)
Always work the last st of a row into the 3rd ch of the previous row’s ch-5.
Wave repeat (20 rows):
- Rows 1–10: Work a curve row on every odd row (Rows 1, 3, 5, 7, 9) and a straight row on every even row (Rows 2, 4, 6, 8, 10). Side A grows longer and the strip bends toward side B.
- Rows 11–20: Work a straight row on every odd row (Rows 11, 13, 15, 17, 19) and a curve row on every even row (Rows 12, 14, 16, 18, 20). Side B grows longer and the strip bends back toward side A.
Every row in the repeat has 6 sts. Each edge gets one ch-2 loop for every 2 rows, so one repeat adds 10 loops on side A and 10 loops on side B.
Rows 21–200: Work the 20-row wave repeat 9 more times, for 10 repeats in total.
Strip totals: set-up row + 200 rows, 6 sts in every row, 100 edge loops on side A and 100 on side B. Fasten off and weave in ends.
Place a marker on side A of each strip near the set-up row so you keep the orientation consistent.
Make All Pieces
Make 10 strips per panel, all in apricot. Each strip uses about 40 g (100 m). Block the strips lightly before joining. Pin each one to 80.5 in (204.5 cm) along its center, let the waves keep their natural curves, and mist.
Lay the strips RS up with the set-up rows at the bottom and side A on the left. Every strip bends in the same direction at the same height, so all the waves run parallel.
| S1 ~ S2 ~ S3 ~ S4 ~ S5 ~ S6 ~ S7 ~ S8 ~ S9 ~ S10 |
S = wave strip, ~ = zigzag chain-mesh join (9 joins).
Joining
Each join laces side B of the left strip to side A of the right strip. Both edges have exactly 100 loops. Loop 1 on one edge lines up with loop 1 on the other, so the join runs 1-to-1 with no easing.
On side A, the loops sit on odd rows, and Row 1 is the lowest. On side B, the loops sit on even rows, and Row 2 is the lowest. That’s why the zigzag starts on the right-hand strip.
Join: With RS facing, lay both strips flat with their bottoms aligned. Attach yarn with sc in the first side-A loop of the right strip. *Ch 4, sc in next side-B loop of the left strip, ch 4, sc in next side-A loop of the right strip; repeat from * until you finish with sc in the 100th side-B loop of the left strip. Fasten off.
Join count: 200 sc (100 per strip edge) and 199 ch-4 spaces. The lowest ch-4 space links the bottoms of the two strips and the highest links their tops. You use both again in the border.
Tension: Keep every ch-4 the same size. The gap between the loop tips of neighboring strips should measure 0.75 in (1.9 cm). Lay the work flat after every 20 sc and check that neither strip is puckering. If one strip ripples, your chains are too tight on that side.
Work the joins in order: S1 to S2, then S2 to S3, and so on through S10.
Size checkpoint: Two joined strips measure 4.75 in (12.1 cm) wide (2 + 0.75 + 2 in). The full panel measures 26.75 in (67.9 cm): 10 strips x 2 in plus 9 gaps x 0.75 in.
Border
The border goes on the bottom and top edges only. The long side edges keep the outer strips’ edge loops as a light, natural trim.
Border gauge: 1 sc = 0.25 in (0.6 cm), the same width as one strip stitch.
Bottom Scallop Hem
With RS facing, work along the bottom edge from the right corner to the left corner.
Row 1: Join yarn at the bottom of S10. Sc in each of the 6 foundation chains along the base of the set-up row, then work 5 sc in the lowest ch-4 space of the next join. Continue across with 6 sc per strip and 5 sc per join space, ending with 6 sc on S1. (10 x 6 + 9 x 5 = 105 sc.)
Row 2 (scallops): Ch 1, turn, sc in first sc, sk 1 sc, 5 dc in next sc, sk 1 sc, sc in next sc; repeat from * across. (26 scallops*: 1 + 26 x 4 = 105 sts used; 130 dc and 27 sc.)
Row 3 (picots): Ch 1, turn, sc in first sc, sc in next 2 dc, (sc, ch 3, sc) in next dc, sc in next 2 dc, sc in next sc; repeat from * across. (1 + 26 x 7 = 183 sc and 26 ch-3 picots*.) Fasten off.
Why it works: Row 1 matches the panel width. Its 105 sts x 0.25 in = 26.25 in (66.7 cm) span the strip bodies and join spaces, and the outer edge loops add the last 0.5 in (1.3 cm). The scallop repeat is a multiple of 4 sts plus 1. Since 105 = 26 x 4 + 1, the scallops end evenly at both corners.
Top Band and Tabs
Row 1: With RS facing, work along the top edge. Sc in each of the 6 sts of the last row of each strip and 5 sc in the highest ch-4 space of each join. (10 x 6 + 9 x 5 = 105 sc.)
Row 2: Ch 2 (does not count as a st), turn, hdc in each st across. (105 hdc.) Fasten off.
Tabs (make 8): Count the Row 2 sts from the right. Work the tabs over sts 1–7, 15–21, 29–35, 43–49, 57–63, 71–77, 85–91 and 99–105, leaving 7 sts empty between tabs. (8 x 7 + 7 x 7 = 105.)
- Tab Row 1: Join yarn in the first st of a tab section, ch 1, sc in same st and in each of next 6 sts. (7 sc.)
- Tab Rows 2–30: Ch 1, turn, sc in each st across. (7 sc.)
Each tab measures 1.75 in (4.4 cm) wide and 6 in (15.2 cm) long. Fold it to the back and whipstitch the last row behind Row 1 of the band, over the same 7 sts. This makes a 3 in (7.6 cm) loop.
Final Blocking
- Weave in any remaining ends along the dc rows, not through the mesh.
- Lay the panel flat on mats or towels, RS up.
- Pin the top band straight at 26.75 in (67.9 cm) wide.
- Pin the hem straight at the same width, 80.5 in (204.5 cm) below the top of the strips.
- Ease each join so the gap stays at 0.75 in (1.9 cm) and the waves stay parallel.
- Pin out each scallop and open each picot.
- Mist thoroughly and leave until completely dry.
- Hang the panel for a day so the cotton settles under its own weight.
Final Quality-Control Checklist
- 10 strips, each with 6 sts per row, 200 rows plus the set-up row, and 100 loops per edge
- All strips bend in the same direction at the same height
- 9 joins, each with 200 sc and 199 ch-4 spaces
- Hem: 105 sc, 26 scallops, 26 picots
- Top band: 105 sc and 105 hdc
- 8 tabs, each 7 sts wide, evenly spaced
- Panel measures 26.75 in (67.9 cm) x 82 in (208.3 cm)
- All ends secure and hidden
Troubleshooting
Waves look flat. Check that each curve row ends with 2 sc on the short edge. Work those sc a little tighter.
Waves are too tight. Work the hdc in the curve rows slightly looser.
Strips don’t line up. One strip probably has a curve row on the wrong side. Check the loop counts against the row numbers and rip back to the error.
Mesh puckers. Your ch-4 is too tight. Rework the join with a looser chain.
Hem flares. Row 1 has extra stitches. Recount: 6 per strip and 5 per join space.
Tabs twist. Fold every tab to the back and sew it directly behind its own 7 sts.
Care
Hand wash in cool water with mild soap, press the water out in a towel, and dry flat. Re-pin the hem lightly if the scallops need refreshing.
Final Notes
Everything in this panel comes from one measurement chain. Each stitch is 0.25 in (0.6 cm), so a 6-st strip body is 1.5 in (3.8 cm), or 2 in (5.1 cm) with its loops. Ten strips and nine 0.75 in (1.9 cm) joins make 26.75 in (67.9 cm). Ten 8 in (20.3 cm) wave repeats plus the set-up row make 80.5 in (204.5 cm), and the hem and band bring the panel to 82 in (208.3 cm). Check the first strip carefully and the rest will follow.
Happy crocheting!