

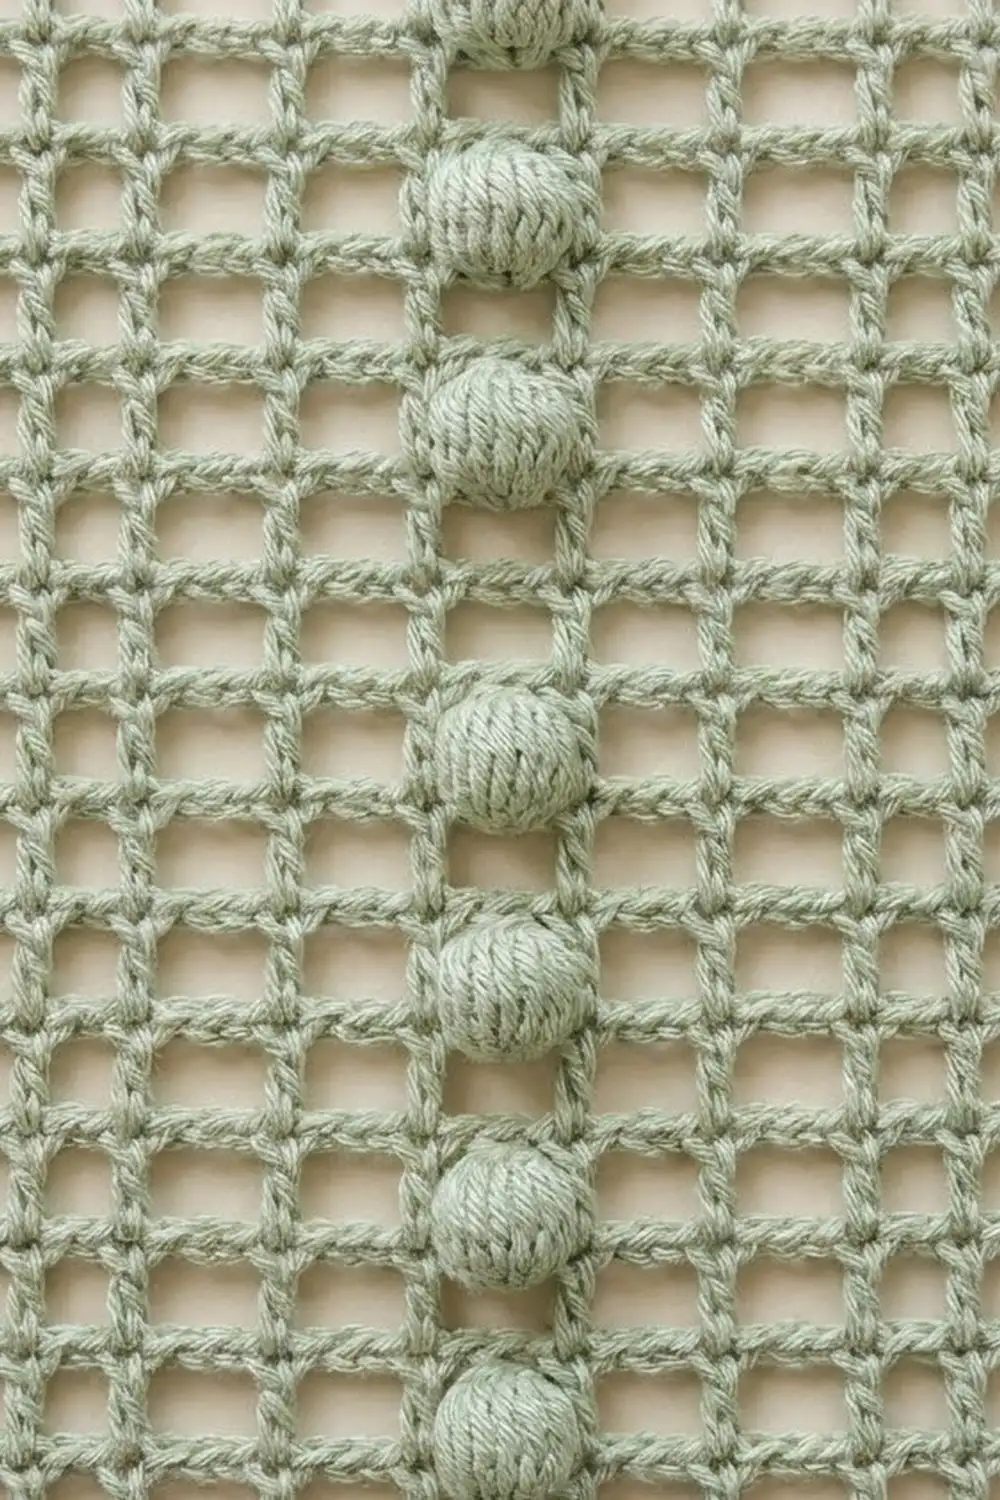
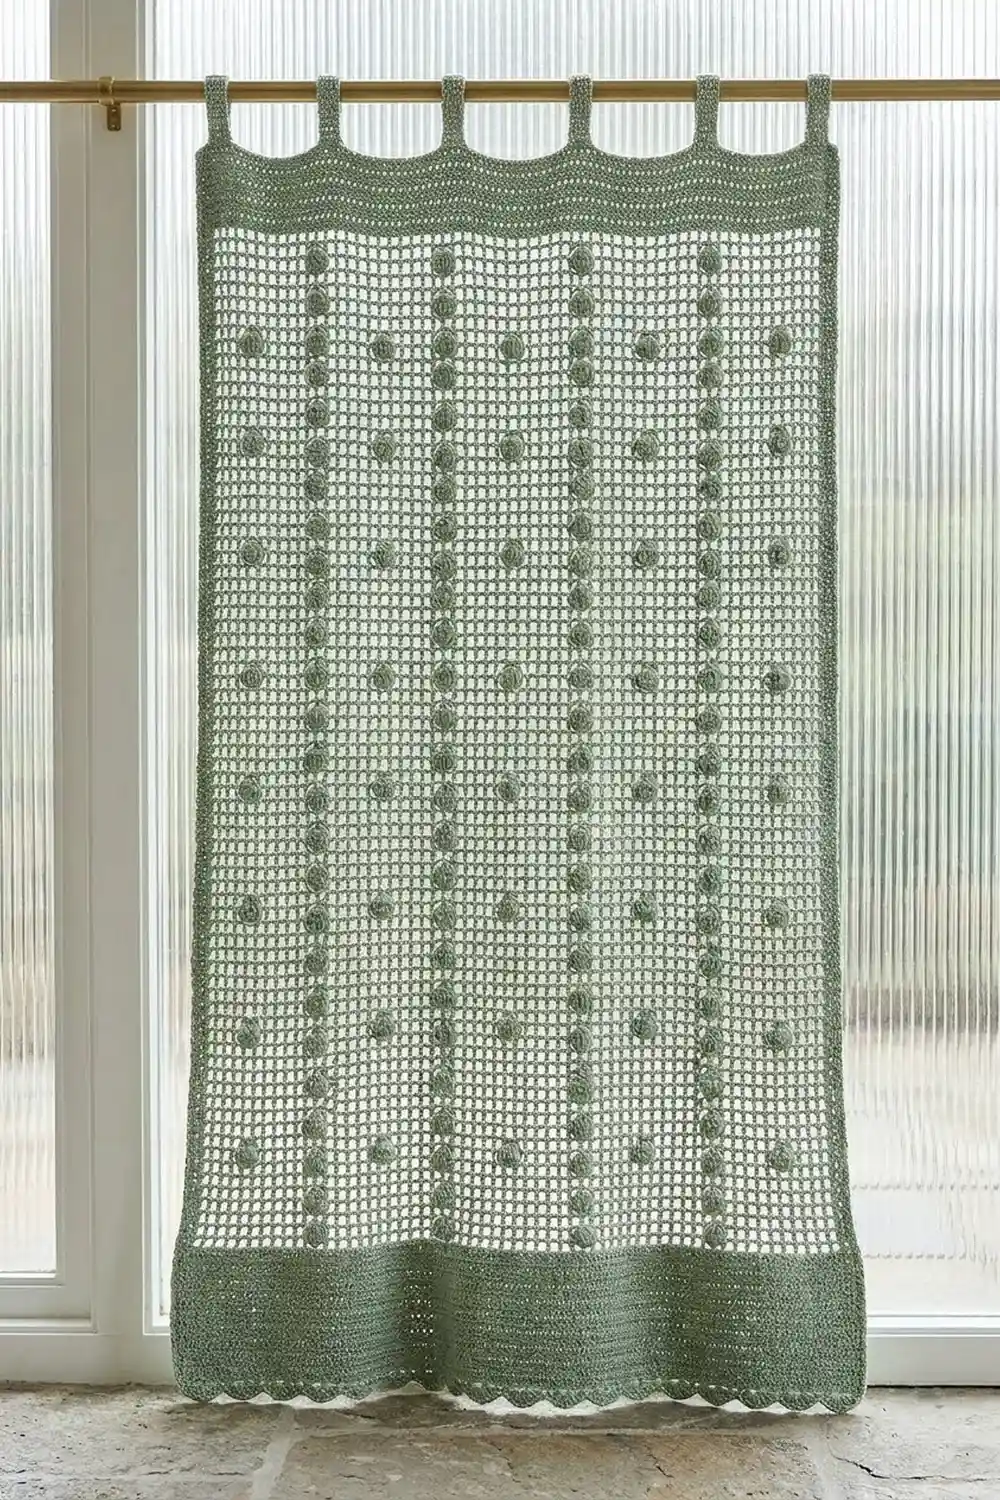
The Sage Dewdrop panel is a light, airy filet-mesh curtain with vertical columns of round bobbles running down it like drops of water on glass. Daylight comes through the open squares, and the bobbles add soft texture without blocking the view.
The panel uses one color, a calm sage-green cotton, and suits natural, spa-like rooms with stone, linen and brass. This pattern uses US crochet terms.
The finished panel measures 39½ in (100.3 cm) wide by 84¾ in (215.3 cm) long, not counting the tab loops above the top edge. The photo shows two panels hung as a pair. This pattern is for one panel, so repeat it to make a second.
You work the panel in one piece from the bottom up. You start with a solid band, then work 132 rows of filet mesh with bobble columns, then a solid top band. The tabs are worked directly off the top edge, and a single-crochet edging and a scalloped hem finish the panel. There is no sewing apart from tacking down the tab ends.
Finished Size and Construction
- Finished size (one panel): 39½ in (100.3 cm) wide × 84¾ in (215.3 cm) long, excluding the tab loops
- Skill level: Intermediate
- Terminology: US terms
- Yarn weight: Worsted (#4), cotton or cotton blend
- Hook: 5.0 mm (US H-8)
- Number of pieces: 1 per panel (the photo shows a pair: make 2)
- Layout: 52 mesh squares wide × 132 mesh rows tall, between solid bands
- Panel size before border: 39 in (99.1 cm) wide × 84 in (213.4 cm) long
- Border depth: ¼ in (0.6 cm) on each side; ¾ in (1.9 cm) at the hem
- Tabs: 7 tabs, each 3¼ in (8.3 cm) wide and worked 7 in (17.8 cm) long
Materials
Choose a smooth, mercerized or combed worsted-weight cotton. Cotton holds the square mesh crisply and hangs straight, and it doesn’t fuzz in humid rooms such as bathrooms. Acrylic will make the mesh stretchy and less square.
- Sage green, worsted cotton: about 950 g / 1,800 m (1,969 yd) per panel. For the pair shown, you need 1,900 g / 3,600 m (3,937 yd).
These quantities include a margin of about 15% for your gauge swatch and small differences in tension.
Tools:
– 5.0 mm (US H-8) crochet hook
– Tapestry needle
– Stitch markers (at least 4)
– Measuring tape at least 60 in (152.4 cm) long
– Rust-proof blocking pins and a large flat surface or blocking mats
Abbreviations (US Terms)
- ch – chain
- sc – single crochet
- hdc – half double crochet
- dc – double crochet
- sk – skip
- sp – space
- st(s) – stitch(es)
- RS / WS – right side / wrong side
Special stitch: Bobble. *Yarn over, insert hook in the indicated space, yarn over and pull up a loop, yarn over and draw through 2 loops; repeat from * 4 more times (6 loops on hook). Yarn over and draw through all 6 loops. A bobble counts as 1 stitch.
Mesh square: ch 2, sk 2 sts (or the ch-2 sp), dc in next dc.
Bobble square: ch 1, bobble in next ch-2 sp, dc in next dc. The ch-1 and the bobble together take the place of the ch-2, so every square is always 3 stitches wide.
Gauge and Checkpoints
Mesh gauge: 4 mesh squares = 3 in (7.6 cm) wide, and 5 dc rows = 3 in (7.6 cm) tall. Each square is ¾ in (1.9 cm) wide and each row is 0.6 in (1.5 cm) tall. That works out to 4 sts per inch.
Single-crochet gauge (tabs): 9 sc rows = about 2 in (5.1 cm).
Test swatch first. Ch 33. Work Row 1 as dc in the 4th ch from the hook and in each ch across (31 sts). Then work 10 mesh rows of 10 squares each, with a bobble square in square 5 of mesh row 4.
Block the swatch. It should measure 7½ in (19.1 cm) wide, and the 10 mesh rows should measure 6 in (15.2 cm) tall. Check that the bobble sits flat inside its square without pulling it narrow.
- Too big: go down to a 4.5 mm hook.
- Too small: go up to a 5.5 mm hook.
- Width correct but rows too tall: pull up a slightly shorter loop on each dc.
Checkpoints on the panel:
1. After Row 3: 39 in (99.1 cm) wide and 1.8 in (4.6 cm) tall.
2. After Row 23 (20 mesh rows): 13.8 in (35.1 cm) tall in total.
3. After Row 135 (all mesh rows): 81 in (205.7 cm) tall.
4. After Row 140: 84 in (213.4 cm) tall, and still 39 in (99.1 cm) wide.
Measure flat and unstretched. Never measure while the panel hangs from your lap.
Bottom Band
Ch 159.
Row 1 (WS): Dc in the 4th ch from the hook (the skipped ch counts as the first dc) and in each ch across. Turn. (157 sts)
Rows 2–3: Ch 3 (counts as dc), dc in each st across, with the last dc in the top of the turning ch. Turn. (157 sts)
From here on, odd rows are WS rows. All bobbles are worked on WS rows, so they pop out toward the RS.
Mesh Body with Bobble Columns
The bobble columns sit in squares 7, 20, 33 and 46. These positions are symmetrical, so they line up the same way whichever direction you are working. Every column has 12 plain squares between it and the next.
Row 4 (RS), first mesh row: Ch 5 (counts as dc + ch 2), sk next 2 sts, dc in next st. Ch 2, sk 2 sts, dc in next st; repeat from * to the end, with the last dc in the top of the turning ch. Turn. (52 squares; 53 dc + 104 ch = 157 sts)
Plain mesh row: Ch 5 (counts as dc + ch 2), dc in next dc. Ch 2, dc in next dc; repeat from * to the end, with the last dc in the 3rd ch of the turning ch-5. Turn. (52 squares; 157 sts)
Bobble row: Work these squares in order:
– Ch 5, dc in next dc (square 1)
– [Ch 2, dc in next dc] 5 times (squares 2–6)
– Bobble square (square 7)
– [Ch 2, dc in next dc] 12 times (squares 8–19)
– Bobble square (square 20)
– [Ch 2, dc in next dc] 12 times (squares 21–32)
– Bobble square (square 33)
– [Ch 2, dc in next dc] 12 times (squares 34–45)
– Bobble square (square 46)
– [Ch 2, dc in next dc] 6 times (squares 47–52), with the last dc in the 3rd ch of the turning ch-5
Turn. (52 squares; 49 ch-2 squares + 4 bobble squares… see count below)
That is 1 + 5 + 1 + 12 + 1 + 12 + 1 + 12 + 1 + 6 = 52 squares. The row has 53 dc, 4 bobbles, 4 ch-1 and 48 ch-2 (96 ch), for a total of 157 sts.
On the row after a bobble row, work a plain mesh row. Over each bobble square, ch 2, skip the bobble and its ch-1, and dc in the next dc. The square count does not change.
Row sequence (overall row numbers):
– Rows 5–6: plain mesh rows (mesh rows 2–3)
– Row 7 (WS): bobble row (mesh row 4)
– Rows 8–10: plain mesh rows
– Rows 11–134: repeat the 4-row set of Rows 7–10 another 31 times. Bobble rows fall on Rows 7, 11, 15 and so on, up to Row 131.
– Row 135: plain mesh row (mesh row 132)
The panel now has 32 bobble rows of 4 bobbles each, for 128 bobbles in total. Each column has 3 plain squares between bobbles, and there are 3 plain rows below the first bobble and 4 plain rows above the last one.
Top Band
Row 136 (RS), conversion row: Ch 3 (counts as dc). 2 dc in next ch-2 sp, dc in next dc; repeat from * to the end, with the last dc in the 3rd ch of the turning ch. Turn.
Count: 53 dc worked into posts (1 per existing dc, including the turning ch) + 104 dc worked into the 52 spaces (2 per space) = 157 sts.
Rows 137–140: Ch 3 (counts as dc), dc in each st across. Turn. (157 sts)
The top band is 5 rows, or 3 in (7.6 cm), deep. Do not fasten off.
Tabs
The tabs are worked directly off Row 140, using the same tension as before. Each tab is 13 sts wide, and there are 11 sts between tabs:
7 tabs × 13 sts + 6 gaps × 11 sts = 91 + 66 = 157 sts ✓
Tab 1: Ch 1, sc in each of the first 13 sts. Turn. Work 31 more rows of 13 sc (32 rows in total, about 7 in / 17.8 cm). Fasten off, leaving a 16 in (40.6 cm) tail.
Tabs 2–7: Skip 11 sts of Row 140 and join yarn in the next st. Work the next 13 sts exactly like Tab 1.
Finishing the tabs: Fold each tab to the WS. Lay the last 2 in (5.1 cm) of the tab flat over Rows 137–140, matching its edges to the tab’s base stitches. Whipstitch the end and both sides through the back loops of the band only.
The finished loop stands about 2¼ in (5.7 cm) above the top edge. That fits rods up to 1¼ in (3.2 cm) in diameter.
Border
The border is worked along the two sides and the hem only. The top is already finished by the band and tabs.
Side gauge: each dc row is 0.6 in (1.5 cm) tall. 5 sc span about 0.6 in per 2 rows, which matches the 4-sts-per-inch fabric, so alternating 2 sc and 3 sc per row-end keeps the edge flat.
Row 1 (RS): With the RS facing, join yarn at the top corner of one side edge (the end of Row 140).
– Down the side: work 2 sc in the first row-end and 3 sc in the next row-end. Repeat across all 140 rows: 70 pairs × 5 = 350 sc.
– First corner: work 3 sc in the base of the first foundation st. The center sc of the 3 is the corner st.
– Across the bottom: sc in the base of each of the next 155 foundation sts.
– Second corner: work 3 sc in the base of the last foundation st.
– Up the other side: work 350 sc to the top.
Fasten off. Total: 350 + 3 + 155 + 3 + 350 = 861 sts.
Counts per side (each corner st counted once):
– Each side: 350 sc + 1 corner = 351
– Hem: 1 corner + 1 + 155 + 1 + 1 corner = 159
Row 2 (RS), scalloped hem: With the RS facing, join yarn in the first hem corner st.
– Sc in the corner st, then sc in the next st.
– Sk 1 st, 3 hdc in the next st, sk 1 st, sc in the next st; repeat from * 38 more times (39 scallops).
– Sc in the second corner st.
Fasten off.
Count: 1 + 157 + 1 = 159 sts (42 sc + 117 hdc).
Why the math works: there are exactly 157 sts between the two corner sts. Each scallop uses 4 sts, so 1 + (39 × 4) = 157, and the hem begins and ends with an sc. At 4 sts per inch, that gives one scallop per inch across the 39 in (99.1 cm) hem.
The sc edging adds ¼ in (0.6 cm) to each side, so the panel becomes 39½ in (100.3 cm) wide. The hem adds ¾ in (1.9 cm), so it becomes 84¾ in (215.3 cm) long.
Final Blocking
- Weave in all ends along dc posts, not across open spaces. Split the plies as you go so the ends don’t show against the light.
- Soak the panel in cool water with a little wool or cotton wash for 15 minutes.
- Press out the water without wringing. Roll the panel in towels and press firmly.
- Lay it flat, RS up, on mats or a clean sheet.
- Pin the sides straight to 39½ in (100.3 cm) apart. Check the width at the top, the middle and the hem.
- Ease the length to 84¾ in (215.3 cm). Don’t stretch it longer, because cotton mesh relaxes by up to about 1 in (2.5 cm) when it hangs.
- Run your fingers along each mesh row to square the openings, and pin each scallop point.
- Fluff each bobble outward from the WS.
- Let the panel dry completely before you unpin it, usually 24–48 hours.
Final Quality-Control Checklist
- 52 squares in every mesh row, and 157 sts in every solid row
- 4 bobble columns in squares 7, 20, 33 and 46, in straight vertical lines
- 32 bobbles per column, 128 per panel, all popping to the RS
- Top band of 5 solid rows; bottom band of 3 solid rows
- 7 tabs, each 13 sts wide, with 11-st gaps, evenly sewn down
- 351 sts on each side (including the corner) and 159 sts on the hem
- 39 scallops with flat, unruffled points
- Blocked size: 39½ in (100.3 cm) × 84¾ in (215.3 cm)
Troubleshooting
Mesh slants or squares look like rectangles. Your dc is too tall compared with the chains. Pull up shorter loops, or use ch 2 with slightly firmer chains.
Bobble columns drift sideways. You probably miscounted squares on the return row. Place markers on the dc posts to the right of squares 7, 20, 33 and 46, and move them up every few rows.
Bobbles sink to the back. You worked them on an RS row. Bobbles belong on odd-numbered (WS) rows only.
Side edges wave. You have too many sc. Change to 2 sc in every row-end.
Side edges pull inward. You have too few sc. Check that you are alternating 2 sc and 3 sc.
Hem flares. Your hdc shells are too loose. Work the scallops with a 4.5 mm hook.
Panel grows too long when hung. Cotton mesh drops slightly. Remove 2 plain mesh rows at the next repeat if your blocked rows measure taller than 0.6 in (1.5 cm).
Care
Hand wash or machine wash cold on a delicate cycle inside a large mesh bag, then reshape and dry flat. Press lightly with a warm iron through a cloth if needed, but never press the bobbles flat.
Final Notes
The measurement chain is simple. Each square is ¾ in (1.9 cm) wide, so 52 squares give 39 in (99.1 cm) of width. The ¼ in (0.6 cm) side edging brings that to 39½ in (100.3 cm).
Each row is 0.6 in (1.5 cm) tall. The 3-row bottom band, 132 mesh rows and 5-row top band give 84 in (213.4 cm), and the ¾ in (1.9 cm) scalloped hem completes the 84¾ in (215.3 cm) length.
If your swatch hits gauge, every stitch count in this pattern will land where it should. Make a second panel the same way for a matching pair.
Happy crocheting!