

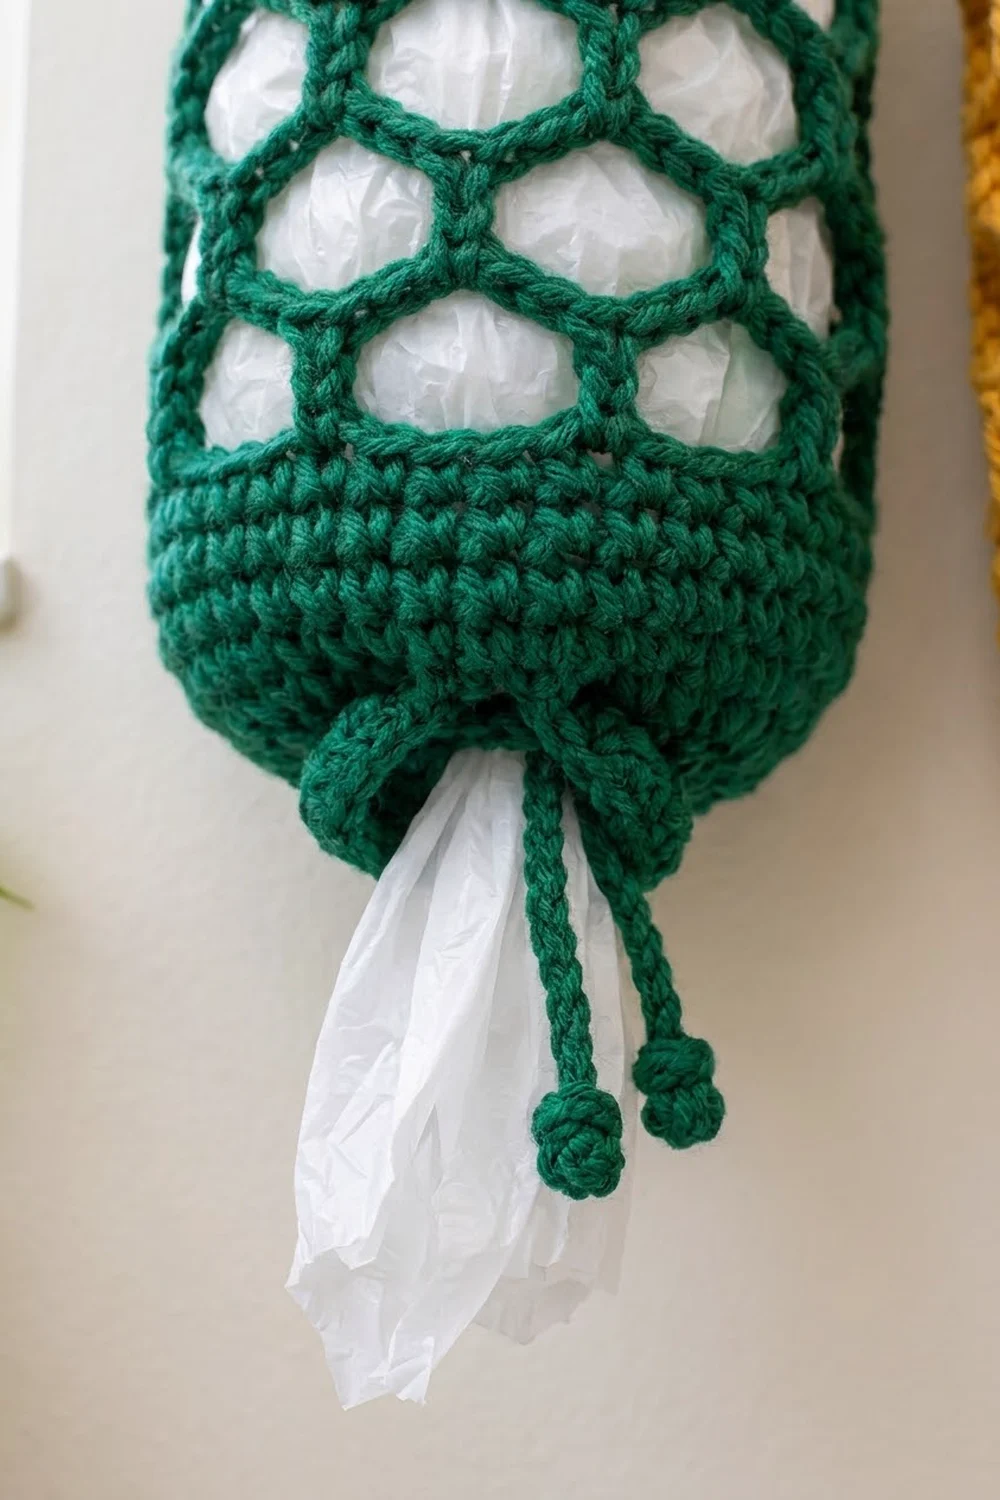
The Honeycomb Hive Grocery Bag Holder is a tall, open-mesh tube that hangs on a hook and keeps plastic bags corralled and easy to grab. A solid single crochet band frames each end, and the body between them is an airy honeycomb net. The white bags show through the open cells, which gives the holder its look.
The sample is shown in two colorways, deep forest green and warm mustard yellow, one holder in each color. Both are worked in a chunky cotton cord that gives the chain mesh bold, rope-like lines. The style is simple, practical, and modern, and it suits a farmhouse or plant-filled kitchen.
This pattern uses US crochet terms. The finished holder measures about 16.3 in (41.4 cm) tall, not counting the hanging loop, and 8 in (20.3 cm) wide when flat, with a circumference of 16 in (40.6 cm).
Construction is one continuous piece worked in joined rounds. You start at the top rim with a solid band, work 12 rounds of chain-loop mesh, and finish with a slightly tapered bottom band that has an eyelet round. A chain drawstring threads through the eyelets and a crocheted strap is added at the rim for hanging. You stuff bags in at the top and pull them out through the gathered bottom opening.
Finished Size and Construction
- Finished size: 16.3 in (41.4 cm) tall x 8 in (20.3 cm) wide when flat
- Hanging loop: stands about 4 in (10.2 cm) above the rim
- Skill level: Easy
- Terminology: US crochet terms
- Yarn weight: Bulky (#5) cotton or cotton-blend cord
- Hook: 6.0 mm (US J-10)
- Number of pieces: 1 tube per holder, plus a chain drawstring and a strap attached to it
- Layout: Single vertical tube, worked top to bottom in joined rounds
- Piece size: 16 in (40.6 cm) circumference at the top band and mesh
- Size before border: 2 in (5.1 cm) top band + 12 in (30.5 cm) mesh = 14 in (35.6 cm)
- Border depth: bottom band 2.3 in (5.8 cm), tapering to a 14 in (35.6 cm) circumference
Materials
Choose a smooth bulky cotton or cotton-blend cord with roughly 140 m (153 yd) per 100 g. Cotton holds the mesh shape well and doesn’t stretch out much when the holder is full of bags. A bit of polyester in the blend makes it lighter and less likely to sag.
Yarn, per holder (pick one color):
- Color A, Forest Green: 100 g, about 140 m (153 yd)
- Color B, Mustard Yellow: 100 g, about 140 m (153 yd)
To make the matching pair shown, buy 100 g of each color. These quantities include a margin of about 15% for your gauge swatch and tension differences.
Tools:
- 6.0 mm (US J-10) crochet hook
- 1 stitch marker
- Tapestry needle with a large eye
- Scissors
- Measuring tape
- Spray bottle and pins for blocking
- A wall hook or adhesive hook for hanging
Abbreviations (US Terms)
- ch – chain
- sc – single crochet
- sl st – slip stitch
- sk – skip
- st(s) – stitch(es)
- sp – space
- sc2tog – single crochet 2 together
- rnd(s) – round(s)
- rep – repeat
Special stitch, ch-5 loop: Chain 5 loosely. In the mesh, every sc goes into the center (3rd chain) of a ch-5 loop from the round below. This is what pulls the loops into the stacked, hexagon-like honeycomb cells.
sc2tog: Insert hook in next st, yarn over and pull up a loop, insert hook in following st, yarn over and pull up a loop, yarn over and pull through all 3 loops on hook.
Gauge and Checkpoints
Solid gauge: 12 sc x 12 rnds = 4 in (10.2 cm) in sc worked in the round.
Mesh gauge: 12 ch-5 loops around a 16 in (40.6 cm) tube; each mesh round adds about 1 in (2.5 cm) of height when the holder hangs.
Because this is a single piece, the top band is your test piece. Work the foundation and Rnds 1 to 6, then lay the tube flat and measure before going on.
Checkpoints:
- After Rnd 6 (top band): 8 in (20.3 cm) wide flat and 2 in (5.1 cm) tall.
- After Mesh Rnd 6: about 8 in (20.3 cm) total height when held up and lightly stretched.
- After Mesh Rnd 12: about 14 in (35.6 cm) total height.
- After the bottom band: 16.3 in (41.4 cm) total, with the bottom edge 7 in (17.8 cm) wide flat.
If your band is too wide, more than 8.5 in (21.6 cm) flat, go down to a 5.5 mm (US I-9) hook. If it is too narrow, under 7.5 in (19.1 cm), go up to a 6.5 mm (US K-10.5) hook. Keep the 48-stitch count. The mesh repeat depends on it.
Pattern: Top Band
Work in joined rounds with the right side facing you throughout. Do not turn.
Foundation: Ch 48. Make sure the chain isn’t twisted, then sl st in the first ch to form a ring. The ring should measure about 16 in (40.6 cm) around.
Rnd 1: Ch 1 (does not count as a st), sc in the same ch as the join and in each ch around, sl st in first sc to join. (48 sc)
Rnds 2–6: Ch 1, sc in each st around, sl st in first sc to join. (48 sc)
Place a marker in the first st of Rnd 6. This is the back center of the holder, and the strap will go here later.
Checkpoint: the band measures 8 in (20.3 cm) wide flat and 2 in (5.1 cm) tall.
Pattern: Honeycomb Mesh Body
Mesh Rnd 1 (conversion round): Ch 1, sc in first st, ch 5, sk 3 sts, sc in next st; rep from * 10 more times, ch 5, sk last 3 sts, sl st in first sc to join. (12 sc + 12 ch-5 loops)
Check the math: each repeat uses 4 band stitches (1 sc plus 3 skipped), and 12 x 4 = 48. The loops sit evenly all the way around.
Mesh Rnd 2: Sl st in each of the first 3 ch of the next loop, which puts you at the loop’s center. Ch 1, sc in the same loop, ch 5, sc in next ch-5 loop; rep from * 10 more times, ch 5, sl st in first sc to join. (12 sc + 12 ch-5 loops)
Mesh Rnds 3–12: Rep Mesh Rnd 2. (12 sc + 12 ch-5 loops in each round)
Because each sc goes into the center of a loop below, each new round shifts half a cell over. That shift creates the offset honeycomb pattern. Keep the chains loose and even. Tight chains pucker the mesh and shorten the holder.
Checkpoint after Mesh Rnd 6: about 8 in (20.3 cm) total height. Checkpoint after Mesh Rnd 12: about 14 in (35.6 cm) total height.
End Mesh Rnd 12 with the sl st into the first sc. Do not fasten off.
Border: Bottom Band and Drawstring Channel
The bottom band works as the holder’s border. It closes the mesh, tapers the bottom slightly, and holds the eyelets for the drawstring.
Border gauge: 12 sc = 4 in (10.2 cm), the same as the top band. Since a tube has no corners, each count below is the full count for the round.
Rnd B1 (conversion round): Ch 1, sc in first sc, 3 sc in next ch-5 loop, sc in next sc, 3 sc in next ch-5 loop; rep from * around, sl st in first sc to join. 12 sc (one in each mesh sc) + 36 sc (3 in each of 12 loops) = 48 sc.
Rnd B2: Ch 1, sc in each st around, join. (48 sc)
Rnd B3 (decrease): Ch 1, sc in next 6 sts, sc2tog; rep from * 5 more times, join. (42 sc)
Rnd B4: Ch 1, sc in each st around, join. (42 sc)
Rnd B5 (eyelets): Ch 1, sc in next 5 sts, ch 2, sk 2 sts; rep from * 5 more times, join. (30 sc + 6 ch-2 sps)
Rnd B6: Ch 1, sc in each sc and 2 sc in each ch-2 sp around, join. 30 sc + 12 sc (2 in each of 6 sps) = 42 sc.
Rnd B7: Ch 1, sc in each st around, join. (42 sc) Fasten off and weave in the end.
Why the math works: Mesh Rnd 1 used 48 stitches to make 12 loops. Rnd B1 rebuilds exactly 48 by putting 1 sc into each of the 12 sc and 3 into each of the 12 loops, so the bottom matches the top at 16 in (40.6 cm) around. Rnd B3 takes away 6 stitches, one per 8-stitch repeat (6 x 8 = 48), leaving 42. That’s 14 in (35.6 cm) around, or 7 in (17.8 cm) flat, which gives the gentle taper. In Rnd B5, 6 repeats of 7 stitches use all 42 (6 x 7 = 42), and Rnd B6 puts the 12 skipped stitches back, 2 per eyelet.
Hanging Strap
With the top rim facing you, join yarn with a sl st in the marked st (the first st of Rnd 6).
Strap: Ch 24, about 8 in (20.3 cm). Sk the next 3 sts of the rim and sl st in the 4th st. Turn. Sc in each ch across (24 sc), then sl st in the marked st. Fasten off and weave the ends firmly into the band.
The strap folds into a loop that stands about 4 in (10.2 cm) above the rim. Because both ends are anchored in the solid band, it carries the weight of a full holder without pulling the mesh.
Drawstring
Ch 90, about 30 in (76.2 cm). Fasten off. Tie a double overhand knot in each end so the knots look like small beads, and trim the tails to 0.25 in (0.6 cm).
Starting at the center front, weave the cord in and out through the 6 eyelets of Rnd B5 so both ends come out at the front, next to each other. Pull until the bottom opening is about 1.5 in (3.8 cm) across. That’s tight enough to hold the bags in but loose enough for one bag to slide out. Tie a single bow or a loose knot, and leave about 3 in (7.6 cm) of each end hanging.
Final Blocking
- Lightly spritz the whole holder with water until it’s damp, not dripping.
- Slide a rolled towel or a tall bottle inside, about 5 in (12.7 cm) across, to open up the tube.
- Gently pull the mesh lengthwise until it measures 12 in (30.5 cm) between the bands.
- Nudge each ch-5 loop with your fingers so the cells sit evenly and the sc points line up in offset columns.
- Flatten the top band so the rim is level, and pin the strap straight up.
- Let it dry completely, then measure: 16.3 in (41.4 cm) tall and 8 in (20.3 cm) wide flat at the top.
Final Quality-Control Checklist
- Top band and Mesh Rnd 1 count exactly 48 stitches.
- Every mesh round has 12 sc and 12 ch-5 loops.
- The honeycomb cells are offset by half a cell each round, with no twisted or doubled loops.
- Rnds B1 and B2 have 48 sc, and Rnds B3, B4, B6, and B7 have 42 sc.
- Rnd B5 has 6 evenly spaced eyelets.
- The strap is anchored 4 stitches apart in the solid band.
- Both drawstring ends exit at the front, and both have knotted ends.
- All tails are woven into the solid bands, not the mesh.
- The holder measures 16.3 in (41.4 cm) tall.
Troubleshooting
The mesh looks short and squished. Your chains are too tight. Rework with looser chains, or chain 6 instead of 5, keeping 12 loops per round.
The cells drift into a spiral. You probably missed the 3 sl sts at the start of a round, or you joined into the wrong sc. Always start each round from the center of the first loop.
The bottom band ruffles. Use 3 sc per loop in Rnd B1, not 4. If it still ruffles, go down a hook size for the bottom band only.
The bags fall out the bottom. Pull the drawstring tighter, or add a second knot. A 1.5 in (3.8 cm) opening works for most thin grocery bags.
The strap stretches. Go down one hook size for the strap, or work a second row of sc along the other side of the chain.
Care
Hand wash in cool water with mild soap, press out the water in a towel, and dry flat with a bottle inside to keep the shape. Avoid the dryer, which can shrink cotton and distort the mesh.

Final Notes
The measurement chain is simple. A 48-stitch band measures 16 in (40.6 cm) around and 2 in (5.1 cm) tall. Those 48 stitches divide into 12 ch-5 loops. Twelve mesh rounds add 12 in (30.5 cm). A 48-stitch conversion round leads into a band tapering to 42 stitches, which adds 2.3 in (5.8 cm), for a total of 16.3 in (41.4 cm). If your band is right, everything that follows will be right too. Make one in forest green, one in mustard yellow, and hang them side by side.
Happy crocheting!