

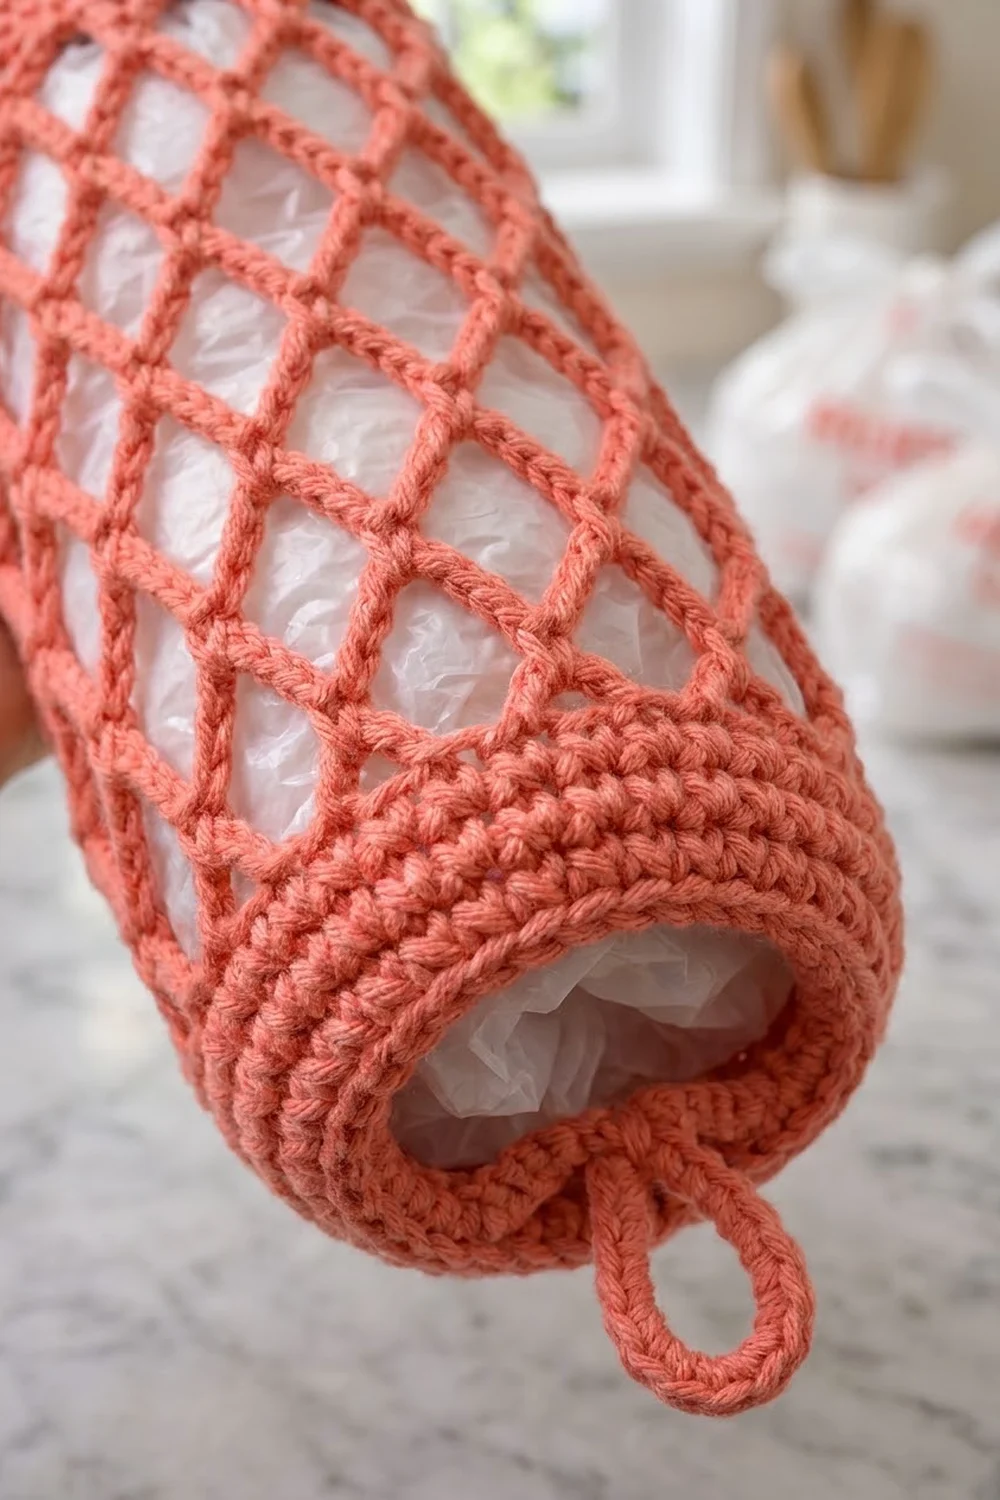
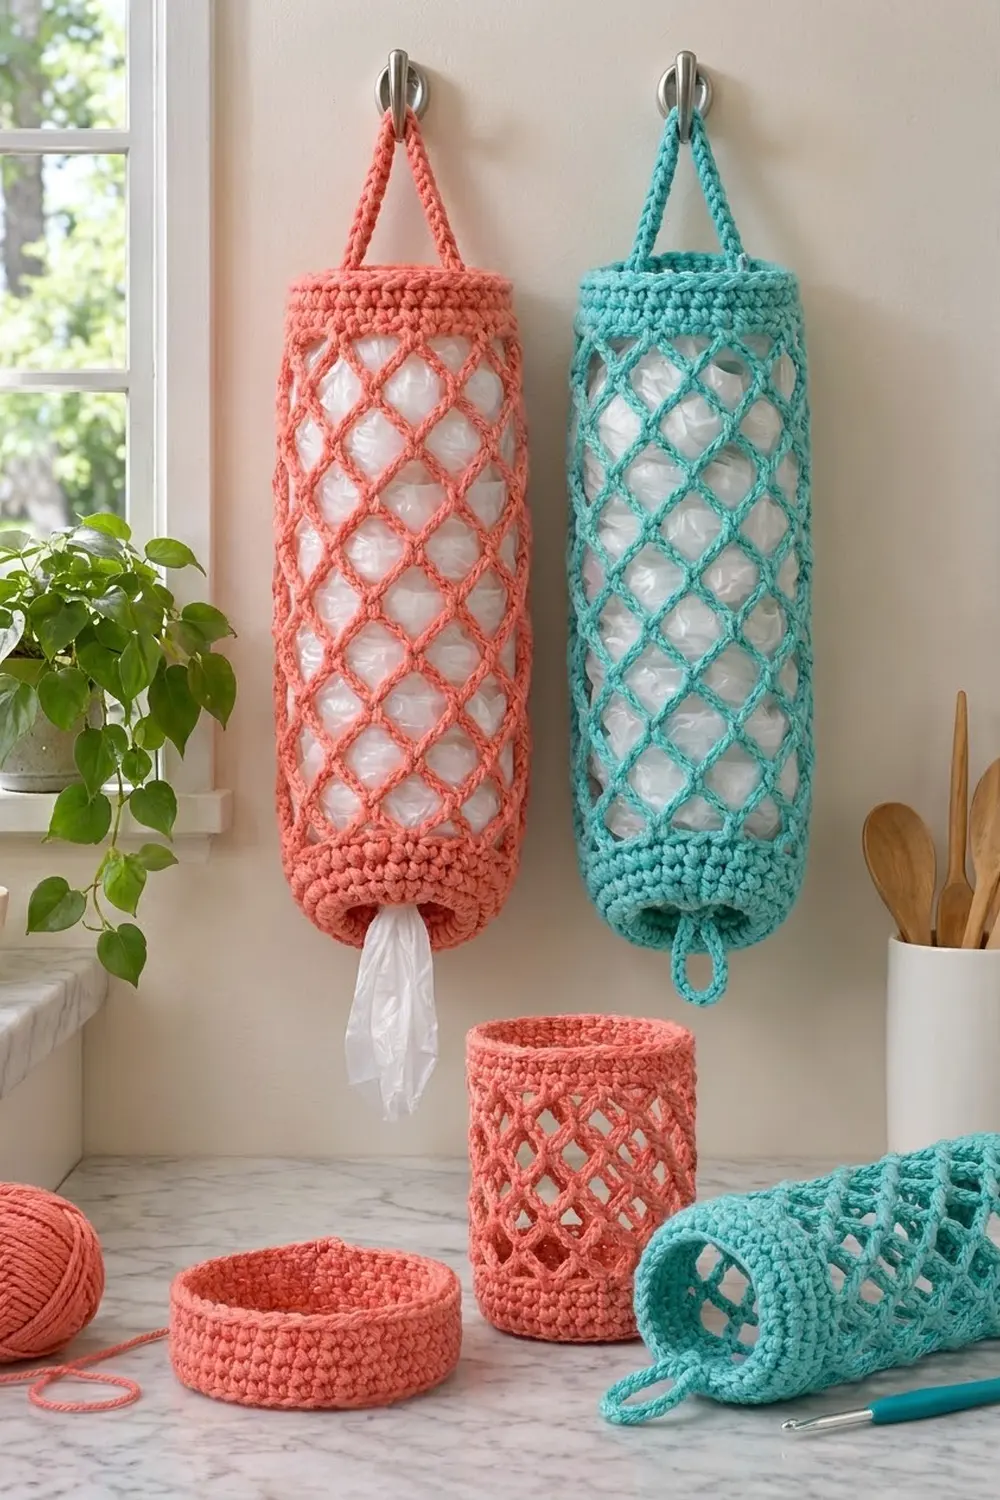
This plastic bag holder is a tall, airy tube with a diamond lattice body and solid bands at each end. Grocery bags go in through the top, and you pull them out one at a time through a narrow opening at the bottom. A crocheted strap hangs it from a wall hook or cabinet knob, and a small loop at the bottom gives you something to grab.
The samples are worked in a soft coral and a bright turquoise. Each holder uses one color from start to finish, so the lattice stands out clearly and the bags inside show through as a soft white fill. The look is clean and a little retro, and it suits a sunny kitchen or laundry room.
The pattern uses US crochet terms. The finished holder is a tube 16 in (40.6 cm) around and about 17 in (43.2 cm) long, and the strap adds about 4 in (10.2 cm). Laid flat, it measures 8 in (20.3 cm) wide.
The holder is one seamless piece worked from the bottom up in joined rounds. You start with a small chain ring for the dispensing opening and increase out to a flat ledge. Then you work a short solid wall, 20 rounds of chain mesh, a solid top band, a strap, and the bottom loop. There are no seams to sew. The photos show two holders, but they are two separate copies of the same pattern in two colors, not one joined piece.
Finished Size and Construction
- Finished size: 16 in (40.6 cm) around; 8 in (20.3 cm) wide laid flat; about 17 in (43.2 cm) long without the strap
- Skill level: Easy
- Terminology: US crochet terms
- Yarn weight: Bulky (#5), cotton or cotton blend
- Hook: 6 mm (US J-10)
- Number of pieces: 1 (one seamless tube)
- Layout: worked in the round, bottom to top
- Piece size: 48 stitches around at full width
- Size before top band: 14 in (35.6 cm) of wall above the bottom ledge
- Top band depth: 2 in (5.1 cm)
Materials
Choose a smooth, round bulky yarn with good stitch definition. Cotton or a cotton-acrylic blend works best because it holds the mesh open and doesn’t stretch much under the weight of the bags. Avoid fuzzy or loosely plied yarn, which blurs the diamonds.
- Color A (one holder), coral or turquoise: about 250 g / 250 m (273 yd)
- Optional second color: another 250 g / 250 m (273 yd) if you want a matching holder in a second shade, as in the photos
These amounts include a margin of about 15 percent over what the sample used. That leaves room for a gauge swatch and a little extra strap length.
Tools:
- 6 mm (US J-10) crochet hook
- 1 locking stitch marker
- Tapestry needle
- Scissors
- Tape measure
- Rolled towel or a clean 2-liter bottle for blocking
Abbreviations (US Terms)
- ch: chain
- sl st: slip stitch
- sc: single crochet
- dc: double crochet
- inc: 2 sc in the same stitch
- sk: skip
- st(s): stitch(es)
- rnd(s): round(s)
- ch-5 loop: the space under a chain of 5
Special stitch – mesh closer: At the end of each middle mesh round, ch 2, then dc in the first sc of the round. The ch 2 plus the dc stand in for one ch-5 loop and leave your hook at the center of that loop. You can then start the next round without slip-stitching across.
Gauge and Checkpoints
Gauge in sc: 12 sts and 12 rnds = 4 in (10.2 cm).
Mesh gauge: 5 mesh rnds = 3 in (7.6 cm), measured lightly stretched lengthwise.
Test the base of the holder before you go further. Work Rnds 1 to 10 and lay the tube flat. It should measure 8 in (20.3 cm) across. If it does, the rest of the pattern will come out at the right size.
Checkpoints:
- After Rnd 1: the opening measures 10 in (25.4 cm) around, about 3.2 in (8.1 cm) across.
- After Rnd 4: a flat ring with an outer diameter of about 5.1 in (13.0 cm).
- After Rnd 10: a straight wall 2 in (5.1 cm) tall above the ledge, 8 in (20.3 cm) wide flat.
- After Rnd 20: 6 in (15.2 cm) of mesh.
- After Rnd 30: 12 in (30.5 cm) of mesh; 14 in (35.6 cm) of wall in total.
- After Rnd 36: 16 in (40.6 cm) of wall.
If your base is too big (wider than 8.25 in / 21.0 cm flat), go down to a 5.5 mm hook. If it is too small (narrower than 7.75 in / 19.7 cm flat), go up to a 6.5 mm hook. Don’t change the stitch counts, because the mesh depends on 48 stitches.
Pattern
Work in joined rounds with the right side facing you throughout. The ch 1 at the start of a round doesn’t count as a stitch. Place your marker in the first stitch of each round and move it up as you go.
Bottom Opening and Ledge
Foundation: Ch 30, sl st in the first ch to form a ring. Check that the chain isn’t twisted.
Rnd 1: Ch 1, sc in each ch around, sl st in first sc to join. (30 sc)
Rnd 2: Ch 1, *sc in next 4 sts, inc in next st; rep from * 6 times total, join. (36 sc)
Rnd 3: Ch 1, *sc in next 5 sts, inc in next st; rep from * 6 times total, join. (42 sc)
Rnd 4: Ch 1, *sc in next 6 sts, inc in next st; rep from * 6 times total, join. (48 sc)
These four rounds lie flat and form a ledge about 1 in (2.5 cm) deep that curls inward around the opening. The ledge holds the bags in and lets you pull them out one at a time.
Solid Bottom Wall
Rnds 5 to 10: Ch 1, sc in each st around, join. (48 sc)
The work now turns upward into a straight tube. After Rnd 10, the wall stands 2 in (5.1 cm) tall above the ledge.
Diamond Mesh Body
Rnd 11 (first mesh rnd): Ch 1, sc in first st, *ch 5, sk next 2 sts, sc in next st; rep from * 14 more times, ch 2, sk last 2 sts, dc in first sc. (16 loops: 15 ch-5 loops plus 1 closing loop)
Check: 48 sts divided by 3 sts per repeat = 16 repeats, so the loops are evenly spaced with no stitches left over.
Rnds 12 to 29: Ch 1, sc in the loop just made (around the dc post), *ch 5, sc in next ch-5 loop; rep from * 14 more times, ch 2, dc in first sc. (16 loops each rnd)
Each sc lands in the center of a loop from the round below, which builds the offset diamond lattice.
Rnd 30 (last mesh rnd): Ch 1, sc in the loop just made, *ch 5, sc in next ch-5 loop; rep from * 14 more times, ch 5, sl st in first sc. (16 full ch-5 loops)
This round ends with a full ch 5 and a sl st instead of the mesh closer, so every loop is complete before the band begins. You now have 20 mesh rounds, about 12 in (30.5 cm).
Top Band
Rnd 31 (conversion rnd): Ch 1, *sc in next sc, 2 sc in next ch-5 loop; rep from * 16 times total, join. (16 sc worked 1 per existing sc + 32 sc added in the loops = 48 sc)
Rnds 32 to 36: Ch 1, sc in each st around, join. (48 sc)
The top band is 6 rnds deep, 2 in (5.1 cm). Don’t fasten off, because the strap starts here.
Border: Hanging Strap and Bottom Loop
On a tube, the border is the finishing that turns the body into a usable holder: the strap at the top and the pull loop at the bottom.
Border gauge: the strap uses the same sc gauge, 12 sts = 4 in (10.2 cm). Thirty stitches make 10 in (25.4 cm) of strap.
When the tube is laid flat, each side of the top band holds 24 sts (48 divided by 2). The strap is anchored at the two folds, so it sits centered over the opening.
Strap Row 1: Ch 30, sk next 23 sts of Rnd 36, sl st in next st. Turn. Sc in each ch back across. (30 sc) Sl st in the st where the strap began.
Strap Row 2: Turn, sc in each sc across. (30 sc) Sl st in the anchor st on the opposite side. Fasten off and weave in the end.
Why the math works: skipping 23 sts and slip-stitching into the next one puts the second anchor exactly 24 sts from the first, which is half of 48. The strap therefore spans the tube from one fold to the other. It is 2 rows wide, about 0.75 in (1.9 cm), and rises about 4 in (10.2 cm) above the rim when hung.
Bottom Loop: Turn the holder upside down. Join yarn with a sl st in the foundation chain directly below one strap anchor. Ch 10, sl st in the same st. Ch 1, work 16 sc into the ch-10 space, sl st in the first sc. Fasten off.
The ch 10 is about 3.3 in (8.4 cm) long and forms a loop that hangs about 1.5 in (3.8 cm) below the opening. The 16 sc pack the loop firmly so it stays round.
Final Blocking
- Weave in all ends along the solid bands, never through the mesh, where they would show.
- Soak the holder in cool water for 10 minutes, then press out the water in a towel. Don’t wring it.
- Slide the holder over a rolled towel or a clean 2-liter bottle about 5 in (12.7 cm) across.
- Gently pull the mesh lengthwise until it measures 12 in (30.5 cm) between the bands. Straighten the diamonds so each column lines up.
- Shape the bottom ledge so it curls evenly inward, and press the strap flat.
- Let it dry completely, at least 24 hours, before filling it with bags.
Final Quality-Control Checklist
- Rnd 4 and every solid round after it have 48 sts.
- Every mesh round has 16 loops.
- The diamonds line up in straight diagonal columns with no twist.
- The wall measures 16 in (40.6 cm), and the width is 8 in (20.3 cm) flat.
- The strap anchors sit directly opposite each other, 24 sts apart.
- The bottom loop sits under one strap anchor, not off to the side.
- The bottom opening is about 3.2 in (8.1 cm) across and lets a bag slide through with a gentle pull.
- All ends are hidden in the solid bands.
Troubleshooting
The mesh spirals around the tube. You may be starting the round in the wrong spot. Always work the first sc into the loop formed by the mesh closer, not into the top of the dc.
The bottom ledge ruffles. Your increase rounds are too loose. Try a smaller hook for Rnds 1 to 4 only.
The bottom ledge pulls in too tightly and bags stick. Start with a ch-33 ring instead (33 sc in Rnd 1). Then increase 5 sts per rnd in Rnds 2 to 4 (38, 43, 48 sc) so you still reach 48.
The mesh looks too long or droopy. Your chains are loose. Work the ch-5 loops slightly tighter, or stop at 18 mesh rnds for a mesh section of about 11 in (27.9 cm).
Rnd 31 has fewer than 48 sts. You missed a loop. Count 16 sc anchors before you start the band.
The strap twists. Make sure the starting ch 30 isn’t twisted before you slip-stitch it to the far side.
Care
Hand wash in cool water, or machine wash on a gentle cycle inside a mesh bag. Reshape it and dry it flat or hanging. Avoid hot dryers, which can shrink cotton and tighten the opening.
Final Notes
The measurements build on each other in a simple chain. A 30-st opening grows to 48 sts. At 12 sts per 4 in (10.2 cm), that gives a 16 in (40.6 cm) circumference and an 8 in (20.3 cm) flat width. The 48 sts divide into 16 mesh loops, and 20 mesh rnds give 12 in (30.5 cm) of lattice. The conversion round turns the 16 loops back into 48 sts, each solid band adds 2 in (5.1 cm), and the strap spans exactly half of the 48 sts. Check your base width and count your loops, and the rest of the holder will come out right.
Happy crocheting!