

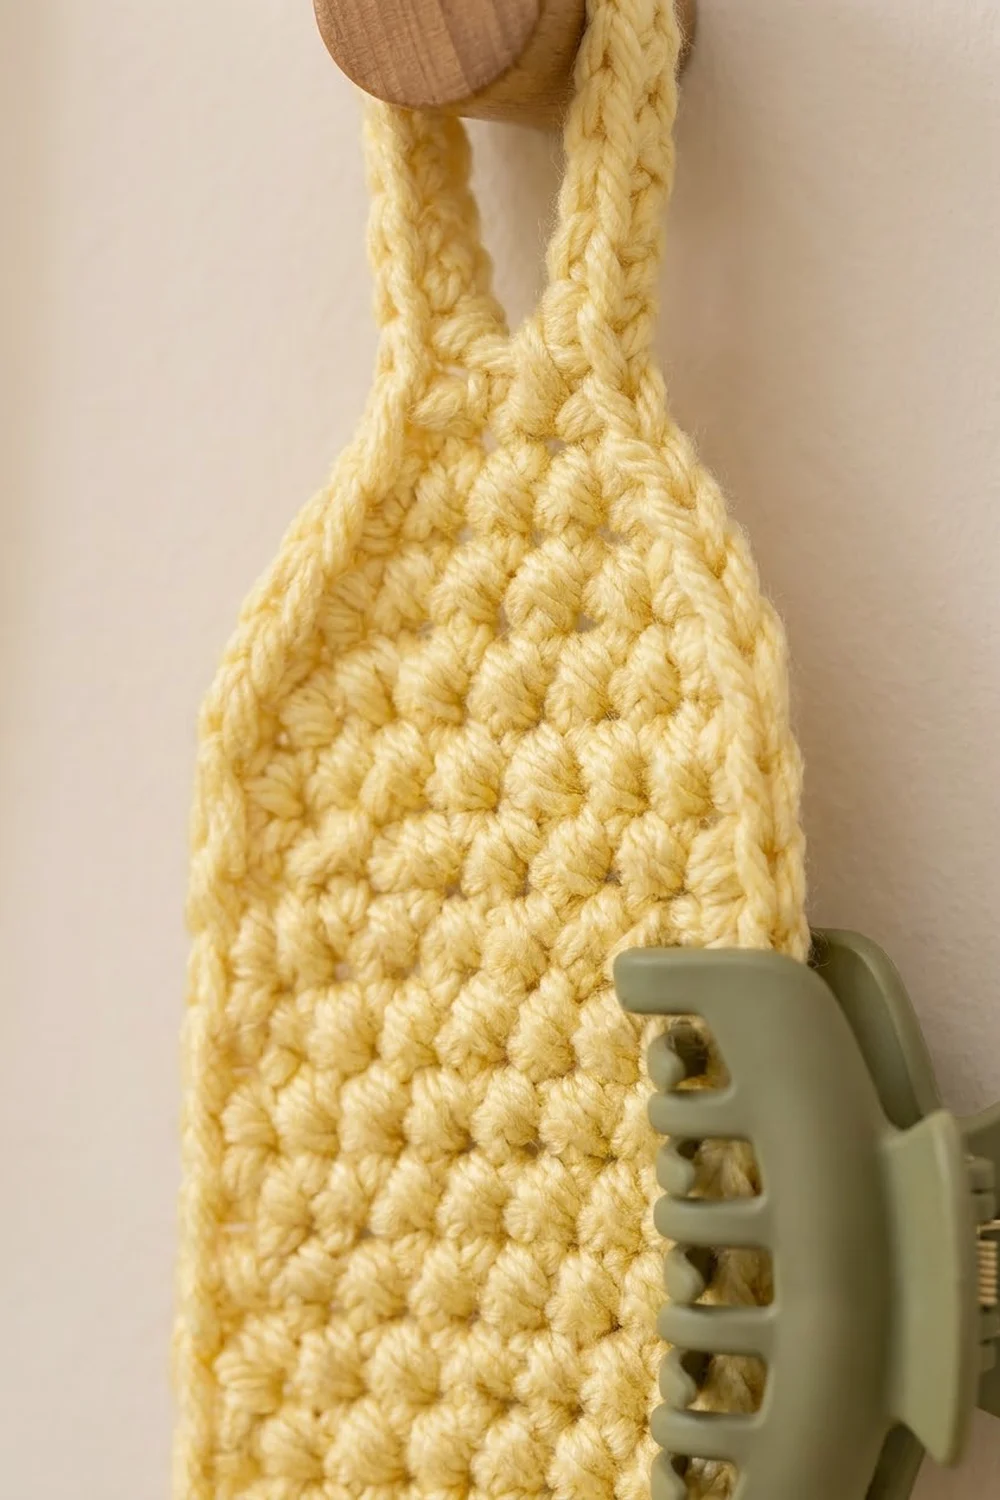
Claw clips have a way of ending up everywhere: on the dresser, in bags, and at the bottom of drawers. The Buttercup Claw Clip Holder gives them one tidy home. It is a slim strip of firm single crochet that hangs from a hook or peg, and you clip your claw clips straight onto its edges.
This pattern uses one soft butter-yellow yarn, and the look is calm and minimal. The bottom end is rounded, and the top tapers into a narrow strap that folds into a hanging loop. A single round of single crochet around the edge keeps everything smooth and gives the clips a firm edge to grip.
The pattern uses US crochet terms. The finished holder measures 3 in (7.6 cm) wide. The main panel, from the bottom edge to the top of the taper, is 17 1/4 in (43.8 cm). Including the loop, the total hanging length is about 19 3/4 in (50.2 cm).
You work the whole strip flat in rows of single crochet, from the rounded bottom up to the end of the strap. Then you work one border round all the way around the piece. Finally, you fold the strap back and sew it down to make the loop.
Finished Size and Construction
- Finished size: 3 in (7.6 cm) wide × about 19 3/4 in (50.2 cm) total hanging length
- Skill level: Easy
- Terminology: US crochet terms
- Yarn weight: Worsted (#4), cotton or cotton blend
- Hook: 4.5 mm (US 7)
- Number of pieces: 1
- Layout: Single vertical strip with a rounded bottom, a tapered top, and a folded hanging loop
- Piece size before border: 2 1/2 in (6.4 cm) wide × 22 in (55.9 cm) long, strap included
- Border depth: 1/4 in (0.6 cm) on every edge
- Main panel after border: 3 in (7.6 cm) wide × 17 1/4 in (43.8 cm) long
- Strap after border: 1 in (2.5 cm) wide
Materials
Yarn: Choose a smooth worsted-weight cotton or cotton blend. Cotton holds its shape well and has a slightly matte surface that grips claw clips without letting them slide. Avoid fuzzy or very stretchy acrylics, because the strip may lengthen under the weight of the clips.
- Butter yellow: 45 g, about 72 m
Tools:
– 4.5 mm (US 7) crochet hook
– Tapestry needle
– Scissors
– 2 locking stitch markers
– Measuring tape
– Rust-proof pins and a blocking mat or folded towel
The yarn amount includes a margin of about 10 g for your gauge swatch and small tension differences.
Abbreviations (US Terms)
- ch: chain
- sc: single crochet
- sc2tog: single crochet 2 together (decrease)
- sl st: slip stitch
- st(s): stitch(es)
- inc: 2 sc in the same stitch
Special stitch: sc2tog. Insert your hook in the next stitch, yarn over, and pull up a loop. Insert your hook in the following stitch, yarn over, and pull up a loop (3 loops on hook). Yarn over and pull through all 3 loops. This turns 2 stitches into 1.
Pattern notes:
– The ch 1 at the start of each row is a turning chain. It does not count as a stitch.
– Work every stitch under both loops.
– Stitch counts are given at the end of each shaping row.
Gauge and Checkpoints
Gauge: 16 sc × 16 rows = 4 in (10.2 cm) square, worked in rows.
That works out to 4 stitches and 4 rows per inch (2.5 cm). This holder is one piece, so your test piece is a gauge swatch. Chain 17, work 16 sc, and keep working rows until you have 16 rows. Block the swatch lightly and measure it.
The fabric should be firm and dense, with no gaps you can see through. A firm fabric is what holds the clips in place.
Checkpoints while you work:
– After Row 4: 10 sts, 2 1/2 in (6.4 cm) wide and 1 in (2.5 cm) tall
– After Row 20: 5 in (12.7 cm) tall
– After Row 60: 15 in (38.1 cm) tall
– After Row 68 (end of taper): 17 in (43.2 cm) tall, 2 sts wide
– After Row 88 (end of strap): 22 in (55.9 cm) total length
– After the border: 3 in (7.6 cm) wide at the main panel
If your piece is too big: Change to a 4 mm (US G-6) hook. A wide strip lets clips slide, and a long strip uses more yarn than planned.
If your piece is too small: Change to a 5 mm (US H-8) hook. A narrow strip still works, but the clips will cover more of it.
Width matters more than length. If you match the row gauge but not the stitch gauge, change your hook size. If you match the stitch gauge but not the row gauge, you can add or remove plain rows in the Rows 5–60 section to reach 15 in (38.1 cm) at Row 60.
Main Strip
Rounded Bottom (Rows 1–4)
Foundation: Ch 5.
Row 1: Sc in the 2nd ch from the hook and in each of the next 3 ch. Turn. (4 sts)
Row 2: Ch 1, inc in the first st, sc in the next 2 sts, inc in the last st. Turn. (6 sts)
Row 3: Ch 1, inc in the first st, sc in the next 4 sts, inc in the last st. Turn. (8 sts)
Row 4: Ch 1, inc in the first st, sc in the next 6 sts, inc in the last st. Turn. (10 sts)
Adding 1 stitch at each end of 3 rows in a row makes the gentle curve at the bottom. The border later smooths the small steps into an even, rounded edge. At this point the piece should measure 2 1/2 in (6.4 cm) wide.
Straight Body (Rows 5–60)
Rows 5–60: Ch 1, sc in each st across. Turn. (10 sts)
That is 56 rows, which comes to 14 in (35.6 cm). Count your rows by placing a stitch marker on Row 20 and another on Row 40. At Row 60, the piece should measure 15 in (38.1 cm) from the foundation edge.
Keep the side edges straight. Always work the first stitch into the very first stitch of the row, not into the turning chain, and always work the last stitch into the last stitch.
Tapered Top (Rows 61–68)
Decrease at both ends of every other row, so the taper slopes evenly on both sides.
Row 61: Ch 1, sc2tog, sc in the next 6 sts, sc2tog. Turn. (8 sts)
Row 62: Ch 1, sc in each st across. Turn. (8 sts)
Row 63: Ch 1, sc2tog, sc in the next 4 sts, sc2tog. Turn. (6 sts)
Row 64: Ch 1, sc in each st across. Turn. (6 sts)
Row 65: Ch 1, sc2tog, sc in the next 2 sts, sc2tog. Turn. (4 sts)
Row 66: Ch 1, sc in each st across. Turn. (4 sts)
Row 67: Ch 1, sc2tog twice. Turn. (2 sts)
Row 68: Ch 1, sc in each st across. Turn. (2 sts)
The taper is 8 rows, or 2 in (5.1 cm) tall. The main panel now measures 17 in (43.2 cm) from the foundation edge.
Strap (Rows 69–88)
Rows 69–88: Ch 1, sc in each of the 2 sts. Turn. (2 sts)
That is 20 rows, which comes to 5 in (12.7 cm). The total length of the piece is now 22 in (55.9 cm). Do not fasten off. Go straight into the border.
Border
Border gauge: The border uses the same 4 sts per inch as the main fabric. Your row gauge is also 4 rows per inch, so 1 sc in each row end covers the side edges at exactly the right length. The edge will not ruffle or pull in.
Work the border as one round. You start at the top of the strap and finish where you started.
Border Round:
1. Strap top (Row 88): Ch 1. Work 3 sc in the first st and 3 sc in the last st. (6 sts) The extra stitches turn the two sharp corners at the end of the strap.
2. First side: Rotate the piece and work down the side. Work 1 sc in the end of each row from Row 88 down to Row 1. (88 sts)
3. Bottom edge: Work along the other side of the foundation chain. Work 2 sc in the first ch, 1 sc in each of the next 2 ch, and 2 sc in the last ch. (6 sts) The 2 extra stitches round off the bottom corners.
4. Second side: Work up the other side. Work 1 sc in the end of each row from Row 1 up to Row 88. (88 sts)
5. Join with a sl st to the first sc. (188 sts total)
Why the math works: Each side has 88 rows, so each side gets 88 sc. The 6 stitches at the strap top and the 6 at the bottom include the corner stitches, so they are not counted again: 6 + 88 + 6 + 88 = 188.
The border adds 1/4 in (0.6 cm) on every edge:
– Main panel width: 2 1/2 in + 1/4 in + 1/4 in = 3 in (7.6 cm)
– Strap width: 1/2 in + 1/4 in + 1/4 in = 1 in (2.5 cm)
– Main panel length: 17 in + 1/4 in at the bottom = 17 1/4 in (43.8 cm)
Fasten off and leave a 4 in (10.2 cm) tail. Weave in the tail and the starting tail.
Forming the Hanging Loop
Cut a 16 in (40.6 cm) length of yarn and thread it onto your tapestry needle.
- Lay the strip face down.
- Fold the strap toward you so the end of the strap (Rows 85–88, about 1 in or 2.5 cm) lies flat over the back of Rows 69–72.
- Check that Rows 73–84 now form the loop. That is a 3 in (7.6 cm) length of strap, so the loop stands about 1 1/2 in (3.8 cm) tall.
- Pin the overlap so the edges line up.
- Whipstitch all the way around the overlap. Then sew one straight line across its middle for strength.
- Turn the strip face up. Your stitches should not show from the front.
The finished hanging length is: 1/4 in bottom border + 17 in panel + 1 in visible strap base + 1 1/2 in loop = 19 3/4 in (50.2 cm).
Final Blocking
- Wet the strip completely in cool water. Gently squeeze out the water. Do not wring it.
- Roll it in a towel and press to remove more water.
- Lay it face up on a blocking mat.
- Pin the main panel to 3 in (7.6 cm) wide, with one pin every 2 in (5.1 cm) down each side.
- Pin the length to 17 1/4 in (43.8 cm) from the bottom edge to the top of the taper. Do not stretch it past this, because the weight of the clips will lengthen it a little over time.
- Shape the bottom into an even curve with your fingers.
- Straighten the taper so both slopes match, and pin the strap so it lies flat and centered.
- Let it dry completely, which takes 12–24 hours. Then remove the pins.
Final Quality-Control Checklist
- The main panel measures 3 in (7.6 cm) wide along its whole length.
- The main panel measures 17 1/4 in (43.8 cm) long.
- The bottom curve is smooth and even on both sides.
- Both sides of the taper slope evenly and match each other.
- The strap is centered over the panel.
- The border is flat, with no ruffling or puckering.
- The border round has 188 stitches.
- The loop is about 1 1/2 in (3.8 cm) tall and sewn down securely.
- No sewing stitches show on the front.
- All tails are woven in and trimmed.
- A claw clip grips the edge firmly without sliding.
Troubleshooting
The side edges wave in and out. You are probably skipping the first stitch or working into the turning chain. Count 10 sts at the end of every few rows.
The strip is getting wider as you go. You are adding stitches at the row ends. Put a marker in the first and last stitch of every row.
The bottom curve cups or pulls in. Your row ends there are a little tighter. Undo the border along the curve, and work 2 sc into the row end of Row 3 on each side. This makes 190 sts in total, which is fine.
The border ruffles. Your border stitches are looser than your rows. Work the border with a hook one size smaller.
The taper leans to one side. Make sure each decrease row has a sc2tog at both ends, not just one.
The clips slide off. The fabric is too loose. Remake the strip with a smaller hook, or choose a cotton yarn with more grip.
The loop twists. Unpick it and fold the strap again, keeping it flat and not rotated before you pin.
Care
Hand wash in cool water with a mild soap and lay flat to dry. Remove the clips before washing, and reshape the strip to 3 in (7.6 cm) wide while it is damp.

Final Notes
The measurements build on each other:
– Gauge: 4 sts and 4 rows per inch (2.5 cm)
– Rounded bottom: 4 rows, growing to 10 sts and 2 1/2 in (6.4 cm) wide
– Straight body: 56 rows, 14 in (35.6 cm)
– Taper: 8 rows, 2 in (5.1 cm), ending the panel at 17 in (43.2 cm)
– Strap: 20 rows, 5 in (12.7 cm), for a 22 in (55.9 cm) piece
– Border: 188 stitches, adding 1/4 in (0.6 cm) on every edge
– Finished holder: 3 in (7.6 cm) wide, with a 17 1/4 in (43.8 cm) panel and a hanging length of about 19 3/4 in (50.2 cm)
If you check your size at each checkpoint, the finished strip will hang straight and hold your clips neatly.
Happy crocheting!