

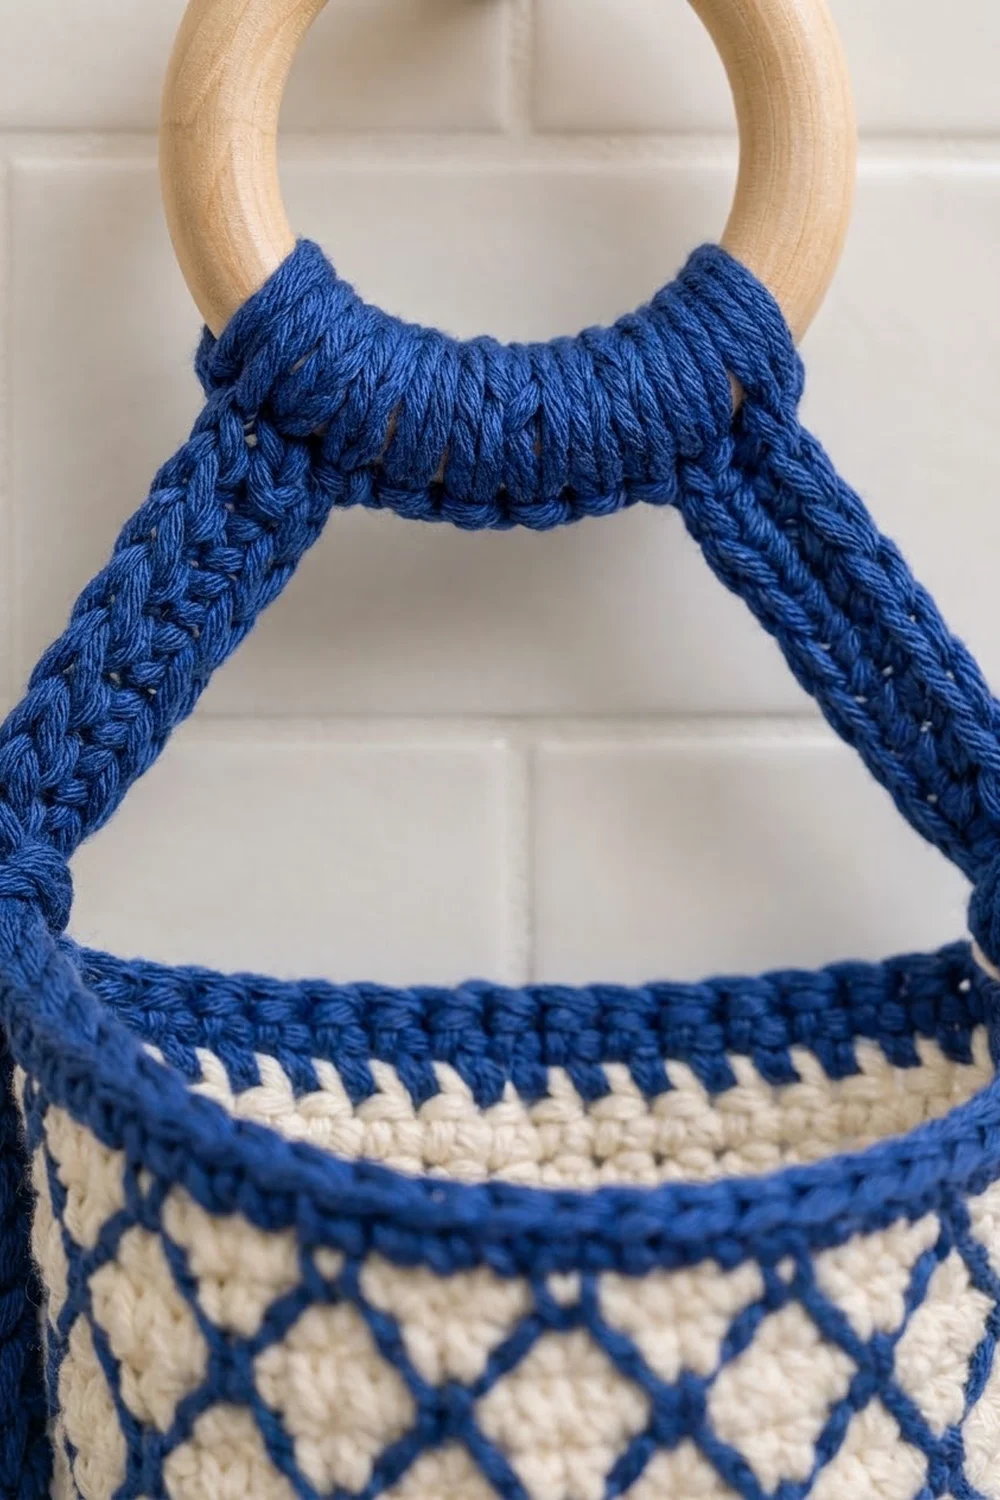
This hanging organizer holds three spare toilet rolls in a neat column on the wall. It is made from three round baskets stacked one above the other. Two side straps hold the baskets and meet at a natural wooden ring at the top.
Each basket has a solid cobalt blue base and lower band, a cream body crossed by a raised blue diamond lattice, and a firm blue rolled rim. The colors look like blue-and-white Delft pottery, so the piece suits a classic, coastal, or farmhouse bathroom.
The pattern uses US crochet terms. The finished organizer measures about 5.9 in (15.0 cm) wide and 21 in (53.3 cm) tall from the top of the ring to the bottom of the lowest basket. Each basket is 4.9 in (12.4 cm) across and 4.5 in (11.4 cm) tall.
The construction is simple. You crochet each basket in joined rounds from the base up, finish the rim with a two-round border, and add the lattice with surface slip stitches. Then you make two flat straps and a small collar, fold the straps over the ring, and sew the baskets in place.
Finished Size and Construction
- Finished size: 5.9 in (15.0 cm) wide x 21 in (53.3 cm) tall, including the 3 in (7.6 cm) ring
- Skill level: Intermediate
- Terminology: US crochet terms
- Yarn weight: Worsted (#4) cotton
- Hook: 4.5 mm (US 7)
- Number of pieces: 6 (3 baskets, 2 straps, 1 collar), plus a wooden ring
- Layout: 1 column of 3 baskets, 0.75 in (1.9 cm) apart
- Basket size: 4.9 in (12.4 cm) diameter x 4.5 in (11.4 cm) tall
- Basket height before border: 4 in (10.2 cm)
- Border depth: 0.5 in (1.3 cm)
Materials
Use a smooth, firmly plied worsted cotton or cotton blend. Cotton holds the basket shape, shows the lattice clearly, and handles bathroom humidity well. Avoid fuzzy or very soft acrylics, because they make the baskets slump.
- Cobalt blue (Color A): 120 g, about 205 m
- Cream (Color B): 85 g, about 145 m
These quantities include a margin of about 20 percent for swatching and sewing.
Tools:
- 4.5 mm (US 7) crochet hook
- 1 unfinished or sealed wooden ring, 3 in (7.6 cm) outer diameter
- 10 locking stitch markers
- Tapestry needle
- Scissors
- Measuring tape
- Rust-proof pins
Abbreviations (US Terms)
- ch – chain
- sc – single crochet
- sl st – slip stitch
- inc – 2 sc in the same stitch
- BLO – back loop only
- st(s) – stitch(es)
- rev sc – reverse single crochet (crab stitch)
Surface slip stitch: Hold the working yarn behind the fabric. Insert the hook from front to back at the marked point, yarn over, and pull up a loop. Move to the next point, insert the hook from front to back, yarn over, and pull the new loop through the fabric and through the loop on the hook. This lays a raised chain line on the right side.
Reverse single crochet: Work from left to right. Insert the hook into the next stitch to the right, yarn over, pull up a loop, yarn over, and pull through both loops.
Gauge and Checkpoints
Gauge: 14 sc and 16 rounds = 4 in (10.2 cm) in sc worked in joined rounds.
Make one full basket first, through the border, before you start the others. That basket is your real gauge swatch.
Checkpoints:
- After Rnd 9: the base is 4.9 in (12.4 cm) across and lies flat.
- After Rnd 25: the wall is 4 in (10.2 cm) tall from the turning ridge.
- After Rnd 27: the wall is 4.5 in (11.4 cm) tall, and the rim circumference is 15.4 in (39.1 cm).
- A standard toilet roll should slide in easily and stand upright.
If the base is larger than 4.9 in (12.4 cm), go down to a 4 mm hook. If it is smaller, or the roll will not fit, go up to a 5 mm hook. Change the hook, not the stitch counts, because the lattice repeat depends on exactly 54 stitches.
Basket (Make 3)
Work in joined rounds and do not turn. Begin each round with ch 1 (this does not count as a stitch) and join with a sl st to the first sc. Keep the joins stacked on one side. A strap will hide this line later.
To change color, work the final joining sl st of the round with the new color.
Base
With Color A, make a magic ring.
Rnd 1: 6 sc in ring. (6 sts)
Rnd 2: Inc in each st around. (12 sts)
Rnd 3: (Sc 1, inc) 6 times. (18 sts)
Rnd 4: (Sc 2, inc) 6 times. (24 sts)
Rnd 5: (Sc 3, inc) 6 times. (30 sts)
Rnd 6: (Sc 4, inc) 6 times. (36 sts)
Rnd 7: (Sc 5, inc) 6 times. (42 sts)
Rnd 8: (Sc 6, inc) 6 times. (48 sts)
Rnd 9: (Sc 7, inc) 6 times. (54 sts)
Check: the base is 4.9 in (12.4 cm) across and flat, with no ruffling.
Lower Blue Band
Rnd 10: Sc in BLO of each st around. (54 sts) This makes a crisp turning ridge, and the work starts to rise as a wall.
Rnds 11–12: Sc in each st around. (54 sts) Change to Color B on the final join of Rnd 12.
Cream Body
Rnds 13–24: With Color B, sc in each st around. (54 sts in each of the 12 rounds)
Change to Color A on the final join of Rnd 24.
Upper Blue Band
Rnd 25: With Color A, sc in each st around. (54 sts)
Check: the wall is 4 in (10.2 cm) tall from the Rnd 10 ridge. Do not fasten off. Work the Border section below, then come back here for the lattice.
Diamond Lattice
The lattice is 18 diagonal lines of Color A surface slip stitch over the cream body: 9 lines leaning right and 9 lines leaning left.
On Rnd 13, place markers in sts 1, 7, 13, 19, 25, 31, 37, 43, and 49. This is a 6-stitch repeat (9 x 6 = 54).
Right-leaning lines (make 9): At a marker, join Color A with a surface sl st at the base of the marked st, on the boundary between Rnd 12 and Rnd 13. *Move up 1 round and 1 st to the right, then work 1 surface sl st. Repeat from * 11 more times, ending at the top of Rnd 24. (13 sl sts per line; each line travels 12 sts, and lines near the round’s end wrap past st 54) Fasten off and weave in the ends on the inside.
Left-leaning lines (make 9): Start at each marker in the same way, but move 1 st to the left on each round. (13 sl sts per line)
The two lines that start from the same marker form a V. Neighboring lines cross every 3 rounds. This gives 9 diamonds around, each 6 sts wide (1.7 in, 4.3 cm) and 6 rounds tall (1.5 in, 3.8 cm). Each basket has 234 surface sl sts in total.
Keep the surface stitches as loose as the base fabric. Tight lines pucker the cream body.
Straps (Make 2)
With Color A, ch 76.
Rnd 1: Sc in the 2nd ch from the hook and in each ch across (75 sc). Do not turn. Rotate the work and sc in the free loop of each foundation ch along the other side (75 sc). Sl st to the first sc. (150 sts)
Fasten off and leave a 24 in (61.0 cm) tail for sewing.
Check: each strap is 21.4 in (54.4 cm) long and 0.5 in (1.3 cm) wide.
Collar (Make 1)
With Color A, ch 9.
Row 1: Sc in the 2nd ch from the hook and in each ch across, turn. (8 sts)
Rows 2–6: Ch 1, sc in each st across, turn. (8 sts)
Fasten off and leave a 12 in (30.5 cm) tail. Check: the collar measures 2.25 in (5.7 cm) x 1.5 in (3.8 cm).
Make All Pieces
- Color A only: 2 straps, 1 collar
- Color A and Color B: 3 baskets (base, bands, rim, and lattice in A; body in B)
Layout grid (front view):
            ( ring )
             [collar]
            /        \
   strap  |  BASKET 1  |  strap
          |  0.75 in   |
   strap  |  BASKET 2  |  strap
          |  0.75 in   |
   strap  |  BASKET 3  |  strap
Joining
Method: Whipstitch with Color A through the strap edge and the basket fabric.
- Fold the top 1 in (2.5 cm) of each strap over the ring from front to back. Whipstitch the end to the strap.
- Push both strap tops together at the bottom of the ring. Wrap the collar around both straps just below the ring, with the short ends at the back. Sew the short ends together, then tack the collar to the straps.
- Measure 4 in (10.2 cm) down each strap from the ring. This point is the top of Basket 1.
- Turn Basket 1 so its stacked join line sits at one side. Mark sts 1 and 28 of Rnd 27. They sit exactly opposite each other, with 27 sts in each half.
- Pin one strap from st 1 straight down to the Rnd 10 ridge. Pin the other strap from st 28 down to the ridge. Each strap covers 18 rounds, or 4.5 in (11.4 cm).
- Whipstitch both long edges of each strap to the basket, with 1 stitch per wall round. That is 18 stitches per edge, 36 per strap, and 72 per basket.
- Leave 0.75 in (1.9 cm) of strap free, then attach Basket 2 the same way. Repeat for Basket 3. About 0.4 in (1.0 cm) of strap remains below Basket 3. Fold it under and tack it to the base.
Tension: Pull each whipstitch snug but not tight. The strap should lie flat. It should not ripple or pull the wall inward.
Size checkpoint: Strap length = 2 in (5.1 cm) folded over the ring + 4 in (10.2 cm) drop + 13.5 in (34.3 cm) on the baskets + 1.5 in (3.8 cm) in the gaps + 0.4 in (1.0 cm) tail = 21.4 in (54.4 cm). When hung, the organizer measures 21 in (53.3 cm) tall and 5.9 in (15.0 cm) wide.
Border
Work the border on each basket right after Rnd 25, before the lattice.
Border gauge: Same as the body, 14 sts = 4 in (10.2 cm). Each half of the rim, from strap to strap, is 27 sts or 7.7 in (19.6 cm).
Rnd 26: With Color A, ch 1, sc in each st around, join. (54 sts: 27 in the front half + 27 in the back half)
Rnd 27: Ch 1, rev sc in each st around, join. (54 sts: 27 in the front half + 27 in the back half)
Fasten off and weave in the ends.
Why the math works: The wall never increases after Rnd 9, so the border has the same 54 sts as the base edge. This keeps the rim from flaring or pulling in. Because 54 splits evenly into two halves of 27, the straps land exactly opposite each other at sts 1 and 28, and the basket hangs level.
Final Blocking
- Fill a basin with cool water and add a drop of gentle wool wash.
- Soak the whole organizer for 15 minutes.
- Roll it in a towel and press out the water. Do not wring it.
- Wrap a toilet roll in plastic and slip it into each basket to hold the shape.
- Lay the organizer flat with the straps straight and the gaps at 0.75 in (1.9 cm).
- Check that each basket is 4.9 in (12.4 cm) across and 4.5 in (11.4 cm) tall.
- Let it dry completely, about 24 hours, then remove the rolls.
Final Quality-Control Checklist
- Each basket has 54 sts in every round from Rnd 9 to Rnd 27.
- All 18 lattice lines are present, and each has 13 sl sts.
- The diamonds are even, with crossings every 3 rounds.
- Each rim half has 27 sts, and the straps sit exactly opposite each other.
- Both straps are 21.4 in (54.4 cm) long.
- The gaps between baskets are 0.75 in (1.9 cm).
- The organizer hangs straight, with no twist at the collar.
- All ends are woven in on the inside.
Troubleshooting
The base ruffles: The increases are too loose. Use a smaller hook for Rnds 1–9.
The base cups before Rnd 10: The stitches are too tight. Use a larger hook for the base.
The lattice puckers: Work the surface sl sts more loosely, or use a hook one size larger for the lattice only.
The diamonds look uneven: A line has skipped a stitch. Move exactly 1 st per round, and check that each line ends 12 sts from where it started.
The basket tilts forward: The straps are not exactly opposite each other. Re-sew them at sts 1 and 28.
The roll is too snug: Your gauge is tight. Remake the basket with a 5 mm hook. Do not add stitches.
The straps stretch over time: Add a second line of whipstitch, or use a firmer cotton.
Care
Hand wash in cool water, press out the excess water, and dry flat with the baskets reshaped. Do not tumble dry.

Final Notes
The measurement chain is short and reliable. A 54-st base 4.9 in (12.4 cm) across gives a 15.4 in (39.1 cm) circumference. Sixteen wall rounds make a 4 in (10.2 cm) wall, and the 2-round border brings each basket to 4.5 in (11.4 cm). Three baskets on 21.4 in (54.4 cm) straps with 0.75 in (1.9 cm) gaps make an organizer 21 in (53.3 cm) tall. Check the first basket carefully, and the others will match it.
Happy crocheting!