

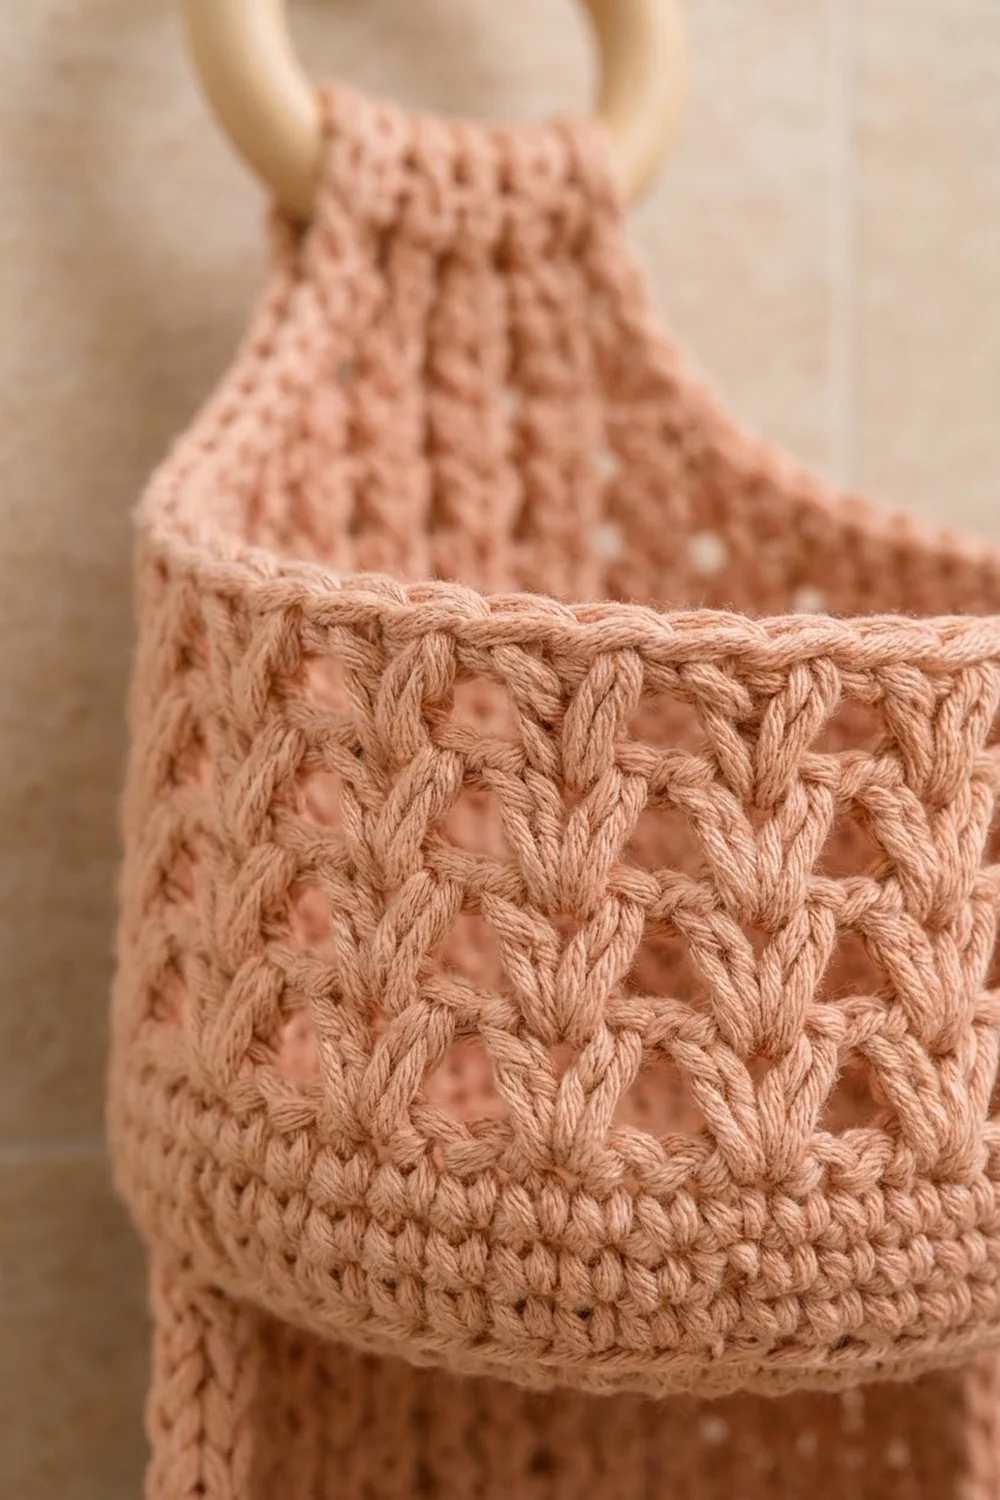
The Peach Cascade holder stacks three soft, open-textured baskets on a slim back panel and hangs from a wooden ring. Each basket holds one standard toilet roll, so spare rolls stay off the floor and in easy reach.
The design is worked in a single dusty peach cotton. Columns of stacked V-stitches give the walls a light, almost knitted look, and solid single-crochet bands at the base and rim keep each basket firm and round. The style is calm, modern and practical.
This pattern uses US crochet terms. The finished holder measures about 4.5 in (11.4 cm) wide and about 16.25 in (41.3 cm) long below the ring. Each basket is 4.75 in (12.1 cm) in diameter and 3.5 in (8.9 cm) tall.
You will make three baskets in joined rounds and one flat back panel in rows. You’ll edge the panel, sew the baskets on stitch-to-stitch, then fold the tab over the ring and sew it down.
Finished Size and Construction
- Finished size: 4.5 in (11.4 cm) wide × 16.25 in (41.3 cm) long, not counting the ring
- Skill level: Easy-intermediate
- Terminology: US crochet terms
- Yarn weight: Worsted (#4) cotton
- Hook: 5.0 mm (H-8)
- Number of pieces: 4 (3 baskets + 1 back panel), plus a wooden ring
- Layout: 1 column × 3 baskets, stacked vertically
- Basket size: 4.75 in (12.1 cm) diameter × 3.5 in (8.9 cm) tall
- Panel size before border: 4 in (10.2 cm) wide × about 17.75 in (45.1 cm) long, unfolded
- Border depth: about 0.25 in (0.6 cm) on each edge
Materials
Yarn: Use a smooth worsted-weight cotton or cotton blend. Cotton holds the basket shape, copes with bathroom humidity and doesn’t stretch much under the weight of the rolls. Avoid very soft acrylic, because the walls will sag.
- Dusty Peach: 200 g, about 340 m (372 yd)
The project uses about 156 g: about 38 g per basket, 34 g for the panel and 8 g for the border and seaming. The quantity listed includes a margin for gauge differences and swatching.
Tools:
- 5.0 mm (H-8) crochet hook
- Wooden ring, 3 in (7.6 cm) outer diameter
- Tapestry needle
- 6 locking stitch markers
- Scissors
- Measuring tape
- Blocking pins and a spray bottle
Abbreviations (US Terms)
- ch: chain
- sl st: slip stitch
- sc: single crochet
- sc2tog: single crochet 2 together
- dc: double crochet
- BLO: back loop only
- sp: space
- st(s): stitch(es)
- rev sc: reverse single crochet (crab stitch)
- rep: repeat
V-stitch (V-st): (dc, ch 1, dc) in the same stitch or space.
Reverse single crochet (rev sc): Working from left to right (right-handed), insert the hook into the next stitch to the right, yarn over, pull up a loop, then yarn over and pull through both loops. This makes the rope-like rim.
Gauge and Checkpoints
Single-crochet gauge: 16 sc and 17 rounds/rows = 4 in (10.2 cm)
V-stitch gauge: 8 V-sts = 4 in (10.2 cm), and 4 V-st rounds/rows = 2.25 in (5.7 cm)
Make one complete basket first. It is your gauge swatch, and it shows straight away whether a roll fits.
Checkpoints:
- After Rnd 5 (30 sts): base diameter is 2.25–2.5 in (5.7–6.4 cm).
- After Rnd 10 (60 sts): base diameter is 4.75 in (12.1 cm).
- After Rnd 13: the wall is about 0.75 in (1.9 cm) tall.
- After Rnd 17: the wall is about 3 in (7.6 cm) tall.
- Finished basket: 3.5 in (8.9 cm) tall. A 4.25 in (10.8 cm) roll slides in easily with about 1 in (2.5 cm) showing above the rim.
If the base is too big: your stitches are loose and the walls will sag. Go down to a 4.5 mm hook.
If the base is too small: the roll won’t fit. Go up to a 5.5 mm hook.
Don’t add or remove increase rounds to fix gauge. The panel joins depend on 60 basket stitches and 16 panel stitches.
Basket (make 3)
Base
Work in joined rounds. Don’t turn.
Rnd 1: Make a magic ring. Ch 1, then work 6 sc in the ring. Sl st to the first sc. (6 sts)
Rnd 2: Ch 1, 2 sc in each st around, join. (12 sts)
Rnd 3: Ch 1, sc in next st, 2 sc in next st around, join. (18 sts)
Rnd 4: Ch 1, sc in next 2 sts, 2 sc in next st around, join. (24 sts)
Rnd 5: Ch 1, sc in next 3 sts, 2 sc in next st around, join. (30 sts)
Rnd 6: Ch 1, sc in next 4 sts, 2 sc in next st around, join. (36 sts)
Rnd 7: Ch 1, sc in next 5 sts, 2 sc in next st around, join. (42 sts)
Rnd 8: Ch 1, sc in next 6 sts, 2 sc in next st around, join. (48 sts)
Rnd 9: Ch 1, sc in next 7 sts, 2 sc in next st around, join. (54 sts)
Rnd 10: Ch 1, sc in next 8 sts, 2 sc in next st around, join. (60 sts)
The base should lie flat and measure 4.75 in (12.1 cm) across.
Wall
Rnd 11: Ch 1, sc in BLO of each st around, join. (60 sts) This makes a crisp edge where the base turns up into the wall.
Rnds 12–13: Ch 1, sc in each st around, join. (60 sts)
Rnd 14 (set-up V round): Ch 4 (counts as dc + ch 1), dc in the same st as the join (first V-st). Skip next st, V-st in next st. Rep from * 28 more times. Skip the last st and sl st to the 3rd ch of the beginning ch-4. (30 V-sts)
Check: the V-sts sit in sts 1, 3, 5 … 59, which is 30 V-sts over all 60 stitches.
Rnds 15–17: Sl st into the first ch-1 sp. Ch 4 (counts as dc + ch 1), dc in the same sp. Work a V-st in the ch-1 sp of each V-st around and join to the 3rd ch of ch-4. (30 V-sts)
Each V sits directly on the V below, so you get vertical columns of stacked V shapes with small openings between them.
Rnd 18 (conversion round): Sl st into the first ch-1 sp, ch 1, sc in the same sp, then sc in the gap between this V-st and the next. Sc in next ch-1 sp, sc in next gap. Rep around and join.
Count: 30 sc (1 in each existing V-st sp) + 30 sc added in the gaps = 60 sts
Rnd 19: Ch 1, sc in each st around, join. (60 sts)
Rnd 20 (rim): Ch 1, rev sc in each st around, join. (60 sts)
Fasten off and weave in the ends. The basket should measure 4.75 in (12.1 cm) across and 3.5 in (8.9 cm) tall.
Back Panel
Work in rows, turning at the end of each row.
Foundation: Ch 17.
Row 1: Sc in the 2nd ch from the hook and in each ch across. Turn. (16 sts)
Row 2 (V row): Ch 3 (counts as dc) in the first st. Skip next st, V-st in next st. Rep from * 6 more times (7 V-sts). Dc in the last st. Turn.
Count: 2 edge dc + 7 V-sts. This uses all 16 sts: 1 + 14 + 1.
Rows 3–23: Ch 3 (counts as dc). V-st in the ch-1 sp of each V-st across (7 V-sts), dc in the top of the turning ch. Turn. (7 V-sts + 2 edge dc)
Row 24 (conversion row): Ch 1, sc in the first dc, 2 sc in each V-st sp across, sc in the top of the turning ch. Turn.
Count: 9 sts worked 1-per-existing (2 edge sts + 7 sps) + 7 extra sc (the second sc in each sp) = 16 sts
Checkpoint: the panel body is 4 in (10.2 cm) wide and about 12.8 in (32.5 cm) tall (2 sc rows plus 22 V rows).
Taper
Row 25: Ch 1, sc2tog, sc in next 12 sts, sc2tog. Turn. (14 sts)
Row 26: Ch 1, sc in each st across. Turn. (14 sts)
Row 27: Ch 1, sc2tog, sc in next 10 sts, sc2tog. Turn. (12 sts)
Row 28: Ch 1, sc in each st across. Turn. (12 sts)
Row 29: Ch 1, sc2tog, sc in next 8 sts, sc2tog. Turn. (10 sts)
Row 30: Ch 1, sc in each st across. Turn. (10 sts)
Row 31: Ch 1, sc2tog, sc in next 6 sts, sc2tog. Turn. (8 sts)
The taper is about 1.6 in (4.1 cm) tall.
Hanging Tab
Rows 32–45: Ch 1, sc in each st across. Turn. (8 sts)
The tab is 2 in (5.1 cm) wide and about 3.25 in (8.3 cm) long. Don’t fasten off yet; the border starts here.
Make All Pieces
All four pieces are Dusty Peach.
- Baskets: 3 pieces, about 38 g each (114 g in total)
- Back panel: 1 piece, about 34 g
- Border and seaming: about 8 g
Layout (front view, top to bottom):
        ( RING )
          [TAB]
         /TAPER\
   [ Panel Row 24      ]
   [ BASKET 3: Rows 17–23 ]
   [ gap: Rows 16–17   ]
   [ BASKET 2: Rows 9–15  ]
   [ gap: Rows 8–9     ]
   [ BASKET 1: Rows 1–7   ]
Border (Back Panel)
Border gauge: 1 sc per sc row, 2 sc per V row. A V row is about 2.4 times as tall as an sc row (0.5625 in vs 0.235 in, or 1.4 cm vs 0.6 cm). Two sc per V row keeps the edge very slightly firm, which stops the long sides from rippling.
Border Round: With the working loop from Row 45, ch 1 and turn the work so you are working across the top edge.
- Top edge (tab): sc in each of the 8 sts, working 3 sc in the first and last st. 8 + 4 = 12 sts
- Long side 1: work down the side. Make 1 sc in each of the 21 sc row-ends of the tab and taper (Rows 45–25), 1 sc in the Row 24 row-end, 2 sc in each of the 22 V-row ends (Rows 23–2) and 1 sc in the Row 1 row-end. 21 + 1 + 44 + 1 = 67 sts
- Bottom edge: sc in each of the 16 foundation ch, working 3 sc in the first and last ch. 16 + 4 = 20 sts
- Long side 2: work up the other side, matching side 1. 67 sts
Join to the first sc. Total: 12 + 67 + 20 + 67 = 166 sts
Why the math works: All four corners belong to the top and bottom counts, so the side counts of 67 include no corner stitches and nothing is counted twice. Each side’s 67 stitches come straight from the row count: 23 sc-type rows at 1 stitch each, plus 22 V rows at 2 each. The panel is now about 4.5 in (11.4 cm) wide.
Fasten off and weave in the ends.
Joining
Method: whipstitch through both loops, using a tapestry needle and a 24 in (61 cm) tail of yarn for each seam.
Stitch-to-stitch logic: The rim and the base of each basket are both 60 stitches around. The back of each basket is a 16-stitch arc, which matches the panel’s 16-stitch width exactly.
- Lay the panel face up. With the joining seam of a basket’s rounds at the back center, mark 16 consecutive stitches on Rnd 19 (just under the rev sc rim). Mark the same 16 stitches on the Rnd 11 base ridge, directly below them.
- Basket 1: Sew the 16 marked base-ridge stitches to the 16 stitches of Row 1. Sew the 16 marked rim stitches across the top of Row 7, one stitch to one stitch. Use the 8 V-st sps and 8 adjacent dc legs as the 16 sewing points.
- Basket 2: Sew the base ridge across the top of Row 9 and the rim across the top of Row 15.
- Basket 3: Sew the base ridge across the top of Row 17 and the rim across the top of Row 23.
- Tack the two vertical edges of each basket’s flattened back to the panel every 0.5 in (1.3 cm).
Each basket is 3.5 in (8.9 cm) tall but spans 6 V rows (3.375 in, 8.6 cm) on the panel. Spread the extra 0.125 in (0.3 cm) evenly up the side tacking. Each gap of 2 V rows leaves 1.125 in (2.9 cm) of panel showing.
Tension: Pull each stitch snug but not tight. The seam should lie flat without puckering the panel’s V-sts.
Ring: Fold the tab around the wooden ring to the back and whipstitch the 8 stitches of Row 45 to the 8 stitches of Row 31.
Size checkpoint: Hang the holder up. It should measure about 16.25 in (41.3 cm) from the bottom border to the top of the fold.
Final Blocking
- Fill each basket with a toilet roll, or a jar of the same size, to hold the round shape.
- Lay the holder flat with the panel face down, or hang it on a hook.
- Mist all over with water until damp but not soaked.
- Pin the panel edges straight at 4.5 in (11.4 cm) wide.
- Gently press the basket rims round and smooth the V columns so they line up vertically.
- Leave it to dry completely, about 24 hours, before you take out the forms.
Final Quality-Control Checklist
- Each basket is 60 stitches around at the base, the walls and the rim.
- The baskets measure 4.75 in (12.1 cm) across and 3.5 in (8.9 cm) tall.
- The V columns stack straight, with 30 V-sts per round.
- The panel is 16 stitches wide, with 7 V-sts per row.
- The border has 166 stitches: 12 + 67 + 20 + 67.
- The baskets sit level, with 1.125 in (2.9 cm) gaps between them.
- The tab is sewn securely and the ring sits centered.
- All ends are woven in at least 2 in (5.1 cm).
Troubleshooting
The base cups upward: your tension is tight. Use a bigger hook for Rnds 1–10.
The base ruffles: you have too many stitches. Count every round, which should increase by exactly 6.
The V columns twist or slant: check that each V-st goes into a ch-1 sp, not between V-sts.
Rnd 18 has fewer than 60 sts: you missed a gap stitch. There should be one between every pair of V-sts.
The panel edge ripples: you worked 3 sc into some V rows. Use 2 per V row.
A basket tips forward: add more tacking stitches along the base and side seams.
The tab stretches: go down one hook size for Rows 25–45.
Care
Hand wash in cool water with mild soap, press out the water in a towel, and dry flat with the baskets reshaped around rolls. Don’t tumble dry.

Final Notes
Every measurement in this pattern links to the next. Sixty stitches give a 4.75 in (12.1 cm) base. Thirty V-sts keep the wall at the same width. Each 3.5 in (8.9 cm) basket is sewn over a 16-stitch arc onto a 16-stitch panel. Six V rows hold each basket and two V rows form each gap. The 166-stitch border brings the panel to 4.5 in (11.4 cm) wide and about 16.25 in (41.3 cm) long below the ring. Check your gauge on the first basket and the rest follows.
Happy crocheting!