

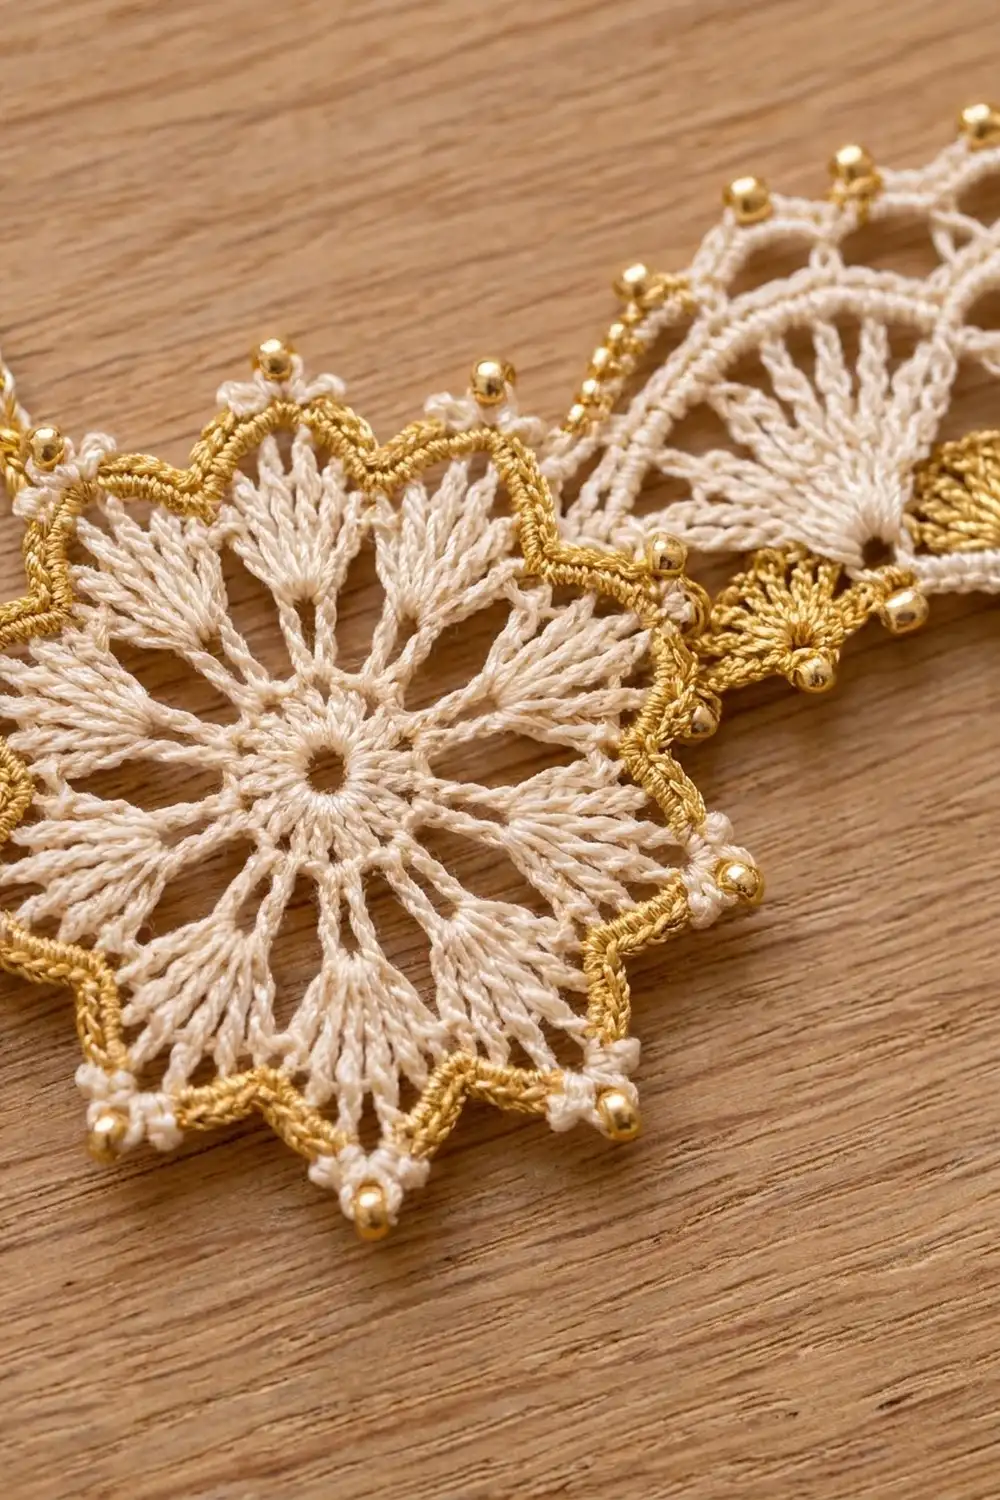
The Golden Comet is a lacy shooting star ornament worked in fine cotton thread. On the left is an 8-point star with a gold outline. A curved tail of cream fans sweeps out to the right, with small gold fans along its lower edge.
The palette is just cream and gold. The cream keeps it soft and vintage, and the metallic gold catches tree lights on the star outline, the picot “beads” and the little fans under the tail. It suits heirloom-style trees, gift toppers and window hangings.
This pattern uses US crochet terms. The finished ornament measures about 6.75 in (17.1 cm) from end to end. The star is 2.75 in (7.0 cm) across, and the tail is 1.5 in (3.8 cm) deep at the star end.
Construction overview: You work the star in five rounds, the last one in gold. The tail starts from a chain anchored to the star and is worked in three rows. Each row is attached to the star with a slip stitch, so the whole ornament stays one piece. A gold edging goes along the tail’s lower edge, then you add a hanging loop.
Finished Size and Construction
- Finished size: 6.75 in (17.1 cm) long; star 2.75 in (7.0 cm) tip to tip; tail 1.5 in (3.8 cm) deep at the star end, tapering to 0.5 in (1.3 cm) at the tip
- Skill level: Intermediate
- Terminology: US
- Yarn weight: Size 10 crochet thread (lace weight)
- Hook: 1.5 mm (US steel 8)
- Number of pieces: 1 (star and tail worked as one connected piece)
- Layout: Star on the left, tail curving down and to the right
- Piece size before tail edging: 6.5 in (16.5 cm) long; tail 1.25 in (3.2 cm) deep
- Edging depth: 0.25 in (0.6 cm) along the tail’s lower edge
Materials
Use a mercerized cotton crochet thread in size 10. Mercerized cotton holds crisp picots and takes starch well. For gold, choose a size 10 metallic thread blended with cotton or polyester so it isn’t scratchy. Pure metallic threads tend to unravel at the ends.
- Cream (Color A): 6 g, about 30 m (33 yd)
- Gold (Color B): 3 g, about 15 m (16 yd)
These amounts include a safety margin of about 25%.
Tools:
– 1.5 mm (US steel 8) crochet hook
– Fine tapestry needle
– Small scissors
– Foam blocking mat with a grid
– Rust-proof pins
– Fabric stiffener or spray starch
– Ruler or tape measure
Abbreviations (US Terms)
- ch – chain
- sl st – slip stitch
- sc – single crochet
- hdc – half double crochet
- dc – double crochet
- tr – treble crochet
- sk – skip
- sp – space
- st(s) – stitch(es)
- RS – right side
Special stitches:
– Picot: Ch 3, then sl st in the 3rd ch from the hook. A picot does not count as a stitch.
– Fan: A group of stitches worked into one stitch. The size of the fan (5 hdc, 7 dc or 9 tr) is given in each row.
Gauge and Checkpoints
Gauge: 11 sc = 1 in (2.5 cm), worked firmly in size 10 thread.
Make a test star first, working Rounds 1–3 only. Thread lace varies a lot between crocheters, and three rounds are enough to show where you stand.
Checkpoints (measured flat and unblocked):
– After Round 1: 0.6 in (1.5 cm) across
– After Round 2: 1.1 in (2.8 cm)
– After Round 3: 1.6 in (4.1 cm)
– After Round 4: 2.4 in (6.1 cm) tip to tip
– After Round 5: 2.75 in (7.0 cm) tip picot to tip picot
– Tail Row 1: 49 sc ≈ 4.5 in (11.4 cm)
If your work is too big: go down to a 1.25 mm (US steel 10) hook. If it’s too small: go up to a 1.75 mm (US steel 6) hook. Change the hook rather than your tension. Lace looks most even at your natural grip.
Part 1: The Star
Use Color A (cream) for Rounds 1–4.
Round 1: Make a magic ring. Ch 3 (counts as dc), then work 15 dc into the ring. Pull the ring closed and sl st to the top of the beginning ch-3. (16 dc)
Round 2: Ch 5 (counts as dc + ch 2). Dc in the next dc, ch 2; repeat from * 14 more times. Sl st to the 3rd ch of the beginning ch-5. (16 dc, 16 ch-2 sps) These are the spokes.
Round 3: Sl st into the first ch-2 sp. Ch 3 (counts as dc), work 2 dc in the same sp, work 3 dc in the next ch-2 sp, then ch 3. Work 3 dc in each of the next 2 ch-2 sps, ch 3; repeat from * 6 more times. Sl st to the top of the beginning ch-3. (48 dc in 8 groups of 6, 8 ch-3 sps)
Round 4 (points): Ch 1 (does not count). Sk the next dc, sc in the next 4 dc, sk the next dc. In the next ch-3 sp work (2 dc, tr, ch 3, tr, 2 dc); repeat from * 7 more times. Sl st to the first sc.
(32 sc, 32 dc, 16 tr = 80 sts, plus 8 ch-3 tip sps)
Skipping a stitch on each side of the 4 sc pulls in the valley, while the tall stitches flare out to the tip. That is what makes the star pointed. Fasten off Color A.
Round 5 (gold outline): Join Color B with a sl st in any ch-3 tip sp. Ch 1.
In the tip sp work (2 sc, picot, 2 sc). Then sc in the next tr, sc in the next 2 dc, sc in the next 2 sc, picot, sc in the next 2 sc, sc in the next 2 dc, sc in the next tr; repeat from * 7 more times. Sl st to the first sc and fasten off.
(112 sc: 4 in each tip + 10 between tips, 8 times; 16 picots: 8 tip, 8 valley)
Labeling the picots: Lay the star RS up. Call the top tip picot T1, then number the tips clockwise T2 to T8. The valley picot between T1 and T2 is V1, the one between T2 and T3 is V2, and so on. The tail attaches between V2 and T4, which sits at roughly 2–4 o’clock.
Part 2: The Tail
Use Color A (cream) for the whole tail.
Foundation: Join Color A with a sl st in valley picot V3. Ch 50.
Row 1 (RS): Sc in the 2nd ch from the hook and in each ch across, working back toward the star. (49 sc) Sl st in tip picot T3 to anchor. Turn.
Row 2 (fans, worked from the star toward the tip): Ch 1. Sc in the first sc.
– Repeats 1–2: Sk 3 sc, work 9 tr in the next sc, sk 3 sc, sc in the next sc.
– Repeats 3–4: Sk 3 sc, work 7 dc in the next sc, sk 3 sc, sc in the next sc.
– Repeats 5–6: Sk 3 sc, work 5 hdc in the next sc, sk 3 sc, sc in the next sc.
Turn.
Count: 7 sc + 18 tr + 14 dc + 10 hdc = 49 sts, 6 fans. That uses 1 + (6 × 8) = 49 stitches of Row 1, so nothing is left over.
The fans get shorter from tr to dc to hdc. That gives the tail its taper, and the flared fan edge, being longer than the chain, starts the crescent curve.
Row 3 (picot arches, worked from the tip toward the star): Ch 1. Sc in the first sc.
– Hdc fans (2): Ch 3, sc in the 3rd hdc, picot, sc in the same hdc, ch 3, sc in the next sc between fans.
– Dc fans (2): Repeat the same sequence, but with ch 4 on each side and working into the 4th dc.
– Tr fans (2): Repeat the same sequence, but with ch 5 on each side and working into the 5th tr.
Sl st in valley picot V2. Fasten off.
Count: 19 sc, 6 picots, 12 arches (48 ch in total: 12 + 16 + 20).
These arches make the scalloped, beaded upper edge. Checkpoint: before edging, the piece is about 6.5 in (16.5 cm) long, and the tail is 1.25 in (3.2 cm) deep at the star end.
Border: Gold Tail Edging
The star’s edge is already finished in gold (Round 5). This border goes along the tail’s lower edge only, working into the free loops on the underside of the foundation chain.
Border gauge: each 8-loop repeat is about 3/4 in (1.9 cm) long and 0.25 in (0.6 cm) deep.
Edging row: Join Color B with a sl st in the skipped turning ch at the tail tip. In that ch, work (sc, picot, sc, picot, sc) to make the tip cluster.
Working into the free loops toward the star: sc in the first loop, sk 3 loops, work 5 dc in the next loop, sk 3 loops, sc in the next loop, picot; repeat from * 5 more times, but leave off the picot on the last repeat. Sl st in tip picot T4. Fasten off.
(Tip cluster: 3 sc + 2 picots. Edge: 7 sc, 30 dc in 6 fans, 5 picots.)
Why the math works: the lower edge has 49 free loops, one under each Row 1 sc. The edging uses 1 + (6 × 8) = 49 loops, the same layout as Row 2. Each gold fan lands in the same chain position as the cream fan above it, so the two line up exactly.
Each 5-dc fan is spread over 8 loops, so it lies flat instead of ruffling, and the inner curve keeps its shape.
Hanging loop: Join Color A with a sl st in tip picot T1. Ch 30, then sl st in the back bump of each ch back down. (30 sl sts) Sl st into T1 again to close the loop. The loop is about 1.25 in (3.2 cm) tall.
Weave in all ends inside the sc stitches of the same color.
Final Blocking
- Wet the ornament thoroughly in cool water, then press it in a towel.
- Soak it in fabric stiffener, or plan to spray-starch it in step 6.
- Lay it RS up on the grid mat. Pin the star center and pull out the 8 tip picots evenly to 2.75 in (7.0 cm) tip to tip.
- Pin each valley picot so the star points look crisp.
- Shape the tail into a smooth crescent. Pin the gold tip cluster first, then pin each arch picot along the outer curve and each gold picot along the inner curve. The tail should measure 1.5 in (3.8 cm) deep at the star end and about 6.75 in (17.1 cm) overall.
- Spray-starch the piece if you didn’t soak it in stiffener, then let it dry completely, about 24 hours.
- Unpin it, then fluff each picot gently with the tip of a pin.
Final Quality-Control Checklist
- The star has 8 even points with a gold picot on every tip and in every valley (16 in total).
- The center ring is closed tight with no gap.
- The tail has 6 cream fans that get smaller toward the tip.
- There are 6 picot arches along the outer edge.
- Each of the 6 gold fans sits directly under a cream fan.
- The gold tip cluster has 2 picots.
- The tail is anchored at V3, T3, V2 and T4.
- The hanging loop is centered on T1.
- All ends are woven in invisibly.
- Overall size is 6.75 in (17.1 cm).
Troubleshooting
- The star cups: Round 2 chains are too tight. Try ch 3 instead of ch 2, or go up a hook size.
- The star ruffles: Round 3 is too loose. Work the dc groups more firmly.
- The points are blunt: Make sure you skip a dc on each side of the valley sc in Round 4.
- The tail is straight instead of curved: Check that Row 1 is worked firmly. Blocking also sets the curve.
- The tail curls backward: Your gold fans are too full. Keep them at 5 dc across 8 loops.
- Your fan count is off: Recount Row 1. It needs exactly 49 sc.
- The metallic thread splits: Use a slightly blunter hook and stretch shorter lengths as you work.
Care
Dust the ornament gently, or hand-wash it in cool water and re-block it with starch. Store it flat in tissue paper so the picots don’t get crushed.

Final Notes
Here is the full measurement chain. With a gauge of 11 sc per 1 in (2.5 cm), the star grows to 0.6 in (1.5 cm), then 1.1 in (2.8 cm), then 1.6 in (4.1 cm), then 2.4 in (6.1 cm). The gold Round 5 brings it to 2.75 in (7.0 cm). The 49-stitch tail adds about 4.5 in (11.4 cm) along its curve, for 6.5 in (16.5 cm) before edging. The gold edging and tip cluster bring the finished ornament to 6.75 in (17.1 cm).
If you check each stage against these numbers, your comet will come out right.
Happy crocheting!