

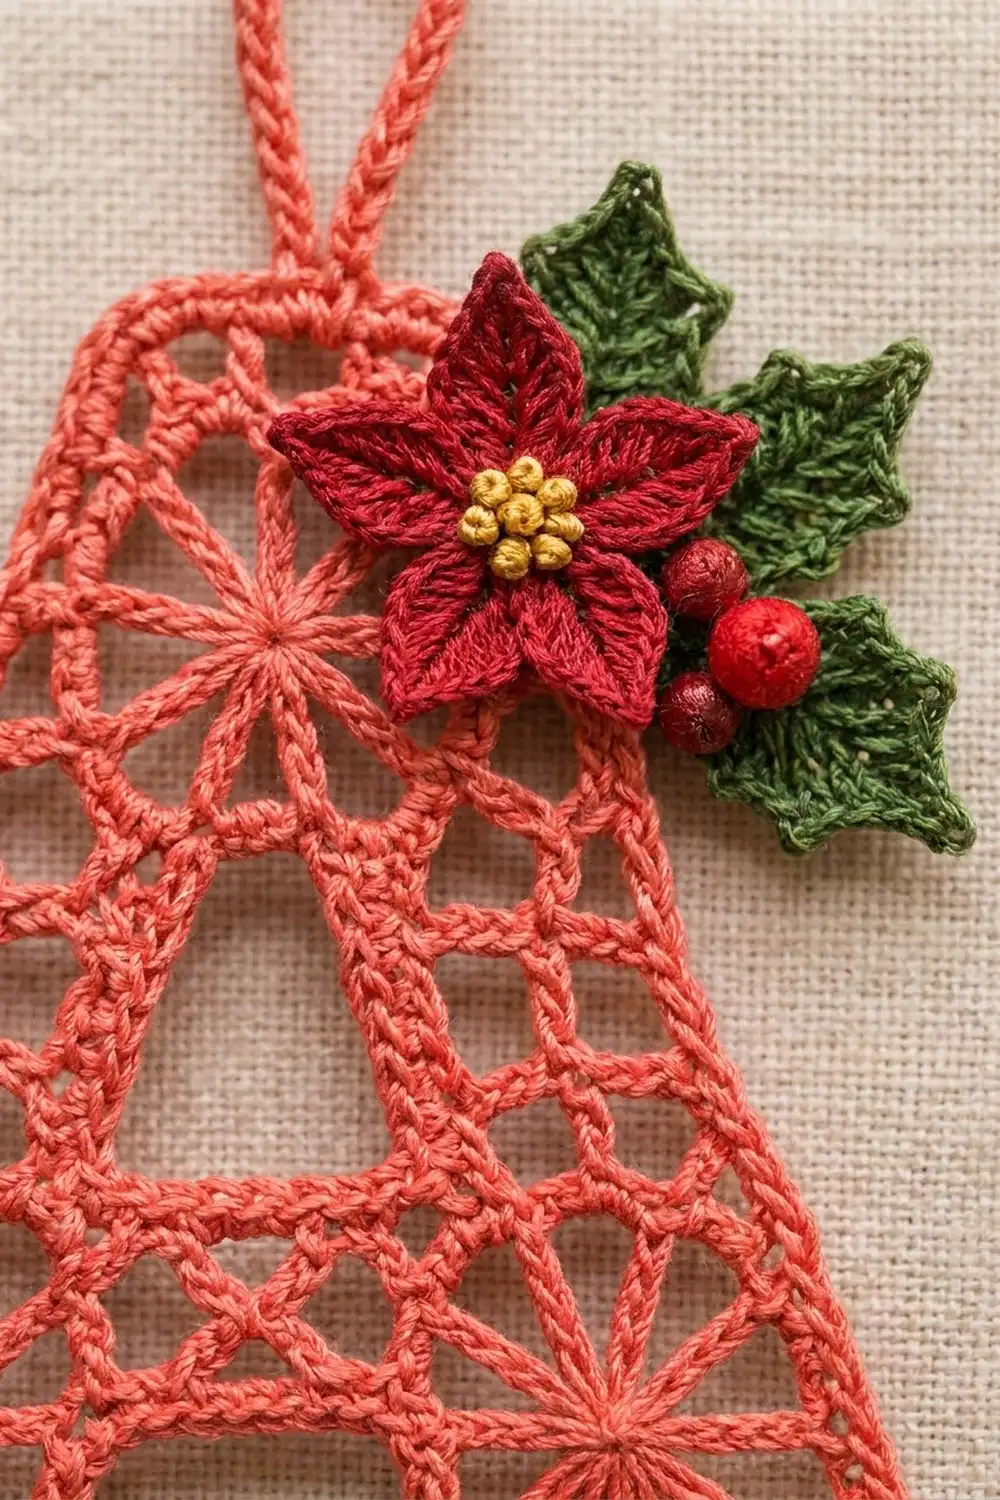
This lace monogram ornament is a capital letter A made of open filet mesh. It has five spoked “wheel” openings: one in each foot, one at each crossbar end and one at the apex. A corded outline gives it a crisp edge, and a slim hanging loop rises from the flat top.
The main thread is a warm coral red. A small deep-red poinsettia with a gold-yellow center sits on the upper right shoulder. Behind it are two dark green holly leaves, with three bright red berries tucked between the flower and the leaves. The style is traditional thread lace with a cozy Christmas finish.
The pattern uses US crochet terms. The finished letter measures 4.25 in (10.8 cm) wide at the feet and 4.65 in (11.8 cm) tall, plus a 1.25 in (3.2 cm) hanging loop.
You’ll work the letter in filet rows from the bottom up:
- Make two legs.
- Join them with the crossbar rows.
- Work the two sides of the counter separately, then close the counter.
- Shape the apex.
- Add the outline, the loop and the wheels.
- Sew on the appliqués.
Finished Size and Construction
- Finished size: 4.25 in (10.8 cm) x 4.65 in (11.8 cm), plus a 1.25 in (3.2 cm) loop
- Skill level: Intermediate
- Terminology: US
- Yarn weight: Size 3 crochet thread (Lace, weight 0)
- Hook: 2.25 mm (B-1)
- Number of pieces: 1 lace letter, plus sewn-on appliqués (1 poinsettia, 2 holly leaves, 3 berries)
- Layout: a single letter A on a grid 10 cells wide x 11 rows tall
- Cell size: 0.4 in (1.0 cm) square
- Size before border: 4 in (10.2 cm) x 4.4 in (11.2 cm)
- Border depth: 1/8 in (0.3 cm) per side
Materials
Use smooth, mercerized size 3 cotton thread. It keeps the mesh crisp and takes starch well. Fuzzy or very soft thread lets the cells collapse.
- Coral red (main): 12 g / 34 m
- Deep red (poinsettia): 3 g / 8 m
- Dark green (holly leaves): 3 g / 8 m
- Bright red (berries): 1 g / 3 m
- Gold-yellow (flower center): 1 g / 2 m
These quantities include a margin for swatching and weaving in ends.
Tools:
– 2.25 mm hook
– Small tapestry needle
– Sewing needle
– Scissors
– Stitch markers
– Blocking board
– Rustproof pins
– Spray bottle
– Spray starch or fabric stiffener (optional)
Abbreviations (US Terms)
- ch – chain
- sl st – slip stitch
- sc – single crochet
- hdc – half double crochet
- dc – double crochet
- sk – skip
- sp – space
- rev sc – reverse single crochet (crab stitch), worked left to right
Special terms:
– Cell: one open filet square (dc, ch 2, dc).
– Bar: a ch-5 that spans 2 cells with no dc in the middle.
– Wheel block: a 2 x 2 cell opening. The bar of its lower row runs across the middle and becomes the horizontal spoke.
– Picot: ch 2, sl st in 2nd ch from hook.
– Post lines: b0 to b10 are the vertical grid lines, numbered from left to right on the finished letter. Every dc sits on one of these lines.
Gauge and Checkpoints
Gauge: 1 cell = 0.4 in (1.0 cm) wide and tall, so 5 cells x 5 rows = 2 in (5.1 cm).
Test one piece first: Leg A is your swatch. After Row 3, it should measure 1.6 in (4.1 cm) across Rows 1–2 and 1.2 in (3.0 cm) tall.
- If it’s too big, change to a 2.0 mm hook.
- If it’s too small, change to a 2.5 mm hook.
Even 1/16 in (0.2 cm) per cell adds up to about 0.6 in (1.5 cm) across the 10-cell base.
Checkpoints:
– After Row 5: 2 in (5.1 cm) tall. The crossbar is 3.2 in (8.1 cm) wide and the feet are 4 in (10.2 cm) across.
– After Row 8: 3.2 in (8.1 cm) tall. The counter is 0.8 in (2.0 cm) x 1.2 in (3.0 cm).
– After Row 11: 4.4 in (11.2 cm) tall, with a top 1.6 in (4.1 cm) wide.
– After the border: 4.25 in (10.8 cm) x 4.65 in (11.8 cm).
Legs (Make 2)
Use coral thread. A ch-5 at the start of a row counts as dc + ch 2. A ch-8 at the start of a row counts as dc + ch 5.
Ch 17.
Row 1: Dc in 8th ch from hook, ch 2, sk 2 ch, dc in next ch, ch 5, sk 5 ch, dc in last ch. (4 posts, including the skipped ch; 4 cells wide: 2 cells + 1 bar.)
Row 2: Ch 8, turn, dc in next dc, ch 2, dc in next dc, ch 2, dc in 5th of the 7 skipped ch. (4 posts, 4 cells.)
Row 3: Ch 5, turn, dc in next dc, ch 2, dc in next dc, ch 2, dc in 6th ch of turning ch-8 (the center of its bar). (4 posts, 3 cells. The outer edge steps in by 1 cell.)
Fasten off Leg A. Make Leg B the same way, but don’t fasten off. The Rows 1–2 wheel block of each leg forms its flared foot.
Crossbar
Lay Leg B on the right, with its working loop at the top right and its wheel block at the lower right. Filet mesh looks the same on both sides, so flip Leg A to mirror it. Place Leg A on the left, wheel block lower left, with a 0.8 in (2.0 cm) gap between the inner edges.
Row 4 (b9 to b1): Ch 8, turn, sk next dc, dc in next dc (b7), ch 2, dc in 3rd ch of Leg B’s Row 3 turning ch-5 (b6). Ch 5, dc in 3rd ch of Leg A’s Row 3 turning ch-5 (b4). Ch 2, dc in next dc (b3), ch 5, sk next dc, dc in last dc (b1). (6 posts, 8 cells: 3 bars + 2 ch-2 sps.)
The middle bar closes the top of the notch between the legs, which is 0.8 in (2.0 cm) x 1.2 in (3.0 cm).
Row 5 (b1 to b9): Ch 8, turn, dc in next dc (b3), ch 2, dc in next dc (b4), ch 2, dc in 3rd ch of next bar (b5), ch 2, dc in next dc (b6), ch 2, dc in next dc (b7), ch 5, dc in 3rd ch of turning ch-8 (b9). (7 posts, 8 cells.)
The end bars of Rows 4–5 form the two crossbar wheel blocks.
Counter Sides
Side 1
Row 6: Turn, sl st in next 3 ch (to the center of the bar, b8). Ch 5, dc in next dc (b7), ch 2, dc in next dc (b6). (3 posts, 2 cells.)
Row 7: Ch 5, turn, dc in next dc, ch 2, dc in 3rd ch of turning ch-5 (b8). (3 posts, 2 cells.) Place a marker in the live loop and set it aside.
Side 2
Row 6: Join coral with a sl st in the 2nd dc of Row 5, counting from the left edge (b4). Ch 5, dc in next dc (b3), ch 2, dc in 6th ch of Row 5’s turning ch-8 (b2). (3 posts, 2 cells.)
Row 7: Ch 5, turn, dc in next dc, ch 2, dc in 3rd ch of beginning ch-5 (b4). (3 posts, 2 cells.) Fasten off.
Upper Rows
Pick up Side 1’s live loop.
Row 8 (b8 to b2): Ch 5, turn, dc in next dc (b7), ch 2, dc in 3rd ch of turning ch-5 (b6). Ch 5, dc in last dc of Side 2 (b4), ch 2, dc in next dc (b3), ch 2, dc in 3rd ch of turning ch-5 (b2). (6 posts, 6 cells.)
The new bar closes the counter, which is 2 cells x 3 rows: 0.8 in (2.0 cm) x 1.2 in (3.0 cm).
Row 9 (b3 to b7): Turn, sl st in next 2 ch and next dc (b3). Ch 5, dc in next dc (b4), ch 2, dc in 3rd ch of bar (b5), ch 2, dc in next dc (b6), ch 2, dc in next dc (b7). (5 posts, 4 cells.)
Row 10: Ch 5, turn, dc in next dc (b6), ch 5, sk next dc, dc in next dc (b4), ch 2, dc in 3rd ch of turning ch-5 (b3). (4 posts, 4 cells.)
Row 11: Ch 5, turn, dc in next dc (b4), ch 5, dc in next dc (b6), ch 2, dc in 3rd ch of turning ch-5 (b7). (4 posts, 4 cells.)
Don’t fasten off. Each side edge steps inward from b0 to b1, b2 and then b3, which makes the diagonal sides.
Border
Border gauge: 3 sc per cell edge, which is 7.5 sc per inch. Work 2 sc in each ch-2 sp + 1 sc in the post top, or 3 sc around each row end.
Rnd 1: Ch 1. Work clockwise, starting at the top-right corner (b7).
– Top-right corner: 3 sc in the last dc made (3).
– Right side (42):
– Rows 11–9: 3 sc around each row end (9).
– Step: 2 sc in ch-2, 1 sc in post top (3).
– Rows 8–6: 3 sc around each row end (9).
– Step: 2 sc around outer half of bar, 1 sc in post top (3).
– Rows 5–3: 3 sc around each row end (9).
– Step: 2 sc around outer half of bar, 1 sc in post top (3).
– Rows 2–1: 3 sc around each row end (6).
– Bottom-right corner: 3 sc in outer foundation ch (3).
– Right foot: 1 sc in each of the next 11 foundation ch (11).
– Inner foot corner: 3 sc in last foundation ch (3).
– Notch (23): 9 sc up the row ends, 5 sc around the Row 4 bar, 9 sc down the row ends.
– Left inner foot corner, left foot, bottom-left corner: 3, 11, 3.
– Left side: work as for the right side, in reverse order (42).
– Top-left corner: 3 sc in post top (3).
– Top (11): 2 sc in ch-2, 1 sc in dc, 5 sc in bar, 1 sc in dc, 2 sc in ch-2.
Join with a sl st to the first sc. (158 sc.)
Why the math works:
– The perimeter is 48 cell edges: 19.2 in (48.8 cm).
– Every straight run gets 3 sc per cell edge, so the stitch count stays matched to the sc gauge.
– Only the six main convex corners get extra stitches (3 sc in one stitch).
– Each stair step has one convex and one concave turn, so the two cancel out.
– The notch corners are concave and need nothing extra.
This keeps the edge flat, without ruffling or cupping.
Rnd 2: Ch 1, rev sc in each sc around, join. (158 sts.) Fasten off. Together, Rnds 1 and 2 add 1/8 in (0.3 cm) on each side.
Counter edge: Join coral at a bottom corner of the counter. Work 5 sc along the bottom, 9 sc up one side, 5 sc around the Row 8 bar and 9 sc down the other side. (28 sc.) Work 1 rnd of rev sc. (28 sts.) Fasten off.
Hanging loop: Join with a sl st in the 6th (center) st of the top edge. Ch 26, sl st in the same st. Work 1 sc in each ch around the loop (26 sc), then sl st in the same st. Fasten off. The loop stands 1.25 in (3.2 cm) tall.
Spoked Wheels (Make 5)
There are five wheel blocks: one in each foot, one at each crossbar end and one at the apex. Each opening is 0.8 in (2.0 cm) square. Work each wheel as follows:
- Join coral with a sl st in a bottom corner. Ch 4, sl st around the center ch of the middle bar (this is the hub). Ch 4, sl st in the opposite top corner.
- Sl st in the next 3 ch of the top bar, to its center. Ch 3, sl st around the hub, ch 3, sl st in the center of the bottom edge.
- Sl st in the next 3 sts, to the remaining bottom corner. Ch 4, sl st around the hub, ch 4, sl st in the remaining top corner. Fasten off.
Each wheel has 8 spokes. Wrap the tail twice around the hub to make it firm, then weave it in.
Appliqués
Poinsettia (deep red):
– Ch 2. Work 5 sc in 2nd ch from hook, join. (5 sc.)
– Petal: ch 7, sl st in 2nd ch from hook, sc in next ch, hdc in next ch, dc in next 2 ch, hdc in last ch, sl st in next sc.
– Work the petal 4 more times. (5 pointed petals.)
The flower is 1.25 in (3.2 cm) across. Add 7 gold-yellow French knots in the center.
Holly leaf (dark green, make 2): Ch 9.
– Side 1: Sl st in 2nd ch from hook, then sc, hdc, dc, picot, dc, dc, picot, hdc, sc in the next ch.
– Tip: Ch 3, sl st in 3rd ch from hook.
– Side 2: Working along the other side of the chain: sc, hdc, dc, picot, dc, dc, picot, hdc, sc, sl st.
Fasten off. Each leaf is 1 in (2.5 cm) long.
Berry (bright red, make 3): Ch 2. Work 6 sc in 2nd ch from hook, join. Sc2tog 3 times, stuff with the tail and close. Each berry is 0.25 in (0.6 cm) across.
Assembly:
1. Sew both leaves behind the upper right shoulder. Angle one up and the other down, so each sticks out about 0.5 in (1.3 cm) past the edge.
2. Sew the poinsettia on top so it overlaps the top-right corner and the bases of the leaves.
3. Tuck the berries between the flower and the leaves and stitch them on securely.
Final Blocking
- Block before you add the appliqués. Soak the letter in cool water and roll it in a towel to press out the water.
- Draw a 4 in (10.2 cm) x 4.4 in (11.2 cm) grid of 0.4 in (1.0 cm) squares and cover it with plastic.
- Pin the six main corners first, then each wheel hub and each counter corner.
- Lay a ruler along each side and nudge the stair steps into straight diagonals.
- Starch the letter and let it dry completely.
- Sew on the appliqués, then steam the petals lightly to shape them.
Final Quality-Control Checklist
- The letter measures 4.25 in (10.8 cm) x 4.65 in (11.8 cm).
- The feet flare evenly and the notch is centered.
- The counter is 0.8 in (2.0 cm) wide and straight.
- All five wheels have 8 taut spokes and a firm hub.
- Rnd 1 has 158 sc and lies flat.
- The loop is centered and 1.25 in (3.2 cm) tall.
- The appliqués are secure and all ends are hidden.
Troubleshooting
- Cells are rectangular instead of square: Your dc are too tall. Pull up the first loop of each dc a little shorter.
- The legs don’t line up for Row 4: Check that each leg has 4 posts in Row 3 and that Leg A is flipped.
- The edge ruffles: Work 2 sc instead of 3 around the row ends next to the steps.
- The edge cups: Use a hook one size larger for the border.
- The spokes sag: Shorten the diagonal spokes to ch 3.
- The letter leans: Re-block with the apex pinned directly above the notch.
Care
Hand wash in cool water, lay flat to dry and re-starch if needed. Store flat in tissue paper between seasons.

Final Notes
The measurements build in one chain:
– Each cell is 0.4 in (1.0 cm).
– 10 cells by 11 rows makes a 4 in (10.2 cm) x 4.4 in (11.2 cm) letter.
– A 1/8 in (0.3 cm) border brings it to 4.25 in (10.8 cm) x 4.65 in (11.8 cm).
– The loop adds 1.25 in (3.2 cm) on top.
If your Leg A swatch matches gauge, every later checkpoint will match too.
Happy crocheting!