

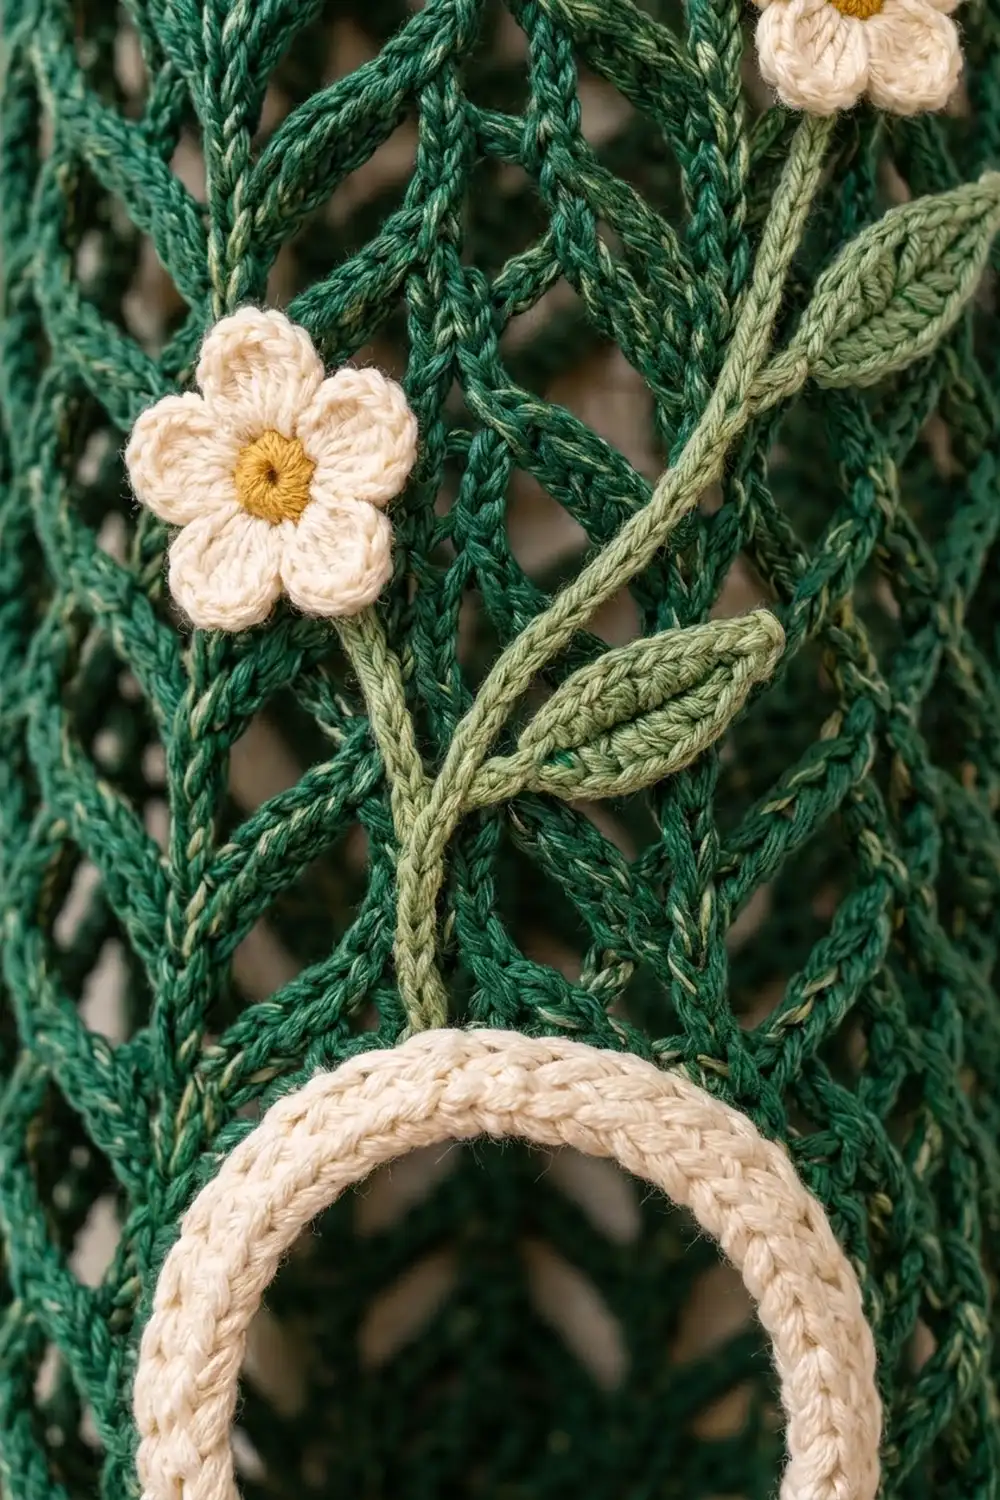
This holder gets the pile of crumpled grocery bags out of your kitchen drawer and onto the wall. The body is an open lattice of stacked V-stitches in deep forest green. The columns look like soft chevrons, and you can see the bags inside.
A cream band finishes the top, and a cream ring frames the round dispensing hole near the bottom. Two small cream flowers with mustard centers grow up the front on a sage-green stem with leaves.
The pattern uses US crochet terms. The finished holder is 6 in (15.2 cm) wide laid flat, 12 in (30.5 cm) around, and 17 3/4 in (45.1 cm) tall, not counting the hanging tab.
Construction is simple. A flat single-crochet circle makes the closed base, and the lattice body is worked upward in joined rounds. A few rows are worked back and forth to leave the opening, then a chain bridge closes the tube again. The top band, opening edging, tab, and appliqués finish the piece.
Finished Size and Construction
- Finished size: 6 in (15.2 cm) wide flat x 17 3/4 in (45.1 cm) tall
- Circumference: 12 in (30.5 cm)
- Skill level: Intermediate
- Terminology: US
- Yarn weight: Worsted (#4)
- Hook: 5.0 mm (H-8)
- Number of pieces: 1 main body, plus a small sewn-on tab, flowers, leaves, and stem
- Layout: Single tube, opening at the front, tab at the back
- Body size before border: 6 in (15.2 cm) wide x 16 1/2 in (41.9 cm) tall
- Border (top band) depth: 1 1/4 in (3.2 cm)
- Opening: 4 in (10.2 cm) outer, about 3 in (7.6 cm) inner
Materials
Choose a smooth worsted cotton or cotton blend. Cotton holds the lattice open and doesn’t stretch under the weight of the bags. Acrylic also works, but the holder may get a little longer over time.
- Forest green (A): 70 g, about 120 m
- Cream (B): 20 g, about 34 m
- Mustard yellow (C): 3 g, about 5 m
- Sage green (D): 8 g, about 14 m
These amounts include about 20 percent extra for swatching and for differences between yarn brands.
Tools:
- 5.0 mm (H-8) crochet hook
- Wooden ring, 2 in (5.1 cm) across
- Tapestry needle
- Stitch markers (at least 4)
- Scissors and a measuring tape
- Rust-proof pins for blocking
Abbreviations (US Terms)
- ch – chain
- sl st – slip stitch
- sc – single crochet
- hdc – half double crochet
- dc – double crochet
- sc2tog – single crochet 2 together
- sk – skip
- sp – space
- st(s) – stitch(es)
- MR – magic ring
- rnd – round
Special stitch – V-stitch (V-st): (dc, ch 1, dc) in the same stitch or space. The ch-1 in the middle is the “V-sp.”
Beginning V-st: ch 4 (counts as dc and ch 1), dc in the same space.
Gauge and Checkpoints
- Single crochet: 16 sts and 16 rnds = 4 in (10.2 cm)
- V-stitch lattice: 3 repeats (V-st plus ch 2) = 3 in (7.6 cm); 3 rnds = 2 in (5.1 cm)
Make the base first and use it as your swatch. After Rnd 8 it should be about 4 in (10.2 cm) across. If it’s larger, go down 0.5 mm; if it’s smaller, go up 0.5 mm.
Checkpoints:
- After Rnd 10 (base): side wall about 1/2 in (1.3 cm) tall, 48 sts.
- After Rnd 12: 12 V-sts measure 12 in (30.5 cm) around, 6 in (15.2 cm) flat.
- After Rnd 19: opening about 4 in (10.2 cm) wide x 4 in (10.2 cm) tall.
- After Rnd 34: lattice measures 16 in (40.6 cm) from the top of Rnd 10.
- After Rnd 39: total height 17 3/4 in (45.1 cm).
If the lattice is too wide, the ch-2 spaces are too loose, so work them more snugly before you change hooks. If the rounds are too tall, pull up less yarn on each dc.
Base
With A, make an MR.
Rnd 1: ch 1, 6 sc in ring, join with sl st to first sc. (6 sts)
Rnd 2: ch 1, 2 sc in each st around, join. (12 sts)
Rnd 3: ch 1, (sc in next st, 2 sc in next st) 6 times, join. (18 sts)
Rnd 4: ch 1, (sc in next 2 sts, 2 sc in next st) 6 times, join. (24 sts)
Rnd 5: ch 1, (sc in next 3 sts, 2 sc in next st) 6 times, join. (30 sts)
Rnd 6: ch 1, (sc in next 4 sts, 2 sc in next st) 6 times, join. (36 sts)
Rnd 7: ch 1, (sc in next 5 sts, 2 sc in next st) 6 times, join. (42 sts)
Rnd 8: ch 1, (sc in next 6 sts, 2 sc in next st) 6 times, join. (48 sts)
Measure: about 4 in (10.2 cm) across.
Rnds 9–10: ch 1, sc in each st around, join. (48 sts)
These two even rounds turn the edge upward and give the holder its rounded bottom.
Lattice Body
Rnd 11 (set-up): Beginning V-st in first st, ch 2, sk 3 sts, *V-st in next st, ch 2, sk 3 sts; repeat from * around, join with sl st to 3rd ch of beginning ch-4. (12 V-sts, 12 ch-2 sps)
Each repeat uses 4 base stitches, so 48 ÷ 4 = 12 repeats.
Rnd 12: sl st into first V-sp, beginning V-st in same sp, ch 2, sk ch-2 sp, *V-st in next V-sp, ch 2, sk ch-2 sp; repeat from * around, join. (12 V-sts, 12 ch-2 sps)
Number the V-sts 1 to 12, starting with the beginning V-st. Place a marker in V-sts 1 and 8. V-sts 9–12 will sit below the opening, which is the front of the holder.
Opening Rows
Work these rows back and forth over V-sts 1–8 only. Leave V-sts 9–12 unworked.
Row 13 (RS): sl st into V-sp of V-st 1, beginning V-st in same sp, (ch 2, V-st in next V-sp) 7 times, turn. (8 V-sts, 7 ch-2 sps)
Rows 14–18: sl st into first V-sp, beginning V-st in same sp, (ch 2, V-st in next V-sp) 7 times, working the last V-st into the ch-1 sp of the turning ch-4, turn. (8 V-sts, 7 ch-2 sps)
You now have six rows (Rows 13–18), about 4 in (10.2 cm) tall, and you finish at the V-st 1 edge.
Rnd 19 (RS, bridge): sl st into first V-sp, beginning V-st in same sp, (ch 2, V-st in next V-sp) 7 times, ch 18, join with sl st to 3rd ch of beginning ch-4. Do not turn from here on. (8 V-sts, 7 ch-2 sps, 1 ch-18 bridge)
Rnd 20: sl st into first V-sp, beginning V-st in same sp, (ch 2, V-st in next V-sp) 7 times, ch 2, sk first 2 ch of bridge, V-st in next ch, (ch 2, sk 3 ch, V-st in next ch) 3 times, ch 2, sk last 3 ch, join. (12 V-sts, 12 ch-2 sps)
Bridge check: 2 + 1 + (3 + 1) x 3 + 3 = 18 chains used.
Upper Body
Rnds 21–34: Repeat Rnd 12. (12 V-sts, 12 ch-2 sps each round)
Check: Rnds 11–34 make 24 lattice rounds and rows, and 24 x 2/3 in = 16 in (40.6 cm). Fasten off A.
Hanging Tab, Flowers, Leaves, and Stem
Hanging Tab
Make the tab after the top band is finished (see Border).
With A, find the back of the holder, opposite the opening. Join A in st 14 of Rnd 39.
Row 1: ch 1, sc in sts 14–19, turn. (6 sts)
Rows 2–20: ch 1, sc in each st across, turn. (6 sts)
The tab is 1 1/2 in (3.8 cm) wide x 5 in (12.7 cm) long. Slide the wooden ring onto it and fold the last 2 in (5.1 cm) toward the inside of the holder. Whipstitch the end to the inside of the band, then fasten off and weave in.
Flowers (make 2)
With C, make an MR.
Rnd 1: ch 1, 10 sc in ring, join. (10 sts) Fasten off C.
Rnd 2: Join B in any st, *(hdc, 3 dc, hdc) in next st, sl st in next st; repeat from * 4 more times. (5 petals; 25 petal sts plus 5 sl sts)
Fasten off, leaving a 10 in (25.4 cm) tail. Each flower is about 1 1/2 in (3.8 cm) across.
Leaves (make 3)
With D, ch 8.
Side 1: sl st in 2nd ch from hook, sc in next ch, hdc in next ch, dc in next 2 ch, hdc in next ch, sc in last ch. (7 sts)
Tip and Side 2: ch 1, rotate to work along the opposite side of the foundation chain, sc in first ch, hdc in next ch, dc in next 2 ch, hdc in next ch, sc in next ch, sl st in last ch. (7 sts)
Sl st into the tip. Fasten off with a long tail. Each leaf is about 2 in (5.1 cm) long.
Stem
Main stem: With D, ch 36, sl st in back bump of 2nd ch from hook and each ch across. (35 sl sts, about 8 in / 20.3 cm)
Branch: With D, ch 14, sl st in back bump of 2nd ch from hook and each ch across. (13 sl sts, about 3 in / 7.6 cm)
Placing the Appliqués
Slide a rolled towel inside the holder so you don’t sew through both layers.
- Start the main stem just above the top of the opening, slightly right of center. Curve it gently up to about 13 1/2 in (34.3 cm) above the base, ending on the right.
- Sew one flower at the top of the stem.
- Attach the branch about one-third of the way up the main stem, angle it to the left, and sew the second flower at its end.
- Sew one leaf near the top flower, one where the branch meets the stem, and one low on the stem near the opening.
Tack each piece to the lattice strands with small stitches in matching yarn.
Border: Top Band and Opening Edging
Border Gauge
Both border areas use B in sc at 16 sts = 4 in (10.2 cm), which is 4 sts per inch.
Top Band
Join B in the V-sp of V-st 1 of Rnd 34.
Rnd 35 (conversion): ch 1, *sc in first dc of V-st, sc in V-sp, sc in second dc of V-st, sc in ch-2 sp; repeat from * around, join. (36 sc worked into V-sts + 12 sc worked into ch-2 sps = 48 sts)
Rnds 36–39: ch 1, sc in each st around, join. (48 sts)
Fasten off and weave in.
Laid flat, each side of the band holds 24 sts, and 24 ÷ 4 = 6 in (15.2 cm). The full round is 48 ÷ 4 = 12 in (30.5 cm), which matches the 12 lattice repeats at 1 in (2.5 cm) each. That’s why the band lies flat and doesn’t flare or pull in. Five rounds at 4 rounds per inch make the band 1 1/4 in (3.2 cm) deep.
Opening Edging
Treat the opening as four sides of 12 sts each.
Rnd 1: Join B in the V-sp of V-st 9 of Rnd 12 (bottom edge). Working counterclockwise:
- Bottom: 3 sc in each V-sp of V-sts 9–12, skipping the ch-2 sps between them. (12 sts)
- Side: 2 sc around the post of each row-end, Rows 13–18. (12 sts)
- Top: working into the free loops of the ch-18 bridge, (sc in next ch, sc2tog over next 2 ch) 6 times. (12 sts)
- Other side: 2 sc around each row-end post, Rows 18–13. (12 sts)
Join. (48 sts)
Rnd 2: ch 1, (sc in next 4 sts, sc2tog) 8 times, join. (40 sts)
Fasten off and weave in.
The square opening is 16 in (40.6 cm) around its edge, but Rnd 1 holds only 48 sts, or 12 in (30.5 cm). This slight gathering pulls the corners in and rounds the hole. Rnd 2 removes 8 more sts for the smaller inner circle, which leaves an inner opening about 3 in (7.6 cm) wide.
Final Blocking
- Weave in any remaining tails along a lattice strand or inside the band.
- Soak the holder in cool water for 10 minutes, then gently press the water out in a towel. Don’t wring it.
- Roll a towel into a tube about 12 in (30.5 cm) around and slide it inside.
- Lay the holder flat with the opening facing up. Pin it to 6 in (15.2 cm) wide and 17 3/4 in (45.1 cm) tall.
- Shape the opening with your fingers into a circle about 4 in (10.2 cm) across.
- Straighten each V-column so it runs vertically.
- Pat the flowers flat and spread the petals.
- Let it dry completely before hanging.
Final Quality-Control Checklist
- The base has 48 sts and is about 4 in (10.2 cm) across.
- Every lattice round has 12 V-sts and 12 ch-2 sps.
- The V-columns run straight and don’t spiral.
- The opening is centered on the front and is 4 in (10.2 cm) across.
- The opening edging has 48 sts, then 40 sts, and lies flat.
- The band has 48 sts per round and is 1 1/4 in (3.2 cm) deep.
- The tab is centered at the back and the ring is secure.
- The holder is 6 in (15.2 cm) wide and 17 3/4 in (45.1 cm) tall.
Troubleshooting
The V-columns spiral. You’re probably working into the ch-2 sp instead of the V-sp. Always place each V-st into the ch-1 at the center of the V below.
The opening is lopsided. Count the stitches along the row ends on each side. Each side needs exactly 12 sc.
The opening edging ruffles. Your sc gauge is loose. Work Rnd 2 with a 4.5 mm hook.
The band flares. Check that Rnd 35 has 48 sts, not 60. Work one sc into each ch-2 sp, not two.
The holder stretches when full. Switch to cotton, or work the lattice with a 4.5 mm hook.
The appliqués pucker. Sew with a towel inside and keep your stitches loose.
Care
Hand wash in cool water and lay flat to dry. Reshape the opening while it’s still damp.

Final Notes
The measurements follow a simple chain. A 48-stitch base, 4 in (10.2 cm) across, sets the 12 in (30.5 cm) circumference. Those 48 sts become 12 V-repeats of 1 in (2.5 cm) each. Twenty-four lattice rounds give 16 in (40.6 cm) of body. The 1/2 in (1.3 cm) base wall and the 1 1/4 in (3.2 cm) band bring the height to 17 3/4 in (45.1 cm). The band’s 48 stitches match the base count exactly.
Check each stage against these numbers and your holder will hang straight and neat.
Happy crocheting!