

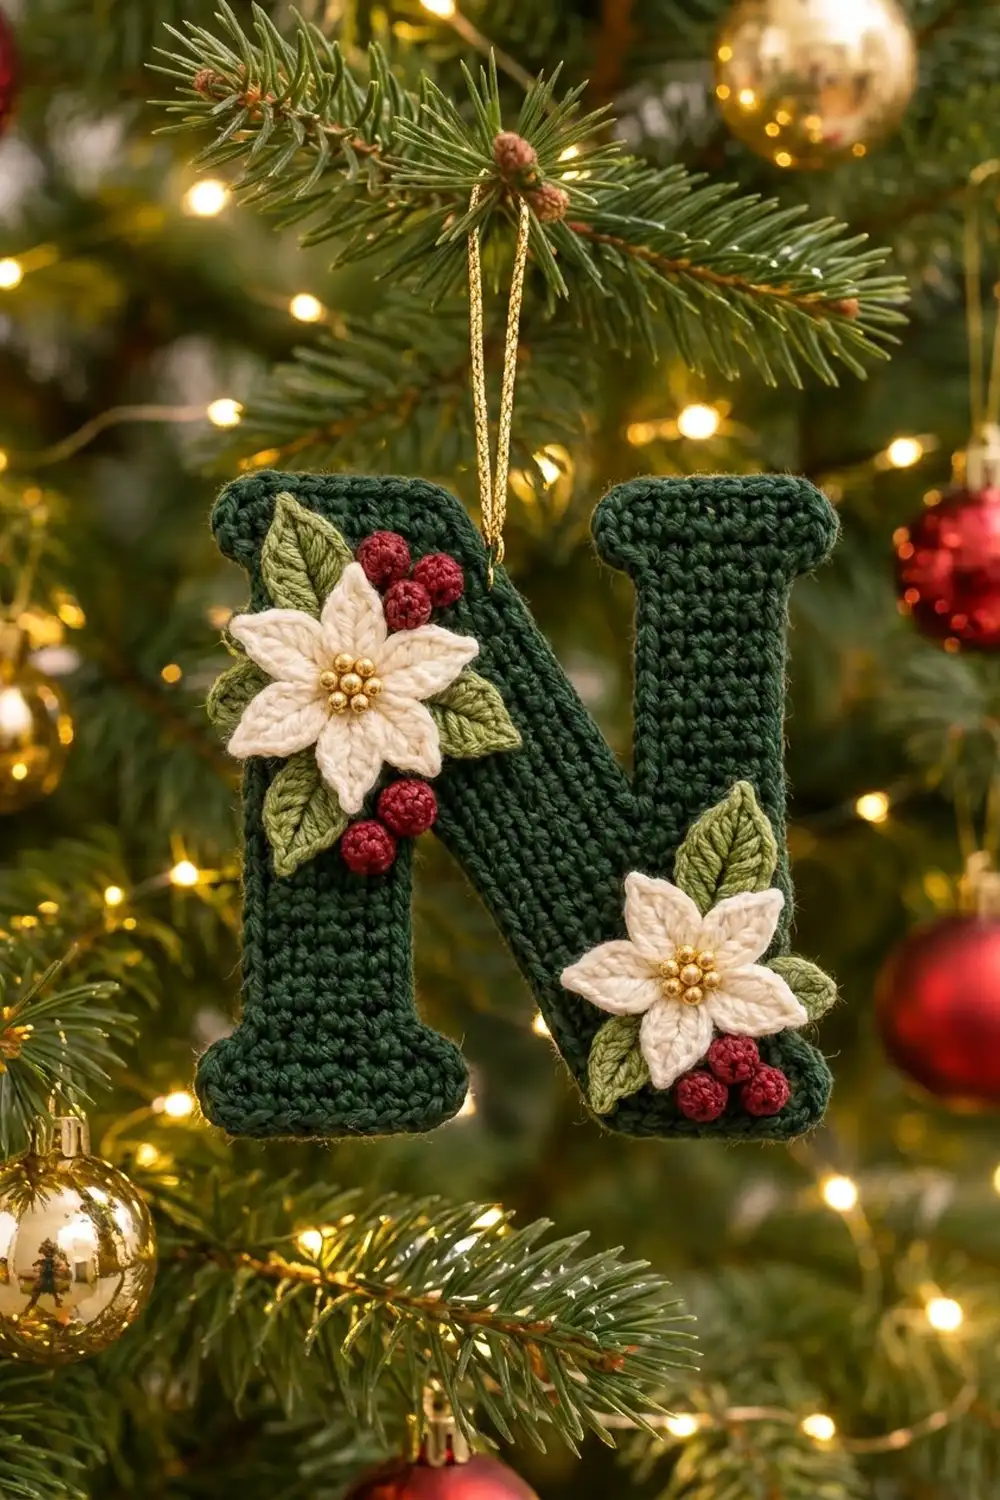
This chunky letter N ornament is made in deep forest green and trimmed with two cream poinsettias, sage-green leaves and tiny red berries. It makes a personal tree ornament, a gift-tag topper or a monogram hung on a door handle, and it looks finished on both the tree and the table.
The letter is worked in dense single crochet, so the fabric is firm, flat and keeps its shape without stiffener. A slip-stitch outline gives it a neat, slightly raised edge. Small gold beads sit in the flower centers, and a gold cord loop finishes the top.
This pattern uses US crochet terms. The finished ornament measures 5.7 in (14.5 cm) tall and 5.0 in (12.7 cm) wide.
The letter is one piece. You turn it sideways and work it in rows from left to right: first the left stem, then a stepped diagonal, then the right stem. A two-round edging smooths out the steps. Last, you sew on the poinsettias, leaves, berries and hanging loop.
Finished Size and Construction
- Finished size: 5.7 in (14.5 cm) tall x 5.0 in (12.7 cm) wide
- Skill level: Easy to intermediate
- Terminology: US crochet terms
- Yarn weight: DK (light worsted, #3)
- Hook: 3.5 mm (E-4)
- Number of pieces: 1 letter base, plus 16 small appliqués (2 flowers, 6 leaves, 8 berries)
- Layout: one single letter. Nothing is joined to it except the sewn-on trims.
- Letter size before border: 5.2 in (13.2 cm) tall x 4.5 in (11.4 cm) wide
- Border depth: about 0.25 in (0.6 cm) on every side
Materials
Use a smooth DK yarn in cotton, a cotton blend or acrylic. Smooth yarn shows the dense stitch texture clearly. Avoid fuzzy yarn, because it blurs the outline of the letter.
- Dark forest green: 15 g / 35 m (letter and border)
- Cream: 5 g / 12 m (poinsettias)
- Sage green: 4 g / 9 m (leaves)
- Deep red: 3 g / 7 m (berries)
All quantities include a safety margin of about 50%.
Tools:
- 3.5 mm (E-4) crochet hook
- Tapestry needle
- Sewing needle and cream sewing thread
- 14 gold seed or round beads, 4 mm (7 per flower)
- 8 in (20.3 cm) of gold metallic cord
- Stitch markers
- Blocking board and rust-proof pins
- Spray bottle or steamer
Abbreviations (US Terms)
- ch – chain
- sl st – slip stitch
- sc – single crochet
- hdc – half double crochet
- dc – double crochet
- tr – treble crochet
- st(s) – stitch(es)
- sk – skip
- MR – magic ring
- sp – space
Special stitch – fsc (foundation single crochet extension): Insert your hook into the chain at the base of the last stitch you made, yarn over and pull up a loop (2 loops on hook). Yarn over and draw through 1 loop; this makes the “chain” base. Yarn over and draw through both loops. Each fsc adds one new stitch to the end of the row, extending it past where the previous row stopped.
Gauge and Checkpoints
Gauge: 20 sc and 22 rows = 4 in (10.2 cm) in sc with a 3.5 mm hook.
Your first rows act as the gauge test. Work Rows 1–9 (the left stem), then measure before you go on. Check each stage:
- After Row 9: the stem is 26 sts long, measuring 5.2 in (13.2 cm), and 9 rows wide, measuring 1.6 in (4.1 cm).
- After Row 16: the piece is 2.9 in (7.4 cm) wide from the left edge to the last diagonal row.
- After Row 25: the letter is 5.2 in (13.2 cm) tall x 4.5 in (11.4 cm) wide.
- After the border: the letter is 5.7 in (14.5 cm) tall x 5.0 in (12.7 cm) wide.
If your stem is too long (over 5.4 in / 13.7 cm), switch to a 3.25 mm hook and start again. If it is too short (under 5.0 in / 12.7 cm), switch to a 3.75 mm hook.
Getting the height right matters most, because every border count depends on it. If your rows are slightly off but your stitches are on gauge, the letter will only be a little narrower or wider, which is fine for an ornament.

The Letter N
Orientation: You work the letter lying on its side. Each row runs from the bottom of the letter to the top, or from the top to the bottom. Row 1 is the outer left edge of the N.
Stitch numbers count from the bottom of the letter: stitch 1 is at the bottom edge and stitch 26 is at the top. The beginning tail ends up at the top-left corner, so you can use it to keep track of which end is the top.
The ch 1 at the start of a row is a turning chain and does not count as a stitch.
Left Stem
With dark green, ch 27.
Row 1 (works bottom to top): Sc in 2nd ch from hook and in each ch across. Turn. (26 sc)
Row 2 (works top to bottom): Ch 1, sc in each st across. Turn. (26 sc)
Rows 3–9: Repeat Row 2. Odd rows end at the top, and even rows end at the bottom. (26 sc per row)
Row 9 ends at the top of the letter. Check the stem against your first checkpoint now.
Diagonal
The diagonal is 14 sts long in every row. Each row moves 2 sts lower than the one before: it drops 2 sts at the top and adds 2 sts at the bottom. This stepped band runs from the top-left of the N down to the bottom-right.
Row 10 (works top to bottom): Ch 1, sc in first 14 sts. Turn, leaving the remaining 12 sts unworked. (14 sc; this row covers sts 13–26)
The 12 unworked stitches become the inner edge of the left stem.
Row 11 (works bottom to top): Ch 3, sc in 2nd ch from hook and next ch (2 sc added at the bottom), sc in next 12 sts. Turn, leaving the last 2 sts unworked. (14 sc; sts 11–24)
Row 12 (works top to bottom): Sl st in first 2 sts, ch 1, sc in next 12 sts, then work 2 fsc. Turn. (14 sc; sts 9–22)
The slip stitches do not count as stitches.
Row 13: Repeat Row 11. (14 sc; sts 7–20)
Row 14: Repeat Row 12. (14 sc; sts 5–18)
Row 15: Repeat Row 11. (14 sc; sts 3–16)
Row 16: Repeat Row 12. (14 sc; sts 1–14)
Row 16 lines up with the bottom edge of the left stem. The piece should now be 2.9 in (7.4 cm) wide.
Right Stem
Row 17 (works bottom to top): Ch 1, sc in each of the 14 sts, then work 12 fsc. Turn. (26 sts: 14 sc + 12 fsc)
The 12 fsc stand free beside the stepped top of the diagonal. They form the inner edge of the right stem.
Row 18 (works top to bottom): Ch 1, sc in each st across. Turn. (26 sc)
Rows 19–25: Repeat Row 18. (26 sc per row)
Do not fasten off. Turn the work upright so the N reads correctly from the front, with the beginning tail at the top-left corner.
Poinsettias (Make 2)
With cream:
Round 1: MR, ch 1, 10 sc in ring. Pull the ring closed and sl st to the first sc. (10 sc)
Round 2 (petals): Ch 6, sl st in 2nd ch from hook, sc in next ch, hdc in next ch, dc in next ch, tr in last ch, sk next sc of Round 1, sl st in next sc. Repeat from * to * 4 more times. (5 petals)
Each petal starts narrow at the slip-stitch tip and widens to the treble at its base, giving the pointed, star-like shape of a poinsettia. Fasten off and leave a 12 in (30.5 cm) tail.
The finished flower is about 2 in (5.1 cm) across. Sew 7 gold beads in a tight cluster over the center ring.
Leaves (Make 6)
With sage green, ch 7.
Sc in 2nd ch from hook, hdc in next ch, dc in next 2 ch, hdc in next ch, then work (sc, ch 2, sc) in the last ch for the tip.
Now work along the other side of the chain, into its free loops: hdc in next ch, dc in next 2 ch, hdc in next ch, sc in last ch. Sl st to the first sc. Fasten off and leave a tail.
(10 sts + a ch-2 tip; each leaf is about 1.1 in / 2.8 cm long)
Berries (Make 8)
With deep red:
MR, ch 1, 6 sc in ring, sl st to the first sc. Pull the ring tight and fasten off, leaving a 6 in (15.2 cm) tail. Push the starting tail inside the berry.
Thread the long tail through the front loops of all 6 sts and cinch them closed. This makes a firm ball about 3/8 in (1.0 cm) across. Keep the tail for sewing.
Border
The border has two rounds. The first is a single crochet round. The second is a slip-stitch round that tightens and lifts the edge into a smooth outline. Work it in dark green, continuing from Row 25 or with a new join.
Border gauge: 5 sc per 1 in (2.5 cm) along stitch edges, which matches the body gauge. Along row-end edges you work 1 sc per row end.
The letter has 10 edges, listed below in working order. It also has 8 outer (convex) corners and 2 inner (concave) corners, where the diagonal meets each stem inside the letter.
Round 1: Join at the top-left corner and work clockwise. Ch 1 does not count as a stitch.
- Edge A, top of left stem and diagonal: 1 sc in each row end of Rows 1–10. (10 sc)
- Edge B, upper stepped diagonal: 12 sc spread evenly along it, about 2 per step (Rows 11–16). (12 sc)
- Edge C, inner edge of right stem: 1 sc in the base of each of the 12 fsc. (12 sc)
- Edge D, top of right stem: 1 sc in each row end of Rows 17–25. (9 sc)
- Edge E, outer right side: 1 sc in each st of Row 25. (26 sc)
- Edge F, bottom of right stem and diagonal: 1 sc in each row end of Rows 25 back to 16. (10 sc)
- Edge G, lower stepped diagonal: 12 sc spread evenly along it, about 2 per step (Rows 15 back to 10). (12 sc)
- Edge H, inner edge of left stem: 1 sc in each of the 12 unworked sts of Row 9. (12 sc)
- Edge I, bottom of left stem: 1 sc in each row end of Rows 9 back to 1. (9 sc)
- Edge J, outer left side: 1 sc in each free loop of the foundation chain. (26 sc)
At each of the 8 convex corners, ch 1 before starting the next edge. At the 2 concave corners, do not add anything; just keep the yarn snug.
Sl st to the first sc. (138 sc + 8 corner ch-1 sps)
Round 2: Ch 1. Working loosely, sl st in each sc around and 1 sl st in each corner ch-1 sp. Join and fasten off. (146 sl sts)
Why the math works:
- The outer sides (E and J) each take 26 sc, one in each of the 26 body stitches, so their length cannot change.
- Single crochet rows are almost square, so 1 sc per row end on the top and bottom edges (A, D, F and I) lies flat. The firm slip-stitch round takes up the small extra fullness.
- The stepped diagonals measure about 2.6 in (6.6 cm). At 12 sc each, they are held slightly firm, which straightens out the steps without puckering.
- The letter has 180-degree symmetry: A matches F, B matches G, C matches H, D matches I, and E matches J. Both halves therefore pull evenly, and the letter stays square.
The border adds 0.25 in (0.6 cm) to each side. That turns 5.2 x 4.5 in (13.2 x 11.4 cm) into 5.7 x 5.0 in (14.5 x 12.7 cm).
Final Blocking
- Block the plain letter before you sew anything on.
- Pin it face up on the board to 5.7 in (14.5 cm) tall x 5.0 in (12.7 cm) wide. Put a pin at every outer corner.
- Line the two stems up with the grid so both are straight and parallel.
- Mist the letter until it is damp, or hover steam over it without touching. Do not press acrylic with the iron.
- Let it dry completely, at least 2 hours, before you unpin it.
- Upper flower: Sew it to the left stem, centered about 1.4 in (3.6 cm) below the top edge. Its right petals should overlap the start of the diagonal.
- Upper leaves: Tuck 3 leaves behind the upper flower, pointing up-left, left and right, and sew each one through its base.
- Upper berries: Sew 3 berries in a cluster above and to the right of the upper flower, and 2 berries below and to the right of it.
- Lower flower: Sew it centered on the right stem about 1.2 in (3.0 cm) above the bottom edge. Add 3 leaves behind it (pointing up, left and right) and 3 berries along its lower edge.
- Hanging loop: Fold the gold cord in half and knot the ends to make a loop about 3 in (7.6 cm) long. Sew the knot to the back of the top edge, just right of the left stem.
- Pin the flower petals flat and give them a light mist. Let them dry.
Final Quality-Control Checklist
- The letter measures 5.7 x 5.0 in (14.5 x 12.7 cm).
- Both stems have exactly 26 sc per row.
- Every diagonal row has 14 sc.
- Border Round 1 has 138 sc plus 8 ch-1 corners.
- Border Round 2 has 146 sl sts.
- The diagonal edges look straight, not stepped.
- No yarn ends show on the front.
- Each flower has 5 pointed petals and 7 beads.
- There are 6 leaves and 8 berries, all sewn on securely.
- The loop is firmly attached, and the ornament hangs straight.
Troubleshooting
The diagonal edges still look stepped. Rework the 12 sc on that edge, putting the stitches into the corners of the steps rather than into their flat faces.
The border ruffles. Your row-end stitches are too loose. Work Round 2 more tightly, or go down to a 3.25 mm hook for the border.
The border cups or curls inward. Work Round 2 more loosely, or work its slip stitches with a 4.0 mm hook.
The letter leans or twists. Re-block it and pin both stems parallel to the grid.
The petals curl. Mist them, pin each tip flat, and let them dry.
The fsc stitches look loose. Pull each one snug before you start the next.
The berries are lumpy. Cinch the front loops harder, and make sure the inner tail fills the ball.
Care
Spot clean only with cool water and a mild soap, and lay the ornament flat to dry. Store it flat in a box so the flowers and the hanging loop keep their shape.
Final Notes
Everything in this pattern depends on the gauge of 20 sc per 4 in (10.2 cm):
- The 26-stitch rows make a stem 5.2 in (13.2 cm) tall.
- 25 rows make a letter 4.5 in (11.4 cm) wide.
- A 0.25 in (0.6 cm) border on each side brings the finished ornament to 5.7 x 5.0 in (14.5 x 12.7 cm).
Measure after Row 9 and the rest of the pattern will fall into place. Use the same method to make a whole name in letters, one ornament at a time.
Happy crocheting!