

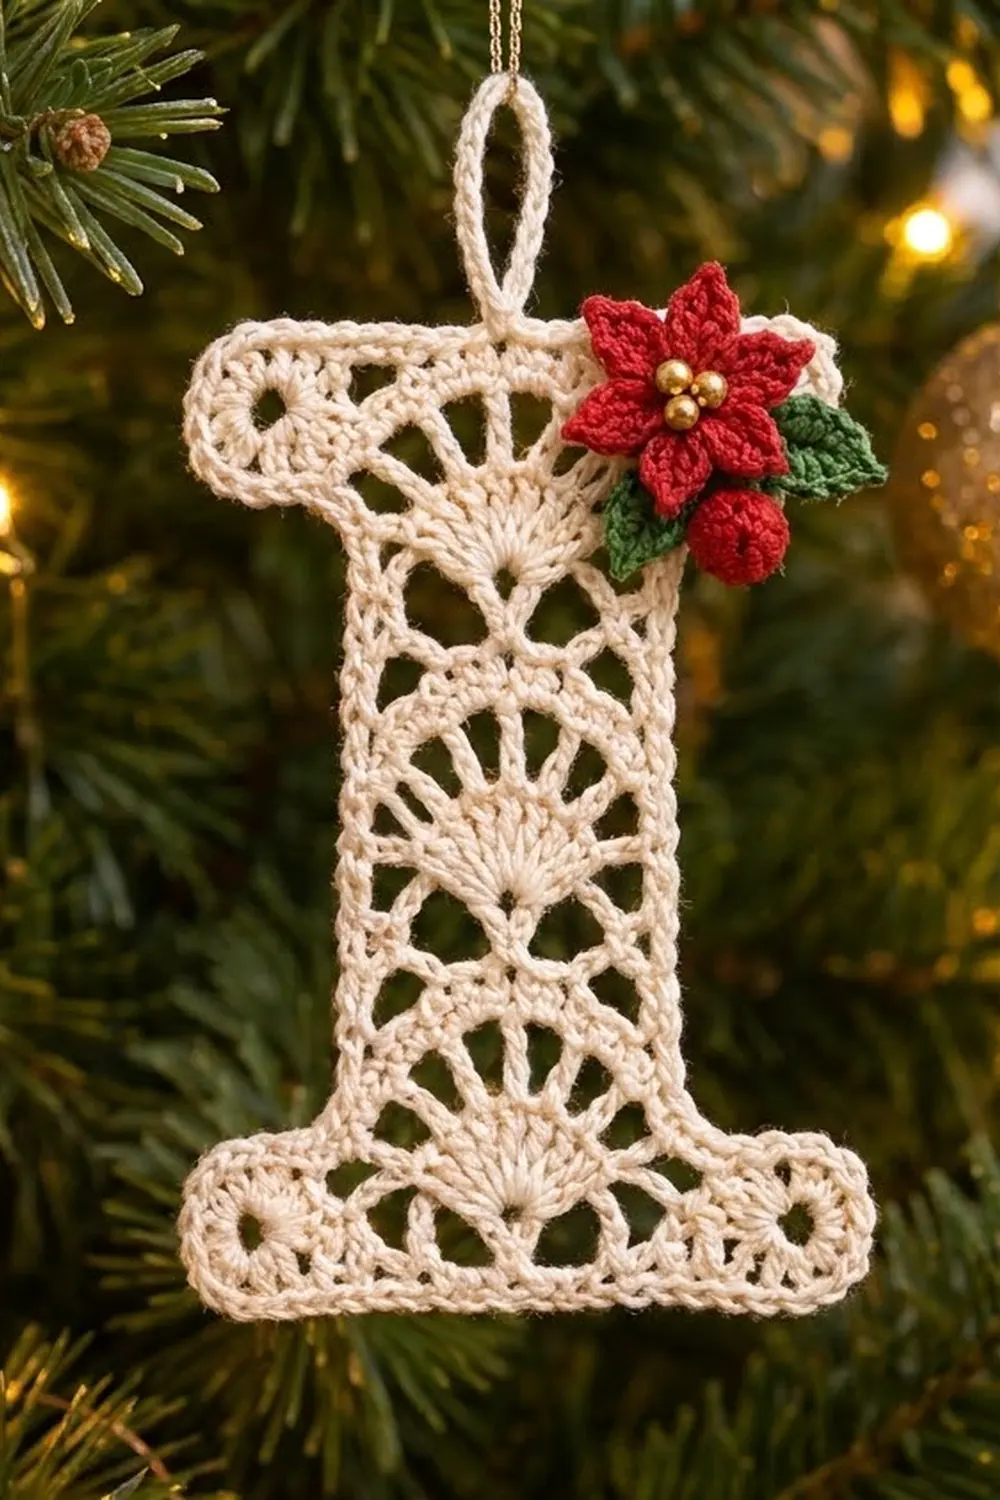
This lace ornament is a single capital letter I in cream cotton thread. A column of fan motifs runs up the center, small round eyelets sit at the ends of both serif bars, and a twisted rope edge outlines the whole letter. A thin loop at the top lets it hang from a tree branch.
The accent is a small poinsettia on the upper right corner of the top bar. It has five pointed red petals, three gold bead centers, two green leaves underneath, and a round red berry tucked below. The red and green against cream lace give it a traditional Christmas look.
The pattern uses US crochet terms. The finished letter measures 3.9 in (9.9 cm) wide across the serifs and 6 in (15.2 cm) tall, not counting the 1 in (2.5 cm) hanging loop.
You work the letter flat in rows from the bottom serif up. The rows narrow to make the stem, then widen again for the top serif. Two edging rounds go around the whole outline. You then add the loop, crochet the flower, leaves and berry separately, and sew them on.
Finished Size and Construction
- Finished size: 3.9 in (9.9 cm) × 6 in (15.2 cm), plus a 1 in (2.5 cm) loop
- Skill level: Intermediate
- Terminology: US crochet terms
- Yarn weight: Size 3 crochet thread (Lace / 0)
- Hook: 2.25 mm (US B-1)
- Number of pieces: 1 lace letter plus 4 small appliqué pieces
- Layout: one standalone letter, not joined to anything
- Stem width: 2 in (5.1 cm) before border, 2.5 in (6.4 cm) after
- Size before border: 3.4 in (8.6 cm) × 5.5 in (14.0 cm)
- Border depth: 0.25 in (0.6 cm) on every edge
Materials
Use a mercerized cotton thread in size 3. It shows the stitches crisply, holds its shape after starching, and doesn’t fuzz. Size 3 thread runs about 135 m per 50 g. If yours is thinner, check gauge carefully.
- Cream (main): 12 g, about 32 m
- Red (petals and berry): 3 g, about 8 m
- Green (leaves): 2 g, about 5 m
All quantities include a margin for swatching and weaving in ends.
Tools
- 2.25 mm (US B-1) crochet hook
- 3 gold seed beads, size 6/0
- Tapestry needle and fine sewing needle
- Cream and red sewing thread
- Blocking mat and rustproof pins
- Fabric stiffener or starch spray
- Scissors and a ruler
Abbreviations (US Terms)
- ch – chain
- sl st – slip stitch
- sc – single crochet
- hdc – half double crochet
- dc – double crochet
- sc2tog – single crochet 2 together
- rev sc – reverse single crochet (crab stitch)
- sk – skip
- sp – space
- st(s) – stitch(es)
- RS – right side
Special stitch: dc-ext (extended double crochet increase). Yo, insert your hook into the base of the previous dc (the small chain at its foot), yo and pull up a loop, yo and draw through 1 loop to make the new base chain, then (yo, draw through 2 loops) twice. Each dc-ext adds 1 stitch to the end of a row.
Counting note: the ch-3 at the start of each row counts as 1 dc. When a total is given in “sts,” each chain inside a space counts as 1 st. This keeps every row lined up with the 17-st stem and the 29-st serif bars.
Gauge and Checkpoints
Gauge: 17 dc = 2 in (5.1 cm) and 4 dc rows = 1 in (2.5 cm), before blocking.
The bottom serif bar (Rows 1–5) is your test piece. Work it, then measure it flat before continuing.
- Checkpoint 1 (after Row 5): 3.4 in (8.6 cm) wide × 1.25 in (3.2 cm) tall
- Checkpoint 2 (after Row 17): stem 2 in (5.1 cm) wide, total height 4.25 in (10.8 cm)
- Checkpoint 3 (after Row 22): 3.4 in (8.6 cm) × 5.5 in (14.0 cm)
- Checkpoint 4 (after border): 3.9 in (9.9 cm) × 6 in (15.2 cm)
Your measurements can be off by up to 0.1 in (0.3 cm). If the bar is too wide, go down to a 2.0 mm hook. If it’s too narrow, go up to a 2.5 mm hook. If the width is right but it’s too short, pull each dc’s first loop a little taller instead of switching hooks.

Letter I Pattern
Bottom Serif Bar
With cream, ch 31.
Row 1: Dc in 4th ch from hook (the skipped 3 ch count as 1 dc) and in each ch across, turn. (29 dc)
Row 2 (eyelets + fan base): Ch 3, dc in next st, ch 2, sk 2 sts, dc in next 2 sts (first eyelet); dc in next 2 sts, ch 5, sk 6 sts, sc in next st (the 15th, center st), ch 5, sk 6 sts, dc in next 2 sts; dc in next 2 sts, ch 2, sk 2 sts, dc in next st, dc in top of turning ch, turn. (8 dc, 1 sc, 2 ch-2 sps, 2 ch-5 sps = 29 sts)
Row 3 (fan): Ch 3, dc in next dc, ch 2, sk ch-2 sp, dc in next 2 dc; dc in next 2 dc, ch 3, sk ch-5 sp, (dc, ch 1) 4 times in center sc, dc in same sc (5-spoke fan), ch 3, sk ch-5 sp, dc in next 2 dc; dc in next 2 dc, ch 2, sk ch-2 sp, dc in next dc, dc in top of turning ch, turn. (17 dc, 4 ch-1 sps, 2 ch-3 sps, 2 ch-2 sps = 31 sts)
Row 4 (close eyelets, fan top): Ch 3, dc in next dc, 2 dc in ch-2 sp, dc in next 2 dc; dc in next 2 dc, ch 2, sk ch-3 sp, dc in first fan dc, (dc in next ch-1 sp, dc in next dc) 4 times, ch 2, sk ch-3 sp, dc in next 2 dc; dc in next 2 dc, 2 dc in ch-2 sp, dc in next dc, dc in top of turning ch, turn. (25 dc, 2 ch-2 sps = 29 sts)
Rows 2–3 leave a ch-2 eyelet two rows tall at each end, and Row 4 closes it. The 9 dc across the top of the fan make its solid arched edge.
Row 5 (band): Ch 3, dc in each dc and 2 dc in each ch-2 sp across, turn. (29 dc)
Measure for Checkpoint 1.
Stem
Row 6 (Row A, lattice): Sl st in each of first 7 sts. Ch 3 (counts as dc in the 7th st), dc in next st, ch 5, sk 6 sts, sc in next st, ch 5, sk 6 sts, dc in next 2 sts, turn. Leave the last 6 sts unworked. (4 dc, 1 sc, 2 ch-5 sps = 17 sts)
Row 7 (Row B, fan): Ch 3, dc in next dc, ch 3, sk ch-5 sp, (dc, ch 1) 4 times in sc, dc in same sc, ch 3, sk ch-5 sp, dc in next dc, dc in top of turning ch, turn. (9 dc, 4 ch-1 sps, 2 ch-3 sps = 19 sts)
Row 8 (Row C, fan top): Ch 3, dc in next dc, ch 2, sk ch-3 sp, dc in first fan dc, (dc in ch-1 sp, dc in next dc) 4 times, ch 2, sk ch-3 sp, dc in next dc, dc in top of turning ch, turn. (13 dc, 2 ch-2 sps = 17 sts)
Row 9 (Row D, band): Ch 3, dc in next dc, 2 dc in ch-2 sp, dc in next 9 dc, 2 dc in ch-2 sp, dc in next dc, dc in top of turning ch, turn. (17 dc)
Rows 6–9 make one fan tier, 1 in (2.5 cm) tall.
Rows 10–13: Repeat Rows 6–9, but start Row 10 with ch 3 instead of the slip stitches. In Row 10, the ch-3 counts as a dc in the first st, and the row ends with a dc in the top of the turning ch. (17 dc at end of Row 13)
Rows 14–17: Repeat Rows 10–13. (17 dc)
You now have three fan tiers stacked in the stem. Measure for Checkpoint 2.
Top Serif Bar
Row 18 (widen): Ch 8, dc in 4th ch from hook and in next 4 ch (6 new sts), dc in each of the 17 stem sts, then work 6 dc-ext, turn. (29 dc)
Row 19: Work as Row 2. (29 sts)
Row 20: Work as Row 3. (31 sts)
Row 21: Work as Row 4. (29 sts)
Row 22: Work as Row 5. Do not fasten off. (29 dc)
Measure for Checkpoint 3. The top bar mirrors the bottom bar, with a fan in the center and an eyelet at each end.
Border
Border gauge: 2 sc per dc row-end and 1 sc per stitch. That’s about 8 sc per inch on the sides and 8.5 sc per inch along the top and bottom edges, which lie flat after blocking.
Corner rule: each of the 8 outer corners gets a ch-1 corner space. The 4 inner corners, where a ledge meets the stem, get no extra stitches. The edge counts below are between corners and do not include the ch-1 corners.
Round 1 (sc): Ch 1 and rotate the piece to work along the side. Working around the outline:
- Top bar end: 10 sc (2 per row-end, Rows 22–18), ch 1
- Underside of top ledge: 6 sc
- Stem side: 24 sc (2 per row-end, Rows 17–6)
- Bottom ledge (the unworked sts of Row 5): 6 sc, ch 1
- Bottom bar end: 10 sc (Rows 5–1), ch 1
- Bottom edge (foundation loops): 29 sc, ch 1
- Second bottom bar end: 10 sc, ch 1
- Second bottom ledge: 6 sc
- Second stem side: 24 sc
- Second top ledge underside: 6 sc, ch 1
- Second top bar end: 10 sc, ch 1
- Top edge: 29 sc, ch 1, join with sl st to first sc.
(170 sc + 8 ch-1 corners)
Check: 29 + 29 + 2 × (10 + 6 + 24 + 6 + 10) = 58 + 112 = 170.
Round 2 (rope edge): Ch 1. Working left to right, rev sc in each sc, with 1 rev sc in each ch-1 corner. At each of the 4 inner corners, skip the 1 stem-side sc right next to the ledge.
- Top and bottom edges: 29 each
- Each bar end: 10
- Each ledge: 6
- Each stem side: 22
- Corners: 8
Join and fasten off. (29 + 29 + 2 × (10 + 6 + 22 + 6 + 10) + 8 = 174 rev sc)
Why the math works: Each dc row is 0.25 in (0.6 cm) tall, and 2 sc fill that height at border gauge, so the sides don’t ripple or pull in. The ch-1 corners give the 8 outer points room to turn, so the serifs block into soft rounded ends. Skipping 4 stitches keeps the rope edge from bunching where it bends inward at the inner corners.
Hanging Loop
Rejoin cream with a sl st in the 15th (center) rev sc of the top edge. Ch 24, then sl st in the same st. Work 32 sc over the loop, sl st in the starting st, and fasten off. The loop stands about 1 in (2.5 cm) tall.
Poinsettia Appliqué
Flower (red): Ch 2, 5 sc in 2nd ch from hook, join. (5 sc) For each petal: ch 6, then starting in 2nd ch from hook work sl st, sc, hdc, dc, dc, and sl st in the next sc of the ring. Make 5 petals in total, then fasten off. The flower measures about 1.1 in (2.8 cm) across.
Leaves (green, make 2): Ch 7. Starting in 2nd ch from hook, work sl st, sc, hdc, dc, hdc, sc. Then work along the other side of the chain: sc, hdc, dc, hdc, sc, sl st. (12 sts) Fasten off. Each leaf is about 0.75 in (1.9 cm) long and pointed at both ends.
Berry (red): Ch 2, 6 sc in 2nd ch from hook. (6) Rnd 2: 2 sc in each st. (12) Rnd 3: sc2tog 6 times. (6) Stuff with the yarn tails, then close. The berry is about 0.4 in (1.0 cm) wide.
Layering: Pin the two leaves on the upper right corner of the top bar, one pointing right and one pointing down-left. Center the flower over the point where the leaves meet, letting it overlap the top border. Tuck the berry under the lower petals, between the leaves. Sew each layer on with matching thread. Then sew the 3 gold beads into the flower center in a small triangle.
Final Blocking
- Before adding the appliqué, soak the letter in cool water for 5 minutes. Press out the water in a towel.
- Lay it RS up on the mat and pin it to 3.9 in (9.9 cm) × 6 in (15.2 cm).
- Pin each eyelet open, and use pins to round the 8 serif corners.
- Use pins to open each fan’s ch-3 spaces so the spokes spread out evenly.
- Spray with stiffener and let it dry completely, about 6 hours.
- Unpin, then sew on the appliqué.
Final Quality-Control Checklist
- Size is 3.9 in (9.9 cm) × 6 in (15.2 cm), give or take 0.1 in (0.3 cm)
- Stem is 2.5 in (6.4 cm) wide with straight sides
- There are 5 fans in total: one in each bar and three in the stem
- All 4 eyelets are open and round
- Round 2 totals 174 rev sc
- The loop is centered on the top edge
- Appliqué layers are firmly stitched and the beads are secure
- All ends are woven in
Troubleshooting
- Stem is off-center: Count your slip stitches in Row 6. Slip across 7 sts and start the row in the 7th.
- Fan spokes bunch together: Work the ch-1s loosely and pin the spokes apart during blocking.
- Top bar curls: The Row 18 chain is too tight. Redo it with a looser chain.
- Border ripples: You’ve worked more than 2 sc into some row-ends. Check your side totals against the counts above.
- Inner corners bunch: Make sure you skipped 1 sc at each inner corner in Round 2.
- Flower looks flat: Sew through the center only and leave the petal tips loose.
Care
Hand-wash in cool water, lay flat to dry, and re-starch if the ornament softens. Store it flat in tissue paper.
Final Notes
Here’s the full measurement chain. The 29-st bottom bar measures 3.4 in (8.6 cm) wide. The 17-st stem is 2 in (5.1 cm) wide, and the letter is 4.25 in (10.8 cm) tall after Row 17. After Row 22 the body measures 3.4 in (8.6 cm) × 5.5 in (14.0 cm). The 0.25 in (0.6 cm) border brings it to 3.9 in (9.9 cm) × 6 in (15.2 cm). If each checkpoint matches, the next stage will come out right too.
Happy crocheting!