

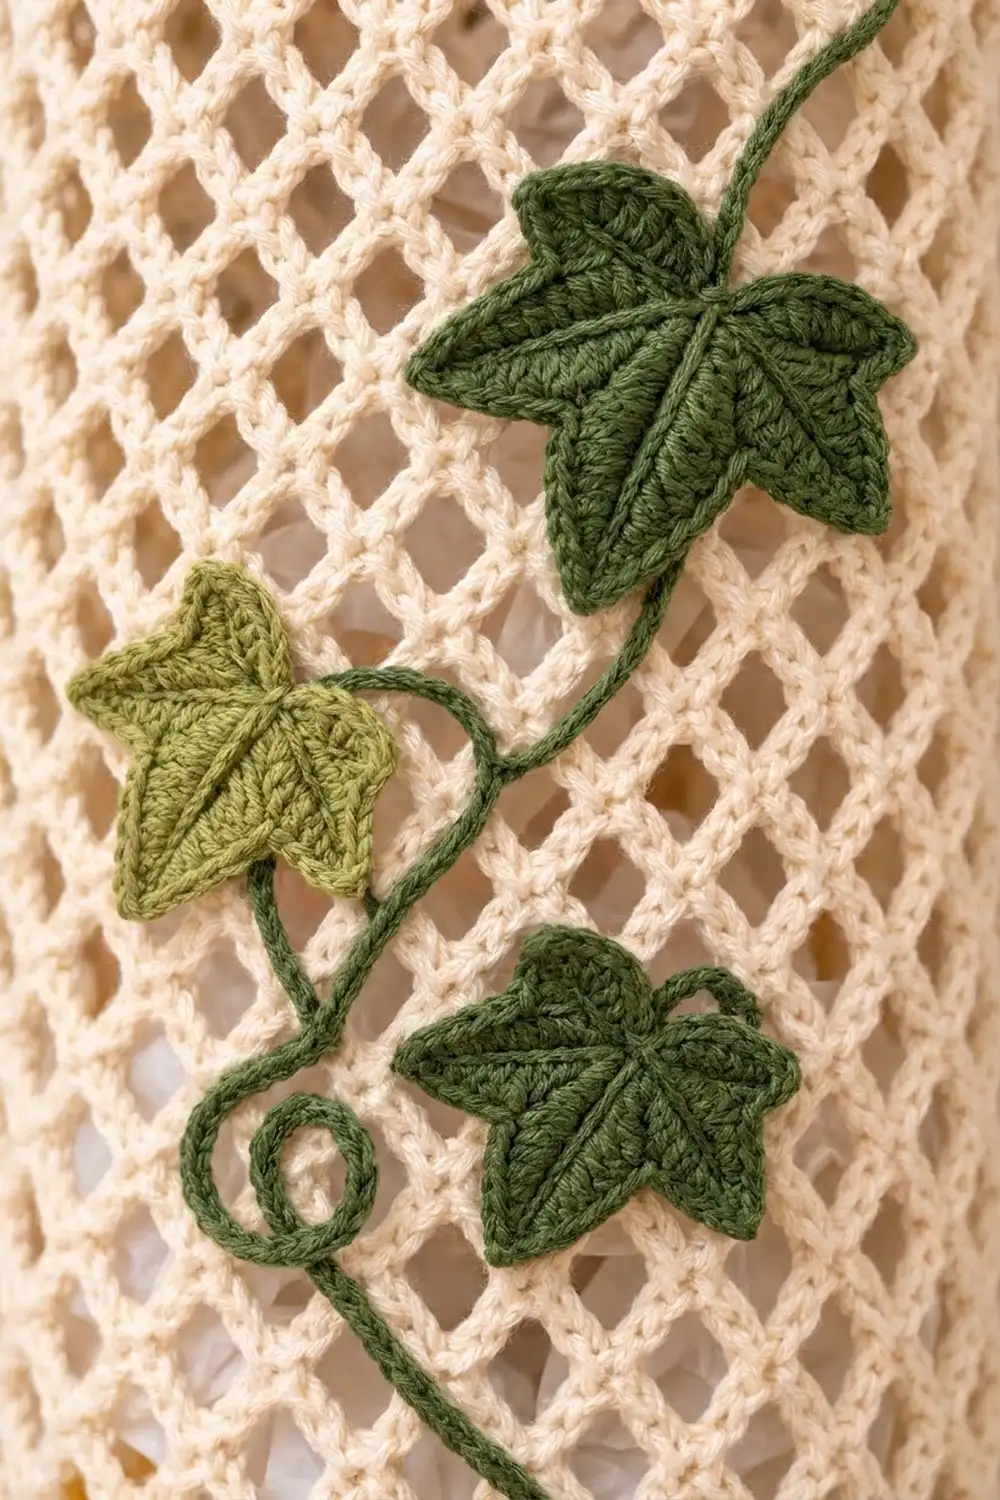
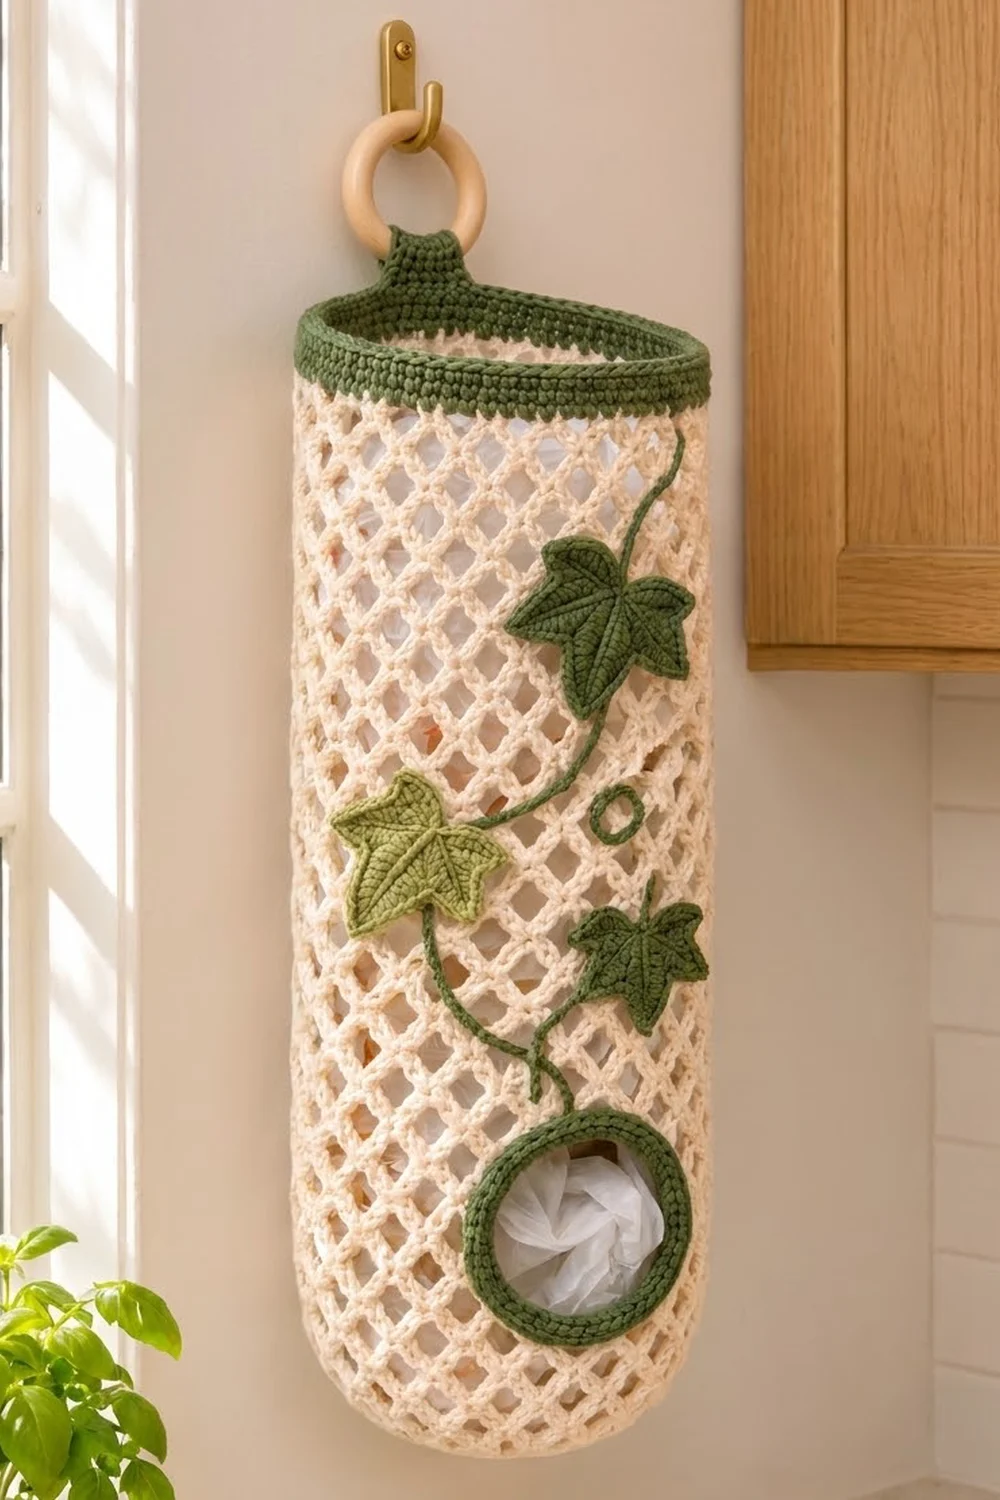
This plastic bag holder looks like a little garden trellis. A cream diamond mesh forms a long tube with a rounded bottom, and a dark green vine with three ivy leaves climbs down the front. You push bags in at the top and pull them out one at a time through a round opening low on the front.
The palette is soft: cream for the mesh, deep forest green for the trim and vine, and a light olive green for one accent leaf. A solid green band finishes the top, and a short green tab loops around a wooden ring for hanging.
The finished holder measures 6 in (15.2 cm) wide when flat and 18 in (45.7 cm) long, not counting the tab and ring. This pattern uses US crochet terms throughout.
You work the body in one piece from the bottom up. First comes a small round base, then the mesh tube. Partway up, a few turned rows leave a gap that becomes the dispensing hole. After the mesh, you add the green top band and the hanging tab, edge the hole, then make the leaves, vine and tendrils separately and sew them on.
Finished Size and Construction
- Finished size: 6 in (15.2 cm) wide flat × 18 in (45.7 cm) long
- Circumference: 12 in (30.5 cm)
- Skill level: Intermediate
- Terminology: US
- Yarn weight: Worsted (#4), cotton or cotton blend
- Hook: 5.0 mm (H-8)
- Number of pieces: 1 main body, plus 6 small appliqué pieces (3 leaves, 1 vine, 2 tendrils)
- Layout: a single vertical tube, hung from one tab
- Mesh: 16 ch-5 loops around
- Size before top band: 16.8 in (42.7 cm) long
- Top band depth: 1.2 in (3.0 cm)
- Dispensing hole: about 2.75 in (7.0 cm) across after edging
Materials
Cotton or a cotton blend works best. It holds the diamond shape, doesn’t stretch out under the weight of the bags, and washes well. The quantities below assume about 85 m per 50 g (1.7 m per gram).
- Cream (main color): 120 g / 204 m
- Dark green (trim, tab, vine, 2 leaves): 40 g / 68 m
- Light olive green (1 leaf): 10 g / 17 m
All quantities include a margin of about 15%.
Tools:
– 5.0 mm (H-8) crochet hook
– 2 in (5.1 cm) wooden ring
– 4 stitch markers
– Tapestry needle
– Rustproof pins
– Measuring tape
– Scissors
Abbreviations (US Terms)
- ch – chain
- sl st – slip stitch
- sc – single crochet
- hdc – half double crochet
- dc – double crochet
- tr – treble crochet
- dtr – double treble crochet
- sc2tog – single crochet 2 together
- sp(s) – space(s)
- sk – skip
- st(s) – stitch(es)
- RS / WS – right side / wrong side
Special stitches
Picot-2: ch 2, sl st in the first ch.
Picot-3: ch 3, sl st in the first ch.
Mesh end (ch 2, dc): at the end of a mesh round, ch 2 and work 1 dc into the first sc. This stands in for the last ch-5 loop and leaves your hook in the middle of that loop, ready for the next round.
Gauge and Checkpoints
Mesh gauge: 4 ch-5 loops = 3 in (7.6 cm) wide, and 5 mesh rounds = 3 in (7.6 cm) tall, measured lightly stretched. That works out to 0.75 in (1.9 cm) per loop and 0.6 in (1.5 cm) per round.
Single crochet gauge: 16 sc and 20 rounds = 4 in (10.2 cm).
Work Rounds 1–8 as your test piece, because this part of the holder is your swatch. Check these points as you go, measuring along the tube from the center bottom:
- After Round 4: the flat base measures 3.5 in (8.9 cm) across.
- After Round 8: the tube is 4.2 in (10.7 cm) long and 6 in (15.2 cm) wide when flattened.
- After Row/Round 13: 7.2 in (18.3 cm) long.
- After Round 29: 16.8 in (42.7 cm) long.
- After the band: 18 in (45.7 cm) long.
If the flat width is over 6.25 in (15.9 cm), go down 0.5 mm in hook size. If it is under 5.75 in (14.6 cm), go up 0.5 mm. Don’t add or remove loops: the dispensing hole and the band math both depend on exactly 16 loops.
Body: Base
Use cream.
Round 1: Make a magic ring. Ch 1, then work 8 sc in the ring. Join with a sl st in the first sc. (8 sc)
Round 2: Ch 1, sc in the first sc, ch 3, sc in the next sc, ch 3; repeat from * 6 more times. Join with a sl st in the first sc. (8 sc, 8 ch-3 sps)
Round 3: Sl st in the first ch-3 sp, ch 1. Work (sc, ch 3, sc) in the ch-3 sp, then ch 3; repeat from * 7 more times. Join in the first sc. (16 sc, 16 ch-3 sps)
Round 4: Sl st in the first ch-3 sp, ch 1, sc in the same sp. Ch 4, sc in the next ch-3 sp; repeat from * 14 more times. Ch 4 and join in the first sc. (16 sc, 16 ch-4 sps)
The base will start to cup. That’s what gives the holder its rounded bottom.
Body: Lower Mesh
Round 5: Sl st in each of the first 2 ch, ch 1, sc in the same sp. Ch 5, sc in the next sp; repeat from * 14 more times. Finish with the mesh end (ch 2, dc in the first sc). (16 sc, 16 ch-5 sps)
Standard mesh round: Ch 1, sc in the sp under the dc. Ch 5, sc in the next ch-5 sp; repeat from * 14 more times. Finish with the mesh end (ch 2, dc in the first sc). (16 sc, 16 ch-5 sps)
Rounds 6–8: Work the standard mesh round. (16 sc, 16 ch-5 sps in each round)
From here on, the loop formed by the ch 2 and dc counts as sp 1, and the other spaces are numbered 2–16 going around.
Body: Dispensing Hole Section
Over the next five rows, you work back and forth across sps 1–12 and leave sps 13–16 of Round 8 unworked. That gap becomes the hole.
Row 9 (RS): Ch 1, sc in sp 1. Ch 5, sc in the next sp; repeat from * 10 more times, ending in sp 12. Turn. (12 sc, 11 ch-5 sps)
Row 10 (WS): Ch 5 (counts as dc + ch 2), sc in the first ch-5 sp. Ch 5, sc in the next ch-5 sp; repeat from * 9 more times. Ch 2, dc in the last sc. Turn. (11 sc, 10 ch-5 sps, plus a half-loop at each edge)
Row 11 (RS): Ch 1, sc in the dc. Ch 5, sc in the next ch-5 sp; repeat from * 9 more times. Ch 5, sc in the 3rd ch of the turning ch. Turn. (12 sc, 11 ch-5 sps)
Row 12 (WS): Repeat Row 10.
Row 13 (RS): Repeat Row 11, but don’t turn. Instead, ch 23 for the bridge and join with a sl st in the first sc of the row. (12 sc, 11 ch-5 sps, 1 ch-23 bridge)
The space under the bridge is 5 loop-widths wide and 5 rows tall, about 3.75 in × 3 in (9.5 cm × 7.6 cm).
Round 14: Sl st in each of the next 3 ch, ch 1, sc in the same sp. Ch 5, sc in the next ch-5 sp; repeat from * 9 more times, for 11 sc in total. Ch 5, sk the first 3 ch of the bridge, sc in the next ch. Ch 5, sk 3 ch, sc in the next ch; repeat from * 3 more times. You now have 5 sc on the bridge, in its 4th, 8th, 12th, 16th and 20th ch. Finish with the mesh end. (16 sc, 16 ch-5 sps)
Body: Upper Mesh
Rounds 15–28: Work the standard mesh round. (16 sc, 16 ch-5 sps in each round)
Round 29: Work the standard mesh round, but replace the mesh end with ch 5 and a sl st in the first sc. Fasten off the cream. (16 sc, 16 ch-5 sps)
The body should now measure 16.8 in (42.7 cm) long.
Border: Top Band, Tab and Hole Edging
Band gauge: 16 sc = 4 in (10.2 cm).
Round 30 (conversion round): Join the dark green in the first sc. Ch 1, sc in the same sc, 2 sc in the next ch-5 sp. Sc in the next sc, 2 sc in the next ch-5 sp; repeat from * 14 more times. Join. (16 sc worked one in each sc + 32 sc added in the spaces = 48 sc)
Rounds 31–35: Ch 1, sc in each st around, join. (48 sc in each round)
The band is 1.2 in (3.0 cm) deep. When you flatten the holder, there are 24 sts across the front and 24 across the back.
Why the math works: 16 loops × 0.75 in (1.9 cm) gives a 12 in (30.5 cm) circumference. At 4 sc per inch, 48 sc also measures 12 in (30.5 cm), so the band sits flat without ruffling or pulling in the mesh.
Hanging tab: Flatten the holder with the hole centered on the front. Mark the 6 band sts at the center back.
- Row 1: Join the dark green in the first marked st, ch 1, sc in the same st and in the next 5 sts. (6 sc)
- Rows 2–18: Ch 1, turn, sc in each st. (6 sc in each row)
The tab is 1.5 in (3.8 cm) wide and 3.6 in (9.1 cm) long. Thread rows 11–18 through the wooden ring, fold them to the back and whipstitch Row 18 to Row 10. That leaves a 2 in (5.1 cm) tab below the ring.
Hole edging:
- Round 1: Join the dark green at the lower right corner of the hole. Ch 1, then work around the opening: 4 sc in each of the 4 unworked Round 8 sps (16 sc), 2 sc in each row-end up the side (10 sc), 1 sc in the free loop of each bridge ch (23 sc), and 2 sc in each row-end down the other side (10 sc). Join. (59 sc)
- Round 2: Ch 1, sc firmly in each st around. Join and fasten off. (59 sc)
The rim is about 0.4 in (1.0 cm) wide. The opening relaxes to a round shape about 2.75 in (7.0 cm) across.
Ivy Leaves (Make 3)
You’ll make 1 large dark green leaf, 1 small dark green leaf and 1 small light olive leaf.
Large leaf
- Round 1: Make a magic ring, ch 2 (doesn’t count as a st), work 14 hdc in the ring, and join. (14 hdc)
- Round 2: Work the five lobes in order:
- Small lobe in sts 1–2: (hdc, dc) in st 1, picot-2, (dc, hdc) in st 2.
- Sl st in st 3.
- Medium lobe in sts 4–5: (dc, tr) in st 4, picot-3, (tr, dc) in st 5.
- Sl st in st 6.
- Top lobe in sts 7–8: (tr, dtr) in st 7, picot-3, (dtr, tr) in st 8.
- Sl st in st 9.
- Medium lobe in sts 10–11.
- Sl st in st 12.
- Small lobe in sts 13–14.
- Sl st in st 1.
- Stem: Ch 6, then sl st in the 2nd ch from the hook and in each of the next 4 ch. Sl st at the base of the leaf and fasten off.
The large leaf measures 3 in (7.6 cm) across. Use the long tail to embroider a straight-stitch center vein if you like.
Small leaves
Work the same way, with these changes:
- Round 1 uses 14 sc instead of 14 hdc.
- Small lobes are (sc, hdc), picot-2, (hdc, sc).
- Medium lobes are (hdc, dc), picot-2, (dc, hdc).
- The top lobe is (dc, tr), picot-3, (tr, dc).
Each small leaf measures 2.25 in (5.7 cm) across.
Vine and Tendrils
Vine: With dark green, ch 50. Sl st in the back bump of the 2nd ch from the hook and in each ch across. (49 sl st) The vine is 11 in (27.9 cm) long.
Tendrils (make 2): With dark green, ch 12. Work 2 sc in the 2nd ch from the hook and in each ch across. (22 sc) The tendril twists into a spiral by itself.
Attaching the Appliqués
Slip a rolled towel inside the holder so you only sew through the front layer.
- Pin the vine first. Start it at the band, just right of center. Curve it down and to the left around Round 20, swing it back to the right, and tuck the end under the upper left side of the hole rim.
- Pin the large dark leaf at Rounds 25–28, overlapping the vine.
- Pin the light olive leaf on the left curve at about Round 20.
- Pin the small dark leaf at about Round 15, just above and to the right of the hole.
- Add one tendril beside the olive leaf and one near the small leaf.
- Sew everything on with matching yarn, catching the mesh sc and chains at the back of each piece. Keep your stitches loose so the mesh doesn’t pucker.
Final Blocking
- Wet the holder thoroughly, then gently press out the water. Don’t wring it.
- Slide a tube about 3.75 in (9.5 cm) across inside, such as a rolled towel or a covered bottle.
- Ease the length to 18 in (45.7 cm) and the flat width to 6 in (15.2 cm).
- Open each diamond evenly, and round the hole to 2.75 in (7.0 cm) across.
- Pin the leaf points flat and press the tendrils into neat spirals.
- Let it dry completely before you hang it.
Final Quality-Control Checklist
- Every mesh round has 16 sc and 16 loops.
- The bridge carries exactly 5 sc in Round 14.
- The band has 48 sc in every round and lies flat.
- The hole edging has 59 sc, and the opening is round, not oval.
- The tab is centered on the back, opposite the hole, and the ring is sewn in securely.
- The holder measures 6 in × 18 in (15.2 cm × 45.7 cm).
- The appliqués are sewn through the front layer only.
Troubleshooting
- The mesh slants or spirals: Make sure each round begins under the dc, not in the dc itself.
- The hole is lopsided: Recount the rows. There must be five (Rows 9–13), and the bridge must be exactly 23 ch.
- The band flares: Work Round 30 with a hook 0.5 mm smaller.
- The band pulls in: Check that you worked 2 sc in every space, for 48 in total.
- Leaf points curl: Pin them out flat while the leaf is wet.
- Bags slip out of the hole: Work a third round of edging with 6 evenly spaced sc2tog, bringing it to 53 sc.
Care
Hand wash in cool water and dry flat, reshaping the leaves while damp. Avoid tumble drying, which can tighten the mesh.
Final Notes
The measurements build on each other in a single chain:
- The 3.5 in (8.9 cm) base sets the 16-loop mesh.
- Sixteen loops make a 12 in (30.5 cm) tube, 6 in (15.2 cm) wide when flat.
- Twenty-five mesh rounds bring the body to 16.8 in (42.7 cm).
- The 48-sc band adds 1.2 in (3.0 cm), for a total of 18 in (45.7 cm).
If you check each of those points as you work, the holder will hang straight, dispense smoothly and show off its ivy vine. Happy crocheting!