

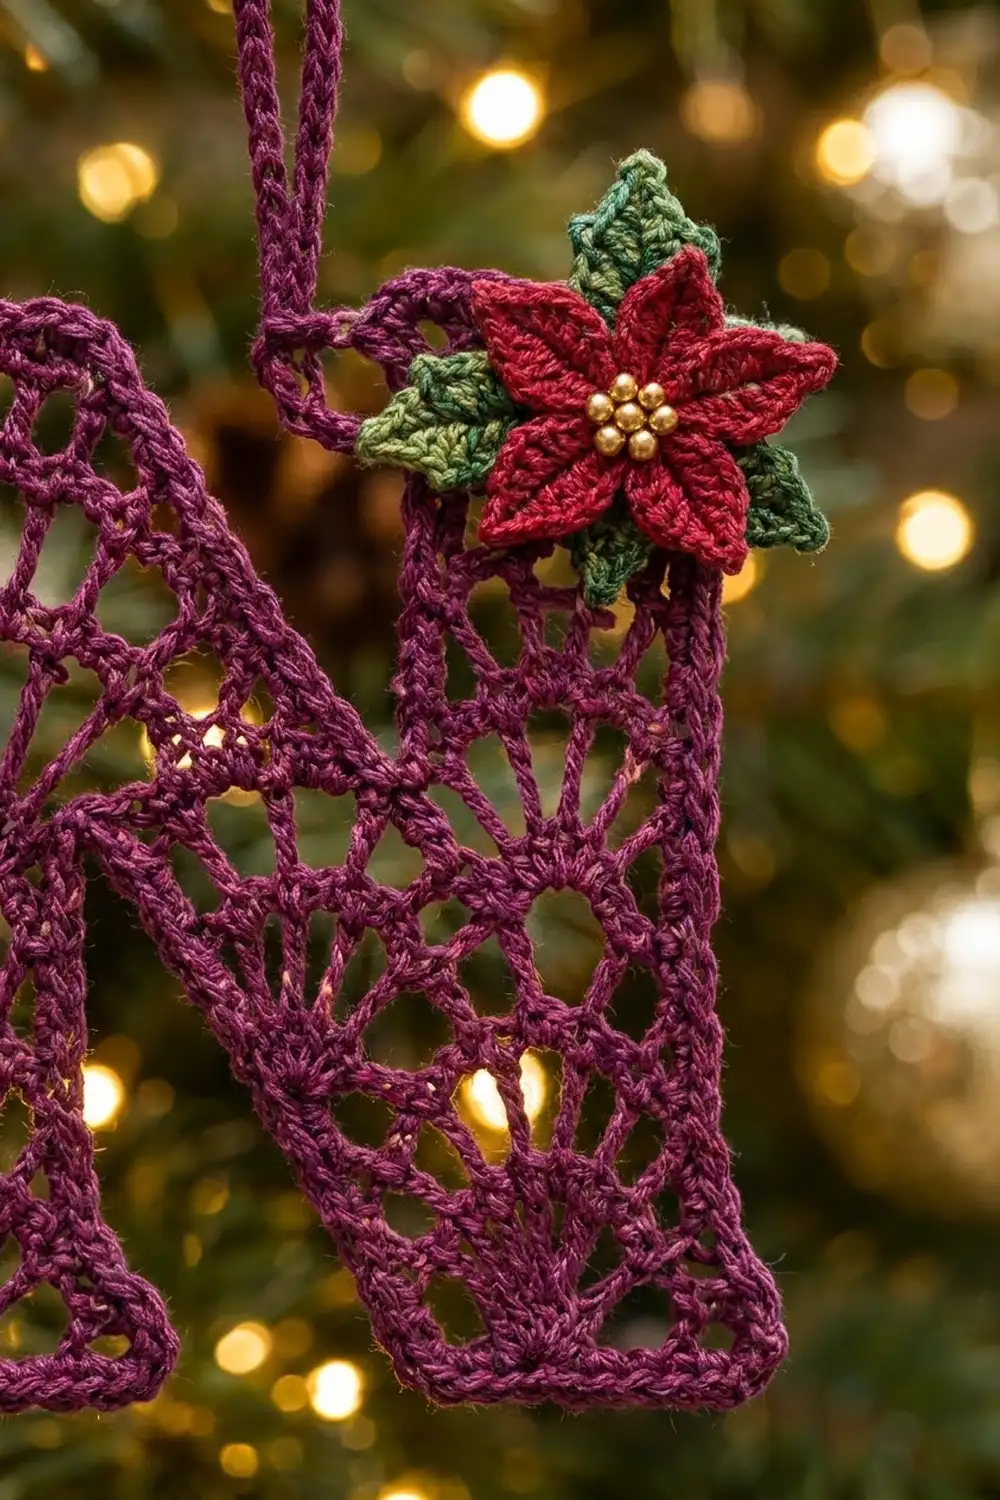
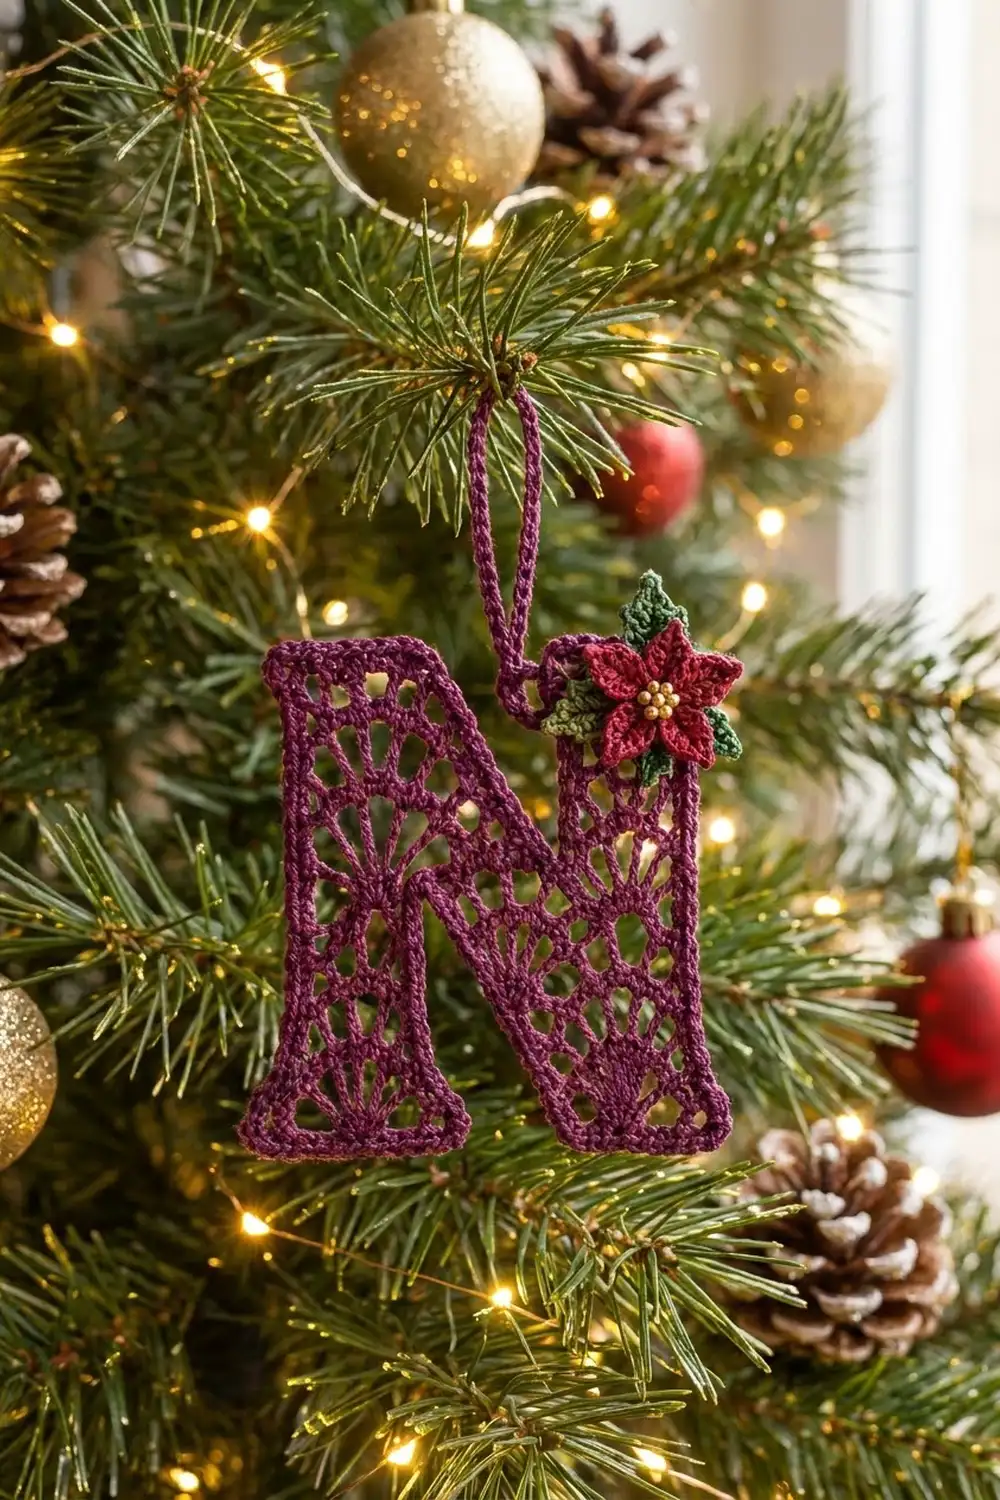
This lace letter N is a single flat ornament made in deep plum thread. Stacked tiers of open fans fill each stroke, a neat rope-like edge outlines the shape, and a tiny red poinsettia with green leaves and a gold bead center sits on the top right corner. It hangs from a corded loop and looks good on a tree, a gift tag, or a wreath.
The style is vintage lace, but on a small scale. Plum is the main color, red and green are used for the poinsettia, and gold beads finish the flower center.
This pattern uses US crochet terms. The finished letter measures 5.75 in x 5.75 in (14.6 cm x 14.6 cm). The hanging loop adds 1.75 in (4.4 cm) above that.
You’ll crochet the letter in one piece, stroke by stroke, the way you would write an N: first the left upright from the bottom up, then the diagonal worked off its top corner, then the right upright worked off the diagonal’s bottom corner. After that you add a two-round border, the hanging loop, and the layered poinsettia.
Finished Size and Construction
- Finished size: 5.75 in x 5.75 in (14.6 cm x 14.6 cm), plus a 1.75 in (4.4 cm) loop
- Skill level: Intermediate
- Terminology: US
- Yarn weight: Size 3 crochet thread (Weight 1, super fine)
- Hook: 2.25 mm (US B-1)
- Number of pieces: 1 letter, plus a small sewn-on poinsettia appliqué
- Layout: Three connected strokes: left upright, diagonal, right upright
- Stroke size: 11 sts = 1.375 in (3.5 cm) wide; 25 rows = 5.375 in (13.7 cm) tall
- Size before border: 5.375 in x 5.375 in (13.7 cm x 13.7 cm)
- Border depth: 0.1875 in (0.5 cm) per side
Materials
Use a mercerized cotton thread. It holds crisp fan shapes and blocks well. Avoid fuzzy or very stretchy fibers, because they blur the lace.
- Plum (main color): 20 g / 32 m
- Red (petals): 3 g / 5 m
- Green (leaves): 2 g / 3 m
- 7 gold seed beads, 3 mm
- 2.25 mm (US B-1) hook
- Tapestry needle and a fine beading needle with matching sewing thread
- Foam blocking mat, rust-proof pins, and spray starch or a light fabric stiffener
- Stitch markers
The quantities include a margin of about 25% for your gauge swatch and tails.
Abbreviations (US Terms)
- ch – chain
- sl st – slip stitch
- sc – single crochet
- hdc – half double crochet
- dc – double crochet
- tr – treble crochet
- sc2tog – single crochet 2 together
- rev sc – reverse single crochet (crab stitch)
- sk – skip
- sp – space
- st(s) – stitch(es)
- rep – repeat
Fan: 9 dc in the same st.
Shift row: Ch 3, sc in 2nd ch from hook and in next ch (2 sc made beyond the edge), sc in next 9 sts, leave last 2 sts unworked. Total: 2 + 9 = 11 sc. Each shift row moves the diagonal 2 sts sideways, which is 0.25 in (0.6 cm).
Gauge and Checkpoints
Work a test swatch first: Rows 1–5 of the left upright. It should measure 1.375 in (3.5 cm) wide and 1.0 in (2.5 cm) tall. That equals 8 sc = 1 in (2.5 cm).
Row heights after light blocking:
– sc row: 0.125 in (0.3 cm)
– fan row: 0.375 in (1.0 cm)
– arch row: 0.25 in (0.6 cm)
– one full 4-row tier: 0.875 in (2.2 cm)
Checkpoints:
1. Left upright finished: 1.375 in x 5.375 in (3.5 cm x 13.7 cm).
2. Diagonal finished: At the bottom, the diagonal’s left corner sits 2.625 in (6.7 cm) from the left upright’s outer edge. The bottom notch opening measures 1.25 in (3.2 cm).
3. Right upright finished: The whole letter measures 5.375 in x 5.375 in (13.7 cm x 13.7 cm).
4. Border finished: 5.75 in x 5.75 in (14.6 cm x 14.6 cm).
If your swatch is too big, go down to a 2.0 mm hook. If it’s too small, go up to a 2.5 mm hook. Change the hook before you change anything else.
Section 1: Left Upright
With plum, ch 12.
Row 1 (WS): Sc in 2nd ch from hook and in each ch across. (11 sc) This row ends at the inner (right) edge of the letter.
Row 2 (RS, fan row): Ch 1, turn. Sc in first sc, sk 4 sc, fan in next sc, sk 4 sc, sc in last sc. (11 sts: 2 sc + 9 dc)
Row 3 (WS, arch row): Ch 4 (counts as tr), turn. Sk 4 dc, sc in 5th (center) dc, ch 3, sk 4 dc, tr in last sc. Before the center sc, ch 3. (9 sts: 2 tr + 1 sc + 6 ch)
Written in order, Row 3 is: ch 4, ch 3, sc in center dc, ch 3, tr in last sc.
Row 4 (RS): Ch 1, turn. Sc in tr, 4 sc in ch-3 sp, sc in sc, 4 sc in next ch-3 sp, sc in top of turning ch. (11 sc: 1 + 4 + 1 + 4 + 1)
Row 5 (WS): Ch 1, turn. Sc in each sc across. (11 sc)
Rows 6–25: Rep Rows 2–5 five more times. You now have 6 fan tiers. (11 sc)
Row 25 ends at the inner top corner. Do not fasten off. Check against Checkpoint 1.
Section 2: Diagonal
The diagonal runs from the top left of the letter down to the bottom right. You’ll work it upward with the piece flipped.
Row 1: Ch 12. Flip the work top to bottom, like turning a calendar page. Row 25 of the upright is now at the bottom, and the chain extends to the right. Keep the new stitches above the chain. Sc in 2nd ch from hook and in next 10 ch. (11 sc) Sl st into the base of the chain to anchor it. Don’t count this sl st.
Row 2 (fan row): Ch 1, turn. Work as Upright Row 2. (11 sts)
Row 3 (arch row): Work as Upright Row 3. (9 sts) Then sl st into the side of the upright at the same height, which is within upright Row 22. This closes the inner corner.
Row 4: Work as Upright Row 4. (11 sc)
Row 5: Turn and work the shift row. This row starts at the side away from the upright. (11 sc: 2 + 9)
Rows 6–21: Rep Rows 2–5 four times, without the joining sl st. Every Row 5 repeat is a shift row, so Rows 9, 13, 17 and 21 all shift. (11 sc)
Rows 22–24: Rep Rows 2–4.
Row 25: Ch 1, turn. Sc in each sc across. (11 sc) Fasten off.
That’s 5 shifts of 2 sts each, so 10 sts or 1.25 in (3.2 cm) in total.
Flip the letter back to its normal orientation. Diagonal Row 25 is now at the bottom. Check against Checkpoint 2.
Section 3: Right Upright
Row 1: With plum, join with a sl st in the bottom right corner st of diagonal Row 25. Ch 12. Keep the new row level with diagonal Row 25 and above the chain. Sc in 2nd ch from hook and in next 10 ch. (11 sc) Sl st in the joining st.
Rows 2–25: Work as Left Upright Rows 2–25, with two joins:
– At the end of Row 3, sl st into the side of diagonal Row 22.
– At the end of Row 5, sl st into the side of diagonal Row 21.
These joins close the lower 1.0 in (2.5 cm) where the two strokes touch. (11 sc)
Fasten off and weave in the ends. Check against Checkpoint 3.
Border
The border gauge is 8 sc per inch on every edge. Each side’s count below includes that side’s corner stitches.
Along row ends, work:
– 1 sc per sc row
– 3 sc per fan row
– 2 sc per arch row
That gives 7 sc per tier, which matches 0.875 in at 8 sc/in.
Skip the small 2-st ledges on the diagonal. The border bridges them.
Rnd 1: With RS facing, join plum at the top left corner of the left upright. Work 3 sc in each of the 8 outer corner sts. Sl st to the first sc to finish.
| Edge | Count |
|---|---|
| Top of left upright + top of diagonal | 22 sts + 4 corner extras = 26 sc |
| Diagonal far edge, top notch apex, right upright inner edge | 34 sc, sc2tog, 34 sc = 69 sts |
| Top of right upright | 11 + 4 = 15 sc |
| Right upright outer edge | 43 sc |
| Bottom of right upright + bottom of diagonal | 22 + 4 = 26 sc |
| Diagonal near edge, bottom notch apex, left upright inner edge | 36 sc, sc2tog, 36 sc = 73 sts |
| Bottom of left upright | 11 + 4 = 15 sc |
| Left upright outer edge | 43 sc |
Rnd 1 total: 310 sts.
Rnd 2: Ch 1, rev sc in each st around. (310 sts) Sl st to the first st, but do not fasten off yet.
Why the math works:
– Each 25-row edge has 1 + (6 x 7) = 43 sc, which equals 5.375 in (13.7 cm) at 8 sc/in. That matches the stroke height, so the edges lie flat.
– The bottom notch edges are 4.625 in (11.7 cm) long. That’s 37 sc per side, and the last sc on each side merges into the sc2tog.
– The top notch edges are 4.375 in (11.1 cm) long. That’s 35 sc per side, again merged into an sc2tog.
– The diagonal is about 2% longer than an upright, so 43 sc on its edge pulls the steps gently into a straight line.
– The two border rounds add 0.1875 in (0.5 cm) per side, so 5.375 in becomes 5.75 in (14.6 cm).
Hanging Loop
- Sl st along Rnd 2 to the center st of the top left corner of the right upright.
- Ch 28, then sl st in the same st.
- Work 36 sc into the loop, packed tightly so it looks like a cord.
- Sl st in the base of the loop and fasten off.
The loop stands 1.75 in (4.4 cm) tall.
Poinsettia Appliqué
Leaves (make 3, green): Ch 8. Sc in 2nd ch from hook, then hdc, dc, dc, hdc, sc in the next ch, and sl st in the last ch. (7 sts) For the tip, ch 2 and sl st in the 2nd ch from hook. Work along the other side of the foundation chain: sl st, sc, hdc, dc, dc, hdc, sc. (7 sts) Fasten off. Each leaf is 0.875 in (2.2 cm) long.
Flower (red):
– Rnd 1: Magic ring, 10 sc in ring. Pull the ring closed and sl st to the first sc. (10 sc)
– Rnd 2: Ch 6, sl st in 2nd ch from hook, then sc, hdc, dc, tr in the next 4 ch. Sk 1 sc and sl st in the next sc. Rep from * 5 times. (5 pointed petals)
Fasten off. The flower measures 1.375 in (3.5 cm) across.
Layering:
1. Sew the 3 leaves to the top outer corner of the right upright: one pointing up, one pointing left, and one pointing down and to the right.
2. Center the flower over the leaves so the leaf tips show between the petals. Sew around Rnd 1.
3. Sew 7 gold beads in a tight cluster in the flower center.
Final Blocking
- Pin a 5.75 in x 5.75 in (14.6 cm x 14.6 cm) square outline onto the foam mat.
- Mist the letter lightly until it’s damp.
- Pin the 8 outer corners to the outline.
- Pin both notch apexes and straighten the diagonal edges.
- Open each fan evenly and pin any arches that curl.
- Spray with starch, keeping it off the poinsettia.
- Let it dry completely, then unpin it.
Final Quality-Control Checklist
- Letter measures 5.75 in x 5.75 in (14.6 cm x 14.6 cm).
- Each stroke has 6 fan tiers.
- The diagonal has 5 shift steps, all smoothed by the border.
- The border has 310 sts with no puckers at the notches.
- The loop is 1.75 in (4.4 cm) tall and sits straight.
- The leaves show between the petals, and the beads are secure.
- All ends are woven in invisibly.
Troubleshooting
Fans cup or ruffle: Your dc are too loose. Try a smaller hook.
Diagonal looks jagged: Check that every shift row has exactly 11 sts. Pin the diagonal edges straight when blocking.
Notch apex puckers: Make the sc2tog right at the joining sl st, not before it.
Border waves: You’ve worked too many row-end sc. Recount to 43 per side.
Loop twists: Pack the sc evenly and steam the loop flat.
Petals curl: Pin each petal tip during blocking and let it dry fully.
Care
Hand wash in cool water and lay flat to dry. Reshape and re-starch the letter if needed, but keep water away from the beads.
Final Notes
Here is the measurement chain at a glance:
– Swatch: 11 sts = 1.375 in (3.5 cm); 5 rows = 1.0 in (2.5 cm)
– Each stroke: 25 rows = 5.375 in (13.7 cm)
– Diagonal: 5 shifts of 0.25 in (0.6 cm)
– Letter before border: 5.375 in x 5.375 in (13.7 cm x 13.7 cm)
– Border: 310 sts adding 0.1875 in (0.5 cm) per side, for 5.75 in x 5.75 in (14.6 cm x 14.6 cm)
Check each stage as you go, and the finished letter will come out square.
Happy crocheting!