

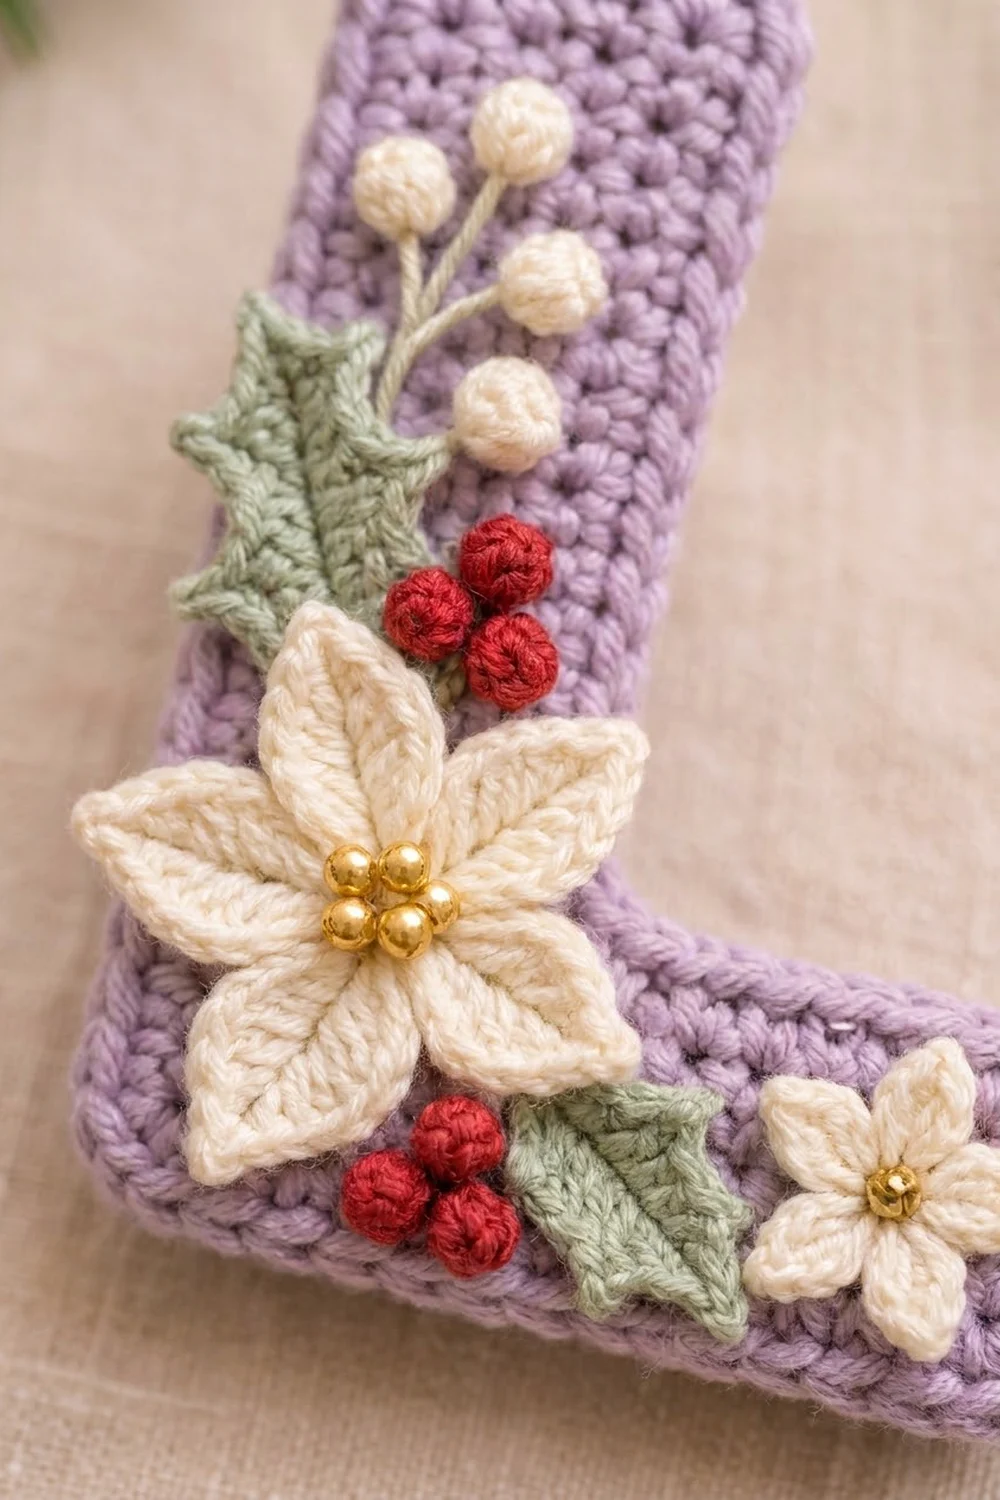
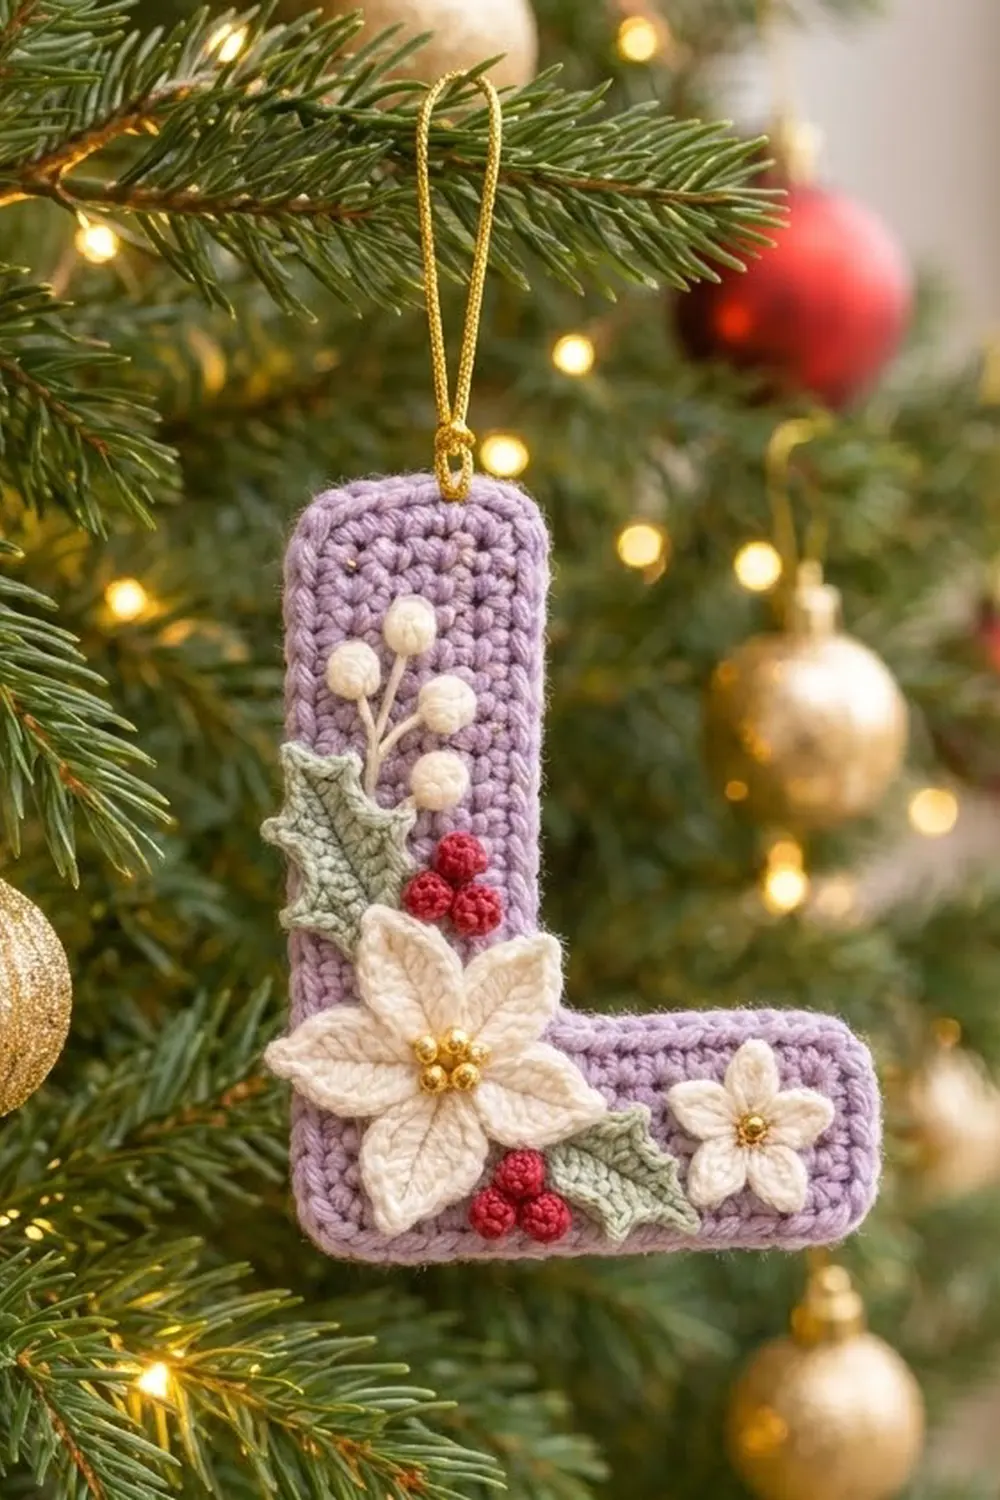
The Lavender Holly Monogram L is a flat crochet letter ornament with a small winter garden on its corner. You work the lavender letter in dense single crochet. Then you add a cream poinsettia, a small cream flower, sage holly leaves, red berries, and a sprig of cream berries. A gold cord loop lets you hang it on the tree.
The colors are calm and a little unexpected for Christmas: lavender, cream, sage green, and red, with tiny gold bead accents. It works as a gift tag, a personalized ornament, or a stocking charm.
The pattern uses US crochet terms. The finished ornament measures 3.4 in (8.6 cm) wide and 4.4 in (11.2 cm) tall.
Construction is simple. You crochet the foot of the L in rows, then keep going on part of the stitches to make the stem. You add one border round all the way around and block the letter. Last, you sew on the appliqués and the hanging loop.
Finished Size and Construction
- Finished size: 3.4 in (8.6 cm) wide x 4.4 in (11.2 cm) tall
- Skill level: Easy to intermediate
- Terminology: US crochet terms
- Yarn weight: DK (weight 3), cotton or cotton blend
- Hooks: 3.5 mm (E-4) for the letter, 3.0 mm (C/D) for the appliqués
- Number of pieces: 1 letter body, plus small appliqués sewn on
- Layout: Single ornament; no motifs to join
- Size before border: 3.0 in (7.6 cm) wide x 4.0 in (10.2 cm) tall
- Stem and foot width before border: 1.2 in (3.0 cm)
- Border depth: 1 round of sc, about 0.2 in (0.5 cm) per side
Materials
Choose a smooth cotton DK, mercerized or matte. Cotton keeps the edges crisp and shows the stitch texture clearly. Avoid fuzzy yarn, because it blurs the appliqué points.
- Lavender: 8 g, about 18 m (letter body and border)
- Cream: 5 g, about 11 m (poinsettia, small flower, cream berries)
- Sage green: 3 g, about 7 m (holly leaves, berry stems)
- Red: 2 g, about 5 m (6 berries)
All quantities include extra for swatching and sewing tails.
Tools:
- 3.5 mm (E-4) and 3.0 mm (C/D) crochet hooks
- Tapestry needle
- 6 gold seed beads (size 6/0 or similar) and sewing thread
- 6 in (15.2 cm) of thin gold cord
- Stitch marker
- Blocking board and rustproof pins
- Spray bottle, and light spray starch (optional)
Abbreviations (US Terms)
- ch: chain
- sl st: slip stitch
- sc: single crochet
- hdc: half double crochet
- dc: double crochet
- sc2tog: single crochet 2 together
- MR: magic ring
- st(s): stitch(es)
- RS: right side
Picot: ch 2, sl st in the top of the stitch you just made.
Sc2tog across a corner: insert hook in the next st, yarn over, pull up a loop. Insert hook in the next row end, yarn over, pull up a loop. Yarn over and pull through all 3 loops.
Gauge and Checkpoints
Gauge: 10 sc and 10 rows = 2 in (5.1 cm) with the 3.5 mm hook. That is 5 sc and 5 rows per 1 in (2.5 cm).
This is a firm gauge. Firm fabric keeps the letter flat and holds up the appliqués.
The foot of the L works as your swatch. Measure at each checkpoint:
- After Row 6: 3.0 in (7.6 cm) wide x 1.2 in (3.0 cm) tall
- After Row 20: 4.0 in (10.2 cm) tall; stem 1.2 in (3.0 cm) wide
- After border: 3.4 in (8.6 cm) x 4.4 in (11.2 cm)
If your piece is too big: go down 0.5 mm in hook size and start again.
If your piece is too small: go up 0.5 mm in hook size.
If the width is right but the height is off, adjust your tension on the turning chain and first stitch instead of adding or removing rows. The appliqué layout depends on the stem and foot keeping these proportions.
Letter Body
Use lavender and the 3.5 mm hook.
Foundation: Ch 16.
Row 1: Sc in 2nd ch from hook and in each ch across. (15 sc)
Rows 2–6: Ch 1, turn, sc in each st across. (15 sc)
Checkpoint: the foot measures 3.0 in (7.6 cm) x 1.2 in (3.0 cm).
Row 7 (start the stem): Ch 1, turn, sc in first 6 sts. Leave the other 9 sts unworked. (6 sc)
Rows 8–20: Ch 1, turn, sc in each st across. (6 sc)
Fasten off and weave in the ends.
Checkpoint: total height is 4.0 in (10.2 cm) and the stem is 1.2 in (3.0 cm) wide.
Single crochet looks almost the same on both sides. Lay the piece down so the stem is on the left and the foot points right, like a printed L. This face is now the RS. Mark it with a stitch marker.
Stitch count check: the foot has 6 rows of 15 sc (90 sc) and the stem has 14 rows of 6 sc (84 sc). That makes 174 sc in the body.
Border
Use lavender and the 3.5 mm hook. Work with the RS facing you and the stem on the left.
Border gauge: along a row edge, each sc covers one row. Along a top or bottom edge, each sc covers one stitch. Because the body has 5 sts and 5 rows per inch, the border matches it 1:1 and lies flat.
Round 1: Join with a standing sc in the bottom-left corner st of the foundation edge. Work counterclockwise:
- Bottom edge: 1 more sc in the same corner st, sc in each of next 13 sts, 2 sc in last st. (17 sc: 15 worked 1-per-st + 2 corner extras)
- Right edge of foot: sc in each of the 6 row ends. (6 sc)
- Top of foot: 2 sc in the first unworked st of Row 6 (outer corner), sc in each of next 7 sts. Then sc2tog across the corner, using the last unworked st and the Row 7 row end. (10 sc: 9 sts used + 1 corner extra; the sc2tog also uses up 1 row end)
- Right edge of stem: sc in each row end of Rows 8–20. (13 sc)
- Top of stem: 2 sc in first st, sc in each of next 4 sts, 2 sc in last st. (8 sc: 6 worked 1-per-st + 2 corner extras)
- Left edge: sc in each of the 20 row ends, back down to the start. (20 sc)
Sl st to the first sc. Fasten off. (74 sc)
Why the math works: the body edge has 70 stitches and row ends (15 + 6 + 9 + 14 + 6 + 20). You work 1 sc into each one, add 1 extra sc at each of the 5 outer corners (+5), and combine 2 into 1 at the inner corner (−1). So 70 + 5 − 1 = 74.
Putting only 2 sc in each outer corner, instead of the usual 3, gives the soft, rounded corners seen on this ornament. The sc2tog keeps the inner corner sharp and stops it from rippling.
The border adds about 0.2 in (0.5 cm) on every side. The width goes from 3.0 in to 3.4 in (8.6 cm), and the height goes from 4.0 in to 4.4 in (11.2 cm). The stem and foot each become 1.6 in (4.1 cm) wide.
Appliqués
Use the 3.0 mm hook for all appliqués so they stay crisp. Leave a 6 in (15.2 cm) tail on each piece for sewing.
Large Poinsettia (make 1, cream)
Round 1: MR, 5 sc in ring, pull closed, sl st to first sc. (5 sc)
Round 2: Ch 6, sl st in 2nd ch from hook, sc in next ch, hdc in next ch, dc in next ch, dc in last ch, sl st in next sc of Round 1. Repeat from * 4 more times. The last repeat ends with a sl st in the joining st. (5 petals, 5 sts each)
Fasten off. The flower is about 1.75 in (4.4 cm) across, with pointed petal tips.
Small Flower (make 1, cream)
Round 1: MR, 5 sc in ring, pull closed, sl st to first sc. (5 sc)
Round 2: (Sc, dc, picot, dc, sc) in next sc. Repeat from * 4 more times, sl st to first sc. (5 petals, 4 sts + 1 picot each)
Fasten off. The flower is about 0.9 in (2.3 cm) across.
Holly Leaf (make 2, sage green)
Foundation: Ch 8.
Side 1: Sl st in 2nd ch from hook, sc in next ch, (hdc, picot) in next ch, dc in next ch, (hdc, picot) in next ch, sc in next ch, sl st in last ch. (7 sts, 2 picots)
Tip: Ch 1, then turn the piece so you can work along the other side of the foundation chain.
Side 2: Sl st in first ch, sc in next ch, (hdc, picot) in next ch, dc in next ch, (hdc, picot) in next ch, sc in next ch, sl st in last ch. (7 sts, 2 picots)
Sl st to the first sl st. Fasten off. (14 sts and 4 picots in total)
Each leaf is about 1.25 in (3.2 cm) long. The picots make the spiky holly points. If you like, stitch one long straight line down the center with a single strand of cream to suggest the vein.
Berries (make 6 red, 3 cream)
Red berry: MR, 6 sc in ring. Do not join. Pull the ring tight. Cut the yarn, thread the tail through the front loops of all 6 sts, and pull it into a ball. (6 sc) Each berry is about 0.3 in (0.8 cm) across.
Cream berry: Make it the same way, but with 7 sc in the ring. (7 sc) Each berry is about 0.35 in (0.9 cm) across.
Assembly
Lay the letter flat with the RS up and the stem on the left. Pin every appliqué in place before you sew anything.
- Cream berry sprig: place the 3 cream berries in a loose fan on the upper half of the stem, about 1.0 in (2.5 cm) below the top edge. With sage green, backstitch 3 stems, each about 0.5 in (1.3 cm) long, meeting at one point below the berries.
- Upper holly leaf: place it at an angle on the left edge of the stem, below the sprig. Let its tip stick out about 0.1 in (0.3 cm) past the border.
- First red cluster: place 3 red berries just to the right of the upper holly leaf, touching each other.
- Poinsettia: center it on the lower stem, just above the foot, overlapping the base of the holly leaf and the inner corner.
- Second red cluster: tuck 3 red berries under the lower right petals of the poinsettia, on the foot.
- Lower holly leaf: place it on the foot to the right of the red cluster, angled upward.
- Small flower: place it near the right end of the foot, about 0.25 in (0.6 cm) from the border.
Sew each piece on with its own tail. Use small stitches that catch only the front layer of the letter, so nothing shows on the back. Tack the poinsettia down at its center and at the base of each petal. Leave the petal tips free so they stand up a little.
Sew 5 gold beads in a tight cluster at the poinsettia center, and 1 gold bead at the center of the small flower.
Hanging loop: fold the 6 in (15.2 cm) gold cord in half to make a 3 in (7.6 cm) loop. Sew both ends to the back of the stem top, centered, with several firm stitches.
Final Blocking
- Block the letter before you sew on the appliqués if you can. If they are already on, keep the beads dry.
- Mist the letter lightly with water until it is just damp.
- Pin it RS up on the blocking board to 3.4 in (8.6 cm) x 4.4 in (11.2 cm).
- Check that the stem and foot are each 1.6 in (4.1 cm) wide and that the inner corner is a crisp right angle.
- Pin the outer corners gently. Let them stay rounded instead of pulling them into points.
- Use light spray starch if you want a stiffer ornament.
- Let it dry completely, at least 4 hours, before you remove the pins.
Final Quality-Control Checklist
- The body has 174 sc and the border has 74 sc.
- The finished size is 3.4 in (8.6 cm) x 4.4 in (11.2 cm).
- The stem is on the left and the foot points right.
- The 5 outer corners are softly rounded and the inner corner is sharp.
- The border lies flat, with no ruffling or cupping.
- The poinsettia has 5 pointed petals and the small flower has 5 petals.
- Each holly leaf has 4 side points plus its tip.
- All 6 red berries and 3 cream berries are firm and round.
- Every appliqué is secure, and no stitches show on the back.
- The gold loop is centered and strong enough to hang the ornament.
- All ends are woven in.
Troubleshooting
The border ruffles. Your border tension is looser than the body. Use the smaller hook for the border only.
The border cups or pulls the edge in. Check that you worked 1 sc into every row end, not every other one.
The inner corner bulges. Make sure you worked the sc2tog across the corner, not 2 separate sc.
The corners look too pointed. Check that only 2 sc go into each outer corner.
The poinsettia petals curl. Steam them lightly, then press them flat with your fingers while they are still warm.
The berries won’t stay round. Push a little of the yarn tail inside before you pull them closed.
The ornament flops on the tree. Starch it more firmly. A body worked looser than gauge is the usual cause.
Care
Spot clean gently with cool water and mild soap, and lay flat to dry. Store the ornament flat in a box so the petals and holly points keep their shape.
Final Notes
The measurements build in a short chain. A gauge of 5 sc and 5 rows per 1 in (2.5 cm) gives a foot of 3.0 in (7.6 cm) x 1.2 in (3.0 cm) after Row 6. The stem brings the body to 4.0 in (10.2 cm) tall after Row 20. One 74-stitch border round adds 0.2 in (0.5 cm) on each side, for a finished letter of 3.4 in (8.6 cm) x 4.4 in (11.2 cm). If you check at each stage, the appliqués will sit exactly where they should.
Happy crocheting!