
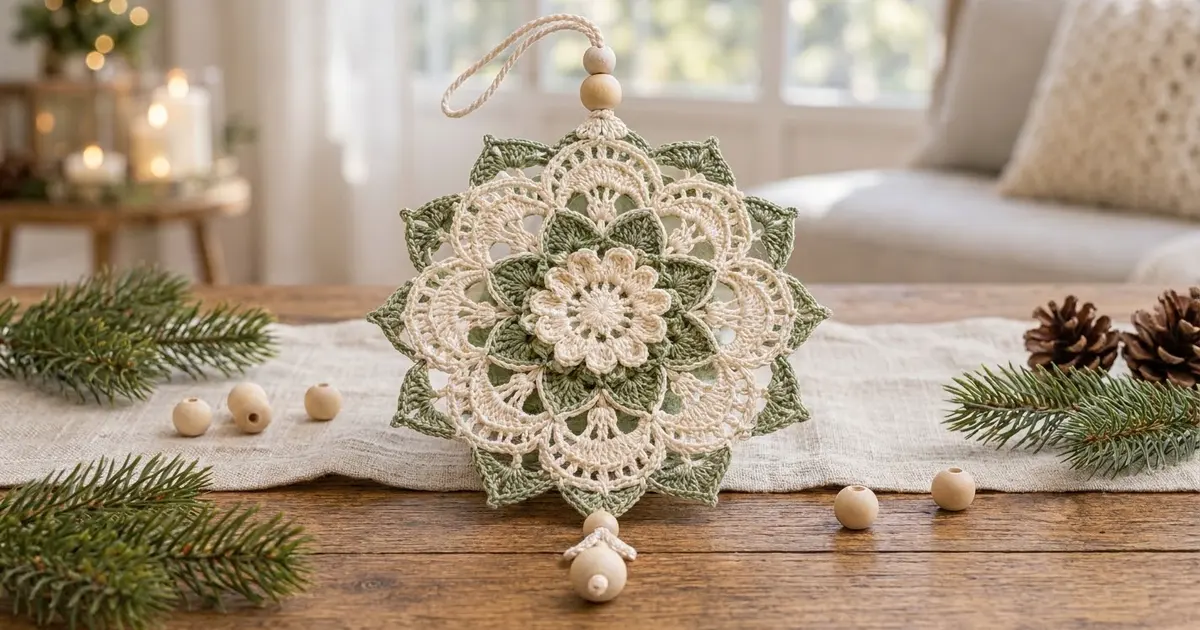
The Sage Frost Mandala Ornament is a layered, lacy holiday decoration that looks intricate but is worked as one continuous motif. A cream flower sits at the center, sage petals peek out behind it, and a ring of open cream fans circles both. Pointed sage tips finish the outer edge and give the ornament a soft star shape.
The palette is calm and natural: ecru cotton, muted sage green and light wooden beads. It suits a Scandinavian, farmhouse or neutral Christmas tree, and it also works as a window hanging all year.
This pattern uses US crochet terms. The finished motif measures 6 in (15.2 cm) across from point to point. With the hanging loop and bead drop, the whole ornament is about 12 in (30.5 cm) long.
The motif is worked in rounds from the center out, changing color four times. The two sage layers are worked into chain loops that hold them behind the cream layers, which creates the stacked look. A twisted cord with beads is added at the top, and a small crocheted bud with beads is added at the bottom.
Finished Size and Construction
- Finished motif size: 6 in (15.2 cm) diameter, point to point
- Total hanging length: about 12 in (30.5 cm)
- Skill level: Intermediate
- Terminology: US crochet terms
- Yarn weight: Fingering (#1) mercerized cotton, or size 3 crochet thread
- Hook: 2.25 mm (US B-1)
- Number of pieces: 1 motif, plus 1 tiny bud for the bead drop
- Layout: Single circular motif with 8-fold symmetry
- Motif size before border: 5.25 in (13.3 cm) after Round 9
- Border depth: about 0.375 in (1.0 cm) on each side (sage points, Rounds 10–11)
Materials
Use a smooth mercerized cotton so the fans and points stay crisp. Acrylic and soft blends block poorly and make the points curl. Choose a cream with a warm undertone and a gray-leaning sage to match the photographed look.
- Color A – Cream/Ecru: 12 g (about 41 m)
- Color B – Sage Green: 8 g (about 27 m)
Both amounts include about a 20% margin for swatching and the cords.
Tools and notions:
- 2.25 mm (US B-1) crochet hook
- Tapestry needle with a small eye that fits through the bead holes
- 4 natural wooden beads for the drop and hanger: one 8 mm, two 12 mm, one 10 mm
- 1 natural wooden bead, 16 mm, for the bottom
- Bead holes must be at least 2.5 mm so they take a doubled strand
- Scissors and stitch markers
- Blocking mat, rustproof pins, and spray starch or a starch/water mix
Abbreviations (US Terms)
- ch – chain
- sl st – slip stitch
- sc – single crochet
- hdc – half double crochet
- dc – double crochet
- tr – treble crochet
- sp(s) – space(s)
- sk – skip
- st(s) – stitch(es)
- MR – magic ring
Special stitch – Join with sc: Place a slipknot on the hook, insert the hook in the stitch or space you’re told to use, yarn over, pull up a loop, yarn over and pull through both loops. This sc counts as the first stitch of the round.
Gauge and Checkpoints
Exact gauge isn’t critical for an ornament, but the layers only stack neatly when the sizes are in proportion. Work Rounds 1–4 first and measure before going on.
Gauge: Rounds 1–2 measure 1.25 in (3.2 cm) across.
Checkpoints:
- After Round 2: 1.25 in (3.2 cm)
- After Round 4 (cream flower): 2.25 in (5.7 cm)
- After Round 6 (sage petals): 3.25 in (8.3 cm)
- After Round 9 (cream fans): 5.25 in (13.3 cm)
- After Round 11 (sage points): 6 in (15.2 cm)
If your piece is too big: go down to a 2.0 mm hook, or tighten the chain loops in Rounds 5, 7 and 10.
If your piece is too small: go up to a 2.5 mm hook.
If the piece cups: your chain loops are too tight. Loosen them before changing hooks.
If it ruffles: your chain loops are too loose, or you’re working extra stitches.
Pattern
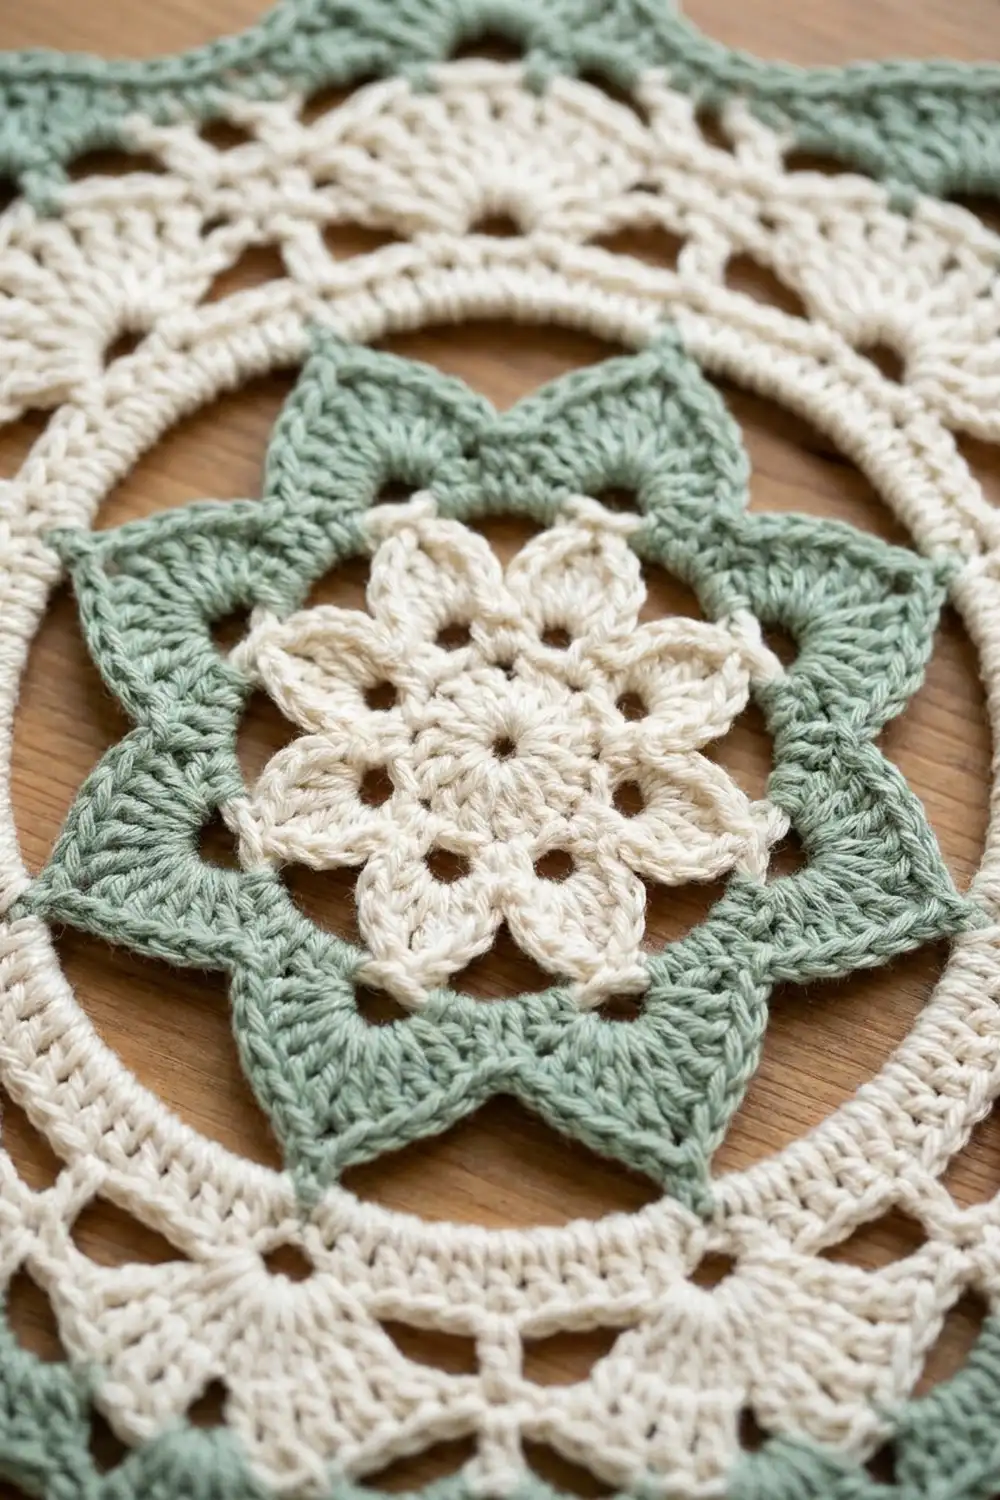
Center Flower (Color A – Cream)
Round 1: Make a MR. Ch 3 (counts as dc), work 15 dc in the ring. Pull the ring closed and join with sl st to the top of the beginning ch-3. (16 dc)
Round 2: Ch 3 (counts as dc), dc in the same st. Work 2 dc in each st around. Join with sl st to the top of the ch-3. (32 dc)
Checkpoint: 1.25 in (3.2 cm).
Round 3: Ch 1, sc in the same st, ch 3, sk 3 sts. Sc in the next st, ch 3, sk 3 sts. Repeat from * 6 more times. Join with sl st to the first sc. (8 sc, 8 ch-3 sps)
Check: 8 repeats × 4 sts covered = 32 sts. ✓
Round 4 (petals): In each ch-3 sp work (sc, hdc, 3 dc, hdc, sc). Join with sl st to the first sc. Fasten off A. (8 petals, 7 sts each, 56 sts total)
Checkpoint: 2.25 in (5.7 cm). The center dc of each petal (the 2nd of the 3 dc) is the petal tip. Mark one tip if that helps.
Sage Petal Layer (Color B – Sage)
Round 5: Join B with sc in the center dc of any petal. Ch 6. Sc in the center dc of the next petal, ch 6. Repeat from * 6 more times. Join with sl st to the first sc. (8 sc, 8 ch-6 loops)
Each ch-6 loop spans the gap between two cream petals. The sage petal built inside it will sit between the cream petals, which gives the alternating layered look.
Round 6: Sl st into the first ch-6 loop. Ch 1. In each ch-6 loop work (sc, hdc, 2 dc, tr, ch 2, tr, 2 dc, hdc, sc). Join with sl st to the first sc. Fasten off B.
(8 pointed petals; 10 sts + 1 ch-2 tip each; 80 sts and 8 ch-2 tips total)
Checkpoint: 3.25 in (8.3 cm). Pinch each ch-2 tip into a point before moving on.
Cream Lace Fans (Color A – Cream)
Round 7: Join A with sc in any ch-2 tip of Round 6. Ch 7. Sc in the next ch-2 tip, ch 7. Repeat from * 6 more times. Join with sl st to the first sc. (8 sc, 8 ch-7 loops)
Each ch-7 loop now lies directly outside one cream center petal.
Round 8 (spoke fans): Sl st into the first ch-7 loop. Ch 4 (counts as dc + ch 1). Work (dc, ch 1) 5 times, then dc, all in the same loop. In each remaining ch-7 loop work (dc, ch 1) 6 times, then dc. Join with sl st to the 3rd ch of the beginning ch-4.
(8 fans; 7 dc + 6 ch-1 sps each; 56 dc and 48 ch-1 sps total)
Don’t add chains between fans. Neighboring fans meet at the Round 7 sc.
Round 9 (arch edging): Sl st into the first ch-1 sp. Ch 1, sc in the same sp.
- Finish the first fan: (ch 3, sc in the next ch-1 sp) 5 times, then ch 1. This ch 1 is the “bridge” between fans.
- Each remaining fan: sc in the first ch-1 sp of the fan, (ch 3, sc in the next ch-1 sp) 5 times, ch 1.
- Close the round: join with sl st to the first sc. Fasten off A.
(Per fan: 6 sc + 5 ch-3 arches. Totals: 48 sc, 40 ch-3 arches, 8 ch-1 bridges)
The 3rd arch of each fan is its center arch. Checkpoint: 5.25 in (13.3 cm). This is the size before the border.
Border: Sage Points (Color B – Sage)
Border gauge: each finished point should stand about 0.375 in (1.0 cm) beyond the cream arches. Measure from the bridge straight out to the tip.
For a round motif, “per side” means “per section.” There are 8 sections, and each one holds exactly 1 point.
Round 10: Join B with sc in the center (3rd) ch-3 arch of any fan. Ch 9. Sc in the center arch of the next fan, ch 9. Repeat from * 6 more times. Join with sl st to the first sc. (8 sc, 8 ch-9 loops; 1 loop per section)
Keep the chains behind the cream arches as you work. Each ch-9 loop crosses behind one ch-1 bridge, so the point built in it appears between two fans.
Round 11: Sl st into the first ch-9 loop. Ch 1. In each ch-9 loop work (sc, hdc, 2 dc, 2 tr, ch 3, 2 tr, 2 dc, hdc, sc). Join with sl st to the first sc. Fasten off B and weave in all ends.
(Per section: 12 sts + 1 ch-3 tip. Total: 96 sts and 8 ch-3 tips)
Checkpoint: 6 in (15.2 cm) point to point.
Why the math works: Each section starts with exactly 1 sc anchor and 1 ch-9 loop, so 8 sections give 8 anchors and 8 loops. Twelve stitches across 9 chains is a 4:3 ratio. That small amount of extra fullness lets the two tr legs spread into a sharp point without the edge ruffling.
The 5.25 in (13.3 cm) motif plus 0.375 in (1.0 cm) of border on each side gives 6 in (15.2 cm). The tr/ch-3 peaks make up most of that depth.
Bud (Color A – Cream, make 1)
Make a MR. Ch 6, sl st in the 2nd ch from the hook, sc in the next ch, hdc in the next ch, dc in each of the last 2 ch, sl st in the ring. Repeat from * 2 more times. (3 small leaves)
Pull the ring snug, but leave a center hole about 0.125 in (0.3 cm) wide for the cord. Fasten off and weave in the ends.
Hanger and Bead Drop
Top hanger:
- Cut a 16 in (40.6 cm) strand of A and fold it in half.
- Use a lark’s head knot to attach the fold through the ch-3 tip of any point. This is now the top.
- Thread both ends through a 12 mm bead, then the 8 mm bead. Slide the beads down against the tip.
- Twist the two strands firmly together, let them twist back on themselves, and tie an overhand knot 4 in (10.2 cm) above the 8 mm bead. This makes a 2 in (5.1 cm) twisted loop.
- Trim the tails to 0.25 in (0.6 cm). Add a dot of glue if you like.
Bottom drop:
- Count 4 points from the top to find the opposite point.
- Attach a second 16 in (40.6 cm) strand there with a lark’s head knot.
- Thread both ends through a 12 mm bead, the bud (from the top of the leaves down, so the leaves hang downward), a 10 mm bead and the 16 mm bead.
- Push everything up snug and tie a double knot under the 16 mm bead.
- Trim the tails and tuck them into the bead hole. The drop measures about 3 in (7.6 cm).
Final Blocking
- Soak the motif in cool water with a little starch for 5 minutes. Press out the water in a towel without wringing.
- Pin the center flower flat, with one pin in each cream petal tip.
- Pin the 8 sage petal tips evenly between the cream petals.
- Pin each fan’s center arch out to an even circle 5.25 in (13.3 cm) wide.
- Pin each sage point out until the full motif is 6 in (15.2 cm) point to point. Pull the ch-3 tips into sharp peaks.
- Let it dry completely, at least 8 hours. Unpin it, then add the hanger and the drop if you haven’t already.
Final Quality-Control Checklist
- [ ] 8 cream petals, 8 sage petals, 8 cream fans and 8 sage points
- [ ] Sage petals sit between cream petals, not on top of them
- [ ] Sage outer points sit between fans
- [ ] Each fan has 7 dc spokes and 5 arches
- [ ] Motif measures 6 in (15.2 cm) and lies flat
- [ ] No chains from Round 10 show on the front
- [ ] Top and bottom cords sit on opposite points
- [ ] Beads are snug, knots are secure and all ends are hidden
Troubleshooting
- Sage petals hide behind the cream ones: you joined Round 5 between petals instead of at the petal tips. Rework it with each sc in a center dc.
- Fans overlap or buckle: the Round 7 ch-7 loops are too short for your tension. Try ch 8.
- Outer points look blunt: keep the ch-3 tip loose, and pin it to a sharp peak when blocking.
- Round 10 chains show on the front: fold the arches forward while you work and keep every chain behind them.
- Beads won’t pass over the doubled strand: thread a single strand through, or switch to beads with 3 mm holes.
Care
Hand wash in cool water, press dry in a towel and reshape flat. Re-starch lightly after washing to keep the points crisp.
Final Notes
The measurement chain runs like this:
| Stage | Diameter |
|---|---|
| Round 2 | 1.25 in (3.2 cm) |
| Cream flower (Round 4) | 2.25 in (5.7 cm) |
| Sage petals (Round 6) | 3.25 in (8.3 cm) |
| Cream fans (Round 9) | 5.25 in (13.3 cm) |
| Sage points, finished (Round 11) | 6 in (15.2 cm) |
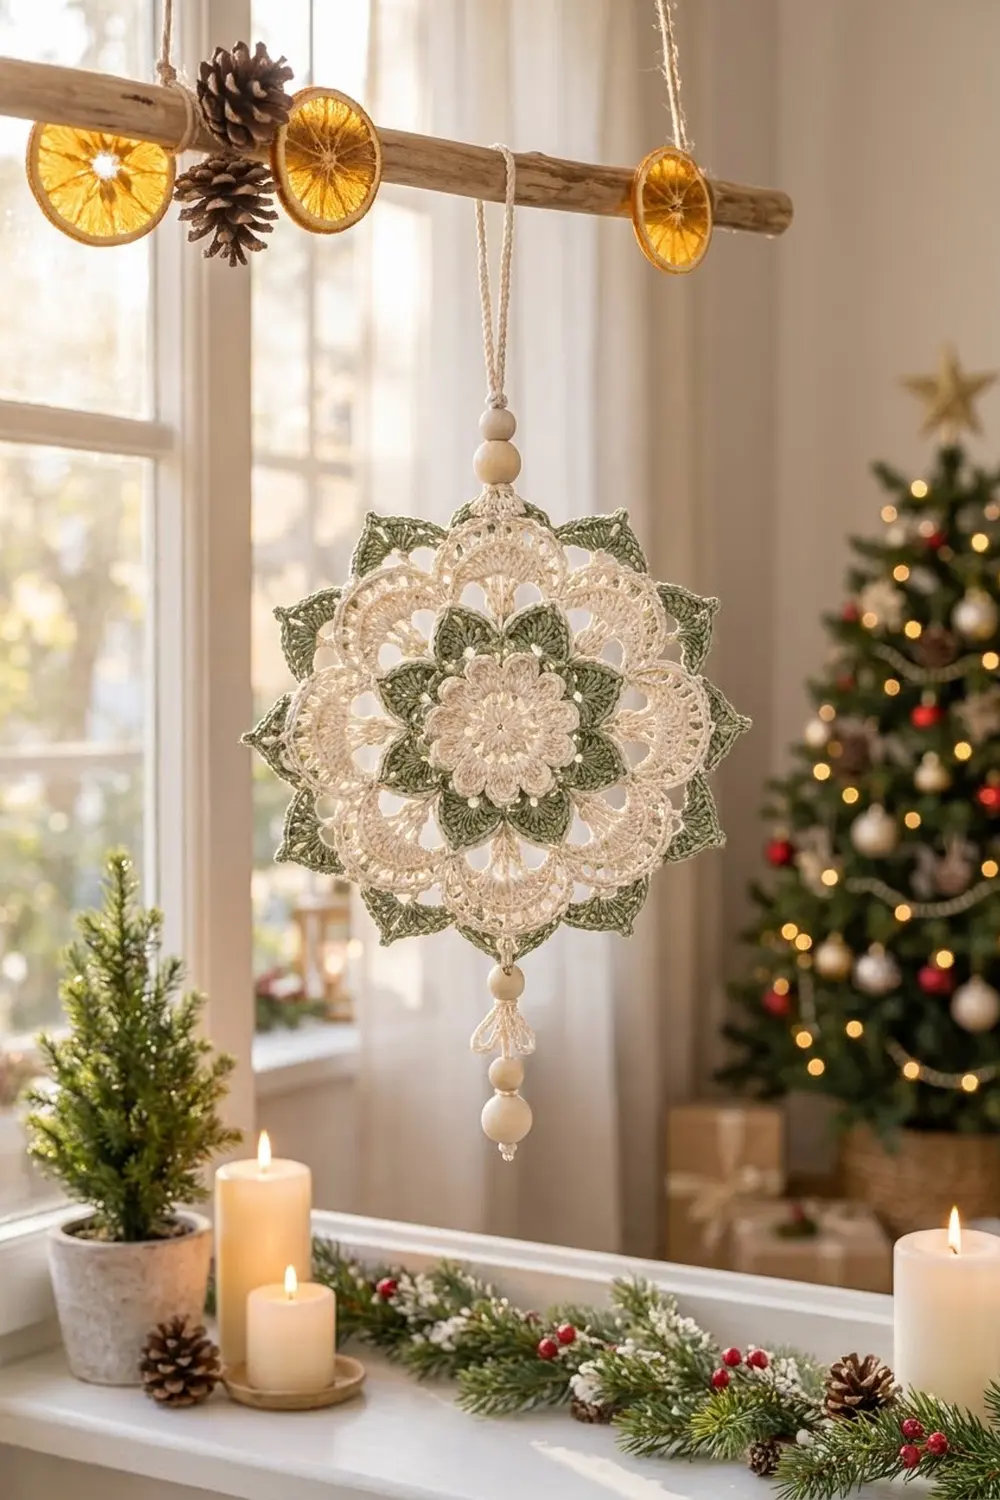
The cord and beads bring the total hanging length to about 12 in (30.5 cm). If you hit each checkpoint, the layers stack evenly and the star shape comes out balanced. Make one for your tree, or a handful in different sage and cream combinations for gifts.
Happy crocheting!