
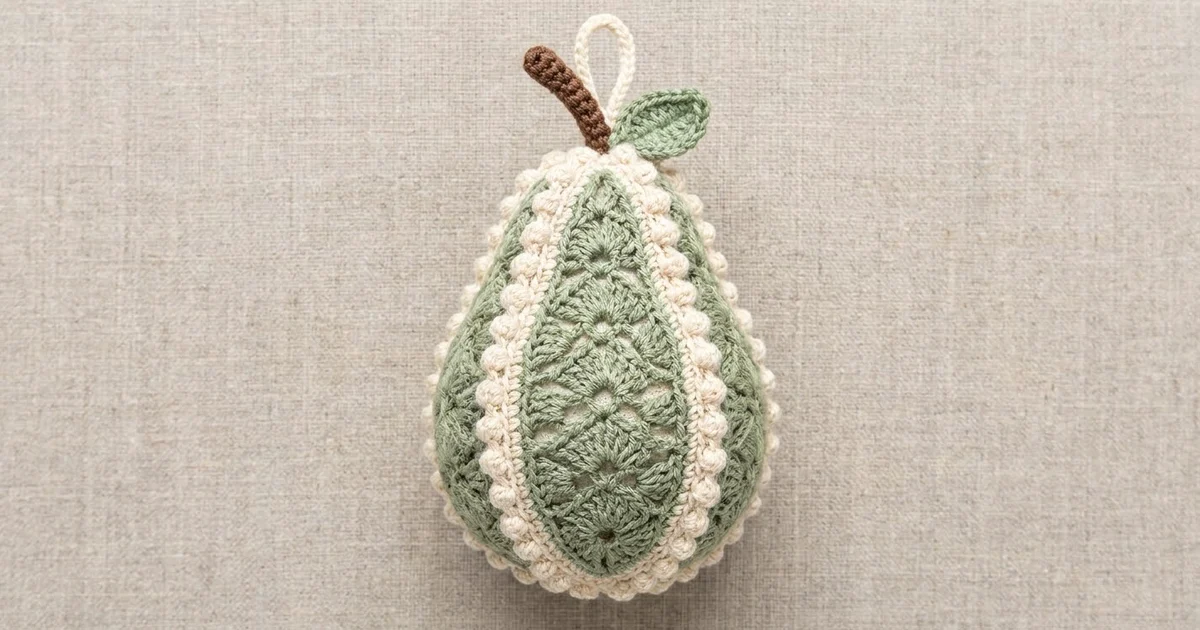
This lacy pear ornament is made from four pointed-oval panels in soft sage green. Each panel has a center column of stacked shell fans. A cream picot frame goes around every panel, and the panels are joined into a hollow 3D pear with raised green picot seams.
The colors are calm and natural: sage green for the fans, seams and leaf, cream for the frames and hanging loop, and a little brown for the stem. It looks delicate and vintage on a tree, but every round is simple once you know the counts.
The pattern uses US crochet terms. The finished pear is about 3.75 in (9.5 cm) tall and 2.75 in (7.0 cm) wide, not counting the stem and loop. With the stem it stands about 4.25 in (10.8 cm) tall.
How it’s made: you crochet a shell strip in rows, then frame it with two green rounds and two cream rounds. Repeat for four panels and join them with green single crochet seams. A picot ridge goes over each seam, the top and bottom points are gathered, and the stem, leaf and loop are added last.
Finished Size and Construction
- Finished size: 3.75 in (9.5 cm) tall x 2.75 in (7.0 cm) wide; 4.25 in (10.8 cm) tall with stem
- Skill level: Intermediate
- Terminology: US crochet terms
- Yarn weight: Fingering cotton (#1 Super Fine)
- Hook: 2.25 mm (US B-1)
- Number of pieces: 4 panels, 1 stem, 1 leaf, 1 hanging loop
- Layout: 4 panels joined side to side in a closed ring, points gathered at top and bottom
- Panel size (blocked flat): 4.25 in (10.8 cm) long x 2.25 in (5.7 cm) wide
- Size before border: 3.75 in (9.5 cm) tall x 2.5 in (6.4 cm) wide
- Border depth: about 0.125 in (0.3 cm) per seam ridge, plus picots
Materials
Choose a smooth mercerized cotton in fingering weight. It keeps the fan shapes crisp and blocks well. Avoid fuzzy or very soft yarns, because the lace holes will close up.
- Sage green: 20 g, about 84 m
- Cream: 10 g, about 42 m
- Brown: 2 g, about 8 m
These amounts include about 20 percent extra for a gauge swatch and tails.
Tools:
- 2.25 mm (US B-1) crochet hook
- Tapestry needle
- Scissors
- Rust-proof pins and a blocking mat
- Spray starch or diluted fabric stiffener
- Optional: 2.5 in (6.4 cm) clear plastic ball or small balloon for shaping
Abbreviations (US Terms)
- ch = chain
- sl st = slip stitch
- sc = single crochet
- hdc = half double crochet
- dc = double crochet
- sp(s) = space(s)
- st(s) = stitch(es)
- RS / WS = right side / wrong side
Special stitches:
- Shell = (3 dc, ch 2, 3 dc) in the same space.
- P-sc (picot single crochet) = sc in next st, ch 3, sl st in front loop and left leg of the sc just made. Counts as 1 sc.
- Picot = ch 3, sl st in 3rd ch from hook.
Gauge and Checkpoints
Gauge matters because the seams have to line up. Make one full panel first and measure it before starting the others.
- Shell strip (Rows 1-7): 2.8 in (7.1 cm) long x 0.75 in (1.9 cm) wide. Each shell row is about 0.4 in (1.0 cm) tall.
- After Rnd 2: 3.5 in (8.9 cm) x 1.5 in (3.8 cm).
- After Rnd 4 (blocked): 4.25 in (10.8 cm) x 2.25 in (5.7 cm).
Being off by about 0.125 in (0.3 cm) is fine. If your strip is too long, go down to a 2.0 mm hook. If it’s too short, go up to a 2.5 mm hook. If only the frame rounds come out large, tighten your chain spaces instead of changing hooks.
Panel (Make 4)
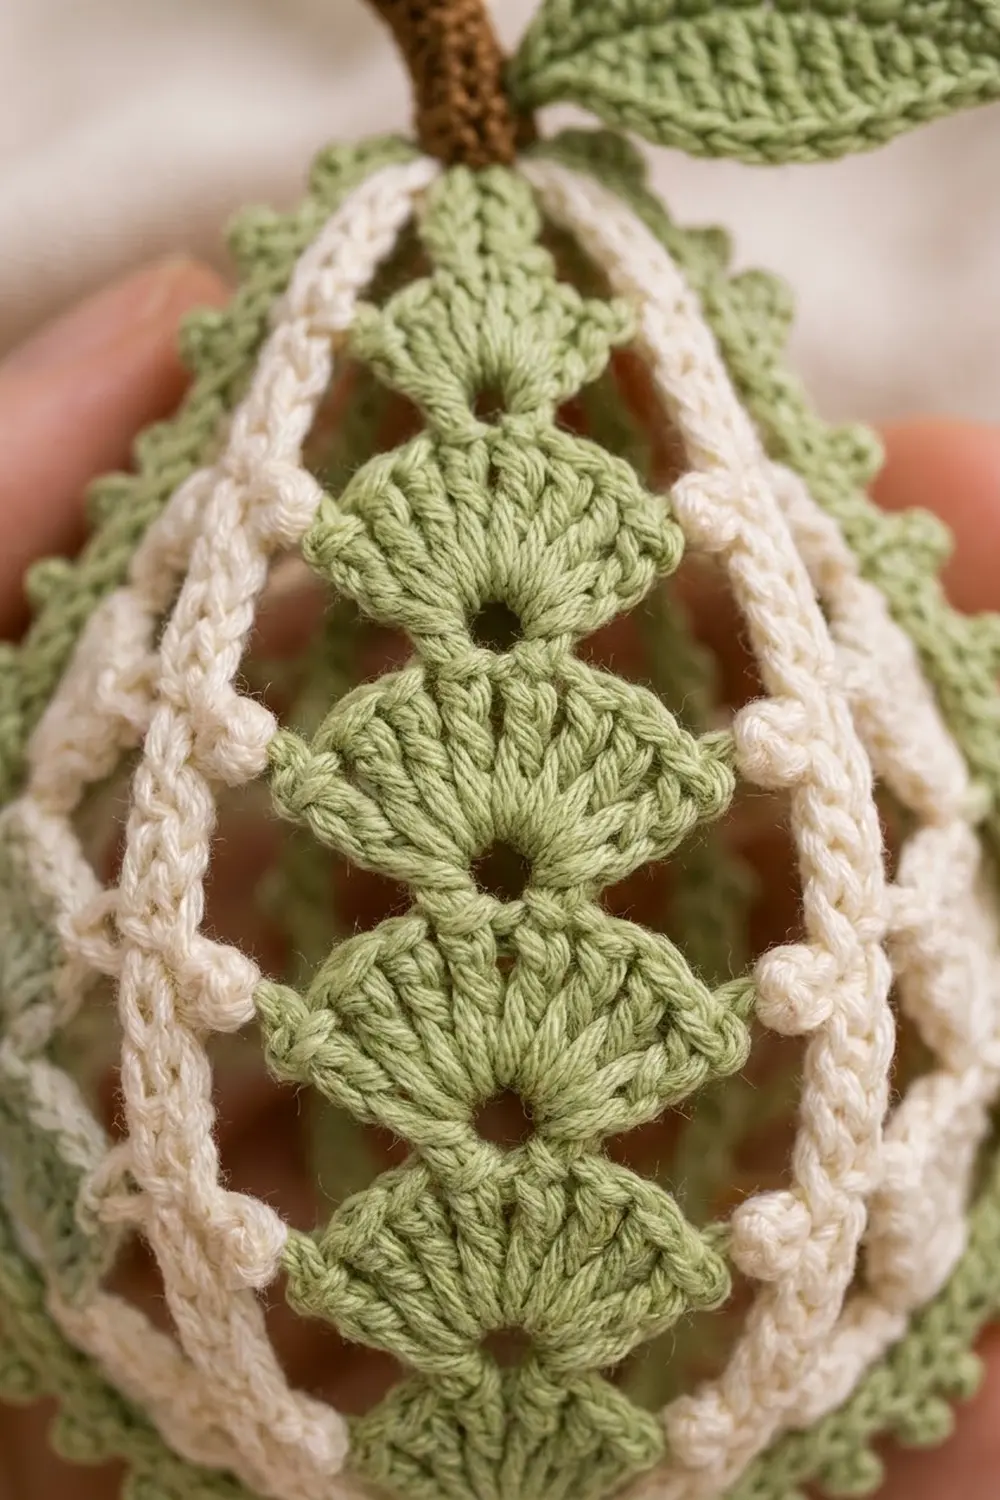
Each panel has a vertical column of shell fans with a small hole at the base of each fan, a green lattice outline, and a cream picot frame.
Shell Strip (Green)
Row 1: Ch 4. Work (2 dc, ch 2, 3 dc) in 4th ch from hook. The skipped 3 ch count as the first dc. Turn. (6 dc, 1 ch-2 sp)
Row 2: Ch 3 (counts as dc), Shell in ch-2 sp, dc in top of turning ch. Turn. (8 dc, 1 ch-2 sp)
Rows 3-7: Ch 3 (counts as dc), Shell in ch-2 sp, dc in top of turning ch. Turn. (8 dc, 1 ch-2 sp in each row)
You now have 7 stacked fans. Each ch-2 sp leaves an open hole at the base of the next fan. Fasten off.
Checkpoint: 2.8 in (7.1 cm) x 0.75 in (1.9 cm).
Rnd 1: Lattice Outline (Green)
This round makes the pointed oval. The upper half uses ch-3 spaces and the lower half uses ch-5 spaces, so the panel widens toward the bottom like a pear.
Join green with sc in ch-2 sp of Row 7, ch 5, sc in same sp (top point made).
Side A: Ch 3, sc in top of edge st of Row 7. Ch 3, sc around edge st of Row 6. Ch 3, sc around edge st of Row 5. Ch 3, sc around edge st of Row 4. Ch 5, sc around edge st of Row 3. Ch 5, sc around edge st of Row 2. Ch 5, sc around edge st of Row 1. Ch 5.
Bottom point: (sc, ch 5, sc) in the base ch of Row 1.
Side B: Ch 5, sc around edge st of Row 1. Ch 5, sc around edge st of Row 2. Ch 5, sc around edge st of Row 3. Ch 5, sc around edge st of Row 4. Ch 3, sc around edge st of Row 5. Ch 3, sc around edge st of Row 6. Ch 3, sc in top of edge st of Row 7. Ch 3, sl st to first sc.
Count: 18 sc (4 point sc + 14 edge sc), 8 ch-3 sps, 8 ch-5 side sps, 2 ch-5 point sps. Each side has 8 spaces: 4 ch-3 and 4 ch-5.
Rnd 2: Solid Outline (Green)
Sl st into top ch-5 point sp, ch 1, (3 sc, ch 2, 3 sc) in same sp. 4 sc in each ch-3 sp and 6 sc in each ch-5 side sp along the side, (3 sc, ch 2, 3 sc) in point sp; repeat once more, leaving out the final point. Sl st to first sc. Fasten off.
Count per side, between the two ch-2 points: 3 + (4 x 4) + (4 x 6) + 3 = 46 sc. Total: 92 sc and 2 ch-2 sps.
Checkpoint: 3.5 in (8.9 cm) x 1.5 in (3.8 cm).
Rnd 3: Cream Frame (Conversion Round)
Join cream in top ch-2 sp. (sc, ch 2, sc) in ch-2 sp, sc in each of next 46 sc, (sc, ch 2, sc) in bottom ch-2 sp, sc in each of next 46 sc, sl st to first sc.
Count per side: 46 (1 per existing st) + 2 (one new point sc at each end) = 48 sc. Total: 96 sc and 2 ch-2 sps.
Rnd 4: Cream Picot Frame (Conversion Round)
Sl st into ch-2 sp, ch 1, (sc, ch 2, sc) in same sp. [Sc in next 3 sc, P-sc in next sc] 12 times, (sc, ch 2, sc) in next ch-2 sp; repeat once more, leaving out the final point. Sl st to first sc. Fasten off.
Count per side: 48 (1 per existing st) + 2 (one new point sc at each end) = 50 sc, with 12 picots. Total: 100 sc, 24 picots, 2 ch-2 sps.
The picots sit along the outer edge like tiny cream beads. When two panels are joined, their cream frames lie side by side and make the beaded cream band between the green fan columns.
Checkpoint: block lightly and measure 4.25 in (10.8 cm) x 2.25 in (5.7 cm).
Stem (Brown)
Make a magic ring.
Rnd 1: 5 sc in ring. (5 sc)
Rnds 2-4: Sc in each st around, working in a spiral. (5 sc)
Sl st to next st and fasten off with a 6 in (15.2 cm) tail. The stem is about 0.5 in (1.3 cm) tall. Don’t stuff it, and bend it slightly.
Leaf (Green)
Ch 10.
Rnd 1: Sc in 2nd ch from hook, hdc in next ch, dc in next 5 ch, hdc in next ch, 3 sc in last ch. Working along the other side of the chain: hdc in next ch, dc in next 5 ch, hdc in next ch, sc in last ch. Sl st to first sc.
Count: 19 sts (8 on the first side, 3 at the tip, 8 on the second side). Fasten off with a 6 in (15.2 cm) tail. The leaf is about 1.25 in (3.2 cm) long.
Hanging Loop (Cream)
Ch 42, about 6 in (15.2 cm). Fasten off, leaving 4 in (10.2 cm) tails at both ends.
Make All Pieces
- Sage green: 4 shell strips, Rnds 1-2 on all 4 panels, 1 leaf, all seams and seam ridges
- Cream: Rnds 3-4 on all 4 panels, 1 hanging loop
- Brown: 1 stem
Layout, seen from the bottom, as a ring:
[Panel 1] | [Panel 2] | [Panel 3] | [Panel 4] | back to [Panel 1]
       Seam A      Seam B      Seam C      Seam D
All panels point the same way: fans open upward, and the wider ch-5 half is at the bottom.
Joining
Use green yarn and a single crochet seam.
Hold Panel 1 and Panel 2 with WS together and RS facing out. Match the bottom ch-2 points and the top ch-2 points. Join green with sl st through both bottom ch-2 sps. Ch 1, sc through both layers in each of the 50 matching sc along one side, then sl st through both top ch-2 sps. (50 sc)
Work one stitch to one stitch. Each side has exactly 50 sc, so every sc on the front panel meets its partner on the back panel. Fold the cream picots toward the RS as you go so they sit flat beside the seam.
Join Panel 2 to Panel 3, then Panel 3 to Panel 4 the same way. For Seam D, close Panel 4 to Panel 1. If you’re using the clear ball, put it inside first.
Keep your tension even and slightly loose. A tight seam pulls the pear into a narrow, puckered shape.
Size checkpoint: the closed pear should measure 3.75 in (9.5 cm) tall x 2.5 in (6.4 cm) wide, with a circumference of about 8 in (20.3 cm) at the widest point.
Border: Picot Seam Ridges
The border is a raised green ridge worked on top of each joining seam. It also makes the picot outline you see along the sides of the pear.
Border gauge: 16 picots fit along one 50-sc seam, about one picot every 0.2 in (0.5 cm).
Each seam (work 4 times): Join green in the first seam sc at the bottom. Ch 1, sc in same st, sc in next 3 sc, Picot 16 times, sc in last sc. Fasten off.
Count per seam: 1 + (16 x 3) + 1 = 50 sc, plus 16 picots. Total for the border: 4 x 50 = 200 sc and 64 picots.
Why the math works: each seam is one row of 50 sc, the same as one panel’s 50 stitches per side. No stitches are added at the seam, so the ridge lies flat without ruffling. The 48 middle stitches divide evenly into 16 groups of 3, which leaves one plain sc at each end next to the points.
Closing the points: thread a green tail through all 4 bottom ch-2 sps, pull snug, and secure. Repeat at the top.
Finishing: sew the stem over the top closure. Sew the base of the leaf beside the stem, tilted outward. Thread the hanging loop under the top closure next to the stem, and knot the tails together inside.
Final Blocking
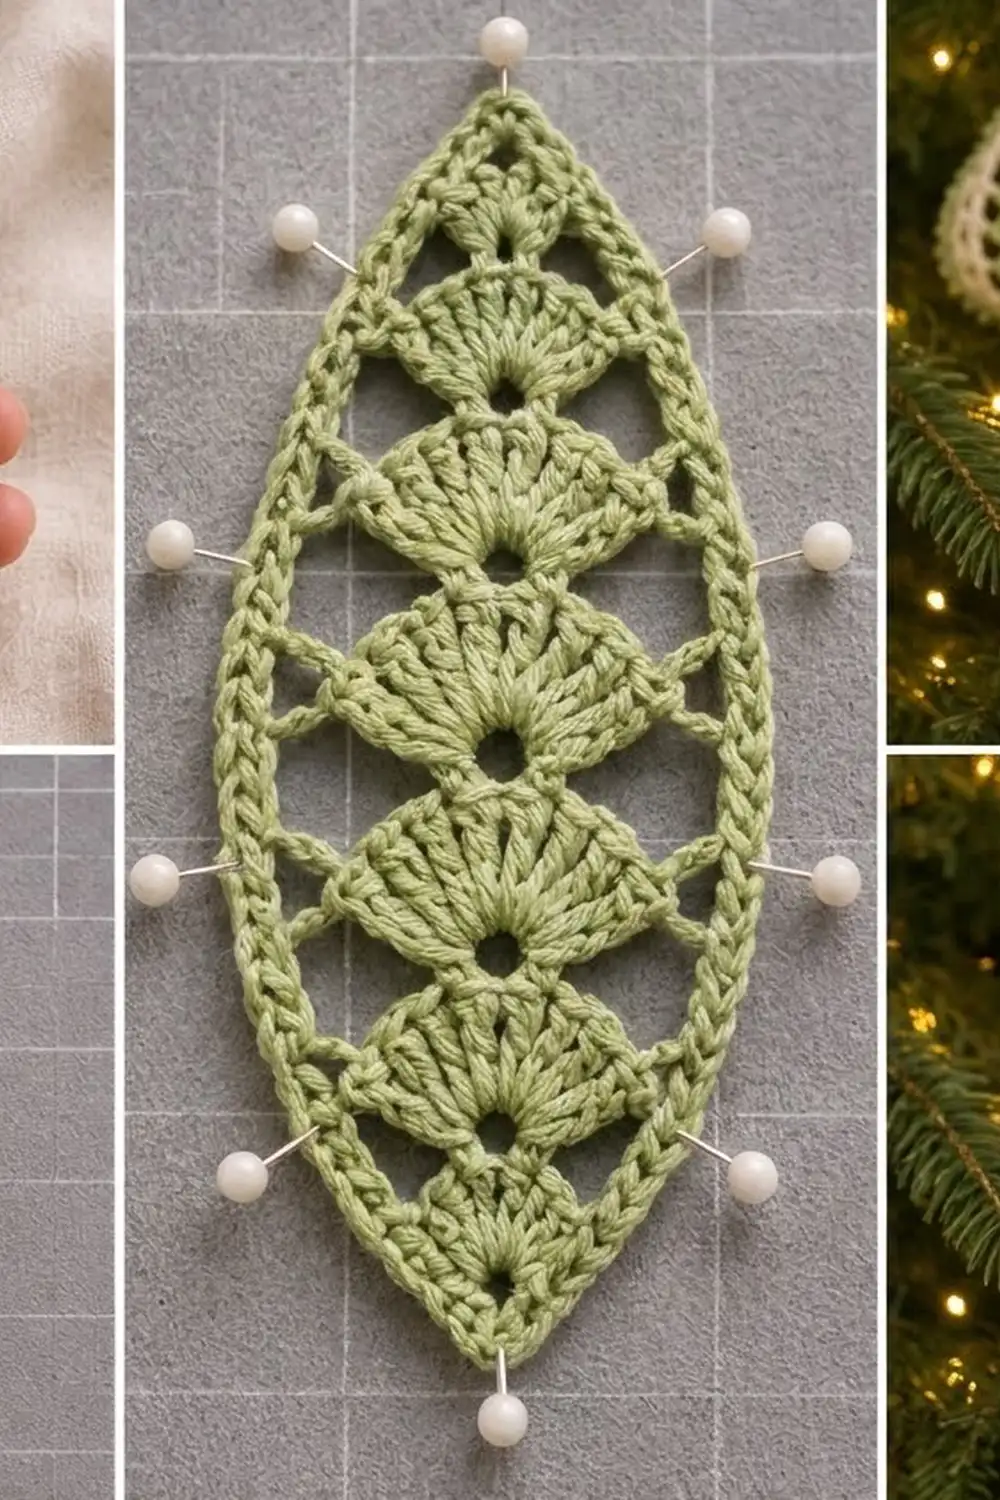
- Block each panel flat before joining. Pin it to 4.25 in (10.8 cm) x 2.25 in (5.7 cm), pinning each point and every second picot.
- Mist with water and let the panels dry completely.
- After joining, put the clear ball or a slightly blown-up balloon inside the pear.
- Spray with starch or brush on diluted stiffener, working it into the seams.
- Gently push each fan open and straighten the cream bands.
- Let dry for at least 12 hours, then take out the balloon if you used one.
- Flatten the leaf with a little starch and bend the stem.
Final Quality-Control Checklist
- Each panel has 7 fans with an open hole at the base of each.
- Rnd 2 has 46 sc per side, Rnd 3 has 48, and Rnd 4 has 50.
- Each panel has 24 cream picots.
- All 4 seams have 50 sc and 16 picots.
- The top and bottom points close without a gap.
- The pear measures 3.75 in (9.5 cm) x 2.75 in (7.0 cm).
- All tails are woven in and hidden inside.
Troubleshooting
- Fans lean to one side: you’re missing the final dc in the turning ch. From Row 2 on, check for 8 dc per row.
- Panel isn’t pear-shaped: check that the ch-5 spaces are on the lower half of both sides.
- Seam ends early: recount Rnd 4. Both sides must have 50 sc.
- Seam ridge ruffles: work the picot ridge with tighter tension or a 2.0 mm hook.
- Pear looks flat: reshape it over a ball and add more stiffener.
- Gap at the top or bottom: pass the tail through the ch-2 sps a second time and pull tight again.
Care
Hand wash in cool water and dry over a ball to keep the shape. Starch again after washing, and store the ornament in a box so it doesn’t get crushed.
Final Notes
Here are the measurements from start to finish. The shell strip measures 2.8 in (7.1 cm). After Rnd 2 the panel is 3.5 in (8.9 cm) long, and after Rnd 4 it is 4.25 in (10.8 cm). Rnd 2 gives 46 sc per side, Rnd 3 gives 48, and Rnd 4 gives 50. Four panels joined one stitch to one stitch make a 3.75 in (9.5 cm) pear, and the 50-stitch picot ridges bring the width to 2.75 in (7.0 cm).
If each panel matches its checkpoints, the seams line up and the pear holds its shape.
Happy crocheting!