

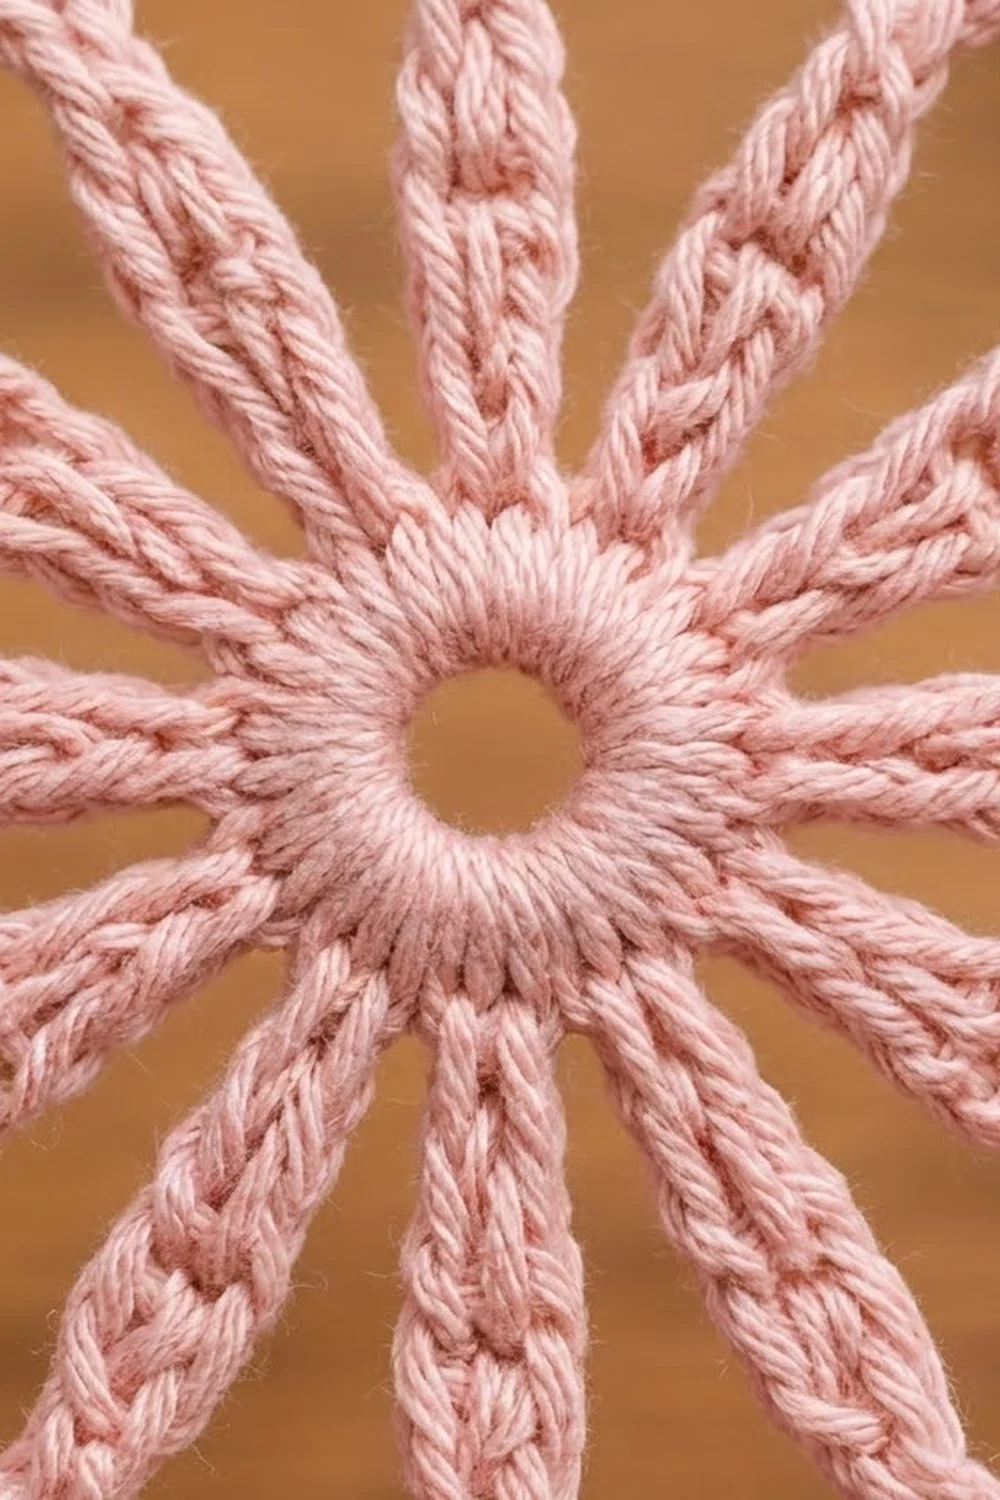
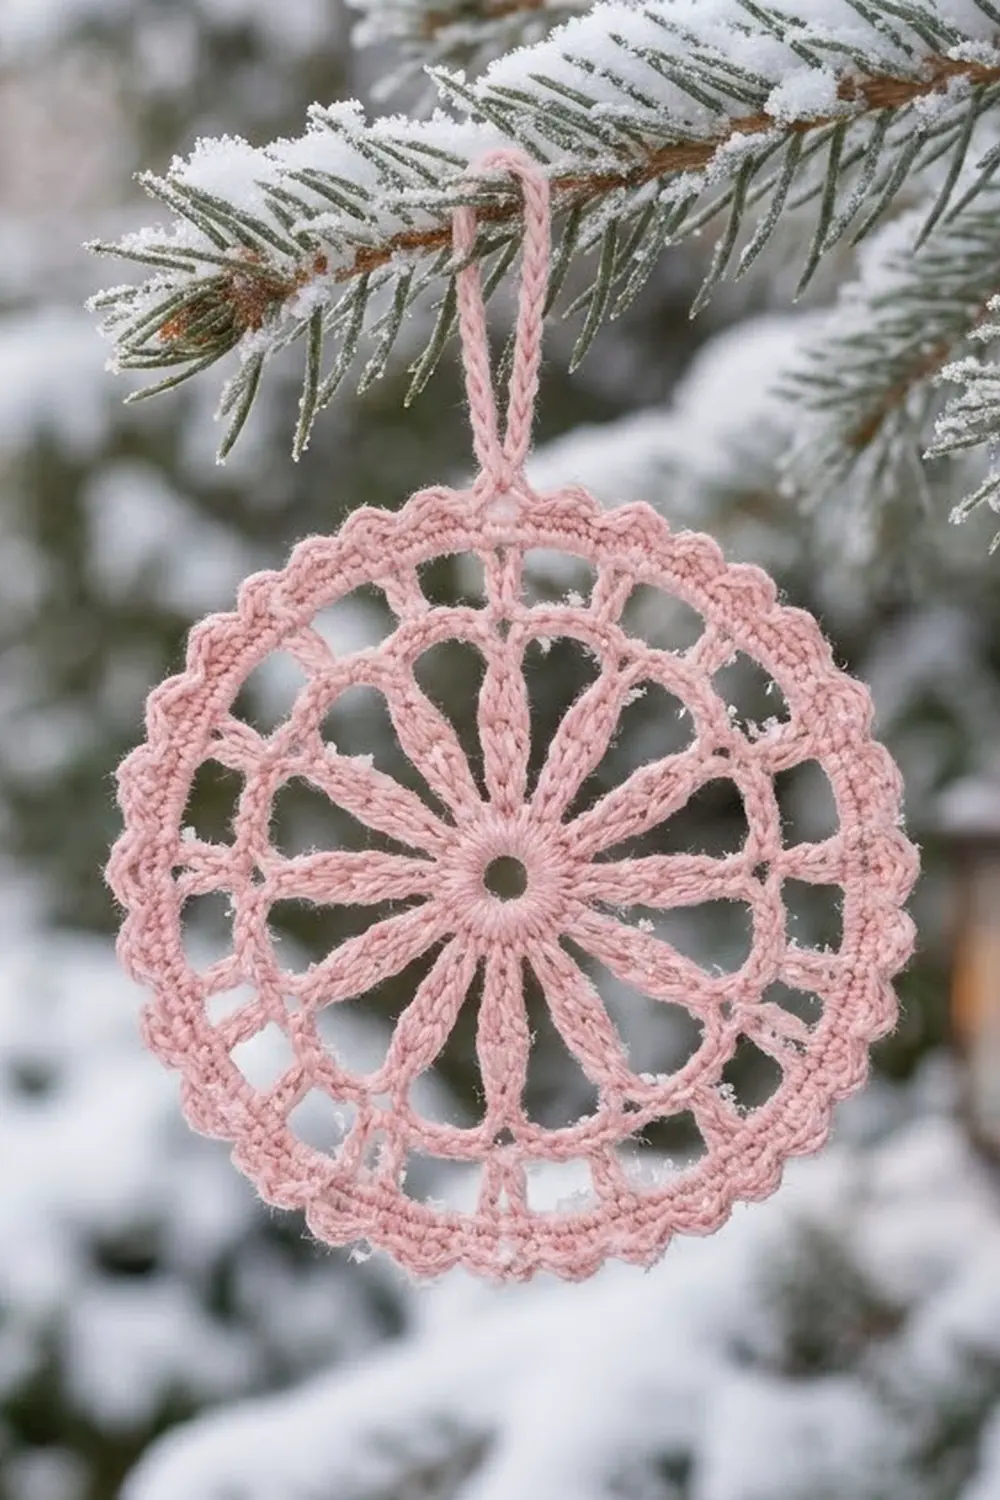
The Rosy Wheel is a small, airy ornament that looks like a frosted cartwheel. Twelve slim spokes grow out of a tiny center ring, with lacy windows between them. Two solid rings hold its round shape, and a neat scalloped edge finishes it off.
This sample is in soft blush pink, which gives it a gentle vintage holiday look. It works just as well in ivory, red, or pale gold. Because it is worked in fine cotton, the lace stays crisp, and it hangs flat after a light starch.
The pattern uses US crochet terms. The finished ornament is 3¾ in (9.5 cm) across, plus a 1¼ in (3.2 cm) hanging loop, so it is 5 in (12.7 cm) tall overall.
It is made in one piece, worked in joined rounds from the center out: a center ring, two rounds of tall spokes, a solid band, a round of short spokes, a second solid band, the scalloped edge, and finally the hanging loop. There is no sewing and no joining.
Finished Size and Construction
- Finished size: 3¾ in (9.5 cm) across; 5 in (12.7 cm) tall including the loop
- Skill level: Easy+ (you need to be comfortable with treble crochet)
- Terminology: US crochet terms
- Yarn weight: Fingering-weight (Super Fine, #1) mercerized cotton
- Hook: 2.5 mm (US B-1)
- Number of pieces: 1
- Layout: One round motif with an attached loop
- Piece size: 3¾ in (9.5 cm) across
- Size before border: 3¼ in (8.3 cm) across, after Round 6
- Border depth: ¼ in (0.6 cm), one scallop round
Materials
Yarn: Choose a smooth, mercerized fingering-weight cotton. Mercerized cotton shows the stitches clearly, holds starch well, and won’t fuzz. Avoid acrylic or wool blends, because they won’t hold the open spokes flat.
- Blush pink: 10 g, about 34 m (37 yd)
The quantity includes a safety margin. One ornament uses about 6 g, and the rest covers your gauge swatch and tails.
Tools:
- 2.5 mm (US B-1) crochet hook
- Tapestry needle
- Scissors
- Blocking mat or foam board
- 24 rust-proof pins
- Spray starch or a 1:1 mix of white glue and water
- Ruler or tape measure
Abbreviations (US Terms)
- ch – chain
- sl st – slip stitch
- sc – single crochet
- hdc – half double crochet
- dc – double crochet
- tr – treble crochet (yarn over twice, insert hook, pull up a loop, [yarn over, pull through 2 loops] 3 times)
- st(s) – stitch(es)
- sp – space
- rep – repeat
Special stitch – Scallop: (hdc, dc, hdc) all in the same stitch.
Turning chains: In Rounds 2, 3, and 5, the starting chain counts as the first stitch. In Rounds 4 and 6, the ch 1 does not count.
Gauge and Checkpoints
Gauge: 7 sc = 1 in (2.5 cm). Rounds 1–3 measure 2¼ in (5.7 cm) across.
Because the item is small, your first ornament is your gauge swatch. Stop and measure at each checkpoint below, laying the piece flat without stretching it.
| After round | Diameter |
|---|---|
| Round 1 | ½ in (1.3 cm) |
| Round 2 | 1¼ in (3.2 cm) |
| Round 3 | 2¼ in (5.7 cm) |
| Round 4 | 2½ in (6.4 cm) |
| Round 6 | 3¼ in (8.3 cm) |
| Round 7 | 3¾ in (9.5 cm) |
If your piece is too big by more than ⅛ in (0.3 cm) at Round 3, go down to a 2.25 mm hook. Tall stitches grow fast, and a loose treble makes the spokes wobbly.
If your piece is too small, go up to a 2.75 mm hook.
If Round 4 or Round 6 ripples, your sc are looser than your chains. Go down half a hook size for those rounds only. If they cup instead, go up half a size for those rounds only.
Pattern
Center Ring
Ch 5 and sl st in the first ch to form a ring.
Round 1: Ch 1, work 12 sc in the ring. Join with a sl st to the first sc. (12 sc)
The ring keeps a neat open hole about ¼ in (0.6 cm) wide. Do not pull it closed.
Checkpoint: ½ in (1.3 cm) across.
Inner Spokes
Round 2: Ch 4 (counts as the first tr), ch 2. Tr in the next sc, ch 2; rep from * 10 more times. Join with a sl st to the top of the beginning ch-4. (12 tr, 12 ch-2 sps)*
Each tr is the first half of a spoke. Keep the chains even so the spokes are spaced evenly.
Checkpoint: 1¼ in (3.2 cm) across.
Round 3: Ch 4 (counts as the first tr), ch 4. Tr in the next tr, ch 4; rep from * 10 more times. Join with a sl st to the top of the beginning ch-4. (12 tr, 12 ch-4 sps)*
Each tr sits directly on top of the tr below it. The two stacked tr make one long spoke, which has the slightly braided look you see in the photo. The ch-4 spaces open into the inner petal windows.
Checkpoint: 2¼ in (5.7 cm) across. This is your main gauge check.
First Solid Band
Round 4 (conversion round): Ch 1, sc in the same st as the join. Work 4 sc in the next ch-4 sp. *Sc in the next tr, 4 sc in the next ch-4 sp; rep from * 10 more times. Join with a sl st to the first sc.
Count: 12 sc worked one in each tr, plus 48 sc worked into the spaces (4 × 12) = 60 sc.
Each group of 5 sc is 1 sc over a spoke plus 4 sc over a window. This band closes off the petal windows and gives you a firm base for the outer spokes.
Checkpoint: 2½ in (6.4 cm) across.
Outer Spokes
Round 5: Ch 3 (counts as the first dc; it sits over a spoke), ch 4, skip the next 4 sc. Dc in the next sc (over the next spoke), ch 4, skip the next 4 sc; rep from * 10 more times. Join with a sl st to the top of the beginning ch-3. (12 dc, 12 ch-4 sps)*
Each dc lines up with an inner spoke, so the 12 spokes read as continuing past the band. The ch-4 spaces form the second ring of smaller windows.
Second Solid Band
Round 6 (conversion round): Ch 1, sc in the same st as the join. Work 5 sc in the next ch-4 sp. *Sc in the next dc, 5 sc in the next ch-4 sp; rep from * 10 more times. Join with a sl st to the first sc.
Count: 12 sc worked one in each dc, plus 60 sc worked into the spaces (5 × 12) = 72 sc.
Here each space gets 5 sc instead of 4. The outer circle is longer than the inner one, and the extra sc lets the band lie flat.
Checkpoint: 3¼ in (8.3 cm) across. This is the size before the border.
Border
Border gauge: One scallop uses 3 sts of Round 6. With 7 sc = 1 in (2.5 cm), that is about 2⅓ scallops per inch, and the border adds ¼ in (0.6 cm) all the way around.
A round motif has no straight sides, so think of it in quarters. Each quarter of Round 6 has 18 sts and gets 6 scallops.
Round 7 (scallop edge): Do not ch 1. Skip the next sc, work a Scallop (hdc, dc, hdc) in the next sc, sl st in the next sc; rep from * 23 more times. The last sl st lands in the first sc of Round 6, where you joined. (24 scallops)*
Count: 24 repeats × 3 base sts = 72 sts, which uses every stitch of Round 6 exactly once. The round contains 24 hdc pairs (48 hdc), 24 dc and 24 sl st, for 96 stitches. That is 6 scallops in each quarter.
Why the math works:
- The repeat is 3 sts, and 72 ÷ 3 = 24 with nothing left over, so the scallops close evenly at the join.
- 24 is twice the 12 spokes, so every spoke has exactly 2 scallops beside it and the edge stays symmetrical.
- Each scallop gains 1 st over the 3 it covers (3 stitches in 1 st, plus a sl st, over 3 sts). That gives just enough extra length for the outer edge to curve outward without ruffling.
Checkpoint: 3¾ in (9.5 cm) across, measured from scallop tip to scallop tip.
Hanging Loop
Pick one spoke to be the top. Sl st into the hdc and then into the dc of the scallop beside that spoke. Ch 20, then sl st in the same dc to form the loop.
Ch 1 and work 26 sc into the loop (around the chain, not into the chain stitches). Sl st in the same dc. (26 sc)
Fasten off. The loop stands 1¼ in (3.2 cm) above the edge. Weave in all ends along the solid bands, where they are hidden. Leave the tail ends uncut until after blocking.
Final Blocking
- Wet: Soak the ornament in cool water for 5 minutes, then roll it in a towel to press out the water.
- Mark a circle: Draw or imagine a 3¾ in (9.5 cm) circle on your blocking mat. Mark its center.
- Center: Place the ring on the center mark, right side up.
- Pin the scallops: Pin the tip of every dc in Round 7 (24 pins) to the circle line. Pin opposite pairs first, then fill in between. That keeps the circle even.
- Straighten the spokes: Nudge each of the 12 spokes into a straight line from the center to the edge, so all the windows are the same size.
- Starch: Spray starch generously, or brush on the glue-and-water mix. Shape the hanging loop upright.
- Dry: Leave it pinned for at least 6 hours, until completely dry.
- Finish: Unpin, trim the tails, and check the diameter again. It should measure 3¾ in (9.5 cm).
Final Quality-Control Checklist
- [ ] Round 1 has 12 sc, and the center hole is about ¼ in (0.6 cm) wide.
- [ ] There are 12 inner spokes, each made of 2 stacked tr.
- [ ] Round 4 has 60 sc, and Round 6 has 72 sc.
- [ ] The 12 outer dc line up with the 12 inner spokes.
- [ ] There are 24 scallops, 2 beside every spoke.
- [ ] The diameter is 3¾ in (9.5 cm) after blocking.
- [ ] The loop sits directly above a spoke and stands 1¼ in (3.2 cm) tall.
- [ ] All ends are woven in along the solid bands and trimmed.
- [ ] The ornament hangs flat, without cupping or ripples.
Troubleshooting
The spokes lean or twist. You are probably working the Round 3 tr into a chain space instead of into the top of the tr below. Go back and work each one directly into the tr.
The center won’t lie flat. You may have pulled Round 1 too tight. Work the 12 sc loosely and keep the ch-5 ring open.
Round 4 ripples. Your sc are looser than your chains. Go down half a hook size for the band rounds.
The scallops don’t close evenly at the join. Count Round 6 again. You need exactly 72 sc, because any other count won’t divide by 3.
The loop flops over. Add more starch to the loop and let it dry standing upright, with a pin through the loop.
The ornament is too big overall. Check Round 3 against its checkpoint. Tight trebles fix most size problems.
Care
Hand wash in cool water with mild soap, press flat in a towel, and re-starch while it is damp. Store it flat between tissue paper so the scallops keep their shape.
Final Notes
Each stage builds on the one before:
- Round 1: ½ in (1.3 cm)
- Round 2: 1¼ in (3.2 cm)
- Round 3: 2¼ in (5.7 cm)
- Round 4: 2½ in (6.4 cm)
- Round 6: 3¼ in (8.3 cm)
- Round 7, finished size: 3¾ in (9.5 cm)
- Hanging loop: 1¼ in (3.2 cm), for 5 in (12.7 cm) total height
The stitch counts go 12 → 12 spokes → 60 → 12 spokes → 72 → 24 scallops. Every round divides evenly by 12, so the wheel stays symmetrical all the way to the edge. Make one ornament, check it against the checkpoints, and then make a whole branch of them.
Happy crocheting!