

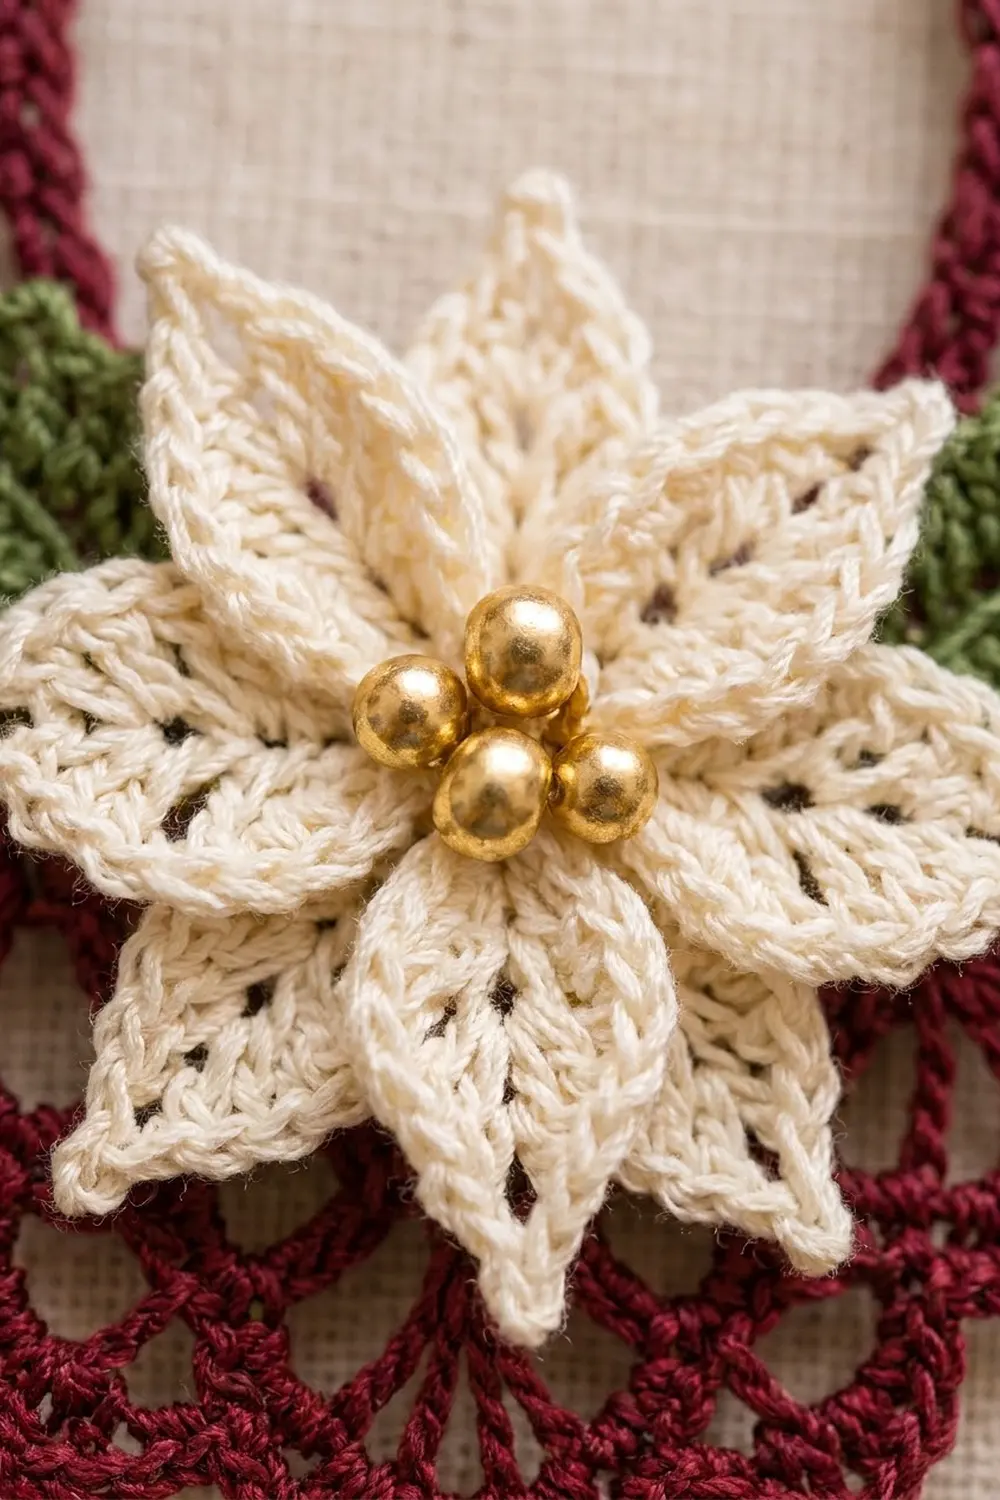
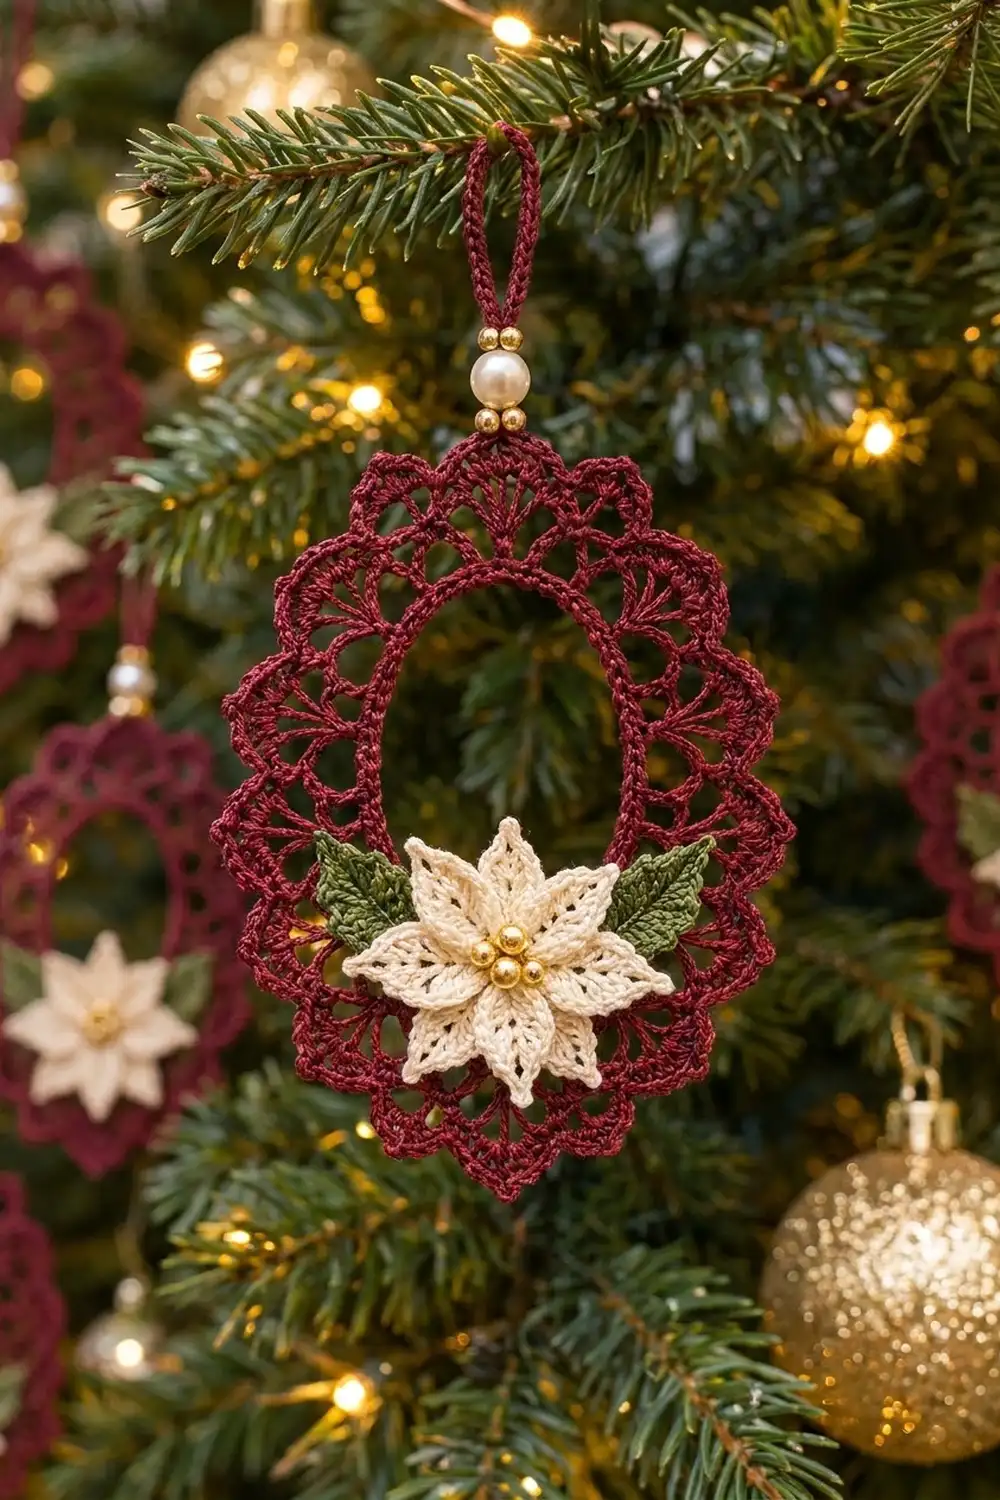
This little ornament looks like an old-fashioned cameo frame made of lace. A burgundy oval frame with an open center holds a cream poinsettia and two small green leaves at its lower edge. A short crocheted hanging loop with a pearl bead between two gold beads finishes the top.
The palette is classic Christmas: deep burgundy, soft cream, moss green, and touches of gold and pearl. Crocheted in size 10 cotton thread, it has the delicate, heirloom feel of vintage doilies. It looks lovely on a tree, tied to a gift, or kept on its own.
This pattern uses US crochet terms. After blocking, the frame measures about 3.5 in wide x 4.25 in tall (8.9 cm x 10.8 cm), not counting the hanging loop. With the loop and beads, it hangs about 5.5 in (14.0 cm) long.
Construction is simple. You crochet the frame in joined rounds around a chain ring and shape it into an oval when you block it. Then you make a two-layer poinsettia, two leaves, and a slip-stitch cord. Finally, you sew everything on and add the beads.
Finished Size and Construction
- Finished size: 3.5 in x 4.25 in (8.9 cm x 10.8 cm), plus a 1.25 in (3.2 cm) bead-and-loop hanger
- Skill level: Intermediate (thread crochet, careful blocking)
- Terminology: US crochet terms
- Yarn weight: Size 10 crochet cotton thread (lace weight, category 0)
- Hook: 1.75 mm steel hook (US steel 6)
- Number of pieces: 1 frame, plus appliqués: 1 poinsettia, 2 leaves, 1 hanging cord
- Layout: One oval frame, with the poinsettia centered over the bottom of the opening and one leaf tucked behind each side of the flower
- Center opening: 1.75 in x 2.5 in (4.4 cm x 6.4 cm)
- Size before border (after Round 5): 3 in x 3.75 in (7.6 cm x 9.5 cm)
- Border depth (Rounds 6–7): 0.25 in (0.6 cm) on every side
Materials
Use a mercerized cotton thread in size 10. Mercerized thread has a slight sheen that shows off the lace, and it holds starch well. Avoid acrylic, because it won’t keep a crisp blocked shape.
- Burgundy: 10 g (about 35 m) – frame and hanging cord
- Cream: 3 g (about 10 m) – poinsettia
- Moss green: 2 g (about 7 m) – leaves
All quantities include a small safety margin for gauge swatches and sewing tails.
Tools:
- 1.75 mm (US steel 6) crochet hook
- Fine tapestry needle for thread, plus a beading needle or sharp sewing needle
- 7 gold beads, 3 mm (2 for the hanger, 5 for the flower center)
- 1 pearl bead, 6 mm
- Locking stitch markers
- Blocking board or foam, plus rustproof pins
- Spray starch or fabric stiffener
- Small scissors
Abbreviations (US Terms)
- ch – chain
- sl st – slip stitch
- sc – single crochet
- hdc – half double crochet
- dc – double crochet
- tr – treble crochet
- sp – space
- blo / flo – back loop only / front loop only
- st(s) – stitch(es)
- rep – repeat
Special stitch – Picot (ch-3 picot): Ch 3, then work the next stitch as written. In this pattern, each picot is an open ch-3 loop between two sc. These loops give the outer edge its tiny beaded look.
Gauge and Checkpoints
Gauge with size 10 thread and a 1.75 mm hook: 9 sc = 1 in (2.5 cm).
Gauge matters less in lace than in clothing. It still decides whether your frame ends up 3.5 in (8.9 cm) or 4.5 in (11.4 cm) wide, though. Make one complete frame first and measure it at each checkpoint before you make more.
- After Round 1: the 64-sc ring, pressed into an oval, measures about 1.75 in x 2.5 in (4.4 cm x 6.4 cm) on the inside.
- After Round 2: the outer edge measures about 2.25 in x 3 in (5.7 cm x 7.6 cm).
- After Round 4: the outer edge measures about 2.75 in x 3.5 in (7.0 cm x 8.9 cm).
- After Round 5: the outer edge measures about 3 in x 3.75 in (7.6 cm x 9.5 cm).
- After Round 7 and blocking: 3.5 in x 4.25 in (8.9 cm x 10.8 cm).
If your piece is too big: go down to a 1.5 mm hook, or work the chain loops in Rounds 3 and 5 more tightly.
If your piece is too small: go up to a 2.0 mm hook. If the frame cups or ruffles instead, see Troubleshooting.
Frame
Work in joined rounds with the right side facing you the whole time. Do not turn.
Place a marker in the first stitch of Round 1. This stitch will be the bottom center of the oval. The 33rd stitch, directly opposite, will be the top center.
Round 1 (inner edge): With burgundy, ch 64 and join with a sl st to the first ch to form a ring, taking care not to twist it. Ch 1, sc in each ch around, join with a sl st to the first sc. (64 sc)
Gently press the ring into an oval with the marker at the bottom. This firm sc ring forms the solid inner rim of the opening.
Round 2 (mesh – conversion round): Ch 4 (counts as dc + ch 1), dc in next sc, ch 1; rep from * 62 more times, join with a sl st to the 3rd ch of the beginning ch-4. (64 dc worked 1 per existing sc + 64 ch-1 sps added)*
Round 3 (chain loops): Sl st in first ch-1 sp, ch 1, sc in same sp, ch 5, skip next ch-1 sp, sc in next ch-1 sp; rep from * around, ending with ch 5, skip last ch-1 sp, join with a sl st to the first sc. (32 sc, 32 ch-5 loops)*
Round 4 (fans): Sl st in first ch-5 loop, ch 3 (counts as dc), 6 dc in same loop, sc in next ch-5 loop, 7 dc in next ch-5 loop; rep from * around, ending with sc in last loop, join with a sl st to the top of the beginning ch-3. (16 fans of 7 dc = 112 dc, plus 16 sc; 128 sts total)*
These 16 fans form the ring of little shells just outside the opening.
Round 5 (arches): Sl st in next 3 dc so you reach the 4th (center) dc of the first fan. Ch 1, sc in same dc, ch 5, sc in next sc, ch 5, sc in center dc of next fan; rep from * around, ending with ch 5, sc in last sc, ch 5, join with a sl st to the first sc. (32 sc, 32 ch-5 loops)*
Checkpoint: the piece should lie flat and measure about 3 in x 3.75 in (7.6 cm x 9.5 cm) when pressed into an oval. This is your size before the border.
Border
The border is Rounds 6 and 7. It adds 0.25 in (0.6 cm) on every side and creates the scalloped outline with its picot trim.
Border gauge: 1 finished scallop = about 0.75 in (1.9 cm), measured along the outer edge after blocking.
An oval has no straight sides, so the counts below are given per quarter. Divide the oval into 4 quarters with markers at the bottom center, right side, top center, and left side. Each quarter holds exactly 4 scallops.
Round 6 (scallops): Sl st in first ch-5 loop, ch 1, sc in same loop, *9 dc in next ch-5 loop, sc in next ch-5 loop; rep from * around, ending with 9 dc in last loop, join with a sl st to the first sc.
- Per quarter: 4 sc + 36 dc = 40 sts
- Total: 16 sc + 144 dc = 160 sts
Round 7 (picot edge): Ch 1, *sc in next sc, sc in next dc, [ch 3, sc in next 2 dc] 4 times; rep from * around, join with a sl st to the first sc. Fasten off and weave in the ends.
Each scallop uses 1 dc + (4 x 2 dc) = 9 dc, so every dc of Round 6 is worked exactly once.
- Per scallop: 10 sc + 4 ch-3 picots
- Per quarter: 40 sc + 16 picots
- Total: 160 sc + 64 picots
Why the math works: Round 1 has 64 sts, and every later round is built on a 4-stitch repeat (64 ÷ 4 = 16). Round 3 halves the stitches into 32 loops, and Round 4 turns each pair of loops into one of 16 fans. Round 5 splits each fan back into 2 arches (32 loops), and Round 6 pairs those arches into 16 scallops. Since 16 divides evenly by 4, each quarter of the oval gets exactly 4 scallops. That keeps the left and right sides mirror images and puts an sc valley at both the top and bottom centers. At 0.75 in (1.9 cm) per scallop, 16 scallops make about 12 in (30.5 cm) around the outside, which matches the outer edge of a 3.5 in x 4.25 in (8.9 cm x 10.8 cm) oval.
Poinsettia
The flower has 8 pointed petals in two layers: 4 large petals in back and 4 smaller petals in front, offset so the points alternate.
Round 1 (center): With cream, ch 4 and join with a sl st to form a ring. Ch 1, 8 sc in ring, join with a sl st to the first sc. (8 sc)
Round 2 (back petals, blo): Ch 1, sc in blo of first sc, ch 9; starting in 2nd ch from hook, sl st, sc, hdc, dc, tr in next 2 ch, dc, hdc (8 sts along the chain); skip next sc, sc in blo of next sc; rep from * 3 more times, working the final sc as a sl st into the first sc. (4 large petals)*
Round 3 (front petals, flo): Sl st in flo of next (2nd) sc. Ch 7; starting in 2nd ch from hook, sl st, sc, hdc, 2 dc, hdc (6 sts along the chain)*; sl st in flo of same sc, sl st in flo of next 2 sc; rep from * 3 more times. Each small petal grows from an even-numbered sc between two large petals. Fasten off, leaving a 10 in (25.4 cm) tail for sewing.
Finished flower: about 1.75 in (4.4 cm) across, point to point.
Leaves (Make 2)
With green, ch 9. Sc in 2nd ch from hook, hdc in next ch, dc in next 3 ch, hdc in next ch, sc in next ch, 3 sc in last ch. Working along the other side of the foundation chain: sc in next ch, hdc in next ch, dc in next 3 ch, hdc in next ch, sc in next ch, ch 2, sl st in 2nd ch from hook (pointed tip), sl st in turning ch. (17 sts + tip)
Fasten off, leaving an 8 in (20.3 cm) tail. Each leaf is about 0.75 in (1.9 cm) long.
Hanging Cord and Assembly
Cord: With burgundy, ch 26. Sl st in the back bump of the 2nd ch from hook and in each ch across. (25 sl st) The cord is about 2 in (5.1 cm) long. Leave an 8 in (20.3 cm) tail at each end.
Hanger: Fold the cord in half. Thread both tails onto a beading needle, then string 1 gold bead, the pearl, and 1 more gold bead. Push the beads up against the fold, leaving a loop about 0.75 in (1.9 cm) tall. Sew the tails into the top-center sc of Round 7 and the Round 6 sc beneath it, then weave them in.
Leaves: Place the leaves on the lower part of the frame, with their bases touching at the bottom center of the opening and their tips pointing outward and slightly up. Sew each base down with small hidden stitches.
Poinsettia: Center the flower over the leaf bases so that it overlaps both the bottom of the opening and the frame. Sew around the center ring only, so the petals stay free. Sew the 5 gold beads to the center: 1 in the middle and 4 around it.
Final Blocking
- If you can, block the frame before sewing on the appliqués. If they’re already sewn on, block gently around them.
- Draw an oval template on paper, with an inner opening of 1.75 in x 2.5 in (4.4 cm x 6.4 cm) and an outer edge of 3.5 in x 4.25 in (8.9 cm x 10.8 cm). Cover it with plastic wrap and lay it on the board.
- Soak the frame in cool water, roll it in a towel, and press out the excess water.
- Pin the inner sc ring to the inner line first. Place pins at the top, bottom, and sides, then fill in between them.
- Pin the tip of each of the 16 scallops to the outer line, 4 per quarter.
- Spray with starch or brush on stiffener. Let it dry completely, which usually takes several hours.
- Pin the flower petals open and starch them flat. Give each leaf a slight crease down the center.
- Remove the pins only when everything is completely dry.
Final Quality-Control Checklist
- Inner opening measures 1.75 in x 2.5 in (4.4 cm x 6.4 cm)
- Outer frame measures 3.5 in x 4.25 in (8.9 cm x 10.8 cm)
- 16 fans in Round 4 and 16 scallops in Round 6
- Each quarter has 4 scallops and 16 picots
- The hanger sits at the top center, directly above the flower at the bottom center
- 8 petal points, alternating large and small
- The leaves mirror each other on either side of the flower
- All ends are woven in and trimmed close, with no tails showing through the lace
Troubleshooting
- Ring twisted in Round 1: Undo it and rejoin. A twist can’t be fixed later.
- Frame cups or bowls: The chain loops are too short. Go up one hook size, or add 1 ch to each loop in Rounds 3 and 5.
- Frame ruffles: The chains are too long or the dc are loose. Go down one hook size.
- Scallops lean to one side: Make sure you started Round 6 in the correct loop and alternated the dc groups and sc evenly.
- Petals curl: Starch them and pin each point while they dry.
- Hanger tilts: Re-sew it so it sits exactly on the top-center sc.
Care
Hand wash in cool water with mild soap, press out the water in a towel, and re-block with starch. Store flat in tissue paper so the scallops keep their shape.
Final Notes
The measurements build in a clear chain. A 64-sc ring gives a 1.75 in x 2.5 in (4.4 cm x 6.4 cm) opening. Rounds 2–5 grow the frame to 3 in x 3.75 in (7.6 cm x 9.5 cm). The two-round border adds 0.25 in (0.6 cm) on each side, for a final frame of 3.5 in x 4.25 in (8.9 cm x 10.8 cm). The poinsettia, leaves, and beaded hanger turn that frame into a finished ornament. Check each stage before moving on, and your ornaments will come out the same size every time.
Happy crocheting!