

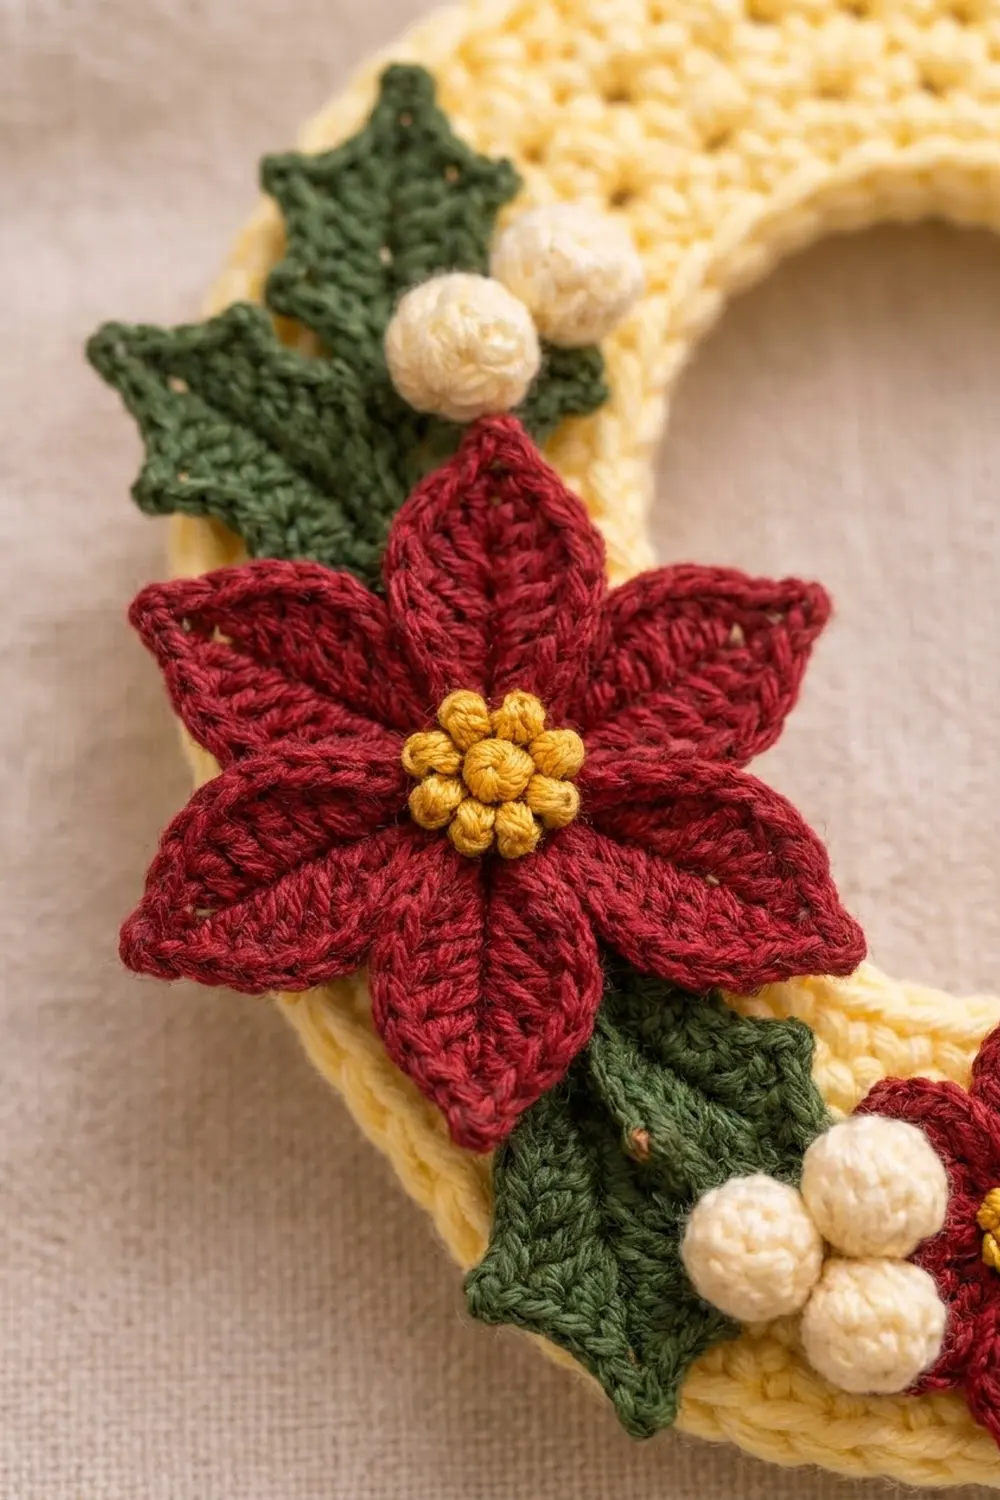
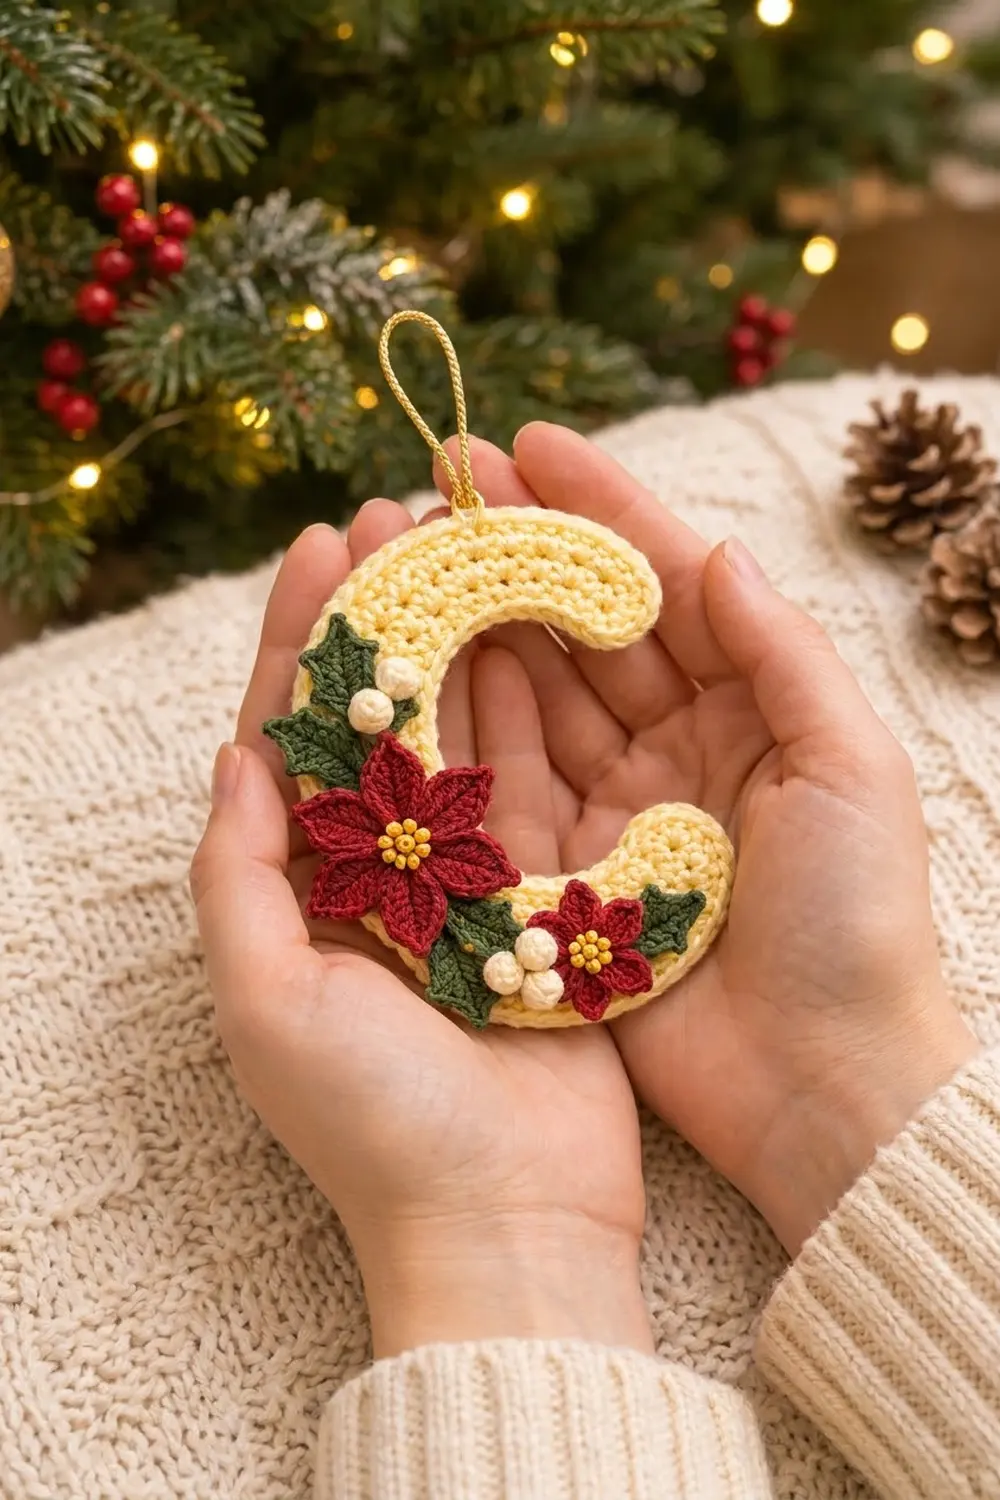
This little letter C is a cheerful, personal Christmas ornament. The butter-yellow letter has a soft, curved stitch texture and a raised, rope-like rim. A small cluster of holiday appliqués is sewn along the left curve: a large red poinsettia, a smaller one, forest-green holly leaves and round cream berries.
The colors are warm and classic: butter yellow, deep red, forest green, cream and a touch of gold in the flower centers. A gold cord loop at the top tip lets it hang straight from a branch. It also makes a good gift tag or package topper.
This pattern uses US crochet terms. The finished ornament is about 4.5 in (11.4 cm) tall and 3.8 in (9.7 cm) wide.
Here’s how it’s made. The letter is one flat piece worked in rows of single crochet. It starts from a straight chain along the inner edge, and evenly spaced increases bend the strip into a C. One round of single crochet and one round of reverse single crochet (crab stitch) finish the outline. Then you make the flowers, leaves and berries separately and sew them on.
Finished Size and Construction
- Finished size: about 4.5 in (11.4 cm) tall x 3.8 in (9.7 cm) wide
- Skill level: Easy-Intermediate
- Terminology: US crochet terms
- Yarn weight: DK (#3)
- Hooks: 3.5 mm (E-4) for the letter, 3.0 mm (C/D) for the appliqués
- Number of pieces: 1 letter body, plus 2 poinsettias, 4 holly leaves and 5 berries as appliqués
- Layout: one single ornament (no joining between motifs)
- Band width of the letter body: 1.0 in (2.5 cm)
- Size before border: about 3.9 in (9.9 cm) tall x 3.2 in (8.1 cm) wide
- Border depth: about 0.3 in (0.8 cm) all around
Materials
Choose a smooth cotton or cotton-blend DK yarn. Cotton gives crisp stitches, holds the curve well after blocking and makes the petal points sharp. Avoid fuzzy yarns, which blur the small details.
- Butter yellow (main color): 15 g, about 35 m (38 yd)
- Deep red: 6 g, about 14 m (15 yd)
- Forest green: 4 g, about 9 m (10 yd)
- Cream: 2 g, about 5 m (5 yd)
- Golden yellow: 1 g, about 2 m (2 yd)
These quantities include a small safety margin.
Tools:
– 3.5 mm (E-4) and 3.0 mm (C/D) crochet hooks
– Tapestry needle
– Sharp embroidery needle
– 6 in (15.2 cm) of gold cord for the hanging loop
– Stitch markers
– Blocking mat and rust-proof pins
– Spray bottle with water
– Scissors
Abbreviations (US Terms)
- ch – chain
- sl st – slip stitch
- sc – single crochet
- hdc – half double crochet
- dc – double crochet
- sc2tog – single crochet 2 together
- MR – magic ring
- st(s) – stitch(es)
- rev sc – reverse single crochet (crab stitch)
- picot – ch 2, sl st into the top of the stitch just made
Special stitch: reverse single crochet (rev sc). Do not turn. Work from left to right (right-handed). Insert the hook into the next stitch to the right, yarn over, pull up a loop, yarn over and pull through both loops. This gives the twisted, corded rim you see around the letter.
Gauge and Checkpoints
Gauge: 18 sc and 20 rows = 4 in (10.2 cm) with the 3.5 mm hook. That works out to 4.5 stitches and 5 rows per inch.
You only need to make one letter, so treat Row 1 as your test.
- Checkpoint 1 (after Row 1): The 21-stitch strip should measure about 4.7 in (11.9 cm).
- Checkpoint 2 (after Row 5): The strip should curve into a C. The band should be about 1.0 in (2.5 cm) wide and the outer edge about 8.2 in (20.8 cm) long.
- Checkpoint 3 (after the border): The ornament should measure about 4.5 in (11.4 cm) tall x 3.8 in (9.7 cm) wide.
If your piece is too big, go down 0.5 mm in hook size. If it’s too small, go up 0.5 mm. Don’t change the stitch counts, because the curve depends on them.
Letter C Body
Use butter yellow and the 3.5 mm hook. The ch 1 at the start of each row does not count as a stitch.
Foundation: Ch 22.
Row 1: Sc in the 2nd ch from the hook and in each ch across, turn. (21 sc)
This straight strip becomes the inner (concave) edge of the C. Leave the bottom loops of the foundation chain free, because you’ll work into them in the border.
Row 2: Ch 1, sc in the next 4 sts, 2 sc in the next st; repeat from * 3 more times, sc in the last st, turn. (25 sc)*
Row 3: Ch 1, sc in the next 5 sts, 2 sc in the next st; repeat from * 3 more times, sc in the last st, turn. (29 sc)*
Row 4: Ch 1, sc in the next 6 sts, 2 sc in the next st; repeat from * 3 more times, sc in the last st, turn. (33 sc)*
Row 5: Ch 1, sc in the next 7 sts, 2 sc in the next st; repeat from * 3 more times, sc in the last st. (37 sc)* Do not fasten off.
Each row adds 4 stitches to the outer edge while the inner edge stays at 21 stitches, so the strip bends into an arc. By Row 5 it should naturally form an open C. Check Checkpoint 2 now. A small amount of cupping is normal and will block out.
Border
The border has two rounds:
- Round 6: a single crochet round that squares off and rounds the corners
- Round 7: a reverse single crochet round that makes the corded rim
Border gauge: same as the body, 4.5 sc per inch. The two rounds add about 0.3 in (0.8 cm) on every edge.
Round 6 (outline round): Ch 1. Do not turn. Work around the whole piece as follows:
- Outer edge: Work 3 sc in the first st of Row 5, sc in the next 35 sts, then 3 sc in the last st. (41 sts)
- First end: Rotate. Work 1 sc into the side of each of the 5 rows. (5 sts)
- Inner edge: Working into the free bottom loops of the foundation chain, work 3 sc in the first loop, sc in the next 19 loops, then 3 sc in the last loop. (25 sts)
- Second end: Work 1 sc into the side of each of the 5 rows. (5 sts)
- Sl st to the first sc to join.
Round 6 total: 76 sc (41 + 5 + 25 + 5)
Round 7 (corded rim): Ch 1. Do not turn. Work rev sc in each st around. Sl st to the first st to join. (76 rev sc) Fasten off and weave in the ends.
Why the math works: Round 6 works 1 sc into each of the 37 Row 5 stitches, the 21 foundation loops and the 10 row ends. That is 37 + 21 + 10 = 68 stitches. The 4 corners each get 3 sc instead of 1, adding 2 stitches per corner, so the extra is 4 x 2 = 8. The total is 68 + 8 = 76, and that matches the side counts above. The corner increases let the edging turn smoothly so both ends of the C look rounded. Round 7 works 1-to-1 with no increases, so it stays at 76.
Hanging loop: Fold the 6 in (15.2 cm) gold cord in half. Thread both ends through the rim at the center of the upper end of the C, knot them on the back, and trim. The finished loop is about 2.5 in (6.4 cm) tall.
Large Poinsettia (make 1)
Use deep red and the 3.0 mm hook.
Round 1: Make an MR. Work 8 sc into the ring, pull it tight, and sl st to the first sc to join. (8 sc)
Round 2 (petals): *Ch 7. Working back down the chain:
- sl st in the 2nd ch from the hook
- sc in the next ch
- hdc in the next ch
- dc in the next ch
- hdc in the next ch
- sc in the last ch
Then sl st into the next sc of Round 1. Repeat from * 7 more times. (8 petals, 6 sts each)
Fasten off and leave a 10 in (25.4 cm) tail for sewing.
Each petal is about 0.9 in (2.3 cm) long, so the whole flower is about 2.1 in (5.3 cm) across. The sl st at each tip makes the sharp point, and the dc in the middle makes the widest part of the petal.
Center: Use golden yellow. Make 7 French knots in a tight cluster over the ring.
Small Poinsettia (make 1)
Use deep red and the 3.0 mm hook.
Round 1: Make an MR. Work 6 sc into the ring and sl st to join. (6 sc)
Round 2 (petals): *Ch 5. Working back down the chain:
- sl st in the 2nd ch from the hook
- sc in the next ch
- hdc in the next ch
- sc in the last ch
Then sl st into the next sc of Round 1. Repeat from * 5 more times. (6 petals, 4 sts each)
Fasten off and leave a sewing tail. The flower is about 1.4 in (3.6 cm) across.
Center: Use golden yellow and make 5 French knots.
Holly Leaves (make 4)
Use forest green and the 3.0 mm hook. A picot is ch 2, then sl st into the top of the dc just made.
Foundation: Ch 9.
Side 1: Starting in the 2nd ch from the hook, work:
- sl st
- sc
- hdc
- (dc, picot) in the same ch
- dc
- (dc, picot) in the same ch
- hdc
- sc in the last ch
(8 sts)
Tip: Ch 3, then sl st in the 3rd ch from the hook.
Side 2: Working along the bottom loops of the foundation chain, work:
- sc
- hdc
- (dc, picot) in the same loop
- dc
- (dc, picot) in the same loop
- hdc
- sc
- sl st
(8 sts)
Fasten off and leave a sewing tail. Each leaf has 5 points, is about 1.3 in (3.3 cm) long and is pointed at both ends.
Berries (make 5)
Use cream and the 3.0 mm hook.
Round 1: Make an MR and work 5 sc into the ring. (5 sc)
Round 2: Work 2 sc in each st. (10 sc)
Round 3: Sc2tog 5 times. (5 sts)
Push the starting tail inside the berry as stuffing. Weave the working tail through the front loops of the 5 stitches, pull tight to close, and keep the tail for sewing. Each berry is about 0.4 in (1.0 cm) across.
Assembly
Lay the blocked letter flat with the opening facing right. Arrange the appliqués along the left curve, working from the top down:
- One holly leaf angled out over the upper-left rim, with 2 berries just to its right.
- Two holly leaves tucked behind the large poinsettia so their tips stick out above and below it.
- The large poinsettia centered on the left curve.
- The small poinsettia on the lower curve, about 0.5 in (1.3 cm) below the large one.
- Three berries to the left of the small poinsettia.
- The last holly leaf to its right.
Pin everything in place. Sew the bottom layer first (the leaves), then the flowers, then the berries. Use small stitches through the center of each piece, and tack each petal tip so it lies flat. Bring each tail to the back of the letter, knot it and hide it.
Final Blocking
- Block the letter before sewing on the appliqués.
- Mist the letter with water until it is damp but not wet.
- Pin it to the mat as a C, 4.5 in (11.4 cm) tall x 3.8 in (9.7 cm) wide. Keep the band an even 1.6 in (4.1 cm) wide all the way around.
- Place pins every 0.75 in (1.9 cm) along the outer edge, then pin the inner edge and the two rounded ends.
- Let it dry completely.
- Pin each poinsettia flat with its petals evenly spaced, mist it and let it dry.
- Unpin everything and sew on the appliqués.
Final Quality-Control Checklist
- Row 5 has 37 sc and Round 6 has 76 sc.
- The ornament measures 4.5 in (11.4 cm) x 3.8 in (9.7 cm).
- The band is an even width with no ripples on the outer edge.
- Both ends of the C are rounded, with no sharp corners.
- The crab-stitch rim is continuous with no gaps.
- The large flower has 8 petals and the small one has 6, all with sharp tips.
- All 4 leaves have 5 points.
- The berries are firm and round.
- No yarn tails show on the front.
- The loop is secure and the ornament hangs upright.
Troubleshooting
- The C ruffles on the outer edge: Your stitches are too loose. Go down a hook size, or check that you made exactly 4 increases per row.
- The C stays too straight: The increases are missing, or your stitches are too tight. Recount Rows 2–5.
- The ends look square: Make sure you worked 3 sc into each of the 4 corners in Round 6, then pin the ends into rounded shapes when blocking.
- The crab stitch twists or flares: Use a slightly smaller hook for Round 7 only.
- The petals curl: Pin them flat, mist them and let them dry before sewing.
- The berries are lumpy: Pull the closing tail evenly and roll the berry between your fingers.
Care
Spot clean only, using cool water and mild soap. Lay the ornament flat to dry, and store it flat in tissue paper so the petals stay crisp.
Final Notes
Here is the measurement chain for this ornament:
- Row 1 is 21 sc and measures 4.7 in (11.9 cm).
- Rows 2–5 each add 4 stitches, ending at 37 sc. That bends the strip into a C with a band 1.0 in (2.5 cm) wide.
- Round 6 works the 68 edge stitches 1-to-1 and adds 8 corner stitches, for 76.
- Round 7 works those 76 stitches 1-to-1 to form the corded rim.
- The finished ornament measures 4.5 in (11.4 cm) x 3.8 in (9.7 cm).
If you check each stage, the poinsettias, holly leaves and berries will fit neatly along the curve.
Happy crocheting!