

This curtain panel is made from simple openwork squares that join into a pattern like soft window panes. Each motif has a square open center, a wide-open window in the middle of each side, and diagonal corner lines. Once the motifs are joined, light comes through in a neat, regular grid.
The sample uses one color, a dusty denim blue cotton. It suits a farmhouse or cottage kitchen, but it also looks good in plain white or natural linen. The pattern uses US crochet terms throughout.
The finished panel measures 32 × 74 in (81.3 × 188.0 cm), not counting the tabs. The tab loops stand about 2.75 in (7.0 cm) above the top edge.
Construction is simple. You make 60 square motifs in rounds and join them in a grid 5 squares wide by 12 squares tall. Then you add a 3-round border, work six tabs directly off the top edge, and make a separate tieback band.
Finished Size and Construction
- Finished size: 32 × 74 in (81.3 × 188.0 cm), without tabs
- Skill level: Easy–Intermediate
- Terminology: US crochet terms
- Yarn weight: Worsted (#4) cotton or cotton blend
- Hook: 5.0 mm (H-8)
- Number of pieces: 60 motifs, plus 1 tieback
- Layout: 5 motifs wide × 12 motifs tall
- Motif size: 6 × 6 in (15.2 × 15.2 cm), blocked
- Size before border: 30 × 72 in (76.2 × 182.9 cm)
- Border depth: 1 in (2.5 cm) on each side
- Tieback: 22 × 2.25 in (55.9 × 5.7 cm), plus end loops
Materials
Yarn: Use a smooth worsted-weight cotton or cotton blend with about 190 m per 100 g. Cotton gives crisp stitch definition and hangs straight without stretching too much. Avoid fuzzy or very stretchy acrylics, because the long panel will grow over time.
- Denim Blue: 900 g (about 1,710 m), or 9 skeins of 100 g each
- Motifs: about 11 g (21 m) each, 660 g in total
- Border: about 60 g
- Tabs: about 48 g
- Tieback: about 20 g
These amounts include a margin of about 14% for swatching and differences in tension. Buy all skeins from the same dye lot.
Tools:
– 5.0 mm (H-8) crochet hook
– Tapestry needle
– Stitch markers
– Measuring tape
– Blocking mats and rust-proof pins
– Spray bottle
– Scissors
Abbreviations (US Terms)
- ch – chain
- sl st – slip stitch
- sc – single crochet
- dc – double crochet
- sp – space
- sk – skip
- st(s) – stitch(es)
- RS / WS – right side / wrong side
- [ ] – repeat the instructions inside the brackets the stated number of times
Corner group: (2 dc, ch 2, 2 dc), all worked into the same corner ch-2 sp.
Gauge and Checkpoints
Make one complete motif before you start the full panel. Gauge matters here because 60 motifs multiply any small error.
Measurement checkpoints (unblocked, measured flat edge to edge):
– After Rnd 1: 2 in (5.1 cm) across
– After Rnd 2: 3.25 in (8.3 cm)
– After Rnd 3: 4.5 in (11.4 cm)
– After Rnd 4: 5.75 in (14.6 cm), blocking to 6 in (15.2 cm)
Edge gauge: Each finished motif side has 19 stitch positions over 6 in (15.2 cm), which is about 3.2 sts per 1 in (2.5 cm). The border depends on this number.
If your motif is too big: Go down to a 4.5 mm hook, or work the dc rounds with a little less height.
If your motif is too small: Go up to a 5.5 mm hook.
A difference of only 1/8 in (0.3 cm) per motif adds up to 0.625 in (1.6 cm) across the width and 1.5 in (3.8 cm) down the length. Fix gauge now, before you make more motifs.
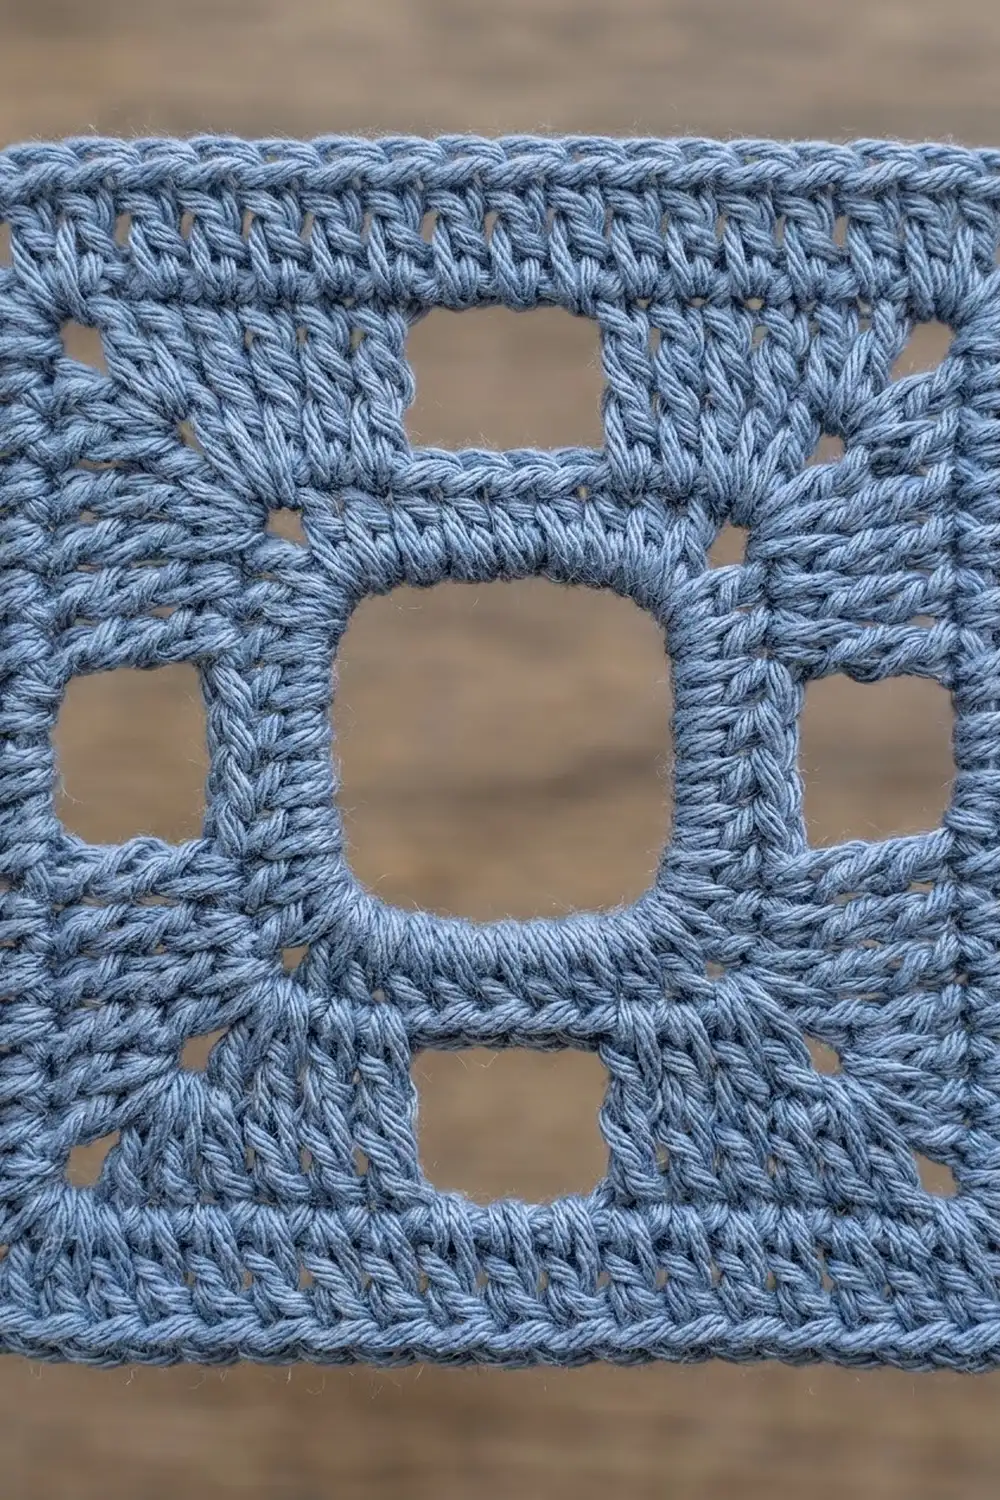
Motif (Make 60)
Rnd 1 (square frame): Ch 20, sl st in first ch to form a ring. Ch 1, sc in the same ch and in the next 4 ch, ch 2, [sc in next 5 ch, ch 2] 3 times. Sl st to the first sc.
(20 sc, 4 corner ch-2 sps: 5 sc per side.)
The ch-2 corners pull the ring into a square. This frames the open center, which is about 1.5 in (3.8 cm) wide.
Rnd 2: Ch 3 (counts as dc), dc in next 4 sc, corner group in ch-2 sp, [dc in next 5 sc, corner group in ch-2 sp] 3 times. Sl st to the top of the beginning ch-3.
(36 dc: 9 dc per side between corner sps, 4 corner ch-2 sps.)
The 9 dc on each side are 2 dc from one corner, 5 dc along the side, and 2 dc from the next corner.
Rnd 3 (windows): Number the 9 dc on each side from 1 to 9. The beginning ch-3 of Rnd 2 sits on position 3.
Ch 3 (counts as dc), ch 3, sk next 3 dc, dc in next 3 dc, corner group in ch-2 sp. Then work [dc in next 3 dc, ch 3, sk next 3 dc, dc in next 3 dc, corner group in ch-2 sp] 3 times. Dc in next 2 dc and sl st to the top of the beginning ch-3.
(40 dc, 4 ch-3 windows, 4 corner ch-2 sps. Each side between corner sps: 2 dc + 3 dc + ch 3 + 3 dc + 2 dc = 13 sts.)
The skipped center stitches make the rectangular window in the middle of each side.
Rnd 4 (solid edge): Ch 3 (counts as dc). Working around, dc in each dc and 3 dc in each ch-3 sp, and work a corner group in each corner ch-2 sp. Sl st to the top of the beginning ch-3. Fasten off and weave in the ends.
(68 dc: 17 dc per side between corner sps, 4 corner ch-2 sps.)
The 17 dc on each side are 2 + 13 + 2.
Per-side count for joining and border: Each side has 19 positions: 1 corner ch-2 sp, then 17 dc, then 1 corner ch-2 sp. Each corner ch-2 sp counts as one position and is shared by the two sides that meet there. Check: 4 × 19 − 4 shared corners = 72 positions = 68 dc + 4 corner sps.
Make All Pieces
- Motifs: 60, all in Denim Blue
- Tieback: 1, in Denim Blue (see below)
Layout grid (5 across × 12 down; M = motif):
Row 1:  M M M M M   <- top edge (tabs)
Row 2:  M M M M M
Row 3:  M M M M M
Row 4:  M M M M M
Row 5:  M M M M M
Row 6:  M M M M M
Row 7:  M M M M M
Row 8:  M M M M M
Row 9:  M M M M M
Row 10: M M M M M
Row 11: M M M M M
Row 12: M M M M M   <- bottom edge
Lightly block all the motifs to 6 in (15.2 cm) before joining. Joining is much easier when every square is the same size.
Joining
Method: Flat slip-stitch join through the back loops, with WS together.
Stitch-to-stitch logic: Hold two motifs with WS together and their edges lined up. Join through the outer loops of matching positions:
1. ch-2 corner sp to ch-2 corner sp
2. Then each of the 17 dc to its matching dc
3. Then the last corner sp to the last corner sp
That makes 19 joins per seam, worked one to one, with no stitches skipped or added.
Order:
1. Join the motifs into 12 horizontal strips of 5 motifs each.
2. Join the strips together along their long edges, one continuous seam per strip edge.
3. Where four corners meet, work a sl st through all the corner sps so the intersection stays flat.
Tension: Keep your sl sts as loose as the dc stitches. Tight seams pucker and pull the grid out of line. If needed, go up to a 5.5 mm hook for joining only.
Size checkpoint: The joined panel should measure 30 × 72 in (76.2 × 182.9 cm). Check this before you start the border.
Border
Border gauge: About 3.2 sc per 1 in (2.5 cm). This matches the motif edges, so each sc sits in one existing position and the border lies flat.
Rnd 1 (sc): With RS facing, join the yarn in any panel corner sp. Work 1 sc in each dc and 1 sc in each corner ch-2 sp along the edges. At a seam, that means 1 sc in each of the two motif corner sps. Work 3 sc in each of the 4 panel corner sps. Sl st to the first sc.
- Top and bottom: 5 motifs × 19 = 95 positions, + 2 extra sc at the corners = 97 sc per side, including both corner sc
- Left and right: 12 motifs × 19 = 228 positions, + 2 = 230 sc per side, including both corner sc
- Total: (97 + 230) × 2 − 4 shared corners = 650 sc
Rnd 2 (dc): Ch 3 (counts as dc). Dc in each sc, and work 3 dc in each corner sc. Sl st to the top of the beginning ch-3.
- Top and bottom: 97 + 2 = 99 dc per side
- Left and right: 230 + 2 = 232 dc per side
- Total: 650 + 8 = 658 dc
Rnd 3 (sc): Ch 1. Sc in each dc, and work 3 sc in each corner dc. Sl st to the first sc. Do not fasten off.
- Top and bottom: 99 + 2 = 101 sc per side
- Left and right: 232 + 2 = 234 sc per side
- Total: 658 + 8 = 666 sc
Why the math works: Rnd 1 matches the 19 positions on each motif side exactly. Only the four panel corners grow, by 2 sts per corner each round, which is what keeps the corners square. The border adds 1 in (2.5 cm) on each side, so the panel becomes 32 × 74 in (81.3 × 188.0 cm).
Tabs (Make 6, Worked Off the Top Edge)
Number the 101 sc of the top edge from left to right. Sc 1 is the top-left corner sc.
Place the tabs on these stitches:
– Tab 1: sts 3–9
– Tab 2: sts 21–27
– Tab 3: sts 39–45
– Tab 4: sts 57–63
– Tab 5: sts 75–81
– Tab 6: sts 93–99
Check: 2 + (6 × 7) + (5 × 11) + 2 = 101. That gives 11-st gaps of about 3.5 in (8.9 cm) between tabs.
Each tab:
– Row 1: With RS facing, join the yarn in the first st of the tab. Ch 1, sc in the same st and in the next 6 sts. Turn. (7 sc)
– Rows 2–20: Ch 1, sc in each sc. Turn. (7 sc)
The tab is 2.2 in (5.6 cm) wide and 6 in (15.2 cm) long. Fold it to the WS and whipstitch Row 20 to the base of Border Rnd 1. This makes a loop that stands about 2.75 in (7.0 cm) tall and fits rods up to 1.5 in (3.8 cm) across.
Tieback
- Foundation: Ch 72.
- Row 1: Sc in 2nd ch from hook and in each ch across. Turn. (71 sc)
- Row 2: Ch 4 (counts as dc + ch 1), sk 1, dc in next st. Then [ch 1, sk 1, dc in next st] across. Turn. (36 dc, 35 ch-1 sps)
- Row 3: Ch 1, sc in each dc and in each ch-1 sp. Turn. (71 sc: 36 + 35)
- Row 4: Ch 3 (counts as dc), dc in each sc. Turn. (71 dc)
- Row 5: Repeat Row 2.
- Row 6: Repeat Row 3. (71 sc)
- End loops: On each short end, join the yarn at the middle of the edge, ch 10, sl st in the same spot, and fasten off.
The tieback measures 22 × 2.25 in (55.9 × 5.7 cm). Hook both end loops over a wall hook.
Final Blocking
- Weave in all the ends along the dc posts, not through the windows.
- Lay the panel flat on mats or a clean sheet.
- Pin it to 32 × 74 in (81.3 × 188.0 cm). Start with the corners, then pin the middle of each side.
- Line up the seams so the grid runs straight. A long ruler helps.
- Spray it until damp, but not soaked.
- Leave it to dry completely, which takes 24 hours or more.
- Pin the tieback flat to its measurements and spray it the same way.
Final Quality-Control Checklist
- Every motif is 6 in (15.2 cm) and shows four clear windows.
- Every seam joins 19 positions to 19 positions.
- The joined panel measured 30 × 72 in (76.2 × 182.9 cm).
- The final border round counts are 101 / 234 / 101 / 234 sc.
- The corners are square and the edges lie flat.
- The six tabs are evenly spaced, the same length, and securely sewn.
- No ends show from the RS.
Troubleshooting
- Motif centers dome up: Your Rnd 1 chains are too tight. Make the foundation chain with a larger hook.
- Windows look uneven: Count the 9 dc on each side in Rnd 2 again before you work Rnd 3.
- Seams pucker: Rejoin with a larger hook or looser sl sts.
- Border ruffles: You added stitches at the seams. Use exactly 1 sc per position.
- Border cups: You skipped stitches. Recount each side against the totals above.
- Panel stretches as it hangs: Re-block it and use a cotton with less drape.
Care
Hand wash or machine wash cold on a gentle cycle in a laundry bag. Then lay flat to dry, and pin it back to size if needed.
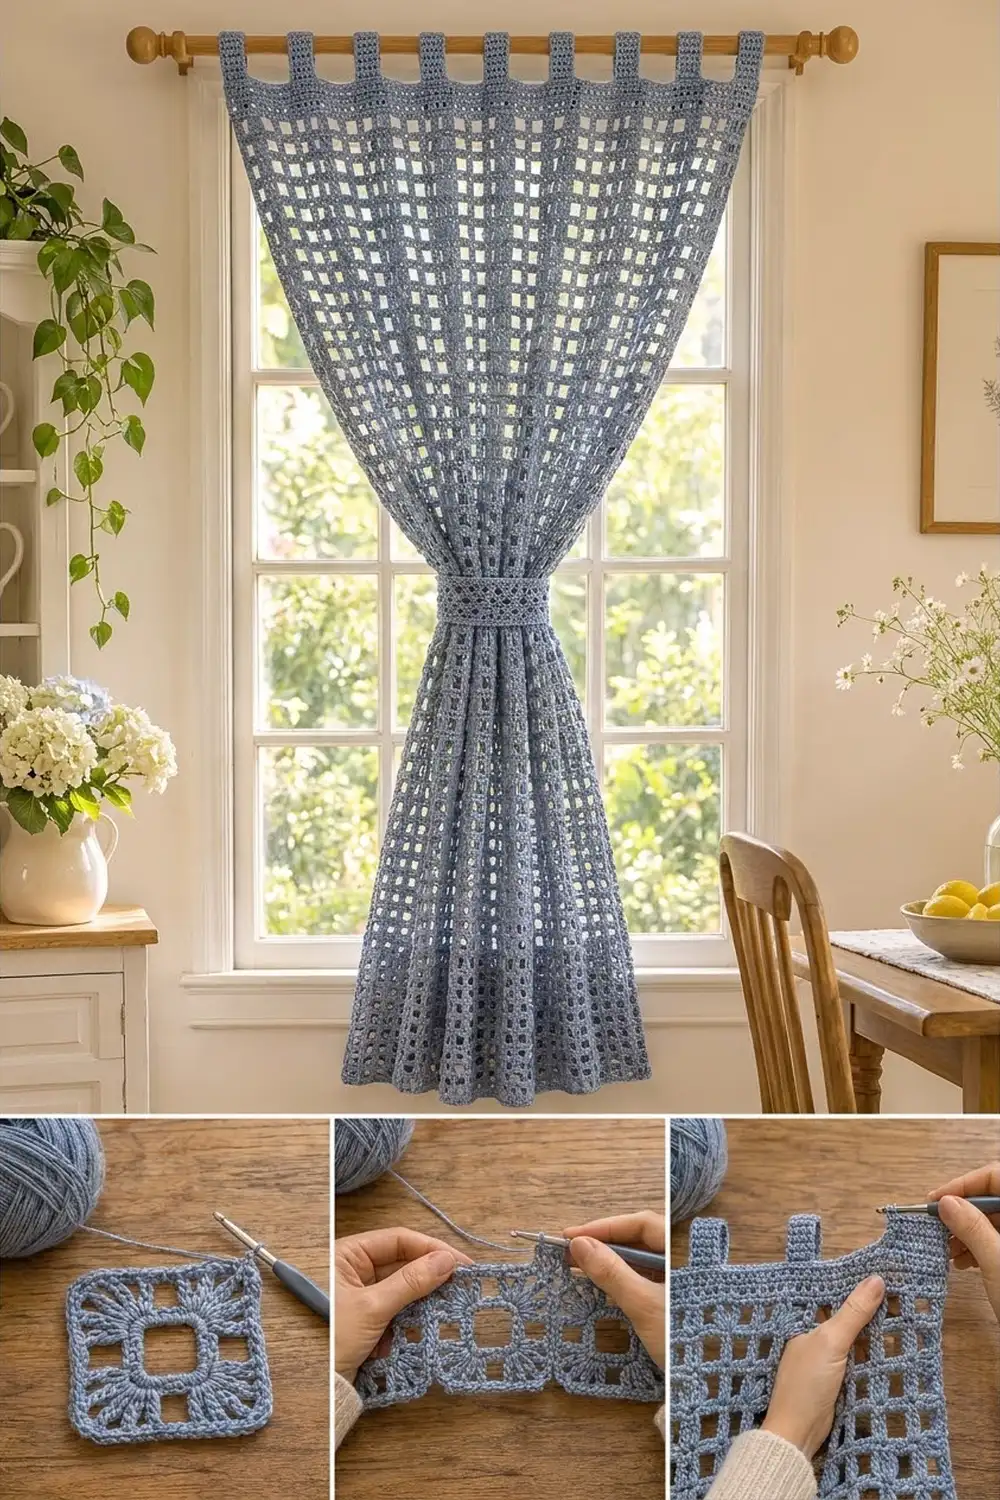
Final Notes
The measurement chain is simple:
1. One motif blocks to 6 in (15.2 cm) with 19 positions per side.
2. Five motifs across and twelve down make 30 × 72 in (76.2 × 182.9 cm).
3. Three border rounds add 1 in (2.5 cm) per side, for a finished 32 × 74 in (81.3 × 188.0 cm).
4. The tabs and tieback finish it for hanging.
Check each step against its number and the panel will come out right. Happy crocheting!