

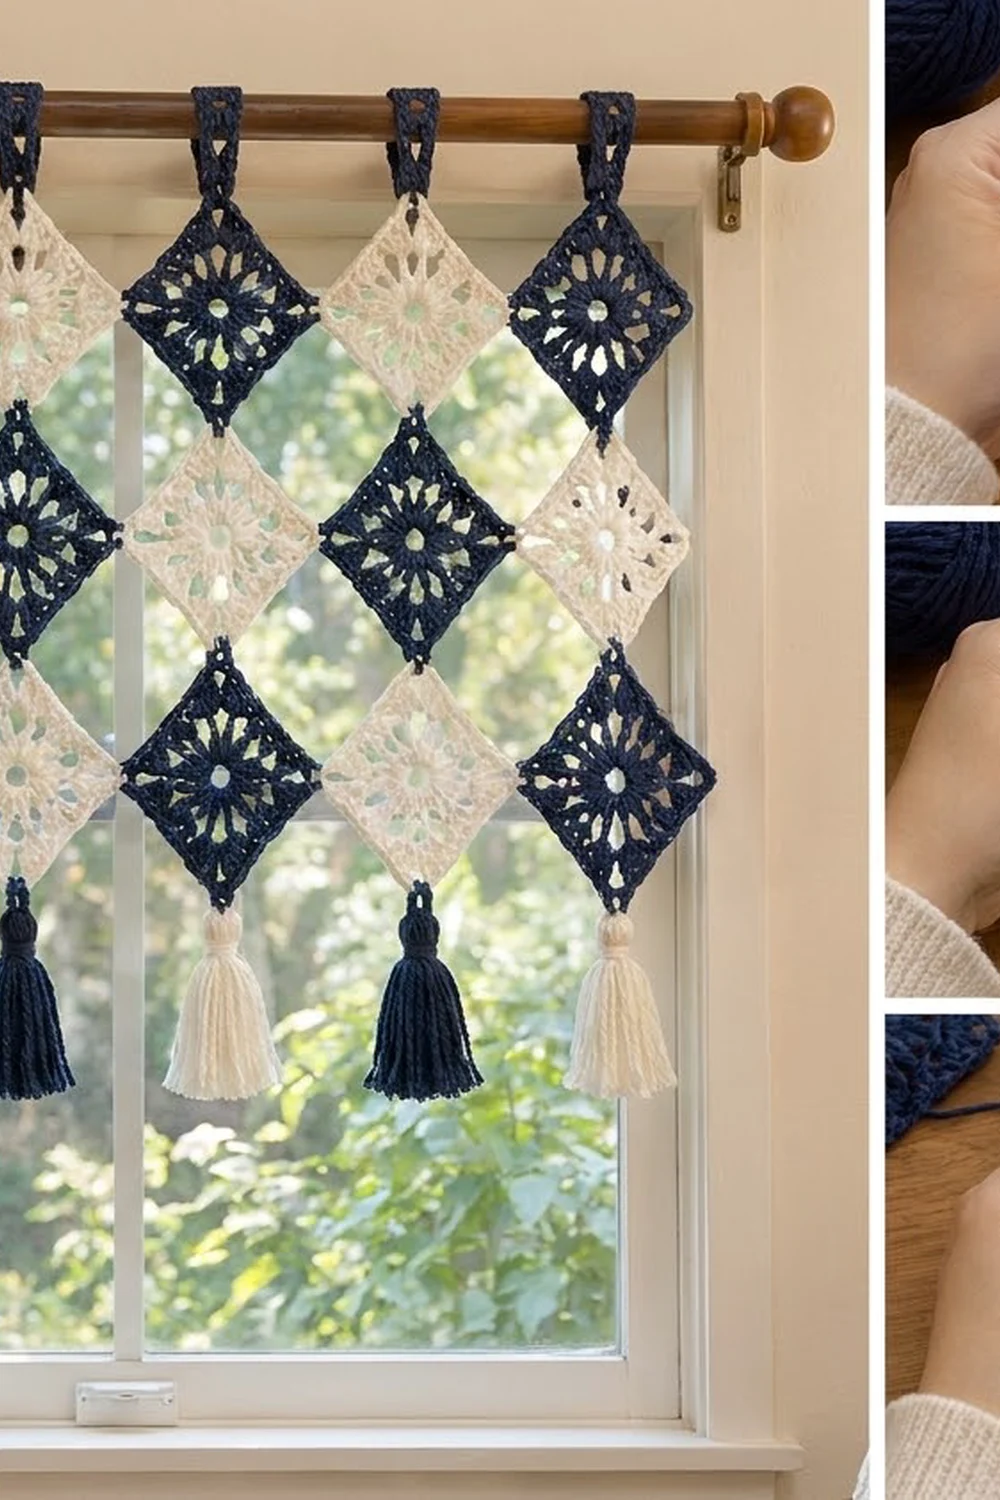
The Indigo Lattice Valance is a light, airy window topper made from small lacy granny squares turned on point. Each square becomes a diamond. The diamonds touch only at their tips, so daylight shines through the open diamond-shaped gaps between them.
The palette is just two colors, deep navy and soft cream, set in a checkerboard. Navy tabs loop over the curtain rod. A full tassel hangs from the bottom point of each lower diamond, always in the opposite color to the square above it. The style is cottage-meets-boho, calm and graphic at the same time.
This pattern uses US crochet terms. Across the diamonds, the finished valance measures about 45.6 in (115.8 cm) wide and 17.1 in (43.4 cm) tall. From the top of the tabs to the tassel tips it measures about 23.1 in (58.7 cm).
Construction is simple. You crochet 24 identical 5-round squares and join them point to point in a grid of 8 columns by 3 rows. Then you add 8 hanging tabs along the top points and finish with 8 tassels along the bottom points.
Finished Size and Construction
- Finished size: 45.6 in (115.8 cm) wide x 23.1 in (58.7 cm) long, tabs and tassels included
- Skill level: Easy to intermediate
- Terminology: US crochet terms
- Yarn weight: Worsted (#4), cotton or cotton blend
- Hook: 5 mm (H-8)
- Number of pieces: 24 squares (12 navy, 12 cream), plus 8 tabs and 8 tassels
- Layout: 8 columns x 3 rows of squares set on point, in checkerboard colors
- Piece size: 4 in x 4 in (10.2 cm x 10.2 cm) per square; about 5.7 in (14.5 cm) from point to point
- Size before border: 45.6 in x 17.1 in (115.8 cm x 43.4 cm)
- Border depth: Tabs add 2 in (5.1 cm) above; tassels add 4 in (10.2 cm) below
Materials
Choose a smooth, mercerized or matte worsted cotton. Cotton holds the crisp diamond points and doesn’t stretch much while hanging. It also stands up to sunlight better than most acrylics. Pick a navy dark enough to contrast clearly with the cream.
- Navy: 130 g, about 247 m (12 squares, 8 tabs, 4 tassels)
- Cream: 110 g, about 209 m (12 squares, 4 tassels)
These amounts assume a yarn of roughly 190 m per 100 g. They include a margin of about 25% for gauge differences and tassel trimming.
Tools:
- 5 mm (H-8) crochet hook
- Tapestry needle
- Scissors
- Stiff card cut to 4.5 in (11.4 cm) tall, for the tassels
- Rust-proof pins and a blocking mat
- Spray bottle
- Tape measure
Abbreviations (US Terms)
- ch – chain
- sl st – slip stitch
- sc – single crochet
- dc – double crochet
- sp(s) – space(s)
- st(s) – stitch(es)
- rep – repeat
- beg – beginning
Special stitch – 3-dc cluster (cl): [Yarn over, insert hook in indicated space, yarn over and pull up a loop, yarn over and draw through 2 loops] 3 times, then yarn over and draw through all 4 loops on the hook.
Beginning cluster (beg cl): Ch 3, then work a 2-dc cluster in the same space: [yarn over, insert hook, pull up a loop, yarn over and draw through 2 loops] twice, then yarn over and draw through all 3 loops. The ch-3 and the 2-dc cluster together count as one cluster.
Gauge and Checkpoints
Make one complete square before anything else and block it lightly. It should measure 4 in x 4 in (10.2 cm x 10.2 cm) from edge to edge. Each side of the final round holds 17 sc.
Measure at each stage:
- After Rnd 1: about 1.5 in (3.8 cm) across
- After Rnd 2: about 2.25 in (5.7 cm) across
- After Rnd 3: about 3 in (7.6 cm) square
- After Rnd 4: about 3.5 in (8.9 cm) square
- After Rnd 5: 4 in (10.2 cm) square
If your square is too big, go down to a 4.5 mm (7) hook. If it’s too small, go up to a 5.5 mm (I-9) hook. A difference of only 0.25 in (0.6 cm) per square adds up to 2 in (5.1 cm) across 8 columns, so it’s worth checking now.
Make your first test square in navy and a second one in cream. Different colors and dye lots can work up slightly differently, and both colors must match.
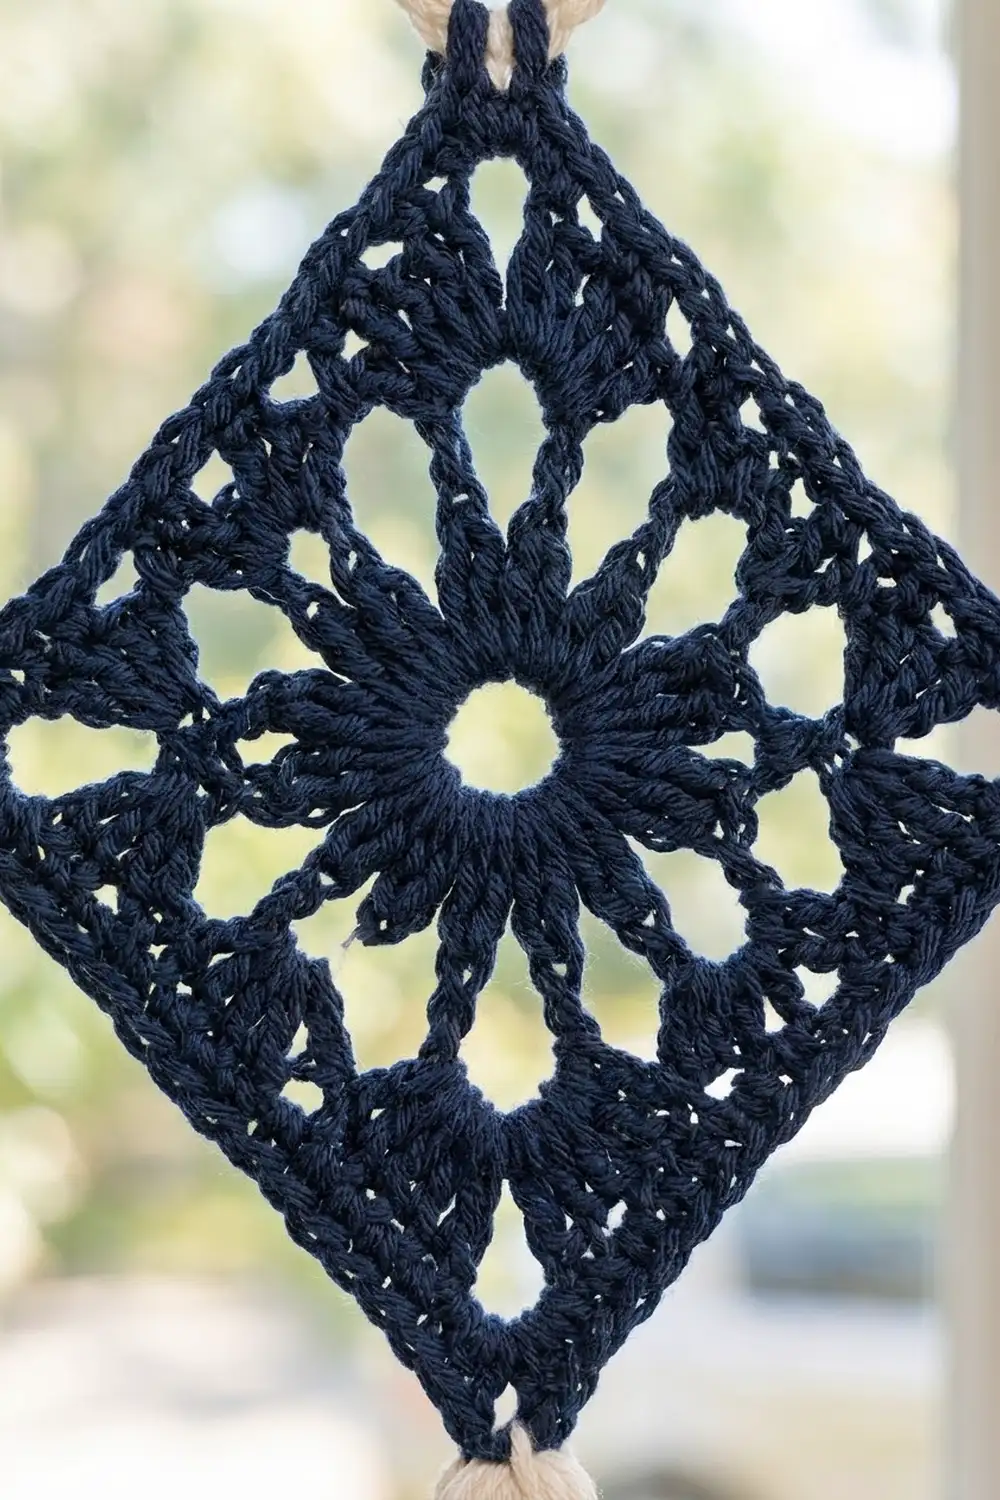
Square Pattern (Make 24)
Work in joined rounds with the right side facing throughout. Don’t turn.
Rnd 1: Make a magic ring. Ch 5 (counts as dc + ch 2), [dc in ring, ch 2] 7 times. Pull the ring closed. Sl st in 3rd ch of beg ch-5.
Count: 8 dc and 8 ch-2 sps.
Rnd 2: Sl st into next ch-2 sp. Beg cl in same sp, ch 3, [cl in next ch-2 sp, ch 3] 7 times. Sl st to top of beg cl.
Count: 8 clusters and 8 ch-3 sps. The clusters form the petals of the center flower.
Rnd 3: Sl st into next ch-3 sp. Ch 3 (counts as dc). In the same sp, work (2 dc, ch 2, 3 dc) for the first corner. Ch 1, 3 dc in next ch-3 sp, ch 1. [(3 dc, ch 2, 3 dc) in next ch-3 sp, ch 1, 3 dc in next ch-3 sp, ch 1] 3 times. Sl st in top of beg ch-3.
Count: 36 dc total, 4 corner ch-2 sps, and 8 ch-1 sps. Each side has 9 dc between corner sps (3 + 3 + 3).
Rnd 4: Sl st in next 2 dc and into the corner ch-2 sp. Ch 3 (counts as dc), (dc, ch 2, 2 dc) in same sp. [Dc in next 3 dc, dc in next ch-1 sp] twice, dc in next 3 dc, (2 dc, ch 2, 2 dc) in next corner sp. Rep from * 2 more times. [Dc in next 3 dc, dc in next ch-1 sp] twice, dc in next 3 dc. Sl st in top of beg ch-3.
Count: 60 dc total. Each side has 15 dc between corner sps (2 + 3 + 1 + 3 + 1 + 3 + 2).*
Rnd 5: Sl st in next dc and into the corner ch-2 sp. Ch 1, (sc, ch 2, sc) in same sp. Sc in each of next 15 dc, (sc, ch 2, sc) in next corner sp. Rep from * 2 more times. Sc in each of next 15 sts. Sl st in first sc. Fasten off and weave in ends.
Count: 68 sc total and 4 corner ch-2 sps. Each side has 17 sc: 1 corner sc + 15 sc + 1 corner sc.*
Rnd 5 is a trim round. On each side you work 15 sc, one in each existing stitch, and add 2 corner sc. The ch-2 corner spaces become the diamond points that you’ll join.
Make All Pieces
- Navy squares: 12
- Cream squares: 12
The first square is worked in full. For every square that meets an earlier one, use the join-as-you-go method below during Rnd 5, and build the grid as you go. Each square sits on point. In the chart, N = navy and C = cream:
Row 1:  C  N  C  N  C  N  C  N
Row 2:  N  C  N  C  N  C  N  C
Row 3:  C  N  C  N  C  N  C  N
Each diamond touches its neighbors only at its side points and its top and bottom points. This leaves open diamond-shaped windows between the squares.
Joining
Method: Join as you go at the corners, during Rnd 5. Work the first square (Row 1, Column 1) completely. On each following square, work Rnd 5 as written until you reach a corner that must meet an existing square.
Joined corner: In the corner sp, work sc, ch 1, sl st into the corner ch-2 sp of the neighboring square, ch 1, then sc in the same corner sp of the working square. Continue Rnd 5 as written.
Stitch-to-stitch logic: The joined corner replaces the ch-2 with ch 1, sl st, ch 1. You still work both corner sc, so every side still has 17 sc and every square still has 68 sc. Only the corner points touch, and the side stitches stay free.
Number of joins: Each row has 7 side-point joins, for 21 in total. Each column has 2 top-to-bottom point joins, for 16 in total. That makes 37 joins.
Each square joins only to its direct horizontal and vertical neighbors. Where four squares surround one gap, they never share a single point.
Tension advice: Keep the ch-1 on each side of the sl st relaxed. If you pull tight, the points draw together and the diamonds tilt. If the join is too loose, the grid sags when it hangs.
Size checkpoint: Lay Row 1 flat once it’s joined. It should measure about 45.6 in (115.8 cm) from point to point. The full grid of 3 rows should measure about 17.1 in (43.4 cm) from top point to bottom point.
Border: Hanging Tabs and Tassels
No edge border goes around the perimeter, because the open points are part of the design. Instead, the top edge gets 8 tabs and the bottom edge gets 8 tassels, one per column.
Tab gauge: 4 sc and 4 rows = about 1 in (2.5 cm).
Tabs (Make 8, Navy)
Work one tab on the top point of each Row 1 square.
Row 1: With the right side facing, join navy in the top corner ch-2 sp. Ch 1, 4 sc in the same sp. (4 sc)
Rows 2–16: Ch 1, turn, sc in each sc across. (4 sc in each row)
Fasten off, leaving a 10 in (25.4 cm) tail. Fold the tab to the back of the square and whipstitch the last row to the back of Row 1 of the tab.
Why the math works: At 4 rows per inch, 16 rows make a strip 4 in (10.2 cm) long. Folded in half, the strip forms a 2 in (5.1 cm) loop with an inner circumference of almost 4 in (10.2 cm). That slides easily over a rod up to 1 in (2.5 cm) in diameter. The tab is 4 sc wide, about 1 in (2.5 cm), so it sits neatly on the narrow point without flaring.
Tassels (Make 4 Navy, 4 Cream)
Each tassel is the opposite color of the Row 3 square it hangs from. Row 3 runs C, N, C, N, C, N, C, N, so the tassels run N, C, N, C, N, C, N, C.
- Wrap the yarn 30 times around the 4.5 in (11.4 cm) card.
- Slide a 10 in (25.4 cm) strand under the wraps at the top and tie it tightly.
- Cut the loops at the bottom. Each strand is now 9 in (22.9 cm) long and folded in half.
- With a separate strand, wrap tightly around the bundle 6 times, 0.5 in (1.3 cm) below the top. Tie it off and bury the ends inside the tassel.
- Trim the tassel to 4 in (10.2 cm), measured from the neck tie to the tips.
- Thread the top tie ends through the bottom corner ch-2 sp of the square and knot them securely on the back. Bury the ends in the tassel.
Final Blocking
- Weave in any remaining ends before blocking.
- Lay the valance face down on a blocking mat.
- Pin every square to 4 in x 4 in (10.2 cm x 10.2 cm), with a pin at each of its 4 points.
- Check that each row measures 45.6 in (115.8 cm) and the grid measures 17.1 in (43.4 cm) tall.
- Spray evenly until damp but not soaked.
- Smooth the center flowers so the petals and openings lie flat.
- Let it dry completely, for at least 12 hours.
- Unpin, then lightly steam or comb the tassels straight.
Final Quality-Control Checklist
- 24 squares, 12 navy and 12 cream, in checkerboard order
- Every square has 68 sc, with 17 sc per side
- Every square measures 4 in (10.2 cm) per side
- 37 point joins, all with relaxed ch-1s
- Grid measures 45.6 in x 17.1 in (115.8 cm x 43.4 cm)
- 8 navy tabs, each 16 rows long and folded into a 2 in (5.1 cm) loop
- 8 tassels, each 4 in (10.2 cm) long and the opposite color to its square
- All ends woven in and secure
Troubleshooting
Square cups or ruffles: Your dc is looser than your sc. Try a 4.5 mm hook for Rnd 5 only.
Corners look rounded: Make sure each ch-2 in Rnds 3, 4, and 5 is a true ch-2. Pin the points sharply when blocking.
Rows tilt when hung: One or more joins are tighter than the rest. Undo them and redo them with relaxed chains.
Cream and navy squares differ in size: Change the hook size for one color until both colors reach 4 in (10.2 cm).
Tassels look thin: Add 5 to 10 more wraps. Expect to use a little more yarn.
Tabs too tight on the rod: Add 2 rows to each tab. This makes the loop 0.25 in (0.6 cm) longer.
Care
Hand wash in cool water with a mild detergent. Roll it in a towel to remove the water, then dry it flat with the points pinned again. Avoid the dryer, which can shrink cotton and fluff up the tassels.
Final Notes
The measurement chain is short and reliable. With 17 sc per side, each square is 4 in (10.2 cm) across and about 5.7 in (14.5 cm) from point to point. Eight diamonds across give a width of 45.6 in (115.8 cm), and three rows give a height of 17.1 in (43.4 cm). Adding the 2 in (5.1 cm) tabs and 4 in (10.2 cm) tassels brings the total drop to 23.1 in (58.7 cm). Check your first square carefully and the rest will follow.
Happy crocheting!