

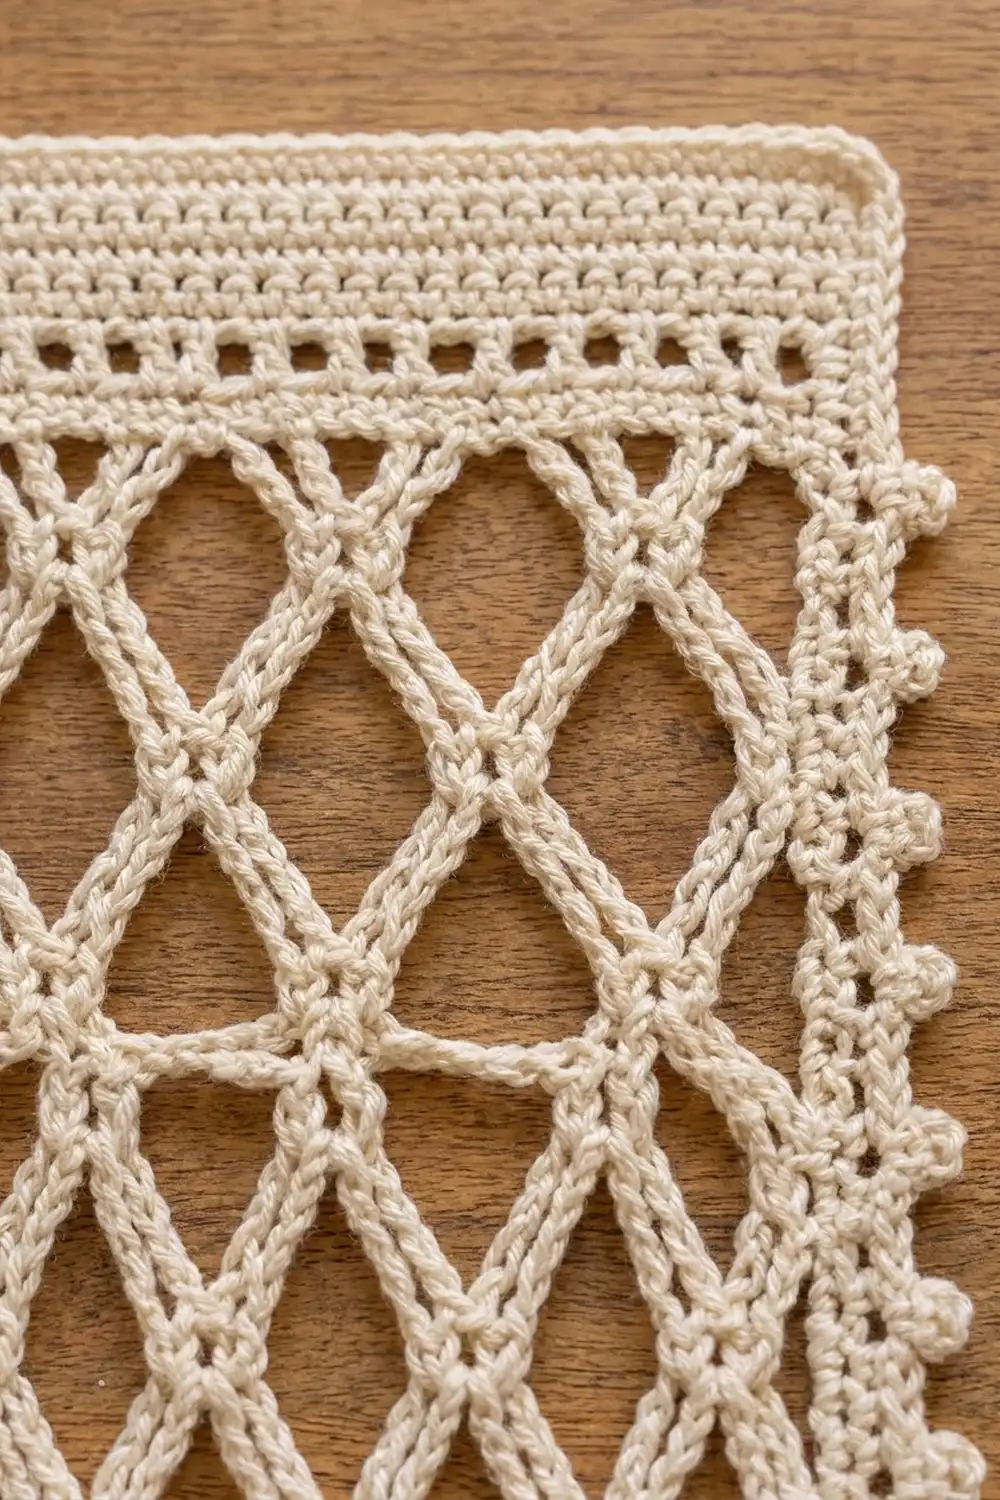
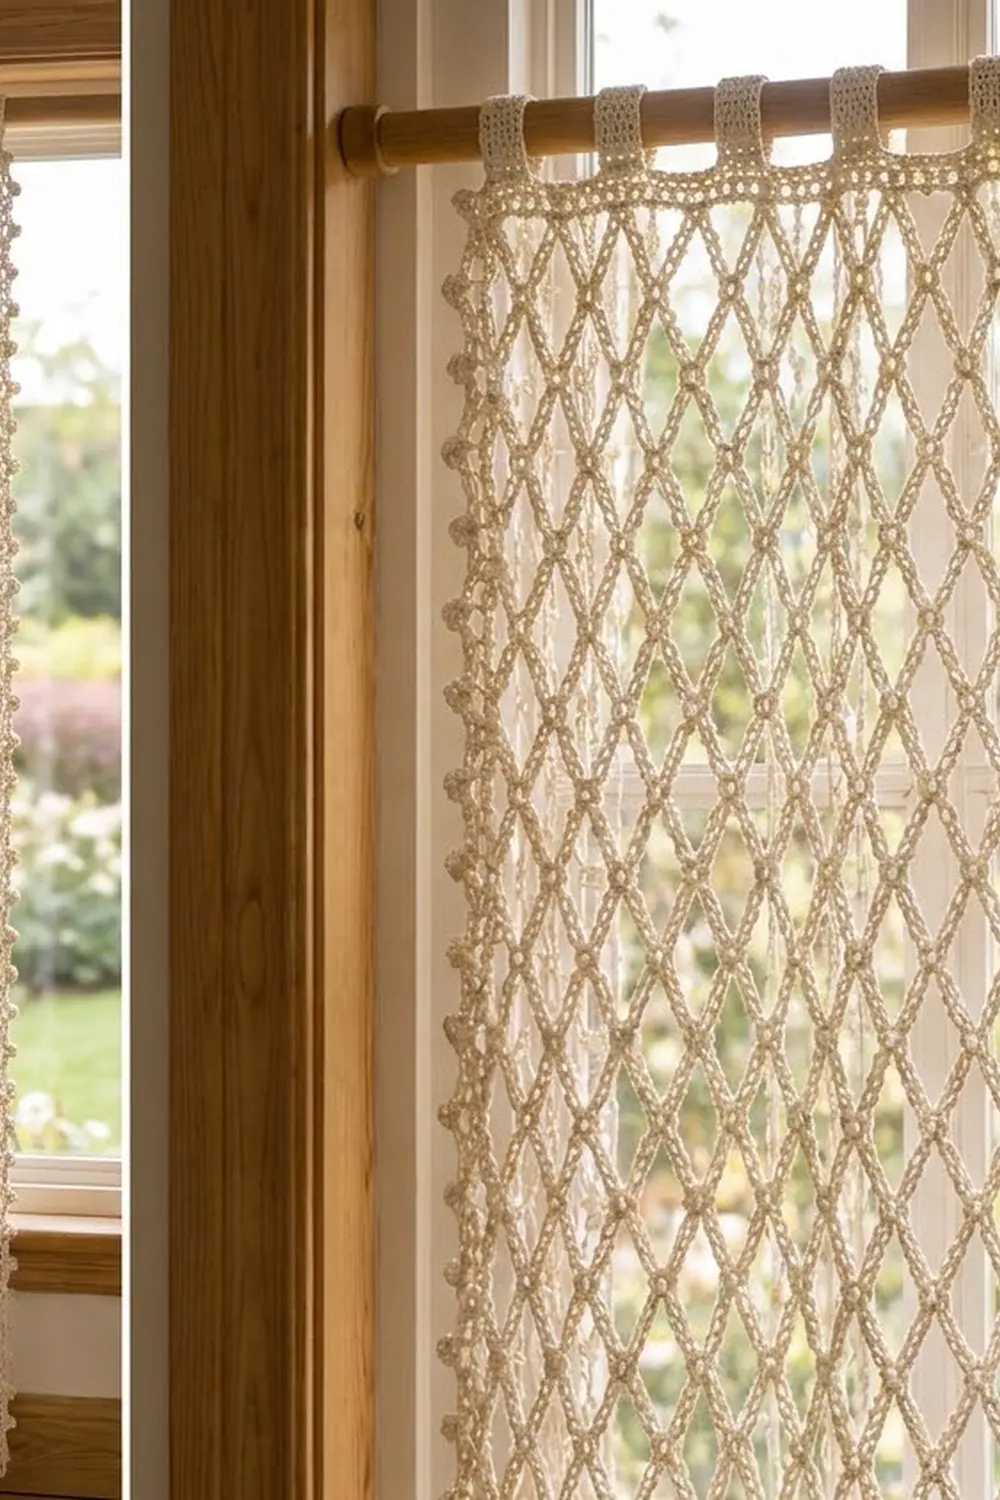
This curtain panel lets sunlight through an open diamond lattice. Chain arches cross each other in offset rows, and each place where they meet is anchored by a small cluster stitch. The effect is a little like hand-knotted macramé, but it’s all crochet.
The panel is worked in one soft ivory cotton, so it suits farmhouse, cottage, and Scandinavian rooms. A solid band along the top keeps the panel straight, nine tabs slide over a standard rod, and a picot edge finishes the sides and bottom.
The pattern uses US crochet terms. The finished panel measures about 29 in wide × 58.5 in long (73.7 × 148.6 cm), not counting the tabs. When folded, the tabs add about 2.25 in (5.7 cm) above the band.
You make the panel in one piece. First you work the lattice body in rows, starting from a foundation chain. Then you work two border rounds all the way around, a three-row band across the top, and finally the tabs, which are worked straight up from the band. There are no pieces to join.
Finished Size and Construction
- Finished size: about 29 × 58.5 in (73.7 × 148.6 cm), excluding tabs
- Skill level: Intermediate
- Terminology: US crochet terms
- Yarn weight: Worsted (#4) cotton
- Hook: US H-8 (5 mm)
- Number of pieces: 1 (single panel)
- Layout: One rectangle with 9 tabs along the top
- Lattice body (before border): 28 × 56.25 in (71.1 × 142.9 cm)
- Border depth: about 0.5 in (1.3 cm) on the sides and bottom; about 1.75 in (4.4 cm) at the top, including the band
- Tabs: 1.4 in (3.6 cm) wide, about 6 in (15.2 cm) long before folding
Materials
Yarn: Use a smooth, tightly plied worsted-weight cotton or cotton blend. Firm cotton keeps the lattice crisp and stops the arches from sagging. Avoid fuzzy or very soft acrylic, because it blurs the diamond outlines.
- Ivory/cream: 750 g, about 1,275 m (1,394 yd), based on 85 m per 50 g ball
These quantities include a margin of about 15% for the gauge swatch and small tension differences. Buy all the yarn from the same dye lot.
Tools:
- US H-8 (5 mm) crochet hook
- 4 locking stitch markers
- Tapestry needle
- Scissors
- Measuring tape
- Blocking mats or a clean carpet, plus rust-proof pins
- Spray bottle
Abbreviations (US Terms)
- ch – chain
- sl st – slip stitch
- sc – single crochet
- dc – double crochet
- tr – treble crochet
- sk – skip
- sp – space
- st(s) – stitch(es)
- RS / WS – right side / wrong side
Special stitches
- Cl (3-dc cluster): [Yo, insert hook in the indicated ch, yo, pull up a loop, yo, draw through 2 loops] 3 times in the same ch, then yo and draw through all 4 loops on the hook. This makes the small knot at each lattice crossing.
- Picot: Ch 3, then sl st in the 3rd ch from the hook.
Gauge and Checkpoints
Lattice gauge (blocked): 1 repeat (one ch-5 loop plus one Cl) = 2 in (5.1 cm) wide, and 8 rows = 10 in (25.4 cm) tall.
Border gauge: 7 sc = 2 in (5.1 cm).
Test piece: Ch 26 and work Rows 1–3 below, adjusting the counts for 4 repeats. Row 1 has 5 sc and 4 loops; Row 2 has 4 Cl; Row 3 has 3 Cl. Repeat Rows 2–3 until you have 9 rows. Pin the swatch out flat, mist it, and let it dry.
- The width should be 8 in (20.3 cm).
- Rows 2–9 should measure 10 in (25.4 cm).
If the swatch is too big, go down to a G-6 (4 mm) hook, or make your chains a little shorter. If it is too small, go up to an I-9 (5.5 mm) hook. Because the lattice stretches, always measure it pinned flat without stretching, never while it hangs off your hook.
Checkpoints during the project:
- After Row 1: 28 in (71.1 cm) wide when laid flat
- After Row 21: 26.25 in (66.7 cm) long
- After Row 45: 56.25 in (142.9 cm) long
- After Border Rnd 2: 29 in (73.7 cm) wide
- After the band: 58.5 in (148.6 cm) long
Lattice Body
Foundation: Ch 86. This is a multiple of 6 plus 2.
Row 1 (RS): Sc in the 2nd ch from the hook. Ch 5, sk the next 5 ch, sc in the next ch; repeat from * across. (15 sc, 14 ch-5 loops)
Row 2 (WS): Ch 4 (counts as tr), ch 2. Cl in the 3rd (center) ch of the next ch-5 loop. Ch 5, Cl in the 3rd ch of the next ch-5 loop; repeat from * 12 more times. Ch 2, tr in the last sc and turn. (14 Cl, 13 ch-5 loops, 2 ch-2 half-loops, 2 edge tr)
The ch-2 plus the Cl fill half a repeat, so the edge stays straight.
Row 3 (RS): Ch 1, sc in the first tr. Ch 5, Cl in the 3rd ch of the next ch-5 loop; repeat from * 12 more times. Ch 5, sc in the 4th ch of the turning ch-4 and turn. (13 Cl, 2 edge sc, 14 ch-5 loops)
Each Row 3 loop arches over a Row 2 cluster, which closes the diamonds. Row 3 has the same layout as Row 1: 15 anchor points and 14 loops. That means you work Row 2 into it in exactly the same way.
Rows 4–45: Repeat Rows 2–3 another 21 times. You finish on a Row 3, which is Row 45. Row 45 has 13 Cl, 2 sc, and 14 ch-5 loops.
The body should now measure 28 × 56.25 in (71.1 × 142.9 cm) when laid flat. Fasten off.
Border
Border gauge: 7 sc = 2 in (5.1 cm), or 3.5 sc per inch.
In this pattern, the ch-2 corner spaces are not counted in the per-side totals.
Rnd 1 (sc foundation)
With RS facing, join the yarn in the first sc of Row 45, at the top right.
- Top: Ch 1, sc in the same sc. [6 sc in the next ch-5 loop, sc in the next Cl] 13 times. 6 sc in the last loop, sc in the last sc. This is a trim round: 15 sc (one in each of the 2 sc and 13 Cl) + 84 sc (6 in each of the 14 loops) = 99 sc.
- Corner: Ch 2.
- Side: Work down the row ends. Put 4 sc in each Row-3-type row end (the short sc edges) and 5 sc around each Row-2-type tr edge. That is 22 × 4 + 22 × 5 = 198 sc. Do not work into the end of Row 1; the corner takes its place.
- Corner: Ch 2.
- Bottom: Work into the free loops of the foundation chain. Sc in the ch at the base of the first sc. [Work 1 sc in each of the next 5 ch, with 2 sc in the center ch (6 sc), then sc in the ch at the base of the next sc] across. That is 15 + 14 × 6 = 99 sc.
- Corner: Ch 2.
- Side: Work up the second side as you did the first. 198 sc.
- Corner: Ch 2, and join with a sl st to the first sc.
Total: 594 sc and 4 ch-2 corners.
Rnd 2 (picot edge)
Ch 1.
- Top: Sc in each of the 99 top sc.
- Corner: (Sc, ch 2, sc) in the corner sp.
- Side: [Sc in each of the next 3 sc, picot] 66 times.
- Corner: (Sc, ch 2, sc) in the corner sp.
- Bottom: [Sc in each of the next 3 sc, picot] 33 times.
- Corner: (Sc, ch 2, sc) in the corner sp.
- Side: [Sc in each of the next 3 sc, picot] 66 times.
- Corner: (Sc, ch 2, sc) in the last corner sp. Join with a sl st and fasten off.
This is also a trim round: 594 sc (one in each existing sc) + 8 corner sc = 602 sc. Each corner adds 1 sc to each of its two sides.
Per side:
- Top: 101 sc
- Each side: 200 sc and 66 picots
- Bottom: 101 sc and 33 picots
Every per-side count is a multiple of 3, so the picots land evenly with no leftover stitches.
Top Band (worked in rows across the 101 top sc)
With RS facing, join the yarn in the first top sc at the right corner.
- Row B1 (RS): Ch 3 (counts as dc). Dc in each of the remaining 100 sc. (101 dc)
- Row B2 (WS): Ch 4 (counts as dc + ch 1). Sk the next st, dc in the next st. [Ch 1, sk 1, dc in the next st] 49 times. (51 dc + 50 ch-1 sps = 101 sts)
- Row B3 (RS): Ch 1. Sc in each dc and each ch-1 sp, ending in the 3rd ch of the turning ch-4. (101 sc) Fasten off.
The three band rows add about 1.25 in (3.2 cm). Add the 0.5 in (1.3 cm) from Rnds 1–2 on each end of the body: 0.5 + 56.25 + 0.5 + 1.25 = 58.5 in (148.6 cm).
Tabs (make 9)
Place markers in Row B3 to mark where each tab starts: sts 1, 13, 25, 37, 49, 61, 73, 85, and 97. Each tab uses 5 sts, and there are 7 sts between tabs. The math works out exactly: 9 × 5 + 8 × 7 = 101.
- Row 1: With WS facing, join the yarn at a marker. Ch 1, sc in the same st and in the next 4 sts. (5 sc)
- Rows 2–24: Ch 1, turn, sc in each sc. (5 sc)
Each tab is about 6 in (15.2 cm) long. Fasten off, leaving a 12 in (30.5 cm) tail. Fold the tab to the back and whipstitch its last row to the back of Row B1. This makes a loop that rises about 2.25 in (5.7 cm) and fits rods up to 1.25 in (3.2 cm) in diameter.
Final Blocking
- Weave in all ends along solid stitches, such as the clusters, band, or border, never along the chain arches.
- Soak the panel in cool water for 15 minutes, then press the water out in a towel. Don’t wring it.
- Lay the panel flat RS up. Pin the four corners to 29 × 58.5 in (73.7 × 148.6 cm).
- Pin every Cl along the sides and through the center so that each diamond opens evenly. The diamonds should be about 2 in (5.1 cm) across.
- Pin out each picot.
- Let the panel dry completely, which takes 24–48 hours.
- Hang the panel for a day before you judge its final length. Cotton lattice can drop 0.5–1 in (1.3–2.5 cm).
Final Quality-Control Checklist
- Every row has the correct count: 14 Cl on Row-2 types, and 13 Cl plus 2 sc on Row-3 types.
- The diamonds line up in straight vertical columns.
- Rnd 1 has 99 sc on the top and bottom and 198 sc on each side.
- Rnd 2 has 66 picots on each side and 33 on the bottom.
- The band rows each have 101 sts, and the ch-1 spaces are evenly spaced.
- The 9 tabs are evenly spaced, and each one has 24 rows.
- The panel measures 29 × 58.5 in (73.7 × 148.6 cm) after blocking.
Troubleshooting
- Side edges wave or flare: You put too many sc into the row ends in Rnd 1. Keep exactly to 4 and 5 sc per row end.
- Side edges pull in: Your chains are tight. Go up one hook size for the ch-5 loops only.
- The diamonds slant: You worked a Cl into the wrong chain of the loop. It must go in the 3rd (center) ch every time.
- The band ruffles: Count Row B1 again; it must have exactly 101 dc.
- The tabs twist: Join the tabs with WS facing, and keep your turning chains on the same edge.
- The panel is too short: Add Rows 2–3 in pairs. Each pair adds 2.5 in (6.4 cm) and 9 sc to each side in Rnd 1, plus 3 picots in Rnd 2.
Care
Hand-wash or machine-wash cool on a gentle cycle inside a mesh bag. Reshape the panel and dry it flat, or rehang it while damp so the weight straightens the lattice.
Final Notes
Here is the full measurement chain, step by step:
- Gauge: 1 repeat = 2 in (5.1 cm) and 8 rows = 10 in (25.4 cm).
- Lattice body: 14 repeats and 45 rows give 28 × 56.25 in (71.1 × 142.9 cm).
- Border Rnd 1: At 3.5 sc per inch, the body takes 99 sc on the top and bottom and 198 sc on each side.
- Border Rnd 2: The picot round brings the panel to 29 in (73.7 cm) wide.
- Top band: The 101-stitch band brings the panel to 58.5 in (148.6 cm) long.
- Tabs: Nine 5-stitch tabs fit across the band exactly.
Check your gauge first, count at every checkpoint, and the panel will hang straight.
Happy crocheting!