

The Lavender Lattice Flower Valance is a light, lacy café-style curtain made of 18 joined flower motifs. Every motif has a double flower: short inner petals around an open center ring, then a larger ring of scalloped outer petals. A cream chain lattice holds all the motifs together and leaves small diamond windows for the light to come through.
Two colors, lavender and cream, swap places from motif to motif. Motif A has a cream center inside lavender outer petals. Motif B has a lavender center inside cream outer petals. Laid out in a checkerboard, they give the valance a soft cottage look. Lavender tabs hang it from a rod, and a lavender tassel finishes the bottom of each column.
This pattern uses US crochet terms. The joined motif panel measures 33 in (83.8 cm) wide by 16.5 in (41.9 cm) tall. The tabs stand about 2 in (5.1 cm) above it and the tassels hang 4.5 in (11.4 cm) below it, so the total drop is about 23 in (58.4 cm).
Construction is simple. You work each motif in the round from a magic ring. The last round of each motif is a cream round of chain loops, and you join each new motif to its neighbors as you work that round (join-as-you-go). Then you crochet a tab onto the top of each top-row motif and tie a tassel to the bottom of each bottom-row motif.
Finished Size and Construction
- Finished size: 33 in x 16.5 in (83.8 cm x 41.9 cm) motif panel; about 23 in (58.4 cm) total drop including tabs and tassels
- Skill level: Intermediate (easy rounds, plus join-as-you-go)
- Terminology: US crochet terms
- Yarn weight: DK (#3 light), cotton or cotton blend
- Hook: 3.5 mm (E-4)
- Number of pieces: 18 motifs (9 Motif A, 9 Motif B), joined into one panel
- Layout: 6 columns x 3 rows, checkerboard
- Piece size: 5.5 in (14.0 cm) center to center when joined; 4.5 in (11.4 cm) across the outer petals
- Size before border: 33 in x 16.5 in (83.8 cm x 41.9 cm)
- Border depth: no flat border band; tabs add 2 in (5.1 cm) above and tassels add 4.5 in (11.4 cm) below
Materials
Use a smooth DK cotton or cotton blend with good stitch definition. Cotton keeps the petals crisp, blocks well, and won’t fuzz in sunlight. Choose a cream that is warm rather than stark white, and a soft, slightly gray lavender, so the two colors look gentle together in the light.
- Color 1, Cream: 150 g, about 345 m (377 yd)
- Color 2, Lavender: 150 g, about 345 m (377 yd)
These quantities include a margin of 25–40% over the expected use (around 108 g cream and 120 g lavender), so you have spare yarn for swatching and any frogging.
Tools:
– 3.5 mm (E-4) crochet hook
– Tapestry needle
– Scissors
– Stitch markers (4–6)
– Tape measure
– A stiff card 4 in (10.2 cm) tall, for tassels
– Blocking mats, rust-proof pins, and a spray bottle
– A curtain rod up to 1.25 in (3.2 cm) in diameter
Abbreviations (US Terms)
- ch – chain
- sl st – slip stitch
- sc – single crochet
- hdc – half double crochet
- dc – double crochet
- st(s) – stitch(es)
- sp – space
- R – round
Special technique: join-as-you-go (JAYG) loop. Wherever a ch-7 loop is going to be joined to a neighbor, work it as: ch 3, sl st into the 4th (center) ch of the neighbor’s matching loop, ch 3. This still makes 7 sts, so the joined loop is exactly as long as a free ch-7 loop.
Gauge and Checkpoints
Swatch gauge: 20 sc and 22 rows = 4 in (10.2 cm) in rows of sc. This gauge matters most for the tabs.
Motif gauge: One finished, unjoined motif measures 5.5 in (14.0 cm) from loop tip to opposite loop tip, lightly stretched.
Make one full Motif A first and check it before you go on. Measure flat with no stretching unless the step says otherwise.
| Stage | Diameter |
|---|---|
| After R1 | 1 in (2.5 cm) |
| After R3 (inner flower) | 2.75 in (7.0 cm) |
| After R5 (outer flower) | 4.5 in (11.4 cm) |
| After R6 (lattice loops, lightly stretched) | 5.5 in (14.0 cm) |
If your motif is too big, go down to a 3.25 mm hook. If it is too small, go up to a 3.75 mm hook. Every 0.25 in (0.6 cm) of error per motif adds up to 1.5 in (3.8 cm) across the six columns, so fix gauge now.
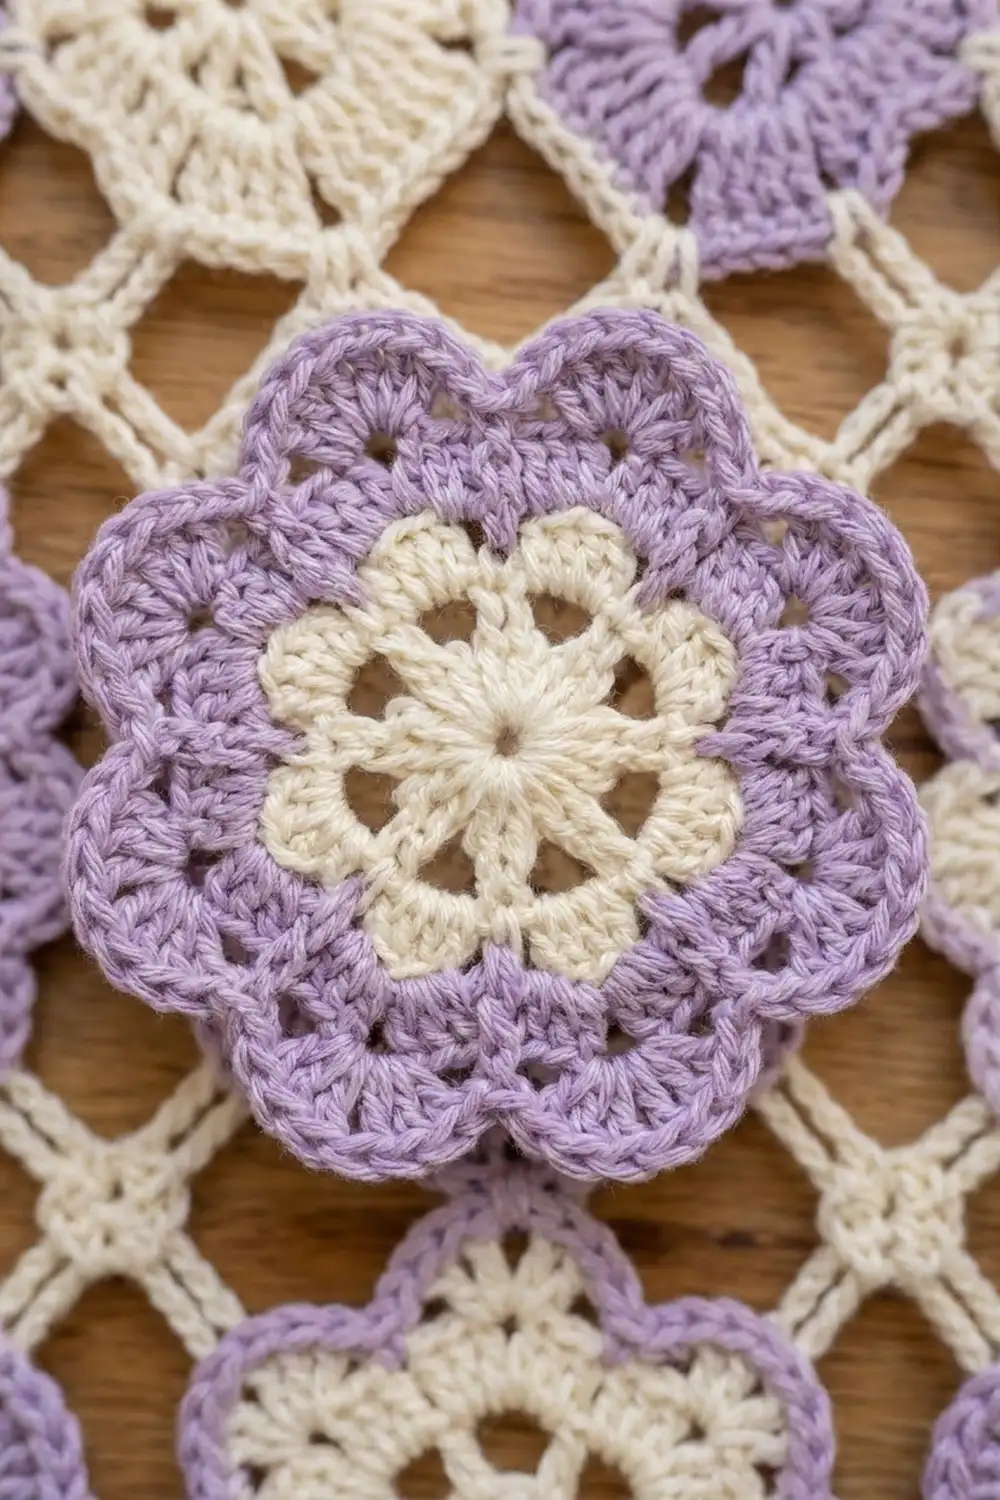
Motif A (Cream Center, Lavender Outer Petals)
Make 9.
R1 (Cream): Make a magic ring. Ch 3 (counts as first dc), 15 dc in ring. Pull the ring closed, leaving a small hole about 1/4 in (0.6 cm) wide. Sl st to top of beginning ch-3. (16 dc)
R2 (Cream): Ch 1, sc in same st, ch 3, skip next st, sc in next st, ch 3, skip next st; repeat from * 6 more times. Sl st to first sc. (8 sc, 8 ch-3 sps)*
R3 (Cream): Sl st into the first ch-3 sp. In each ch-3 sp around, work (sc, hdc, 3 dc, hdc, sc). Sl st to first sc. Fasten off. (8 inner petals, 56 sts: 7 per petal)
R4 (Lavender): This round sits behind the inner petals. Join lavender with a sc worked around the back of any R2 sc, so the loop stays behind R3. Ch 5, sc around the back of the next R2 sc, ch 5; repeat from * 6 more times. Sl st to first sc. (8 sc, 8 ch-5 loops; one loop behind each inner petal)*
R5 (Lavender): Sl st into the first ch-5 loop. In each ch-5 loop around, work (sc, hdc, 7 dc, hdc, sc). Sl st to first sc. Fasten off. (8 outer petals, 88 sts: 11 per petal)
Each outer petal is a smooth, rounded scallop, and its 4th dc is the petal tip.
R6 (Cream lattice round): Join cream with a sc in the 4th (center) dc of any petal. Ch 7, sc in center dc of next petal, ch 7; repeat from * 6 more times. Sl st to first sc. Fasten off. (8 sc, 8 ch-7 loops; 64 ch)*
Each ch-7 loop now sits between two petals. Turn the motif so one loop points straight up. Number the loops clockwise: 1 = top (N), 2 = NE, 3 = right (E), 4 = SE, 5 = bottom (S), 6 = SW, 7 = left (W), 8 = NW.
Motif B (Lavender Center, Cream Outer Petals)
Make 9.
R1–R3: Work as Motif A R1–R3 in lavender. Fasten off. (56 sts, 8 inner petals)
R4–R5: Work as Motif A R4–R5 in cream. (88 sts, 8 outer petals) Do not fasten off.
R6 (Cream): Sl st in next 5 sts (hdc, dc, dc, dc, dc) to reach the center dc of the first petal. Ch 1, sc in same st, then work as Motif A R6 from “Ch 7”. (8 sc, 8 ch-7 loops)
Both motifs end with a cream lattice round, so the whole panel has one consistent cream web between the flowers.
Make All Pieces
- Motif A: 9 (cream R1–R3, lavender R4–R5, cream R6)
- Motif B: 9 (lavender R1–R3, cream R4–R5, cream R6)
Make only the first motif of each type in full. Every other motif gets its R6 worked as part of the joining (see below). So make 8 more Motif A and 8 more Motif B up to R5, and keep them ready for joining.
Layout grid (top row first):
Row 1:  A  B  A  B  A  B
Row 2:  B  A  B  A  B  A
Row 3:  A  B  A  B  A  B
Joining
Method: Join-as-you-go on R6. Work the motifs in order, left to right, top row first. Every motif after the first is joined while you work its own cream R6.
Stitch-to-stitch logic: Each motif shares exactly one loop with each side neighbor and one loop with each neighbor above or below:
- To the motif on its left, join loop 7 to that motif’s loop 3.
- To the motif above, join loop 1 to that motif’s loop 5.
Work R6 as normal. When you reach a loop that needs joining, work a JAYG loop: ch 3, sl st into the 4th ch of the neighbor’s matching loop, ch 3. Then continue with the next sc. All other loops stay as free ch-7 loops. Loops 2, 4, 6, and 8 (the diagonals) are never joined. Where four motifs meet, they frame an open diamond window.
Join count: 5 side joins per row x 3 rows = 15, plus 6 vertical joins x 2 row gaps = 12, for 27 join points total.
Tension advice: Keep the ch 3 on each side of the join at the same tension as your free ch-7 loops. Tight joining chains pull the motifs together and close up the diamonds. Loose ones make the panel sag between the tabs. Lay the work flat after each row to check it.
Size checkpoints:
– After Row 1: 33 in (83.8 cm) wide (6 x 5.5 in / 14.0 cm)
– After Row 2: 11 in (27.9 cm) tall
– After Row 3: 16.5 in (41.9 cm) tall (3 x 5.5 in / 14.0 cm)
Border: Tabs and Tassels
This valance has no flat border band. The scalloped motif edges are part of the design, and a solid band across the top would hide them. Instead, the edges get two finishes: tabs along the top and tassels along the bottom. The left and right edges stay open, showing the free loops 7 (column 1) and loops 3 (column 6).
Border gauge: 20 sc and 22 rows = 4 in (10.2 cm), as in your swatch. So 8 sc = 1.6 in (4.1 cm) wide and 22 rows = 4 in (10.2 cm) long.
Tabs (Lavender), Top Edge
Make one tab on each of the 6 top-row motifs, worked into loop 1.
Row 1: With the right side facing, join lavender in loop 1. Work 8 sc into the loop. Turn. (8 sc)
Rows 2–22: Ch 1, sc in each st across. Turn. (8 sc each row)
Fasten off, leaving a 10 in (25.4 cm) tail. Fold the tab to the back. Sew the 8 sts of Row 22 to the back of the motif along the R5 petal bases on each side of loop 1, about 1/2 in (1.3 cm) below the top of the loop.
Top-edge count: 6 tabs x 8 sc = 48 sts worked into the top edge, exactly 8 per top motif and none at the seams.
Why the math works: A ch-7 loop holds 8 sc without ruffling or gaping. At 5 sc per in, those 8 sc make a 1.6 in (4.1 cm) tab, narrower than the loop, so the scallop still shows on each side. The 4 in (10.2 cm) tab folds into a loop that stands about 2 in (5.1 cm) above the motifs and slides easily over a rod up to 1.25 in (3.2 cm) thick. For a thicker rod, add 2 rows for each extra 1/4 in (0.6 cm) of rod diameter. Because each tab sits at the center of its column, the 5.5 in (14.0 cm) spacing spreads the weight evenly.
Tassels (Lavender), Bottom Edge
Make 6, one for loop 5 of each bottom-row motif.
- Wrap lavender 30 times around the 4 in (10.2 cm) card.
- Slide an 8 in (20.3 cm) strand under the wraps at the top edge and knot it tightly. This is your tie.
- Cut the wraps along the bottom edge.
- Wrap a second strand 6 times around the bundle about 1/2 in (1.3 cm) below the top to form the neck. Knot it and bury the ends inside the tassel.
- Thread the tie through loop 5 of the bottom motif, knot it on the back, and weave in the ends.
- Trim the skirt evenly so the tassel hangs 4.5 in (11.4 cm) below the motif, including the head.
Bottom-edge count: 6 tassels x 1 per bottom motif = 6 tassels, with no extra stitches added.
Final Blocking
- Weave in all ends before blocking. Bury cream ends in cream stitches and lavender ends in lavender stitches.
- Pin the panel face up to 33 in x 16.5 in (83.8 cm x 41.9 cm).
- Pin each motif center on a 5.5 in (14.0 cm) grid.
- Pin out the tip of every free loop so the diamond windows open evenly.
- Ease each outer petal into a round scallop with your fingers.
- Spray until damp, not soaked. Leave the tabs and tassels unpinned.
- Let it dry completely, at least 12 hours.
- Unpin, steam the tassels lightly, and comb the strands straight. Trim if needed.
Final Quality-Control Checklist
- 18 motifs: 9 A and 9 B, in a correct checkerboard
- Each motif: 16 dc, 8 inner petals, 8 outer petals, 8 lattice loops
- 27 join points, all with ch 3 on each side
- Panel is 33 in x 16.5 in (83.8 cm x 41.9 cm)
- 6 tabs, each 8 sc wide and 22 rows long, sewn level
- 6 tassels at an even 4.5 in (11.4 cm) drop
- All ends woven in and invisible from the front
Troubleshooting
- Center hole too big: Pull the magic ring tighter before you join R1, and weave the tail around it once more.
- Outer petals cup: Your R4 loops are too short or tight. Loosen your ch 5.
- Outer petals ruffle: Your R4 loops are too long. Make your ch 5 a little tighter or go down a hook size.
- Panel narrower than 33 in (83.8 cm): Your joining chains are tight. Redo the joins at a looser tension, or block harder.
- Diamonds lopsided: You joined a diagonal loop by mistake. Check that only loops 1, 3, 5, and 7 are joined.
- Tabs twist: Sew all 8 sts of the last row flat across the back.
- Valance sags in the middle: Make sure all 6 tabs are the same length.
Care
Hand wash in cool water with mild soap, press out the water in a towel, and dry flat, re-pinning to 33 in x 16.5 in (83.8 cm x 41.9 cm). Hang away from strong direct sun to keep the lavender from fading.

Final Notes
Every measurement in this valance comes back to the 5.5 in (14.0 cm) motif. Each motif grows from 1 in (2.5 cm) after R1 to 2.75 in (7.0 cm) after R3, 4.5 in (11.4 cm) after R5, and 5.5 in (14.0 cm) after R6. Six columns give 33 in (83.8 cm) of width and three rows give 16.5 in (41.9 cm) of height. The 2 in (5.1 cm) tabs and 4.5 in (11.4 cm) tassels bring the total drop to about 23 in (58.4 cm). Check your first motif carefully, and the rest of the valance will follow.
Happy crocheting!