

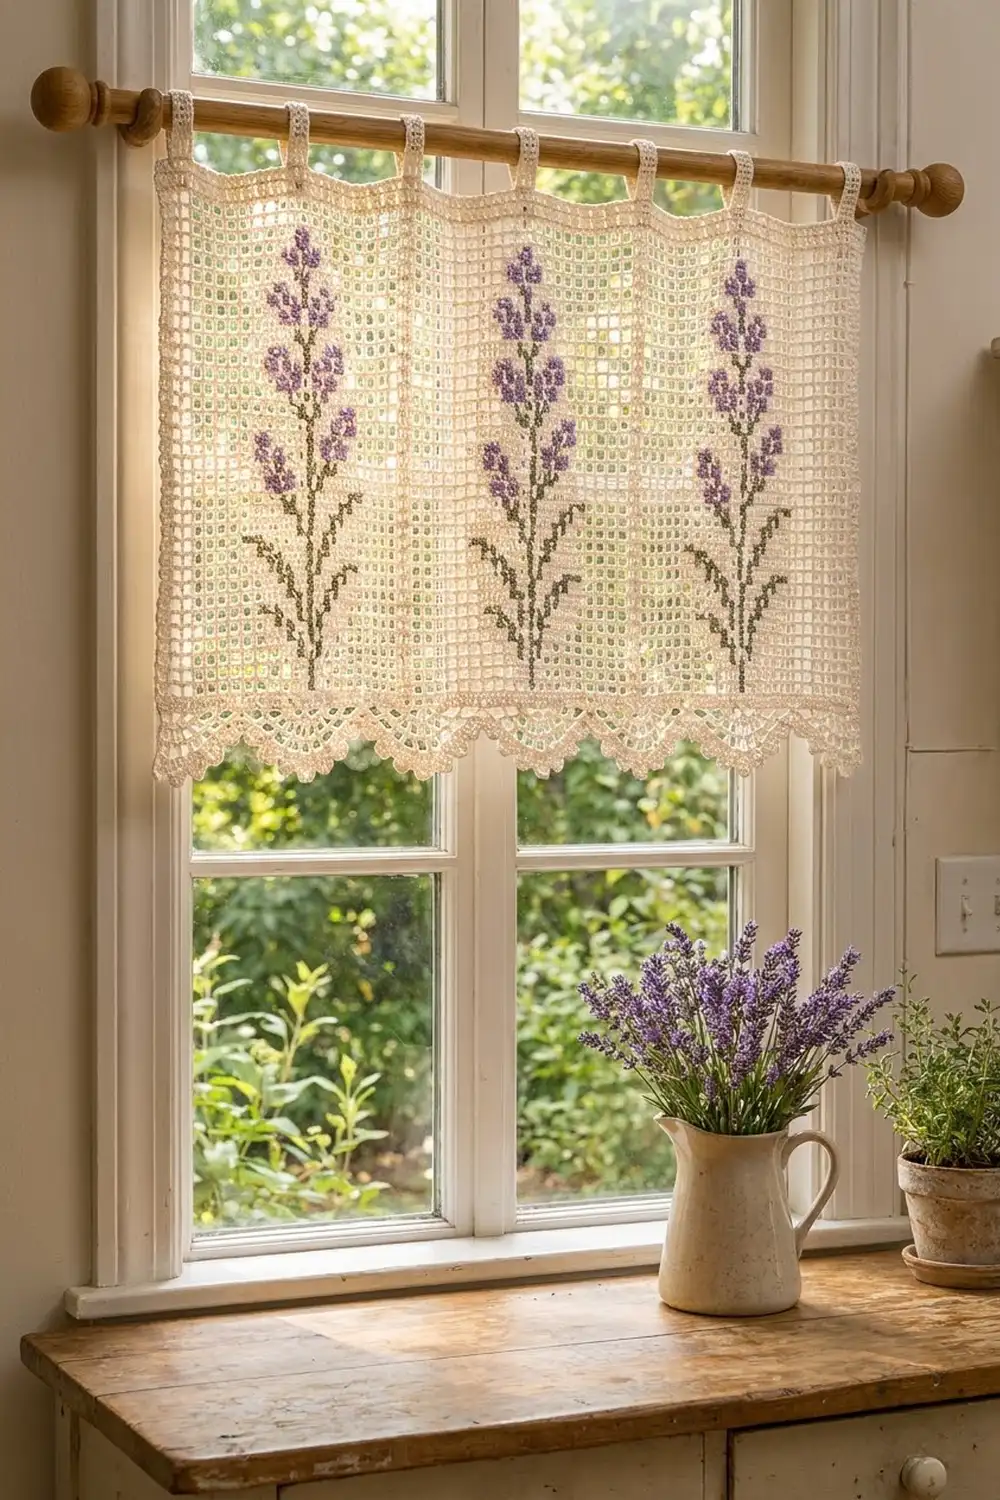
This valance brings a cottage-garden look to a kitchen or breakfast-nook window. A cream filet mesh lets the light through. Six lavender sprigs stand in a row across it, and a scalloped picot edge softens the bottom.
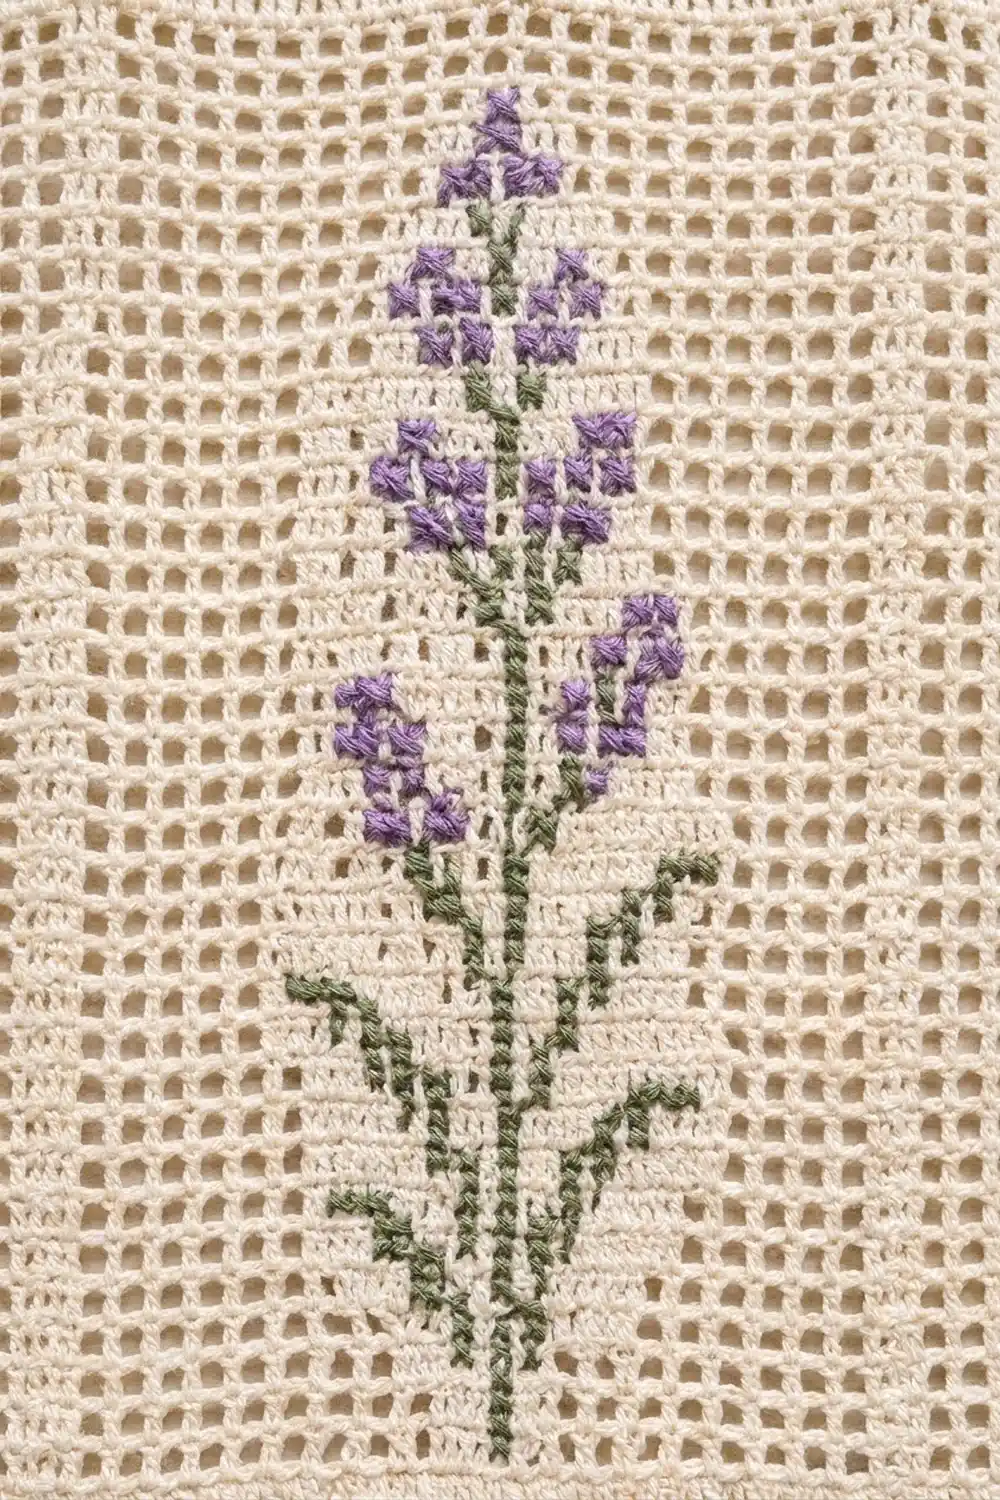
The palette is three colors: cream for the crochet, soft purple for the florets, and sage green for the stems and leaves. The sprigs are cross-stitched onto the finished mesh, so the crochet itself is worked in one color only.
All instructions use US crochet terms. The finished valance is 36.8 in (93.5 cm) wide and 16.7 in (42.4 cm) deep from the top edge to the scallop points. The tab loops add about 2.4 in (6.1 cm) above the top edge.
You work the panel in rows from the bottom up: one solid row, a mesh body with a solid block at each edge, and two solid rows at the top. Next you crochet ten tabs onto the top edge and add the scalloped trim along the foundation chain. Last, you cross-stitch the six sprigs and block the piece.
Finished Size and Construction
- Finished size: 36.8 in × 16.7 in (93.5 cm × 42.4 cm), plus tab loops of about 2.4 in (6.1 cm)
- Skill level: Intermediate
- Terminology: US
- Yarn weight: Super fine (#1) mercerized cotton, or size 3 crochet thread
- Hook: 2.75 mm (C-2)
- Number of pieces: 1 panel (tabs and edging are worked directly onto it)
- Layout: 6 lavender sprigs in a single horizontal row
- Piece size before border: 36.8 in × 15.2 in (93.5 cm × 38.6 cm), which is 92 meshes wide and 38 rows tall
- Border: scalloped edging on the bottom edge only, 1.5 in (3.8 cm) deep
Materials
Use a smooth, mercerized cotton. It gives crisp mesh squares, holds its shape in sunlight, and washes well. Avoid fuzzy or very stretchy fibers, which blur the filet grid.
- Cream (main color): 300 g, about 1,050 m (175 m per 50 g)
- Lavender purple (florets): 25 g, about 88 m, same weight
- Sage green (stems and leaves): 25 g, about 88 m, same weight
All quantities include a margin of about 15%.
Tools:
– 2.75 mm (C-2) crochet hook
– Blunt tapestry needle
– Locking stitch markers
– Rust-proof pins and a blocking board at least 40 in × 20 in (101.6 cm × 50.8 cm)
– Measuring tape
– Spray bottle
Abbreviations (US Terms)
- ch: chain
- sl st: slip stitch
- sc: single crochet
- dc: double crochet
- tr: treble crochet
- sk: skip
- st(s): stitch(es)
- sp: space
- RS / WS: right side / wrong side
Special stitches
- Mesh: ch 2, sk 2 sts, dc in next st.
- Block: dc in each of the next 3 sts. Over a ch-2 sp, work 2 dc in the sp and then 1 dc in the next dc.
- Fan: (tr, ch 2) 6 times in the same st, then tr in that same st. That gives 7 tr and 6 ch-2 sps.
- Picot pair: (sc, ch 3, sc) in the same sp.
Gauge and Checkpoints
Gauge: 10 meshes and 10 rows = 4 in (10.2 cm) in filet mesh. One mesh square is 0.4 in (1.0 cm) wide and 0.4 in (1.0 cm) tall.
Make a test swatch first. Ch 39. Dc in the 4th ch from the hook and in each ch across: 37 dc, counting the skipped chains as a dc. Then work 11 rows of mesh: ch 5 (counts as dc + ch 2), sk 2, dc in next dc, then ch 2, sk 2, dc in next across, for 12 meshes. Block the swatch, then measure the center 10 meshes and the center 10 rows.
- Swatch too big (10 meshes measure more than 4 in / 10.2 cm): go down 0.25 mm in hook size.
- Swatch too small: go up 0.25 mm in hook size.
- Squares taller than they are wide: pull the dc loops a little shorter. Squares wider than tall: loosen the chains slightly.
Checkpoints:
1. After Row 1: the row measures 36.8 in (93.5 cm).
2. After Row 10: the panel is 4 in (10.2 cm) tall.
3. After Row 38: the panel is 15.2 in (38.6 cm) tall.
4. After the edging: the total depth is 16.7 in (42.4 cm).
Main Panel
The panel is 92 mesh units wide. Each row has 277 stitch positions (3 × 92 + 1). The dc “posts” sit at positions 1, 4, 7 and so on up to 277, for 93 posts in all.
Row 1 (solid band): Ch 279. Dc in the 4th ch from the hook and in each ch across. Turn.
(277 dc. The skipped ch counts as the first dc.)
Row 2 (first mesh row): Ch 3 (counts as dc). Dc in each of the next 3 dc to make the first block. Ch 2, sk 2 dc, dc in next dc; repeat from * 90 more times, for 90 meshes. Dc in each of the next 2 dc, then dc in the top of the turning ch to make the last block. Turn.
(1 block + 90 meshes + 1 block = 92 units, 277 positions.)
Mark this side as the RS. All embroidery goes on this face.
Rows 3–36: Ch 3 (counts as dc). Dc in each of the next 3 dc. Ch 2, sk the ch-2 sp, dc in next dc; repeat from * 89 more times. Dc in each of the next 2 dc, then dc in the top of the turning ch. Turn.
(Every row: 1 block + 90 meshes + 1 block.)
The mesh body is now 35 rows tall (Rows 2–36). Check that the panel measures 14.4 in (36.6 cm) from the bottom edge.
Row 37 (conversion to solid): Ch 3 (counts as dc). Dc in each of the next 3 dc. 2 dc in the ch-2 sp, dc in next dc; repeat from * 89 more times. Dc in each of the next 2 dc, then dc in the top of the turning ch. Turn.
(4 dc for the first block + 90 × 3 dc over the meshes + 3 dc for the last block = 277 dc.)
Row 38: Ch 3 (counts as dc). Dc in each st across. Do not fasten off yet if you plan to start the first tab here; otherwise fasten off.
(277 dc.)
Checkpoint: the panel should measure 36.8 in × 15.2 in (93.5 cm × 38.6 cm).
Tabs
There are ten tabs. Each tab is 7 sts wide, about 0.9 in (2.3 cm), and there are 23 sts between tabs.
The tabs fall on these stitch positions of Row 38:
– Tab 1: sts 1–7
– Tab 2: sts 31–37
– Tabs 3–10: each starts 30 sts after the previous one. Tab 10 sits on sts 271–277.
Check: 10 tabs × 7 sts + 9 gaps × 23 sts = 70 + 207 = 277. ✓
Each tab:
- Row T1: With the RS facing, join cream in the first st of the tab. Ch 3 (counts as dc), then dc in each of the next 6 sts. Turn. (7 dc.)
- Rows T2–T12: Ch 3 (counts as dc), dc in each of the next 6 dc. Turn. (7 dc.)
Fasten off, leaving a 12 in (30.5 cm) tail.
Each tab is 4.8 in (12.2 cm) long. Fold it toward the WS and whipstitch Row T12 to the back of Row 37, working stitch to stitch across all 7 sts. Keep the stitches from showing on the RS.
The finished loop stands about 2.4 in (6.1 cm) above the top edge and fits rods up to 1.25 in (3.2 cm) in diameter.
Lavender Cross-Stitch
Work the sprigs after the crochet is finished. Each cross covers one mesh square: the two diagonal legs run from corner to corner where the dc posts meet the chain bars. Work every cross with the top leg slanting the same way. Weave tails through the backs of the nearby crosses; never knot them.
Placement:
– The sprigs fill curtain Rows 5–32, leaving 3 empty mesh rows below them and 4 above.
– Each sprig is 9 meshes wide, 3.6 in (9.1 cm), and 28 rows tall, 11.2 in (28.4 cm).
– Count meshes from the right-hand edge with the RS facing. Mesh 1 and mesh 92 are the solid edge blocks.
– The center columns of the six sprigs fall on meshes 9, 24, 39, 54, 69 and 84. Each sprig sits in a 15-mesh section with 3 blank meshes on each side, so neighboring sprigs are 6 meshes apart.
Chart: P = purple, G = green, . = empty mesh. The chart is read from the bottom row up, and chart row 1 is curtain Row 5. Chart column 5 is the sprig’s center column.
28  . . . . P . . . .
27  . . . P P P . . .
26  . . . P G P . . .
25  . . P P G P P . .
24  . . . P G P . . .
23  . . P P G P P . .
22  . . . . G . . . .
21  . P P . G . P P .
20  . . P P G P P . .
19  . P P . G . P P .
18  . . . . G . . . .
17  P P . . G . . P P
16  . P P . G . P P .
15  . . G . G . G . .
14  . G . . G . . G .
13  . . . . G . . . .
12  G . . . G . . . G
11  . G . . G . . G .
10  . . G . G . G . .
 9  . . . . G . . . .
 8  G . . . G . . . G
 7  . G . . G . . G .
 6  . . G . G . G . .
 5  . . . G G G . . .
 4  . . . . G . . . .
 3  . . . . G . . . .
 2  . . . . G . . . .
 1  . . . . G . . . .
Totals: each sprig uses 40 purple crosses and 43 green crosses. All six sprigs together use 240 purple and 258 green crosses.
Stitch all the green first, then the purple, so the florets sit on top where they touch the stem.
Scalloped Edging
Edging gauge: one fan repeat covers 12 sts, which is 1.6 in (4.1 cm) of the bottom edge. The edging adds 1.5 in (3.8 cm) of depth.
The edging is worked along the bottom edge only. The solid block column on each side already gives a firm, straight finish, so the side edges are not bordered.
Edging Row 1: With the RS facing, join cream in the first free loop of the foundation ch at the right-hand corner. Ch 1, then sc in each free loop across. Turn.
(277 sc: one per existing stitch, 0 added.)
Edging Row 2: Ch 1, sc in the first sc. Sk 5 sc, work a fan in the next sc, sk 5 sc, sc in the next sc; repeat from * 22 more times. Turn.
(23 fans and 24 sc. That is 161 tr and 138 ch-2 sps.)
Edging Row 3: Ch 1, sl st in the first sc. Work a picot pair in each of the 6 ch-2 sps of the next fan, sl st in the next sc; repeat from * 22 more times. Fasten off.
(138 picot pairs and 24 sl sts.)
Why the math works: Each fan repeat uses 12 sts: 1 sc, 5 skipped, 1 fan stitch, and 5 skipped. The next sc is shared with the following repeat. The panel has 277 sts = 12 × 23 + 1, so exactly 23 fans fit, with a sc at both corners. The scallops therefore end evenly at both side edges, and 23 fans × 1.6 in = 36.8 in (93.5 cm), matching the panel width.
Final Blocking
- Weave in all remaining ends along the solid rows or inside the backs of the cross-stitches.
- Soak the valance in cool water with a little wool wash for 15 minutes.
- Press out the water by rolling the valance in a towel. Do not wring it.
- Lay it RS up on the blocking board.
- Pin the top edge straight to 36.8 in (93.5 cm). Measure from the center out to each corner.
- Pin both side edges straight to 15.2 in (38.6 cm), from Row 1 to Row 38.
- Pin out each of the 23 fans. Put one pin at the center picot of each fan so the scallops are rounded and the same depth, 1.5 in (3.8 cm) below the body.
- Run a measuring tape along a few mesh columns and nudge any skewed squares back into line.
- Lay the tabs flat, but do not pin them stretched.
- Mist lightly and let the piece dry completely, which takes about 24 hours, before unpinning.
Final Quality-Control Checklist
- The body measures 36.8 in × 15.2 in (93.5 cm × 38.6 cm).
- Each mesh row has 1 block + 90 meshes + 1 block.
- Rows 1, 37 and 38 each have 277 dc.
- There are 10 tabs, each 7 sts wide with 23 sts between, and all loops are the same length.
- The six sprigs are centered on meshes 9, 24, 39, 54, 69 and 84, and all fall within Rows 5–32.
- Every cross has its top leg slanting the same way.
- There are 23 fans with 6 picot pairs each, ending evenly at both corners.
- No knots or loose tails show on the RS.
Troubleshooting
Valance narrower than 36.8 in (93.5 cm): your chains are tight. Go up a hook size and check the gauge again.
Mesh squares look like tall rectangles: shorten the dc by pulling the first yarn-over snug before you finish the stitch.
Edges wave or flare: check that each mesh row starts with a 4-dc block and ends with 3 dc plus the turning ch. A missing edge stitch pulls the edge inward.
Fans don’t end at the corner: recount Edging Row 1. It must have exactly 277 sc.
Cross-stitches pucker the mesh: you are pulling too hard. Each leg should lie flat across the opening, not tug on the posts.
Tabs twist on the rod: you sewed them off-center. Unpick and re-sew each one stitch to stitch onto the same 7 sts.
Purple looks thin over the mesh: work a second pass on each cross with the same slant.
Care
Hand wash in cool water with a mild detergent and dry flat, reshaping the scallops while the valance is damp. A cool iron through a pressing cloth on the WS will freshen it between washes.
Final Notes
The measurements all build on the gauge. At 10 meshes and 10 rows per 4 in (10.2 cm):
- 92 mesh units make a width of 36.8 in (93.5 cm).
- 38 rows give the 15.2 in (38.6 cm) body.
- 23 fan repeats fit those 277 sts exactly and add a 1.5 in (3.8 cm) edge, for a finished depth of 16.7 in (42.4 cm).
- Ten evenly spaced tabs hang the panel.
Measure at each checkpoint and the valance will come out at the planned size.
Happy crocheting!