

Ginkgo Cascade is a lace curtain made of small fan motifs shaped like ginkgo leaves. Each fan points down. Open spokes radiate from the point, a solid band sits near the top, and a small picot scallop finishes the top edge. A short stem drops from each fan to the one below, so the panel looks like falling leaves when light comes through.
The two colors are warm peach and deep plum, set in a checkerboard. A solid plum band and fifteen plum tab loops run across the top, so the panel slides straight onto a standard rod.
This pattern uses US crochet terms. The finished panel is 49 in (124.5 cm) wide and 85.5 in (217.2 cm) long from the top of the band to the bottom stem tips. With the tab loops it measures 88.5 in (224.8 cm) overall.
Construction overview:
– You make 98 identical fan motifs, each with its own stem.
– You join them in 7 columns and 14 rows: stems to the fan tops below, and corner points to the neighboring fans.
– You work the top band and tabs straight across the top row of motifs.
Finished Size and Construction
- Finished size: 49 in × 85.5 in (124.5 cm × 217.2 cm), plus 3 in (7.6 cm) tab loops
- Skill level: Intermediate
- Terminology: US
- Yarn weight: DK (light, #3) cotton or cotton blend
- Hook: 4.0 mm (G-6)
- Number of pieces: 98 fan motifs (49 peach, 49 plum)
- Layout: 7 columns × 14 rows, checkerboard colors
- Fan size: 7 in (17.8 cm) wide corner to corner × 4 in (10.2 cm) tall; stem 2 in (5.1 cm)
- Vertical repeat per motif: 6 in (15.2 cm)
- Size before border: 49 in × 84 in (124.5 cm × 213.4 cm)
- Border depth: top band 1.5 in (3.8 cm); tab loops 3 in (7.6 cm) above the band
Materials
Choose a smooth mercerized or matte cotton in DK weight, about 200 m per 100 g. Cotton keeps the spokes crisp and drapes well in front of a window. Avoid fuzzy yarns, because they blur the lace.
- Peach: 500 g / 1000 m (5 balls of 100 g / 200 m)
- Plum: 700 g / 1400 m (7 balls of 100 g / 200 m)
Plum needs more yarn because it also makes the top band and the tabs. All quantities include a margin of about 15 percent for gauge differences and joining.
Tools:
– 4.0 mm (G-6) crochet hook
– Tapestry needle
– Locking stitch markers
– Tape measure
– Blocking mats, rust-proof pins and a spray bottle
– Scissors
Abbreviations (US Terms)
- ch – chain
- sl st – slip stitch
- sc – single crochet
- hdc – half double crochet
- dc – double crochet
- tr – treble crochet
- sp – space
- st(s) – stitch(es)
- tch – turning chain
- RS / WS – right side / wrong side
Special stitch – picot: Ch 3, then sl st in the 3rd ch from the hook. A picot does not count as a stitch.
Gauge and Checkpoints
- Double crochet: 18 dc × 10 rows = 4 in (10.2 cm)
- Single crochet: 20 sc × 24 rows = 4 in (10.2 cm)
Make one complete motif first and block it before making the rest. Every later measurement depends on this one fan.
Checkpoints:
– After Row 4: spoke tips span about 5 in (12.7 cm); height from the ring is about 2.75 in (7.0 cm).
– After Row 6: corner to corner is about 7 in (17.8 cm); height is about 3.75 in (9.5 cm).
– Finished fan: 7 in × 4 in (17.8 cm × 10.2 cm); stem 2 in (5.1 cm).
If your fan is too big: go down to a 3.75 mm hook.
If your fan is too small: go up to a 4.5 mm hook.
A difference of 0.5 in (1.3 cm) per fan adds up to 3.5 in (8.9 cm) across 7 columns, so fix it now.
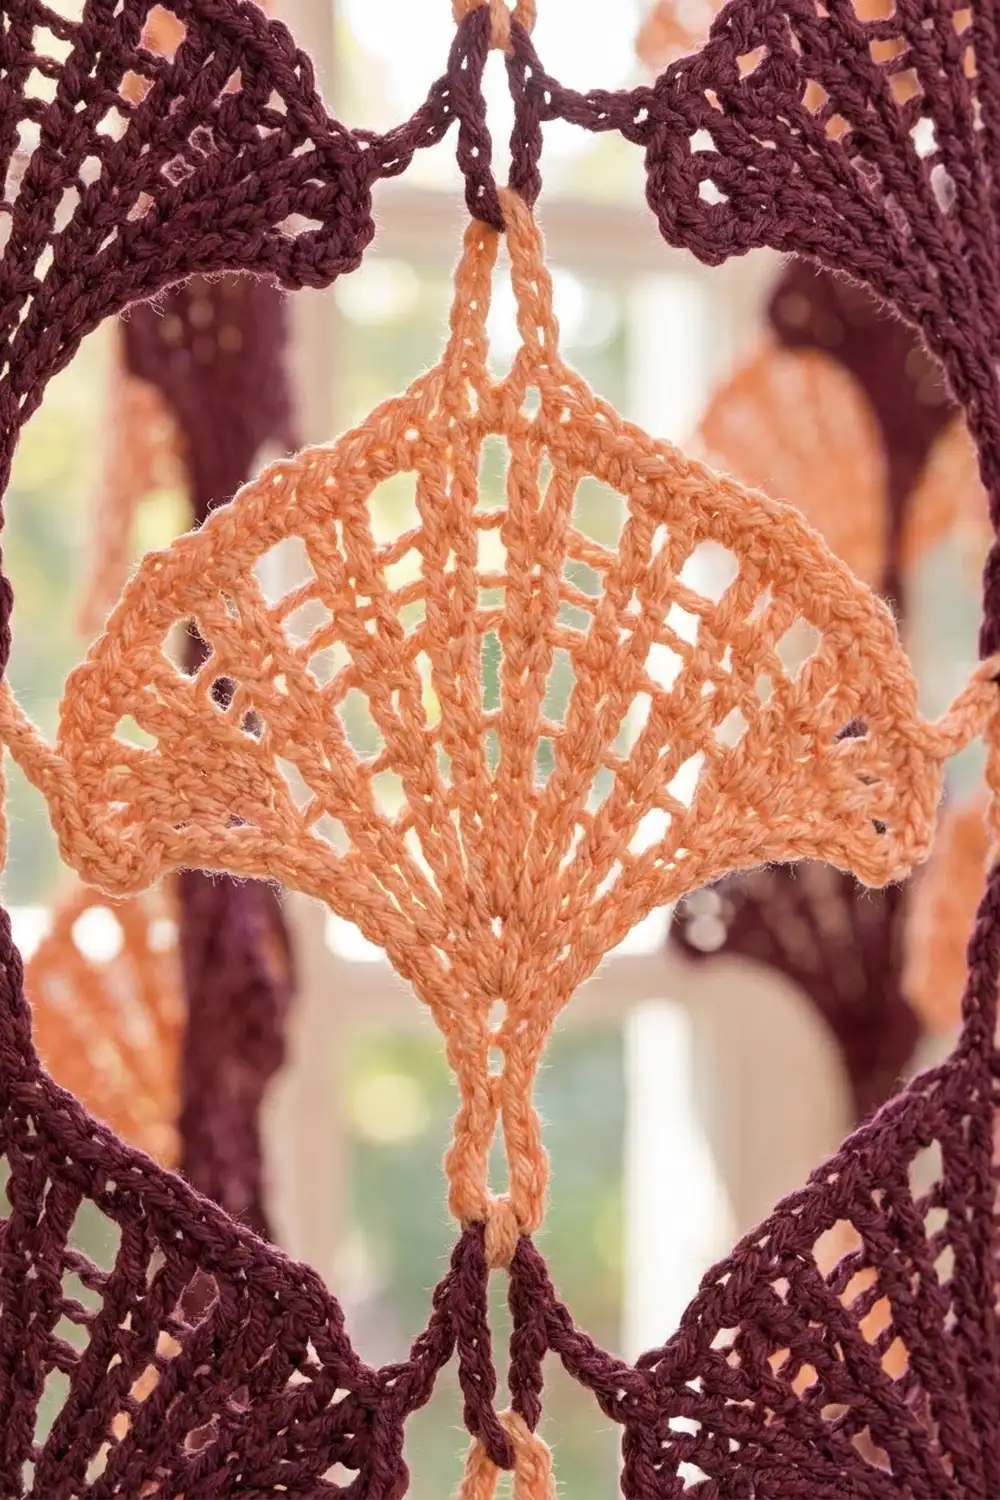
Fan Motif (make 98)
Work in rows from the point upward, turning at the end of each row. The turning chain counts as the first stitch in every row except Row 7.
Ring: Make an adjustable ring.
Row 1 (RS): Ch 3 (counts as dc), 8 dc in the ring. Pull the ring closed until the first and last stitches sit side by side, forming a half circle. Turn. (9 dc)
Row 2 (WS): Ch 5 (counts as tr + ch 1). Tr in next dc, ch 1; repeat from * 6 more times. Tr in the top of the tch. Turn. (9 tr, 8 ch-1 sps)*
Row 3: Ch 6 (counts as tr + ch 2). Tr in next tr, ch 2; repeat from * 6 more times. Tr in the 4th ch of the tch. Turn. (9 tr, 8 ch-2 sps)*
Row 4: Ch 7 (counts as tr + ch 3). Tr in next tr, ch 3; repeat from * 6 more times. Tr in the 4th ch of the tch. Turn. (9 tr, 8 ch-3 sps)*
Rows 2–4 make the open spokes. Each spoke is a column of stitches stacked on the same base stitch, and the spaces get wider on each row so the fan opens out.
Row 5 (conversion row): Ch 3 (counts as dc). 3 dc in the next ch-3 sp. Dc in next tr, 3 dc in next ch-3 sp; repeat from * 6 more times. Dc in the 4th ch of the tch. Turn.
(9 dc worked into the spokes + 24 dc added in the spaces = 33 dc)*
Row 6: Ch 3 (counts as dc), dc in the same st. Dc in each of the next 31 sts. 2 dc in the top of the tch. Turn. (35 dc)
The increases at each end make the small flared side points of the ginkgo leaf.
Row 7 (RS, picot edge): Ch 1 (does not count). Sc in the first 2 sts. Picot, sc in the next 3 sts; repeat from * 10 more times. (35 sc, 11 picots)*
Fasten off and weave in the ring tail.
Picot positions:
– The 6th picot sits exactly at the center of the edge, between sc 17 and sc 18.
– Sc 1 and sc 35 are the corner points.
– Mark sc 18 with a locking marker: it is the joining point for the stem above.
Stem:
1. With RS facing, join the same color with a sl st at the point, at the center of the closed ring.
2. Ch 12.
3. Sl st in the 2nd ch from the hook and in each remaining ch back to the point. (11 sl sts)
4. Fasten off, leaving a 6 in (15.2 cm) tail for joining.
The stem should measure 2 in (5.1 cm).
Make All Pieces
- Peach: 49 motifs
- Plum: 49 motifs
Block motifs in batches as you go (see Final Blocking) so every fan has the same shape before you join.
Layout (row 1 = top; P = peach, L = plum):
Row 1:  P L P L P L P
Row 2:  L P L P L P L
Row 3:  P L P L P L P
Row 4:  L P L P L P L
...continue alternating...
Row 13: P L P L P L P
Row 14: L P L P L P L
- Odd rows have 4 peach and 3 plum.
- Even rows have 3 peach and 4 plum.
- Over 14 rows that totals 49 of each color.
- Every motif has its point down and its picot edge up.
Joining
You make two kinds of join, both with the stem tail and the tapestry needle, or with a 4.0 mm hook and sl sts.
1. Vertical (stem to fan):
– Lay the motif for row 2 below the motif for row 1 in the same column.
– Sew the last sl st of the upper motif’s stem to the marked sc 18 of the lower motif’s top edge. Go through both loops 3 times so the join holds the weight.
– Leave the stem straight, not stretched: the gap between the fan point and the next fan’s top should be 2 in (5.1 cm).
2. Horizontal (corner to corner):
– Place neighboring fans in the same row side by side.
– Join sc 35 of the left motif to sc 1 of the right motif with 1 sl st (or 3 tight whipstitches) through both stitches.
– Add no stitches at this seam. The corners only touch, so the lace spaces stay open.
Tension: Keep every join snug but not puckered. A curtain hangs from its top, so loose joins stretch over time and tight joins pull the fans out of shape.
Order of work: Join row 1 side to side first, then hang each column downward one row at a time. Bottom-row stems (row 14) hang free as a short fringe.
Size checkpoints:
– After the first row: 49 in (124.5 cm) wide (7 × 7 in).
– After 3 rows: 18 in (45.7 cm) long (3 × 6 in).
– When all 14 rows are joined: 49 in × 84 in (124.5 cm × 213.4 cm).
Border: Top Band and Tabs
Work the band in plum across the top edges of row 1 only. Leave the sides and bottom as open lace, as in the finished piece.
Border gauge: 20 sc = 4 in (10.2 cm), which is 5 sc per inch.
Starting count: Each motif’s top side has 35 sc. With 7 motifs across:
7 × 35 = 245 stitches
No stitches are added at the corner seams. Sc 1 and sc 35 are already counted in each motif’s 35.
Row 1 (RS, leveling row): With RS facing, join plum in sc 1 of the top-left motif. Ch 4 (counts as the first tr). Fold the picots forward and work into the sc only.
Across each motif, work: tr in 4 sts, dc in 6 sts, hdc in 5 sts, sc in 5 sts, hdc in 5 sts, dc in 6 sts, tr in 4 sts.
4 + 6 + 5 + 5 + 5 + 6 + 4 = 35 per motif
Go straight from sc 35 of one motif into sc 1 of the next. Turn. (245 sts)
The fan tops are slightly domed. The tall trebles fill the lower corners and the short sc sit over the high centers, so this row levels the edge to a straight line.
Rows 2–9: Ch 1 (does not count), sc in each st across. Turn. (245 sc each row)
The band now measures about 1.5 in (3.8 cm) deep at the center of each motif. Do not fasten off.
Tabs: Set up 15 tabs of 7 sts each with 10-stitch gaps between them:
(15 × 7) + (14 × 10) = 105 + 140 = 245
Place markers so each tab is 1.4 in (3.6 cm) wide and each gap is 2 in (5.1 cm). The first tab starts at st 1, and the last tab ends at st 245.
First tab:
– Tab Row 1: Ch 1, sc in the first 7 sts. Turn. (7 sc)
– Tab Rows 2–36: Ch 1, sc in each of the 7 sts. Turn. (7 sc)
– The tab is now 6 in (15.2 cm) long. Fasten off, leaving a 12 in (30.5 cm) tail.
Remaining 14 tabs: Skip 10 sts, join plum in the next st, and repeat Tab Rows 1–36.
Finishing the tabs:
1. Fold each tab to the WS.
2. Sew its last row along band Row 2 directly behind its own base.
3. Each loop stands 3 in (7.6 cm) tall and fits a rod up to 1.5 in (3.8 cm) across.
Why the math works:
– Band width: 245 sts ÷ 5 per inch = 49 in (124.5 cm), the same as the joined motifs.
– The leveling row works 1 stitch into each existing stitch.
– The tab split uses up exactly 245 stitches, with tabs at both outer edges.
Final Blocking
- Weave in all remaining ends, splitting the plies on the WS. Trim close.
- Soak the panel in cool water with a little wool-free wash for 15 minutes. Press out the water; do not wring.
- Roll it in towels to remove excess moisture.
- Lay it flat on mats or a clean sheet. Work in sections if your floor space is limited.
- Pin the band straight at 49 in (124.5 cm).
- Pin each fan’s corner points 7 in (17.8 cm) apart.
- Pin each stem straight at 2 in (5.1 cm).
- Open every spoke so the ch spaces form even wedges, and pin out every picot.
- Check that the panel is 84 in (213.4 cm) long from the base of the band to the bottom stem tips.
- Let it dry completely before unpinning.
Final Quality-Control Checklist
- [ ] 98 motifs: 49 peach, 49 plum, in checkerboard order
- [ ] Every fan has 33 dc in Row 5, 35 dc in Row 6, and 35 sc with 11 picots in Row 7
- [ ] Every stem is joined to the center sc 18 of the fan below
- [ ] Neighboring fans touch at their corner points only
- [ ] Top band has 245 sts on every row
- [ ] 15 tabs, evenly spaced, with tabs at both outer edges
- [ ] Panel measures 49 in × 85.5 in (124.5 cm × 217.2 cm) plus tab loops
- [ ] All ends are secure and invisible from the RS
Troubleshooting
Fan cups like a bowl: The spoke chains are too tight. Loosen your chains or go up a hook size for Rows 2–4 only.
Fan ruffles at the top: Row 5 is too loose. Work Rows 5–6 with a 3.75 mm hook.
Stems twist: Work the sl sts through the back bump of the chain, and block the stems straight.
Band wavy across the top: Check the leveling row. The trebles must be at the corners and the sc at the centers.
Panel leans to one side: One column has a longer stem. Re-measure every stem at 2 in (5.1 cm).
Tab loops are uneven: Count rows. Every tab needs exactly 36 rows before you fold it.
Care
Hand wash cool and dry flat. If the panel relaxes after hanging, re-block it to the measurements above.
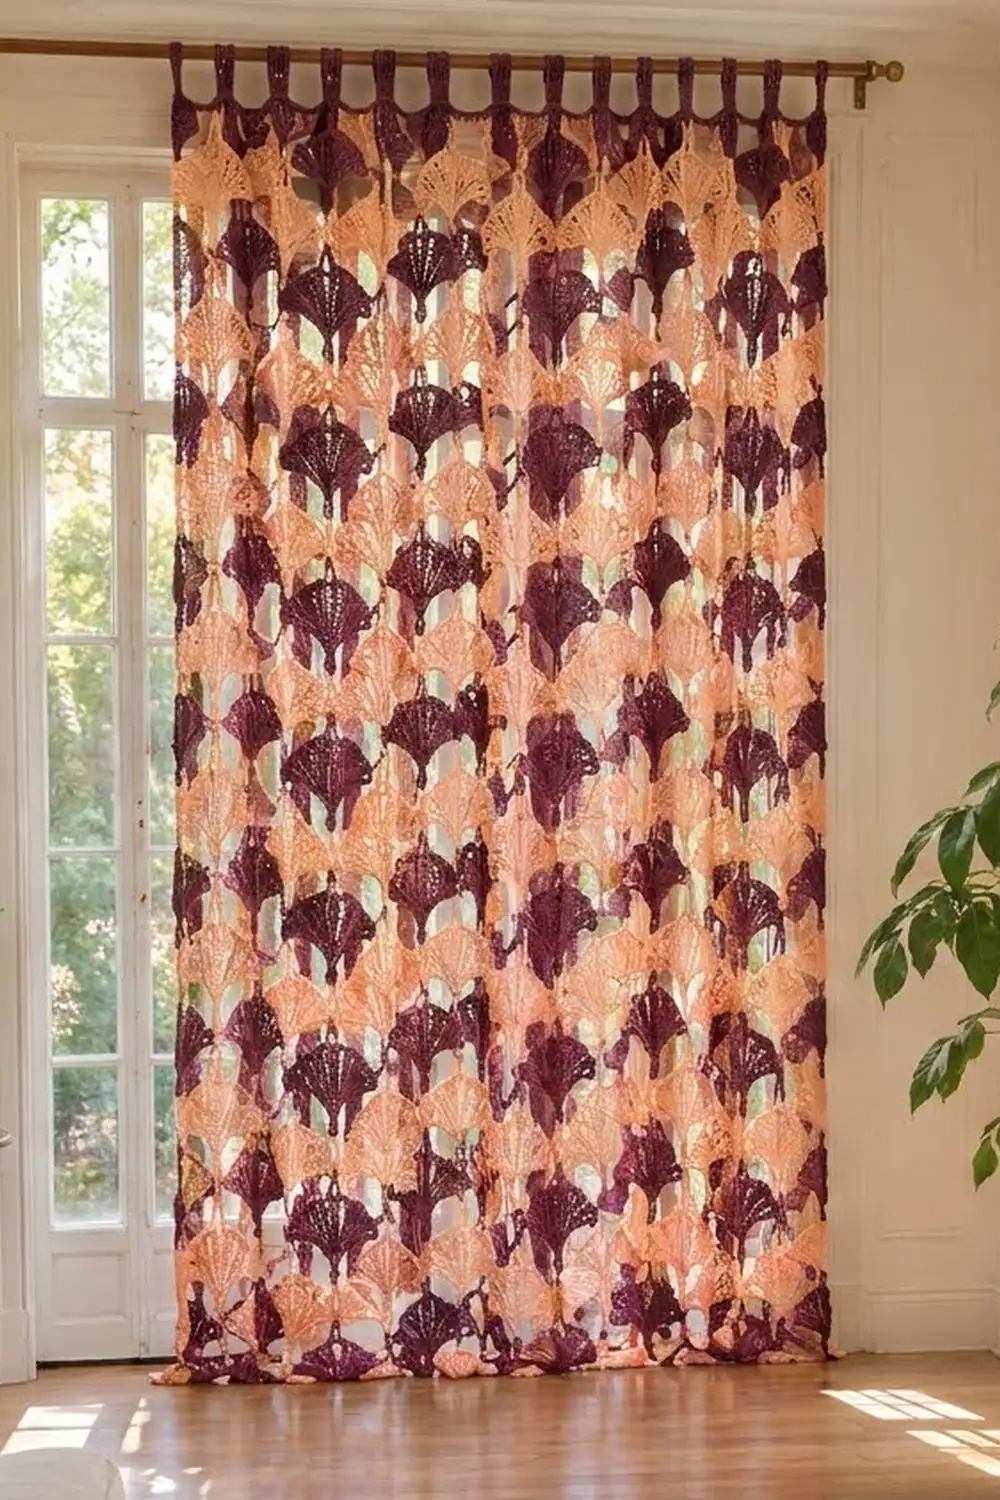
Final Notes
The measurement chain is short and reliable:
– One fan is 7 in (17.8 cm) wide and repeats every 6 in (15.2 cm).
– Seven fans across make 49 in (124.5 cm).
– Fourteen rows down make 84 in (213.4 cm).
– The band adds 1.5 in (3.8 cm), and the loops add 3 in (7.6 cm).
If your test motif matches, everything else will match. Take your time with the first fan, keep the joins even, and let the light do the rest.
Happy crocheting!