

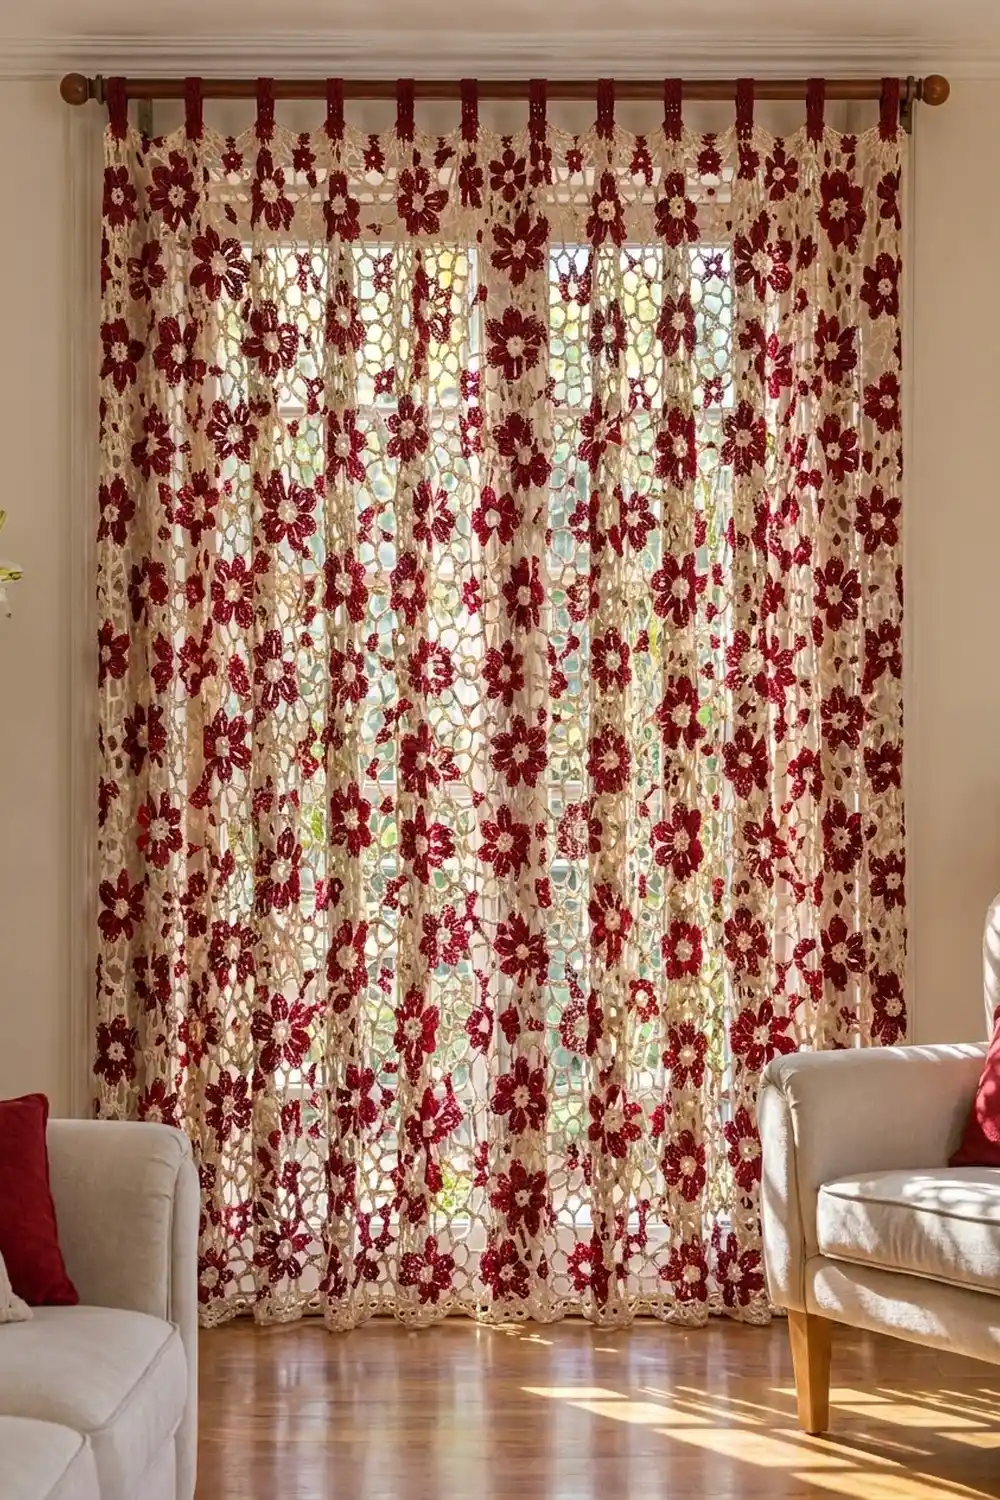
The Cranberry Bloom Lace Curtain is a floor-length panel made of small, open flower motifs. Each square has a cream center, six burgundy petals with open slits, a cream outline that follows the petals, and a light cream chain mesh that squares off the flower. Once joined, the mesh reads as one lace background and the flowers seem to float on it when light comes through.
The palette is deep cranberry red and warm cream. The style is cottage-traditional, but the regular repeat looks tidy on a plain wall.
This pattern uses US crochet terms. The finished panel measures 52″ x 82″ (132.1 cm x 208.3 cm) without the tabs. Eleven burgundy tabs add a 3″ (7.6 cm) hanging loop above the top edge.
You crochet 160 identical 5″ (12.7 cm) square motifs and join them flat in a grid 10 across and 16 down. Then you work a three-round border and crochet the tabs directly onto the top edge.
Finished Size and Construction
- Finished size: 52″ x 82″ (132.1 cm x 208.3 cm), plus 3″ (7.6 cm) tab loops
- Skill level: Intermediate
- Terminology: US crochet terms
- Yarn weight: DK (#3 light) cotton
- Hook: 3.75 mm (US F-5)
- Number of pieces: 160 square motifs
- Layout: 10 motifs across x 16 motifs down
- Motif size: 5″ x 5″ (12.7 cm x 12.7 cm)
- Size before border: 50″ x 80″ (127.0 cm x 203.2 cm)
- Border depth: 1″ (2.5 cm) on each side
Materials
Choose a smooth mercerized cotton or cotton blend in DK weight. Cotton holds the petal shapes, blocks crisply, and stands up to sunlight and washing. Look for about 2.4 m per gram (about 120 m per 50 g).
- Burgundy (petals, border edge, tabs): 600 g, about 1,440 m
- Cream (centers, outlines, mesh, joining, border): 1,050 g, about 2,520 m
Both quantities include a margin of about 15% for gauge differences, joining, and a test motif.
Tools: 3.75 mm (US F-5) hook, 4 mm (US G-6) hook for joining if needed, tapestry needle, scissors, stitch markers, tape measure, blocking mats or a sheet-covered carpet, rust-proof pins, and a spray bottle.
Abbreviations (US Terms)
- ch: chain
- sl st: slip stitch
- sc: single crochet
- hdc: half double crochet
- dc: double crochet
- tr: treble crochet
- dtr: double treble crochet
- trtr: triple treble crochet
- st(s): stitch(es)
- sp(s): space(s)
- RS / WS: right side / wrong side
- rep: repeat
Special stitch: triple treble (trtr). Yarn over 4 times, insert the hook in the stitch, and pull up a loop (6 loops on hook). *Yarn over and pull through 2 loops; rep from * 4 more times until 1 loop remains.
Gauge and Checkpoints
Gauge: 20 sc = 4″ (10.2 cm), or 5 sc per 1″ (2.5 cm).
Before anything else, make one complete motif, block it lightly, and measure it. The whole panel depends on this one square.
Motif checkpoints:
- After Round 2: about 1.75″ (4.4 cm) across
- After Round 4: about 4″ (10.2 cm) from one petal tip to the opposite tip
- After Round 5: about 4.5″ (11.4 cm) from tip to tip
- After Round 7: 5″ x 5″ (12.7 cm x 12.7 cm), with 25 sc per side
Too big? Go down to a 3.5 mm (US E-4) hook. Too small? Go up to a 4 mm (US G-6) hook. An error of just 1/4″ (0.6 cm) per motif adds up to 2.5″ (6.4 cm) across the width and 4″ (10.2 cm) down the length, so fix it now.
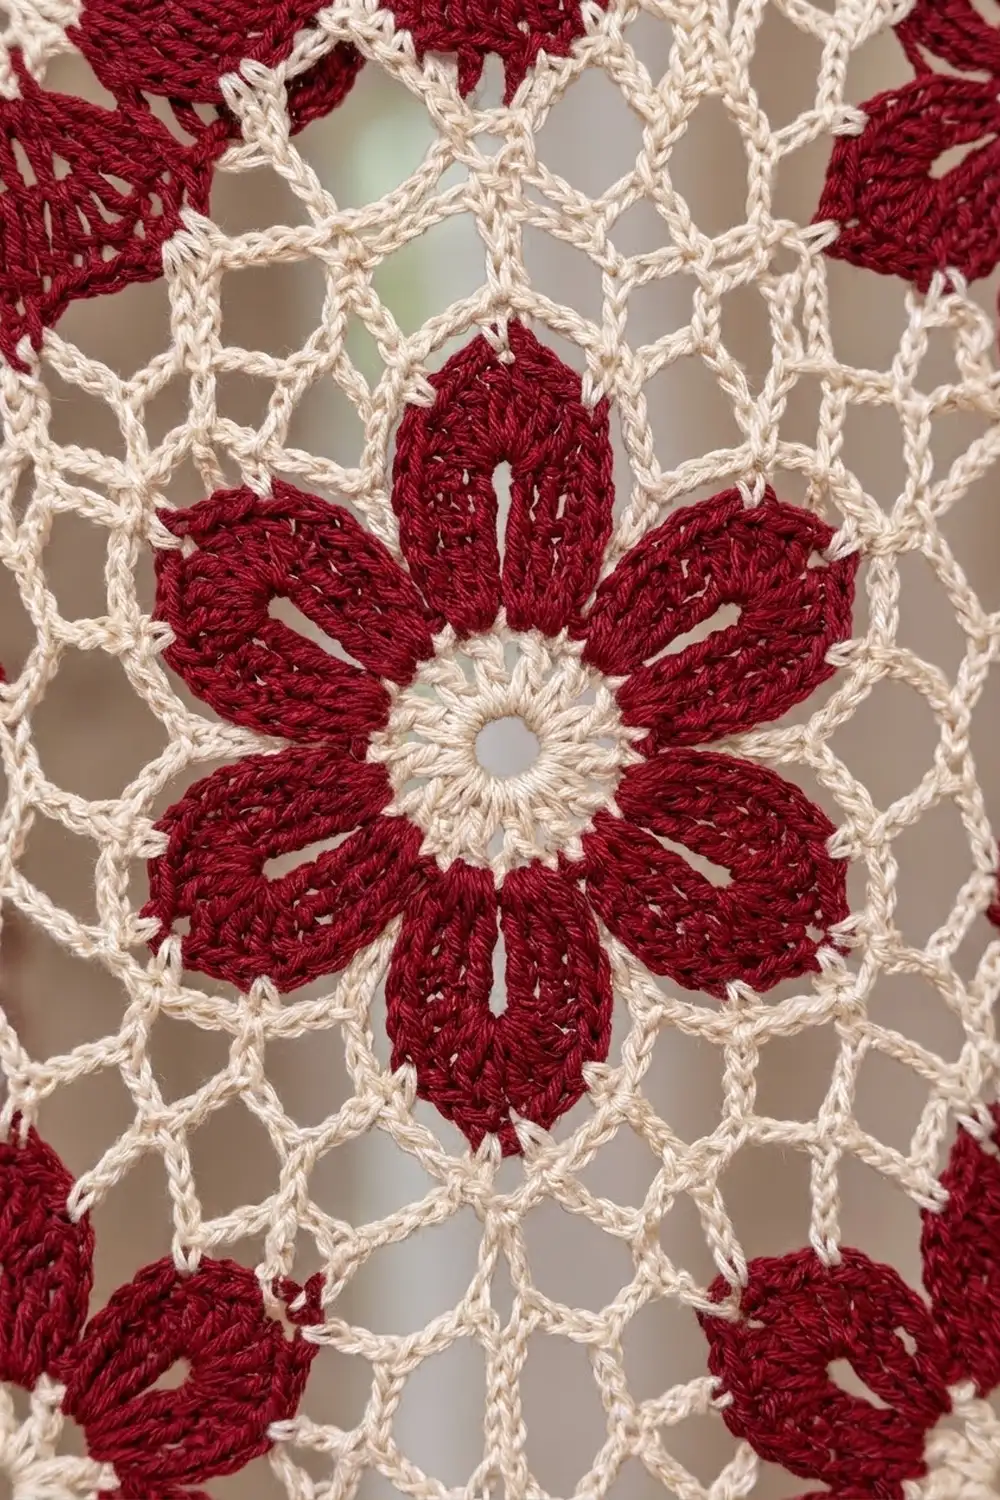
Motif (Make 160)
Work in rounds with the RS facing. Do not turn.
Round 1 (cream): Make a magic ring. Ch 4 (counts as dc + ch 1), *dc in ring, ch 1; rep from * 10 more times. Join with sl st to the 3rd ch of the beginning ch-4 and pull the ring closed. (12 dc, 12 ch-1 sps)
Round 2 (cream): Ch 1, sc in same st as join, *ch 4, skip next (ch-1 sp, dc, ch-1 sp), sc in next dc; rep from * 4 more times, ch 4, skip last (ch-1 sp, dc, ch-1 sp), join with sl st to first sc. Fasten off. (6 sc, 6 ch-4 sps)
Round 3 (burgundy): Join burgundy in any ch-4 sp. Ch 1, *(sc, ch 9, sc) in ch-4 sp, sc in next sc; rep from * around. Join with sl st to first sc. (18 sc, 6 ch-9 loops)
The ch-9 loops are the petal frames. Because you work each petal around a loop instead of into stitches, an open slit stays down the middle of every petal.
Round 4 (burgundy, petals): *Skip next sc, work (2 hdc, 3 dc, 2 tr, ch 3, 2 tr, 3 dc, 2 hdc) around the ch-9 loop, skip next sc, sl st in next sc (the sc between petals); rep from * around. Fasten off. (6 petals of 14 sts = 84 sts, 6 ch-3 tip sps, 6 sl sts)
Round 5 (cream outline): Join cream in any petal tip ch-3 sp. Ch 1, *(sc, ch 3, sc) in tip sp, ch 3, sc in center dc of next 3-dc group, ch 3, sc in sl st between petals, ch 3, sc in center dc of 3-dc group on next petal, ch 3; rep from * around. Join with sl st to first sc. Fasten off. (30 sc, 30 ch-3 sps)
This round has three kinds of anchor:
- Flank sc (12 total): each sc worked in a center dc
- Valley sc (6 total): each sc worked in a sl st between petals
- Tip sp (6 total): each ch-3 sp at a petal point
The ch-3 loops trace the scalloped flower edge.
Orient the flower: Hold the flower with one petal pointing straight up. Each of the four diagonal petals has one flank sc that faces the top or bottom petal. Those 4 flank sc are the corner anchors.
Round 6 (cream, square mesh): Join cream with sl st in any corner anchor. Ch 6 (counts as trtr), trtr in same st, ch 4, 2 trtr in same st (first corner made). *Ch 4, work the next side, ch 4, (2 trtr, ch 4, 2 trtr) in next corner anchor; rep from * 2 more times, ch 4, work the last side, ch 4, join with sl st to top of ch-6.
- Side A (top and bottom, next anchor is a valley sc): dtr in valley sc, ch 4, hdc in tip sp, ch 4, dtr in next valley sc.
- Side B (left and right, next anchor is a tip sp): tr in tip sp, ch 4, dtr in valley sc, ch 4, tr in next tip sp.
The sides alternate A, B, A, B. Skip all flank sc and ch-3 sps between anchors. Between corner sps, each side has 2 trtr + 4 ch + 1 st + 4 ch + 1 st + 4 ch + 1 st + 4 ch + 2 trtr = 23 sts and chains. (28 sts in total: 16 trtr, 6 dtr, 4 tr, 2 hdc; plus 16 side ch-4 sps and 4 corner ch-4 sps)
Round 7 (cream, trim): Ch 1, sc in same st and in next trtr, (sc, ch 2, sc) in corner sp, sc in next 2 trtr, [4 sc in next ch-4 sp, sc in next st] 3 times, 4 sc in next ch-4 sp, sc in next 2 trtr, (sc, ch 2, sc) in next corner sp; rep from * 3 more times, ending the last rep at *. Join with sl st to first sc. Fasten off.
Round 7 count per side: 23 sc worked one per st or ch, plus 2 corner sc, = 25 sc. In total: 100 sc and 4 ch-2 corner sps.
Each side’s 25 sc already includes its 2 corner sc. The motif now measures 5″ x 5″ (12.7 cm x 12.7 cm).
Make All Pieces
Make 160 motifs. Each motif uses about 3 g of burgundy and 5 g of cream. Weave in tails as you go, on the WS, through stitches of the same color.
Layout (M = one motif):
Top edge (tabs)
Row 1:     M M M M M M M M M M
Row 2:     M M M M M M M M M M
Rows 3–15: same as Row 1
Row 16:    M M M M M M M M M M
Bottom edge
Turn every motif the same way, with Side A at the top and bottom, so the flowers line up in straight columns.
Joining
Method: Flat slip-stitch join in cream, RS facing up, through the back loops of both motifs.
Lay two motifs side by side. Sl st through both matching corner ch-2 sps. Then sl st through each pair of matching sc, one to one, for all 25 sc. Finish with a sl st through the next pair of corner ch-2 sps. Both sides have exactly 25 sc, so the edges match with no easing.
- Join the 10 motifs of each row into a strip, with 9 short seams per strip.
- Join the 16 strips with long seams. Where four corners meet, sl st through the corner ch-2 sps, then carry on into the next motif’s 25 sc.
Tension: Keep each sl st as loose as the sc next to it. Tight seams pucker the lace, and blocking cannot fully fix that. If your seams feel stiff, use the 4 mm (US G-6) hook for joining only.
Checkpoint: Each strip should measure 50″ (127.0 cm). The joined panel should measure 50″ x 80″ (127.0 cm x 203.2 cm).
Border
Border gauge: 5 sc per 1″ (2.5 cm), the same as the motif gauge.
Starting counts:
- Top and bottom edges: 10 motifs x 25 sc = 250 sc each
- Side edges: 16 motifs x 25 sc = 400 sc each
These counts already include each motif’s corner sc. You do not work into the joined seam ch-2 sps, so no stitches are added at the seams.
Round 1 (cream, trim): With RS facing, join cream in the first sc after any panel corner. Ch 1. Sc in each sc along the edges, skipping the seam ch-2 sps, and work (sc, ch 2, sc) in each of the 4 panel corner ch-2 sps. Join with sl st to first sc.
- Top and bottom: 250 + 2 = 252 sc each
- Sides: 400 + 2 = 402 sc each
- Total: 1,308 sc and 4 corner ch-2 sps
Round 2 (cream): Ch 3 (counts as dc). Dc in each sc along the edges, and work (dc, ch 2, dc) in each corner ch-2 sp. Join with sl st to top of ch-3.
- Top and bottom: 252 + 2 = 254 dc each
- Sides: 402 + 2 = 404 dc each
- Total: 1,316 dc
Round 3 (burgundy): Join burgundy in any corner sp. Ch 1. Sc in each dc along the edges, and work (sc, ch 2, sc) in each corner sp. Join with sl st to first sc and fasten off.
- Top and bottom: 254 + 2 = 256 sc each
- Sides: 404 + 2 = 406 sc each
- Total: 1,324 sc
Why the math works:
- The border starts with exactly 25 sc per motif side, which matches the gauge of 5 sc per 1″ (2.5 cm). That means 250 sc lies flat along 50″ (127.0 cm).
- Each round adds only 1 st at each end of each side to turn the corner. The corners stay square and the long edges don’t ruffle.
- The three rounds add about 1″ (2.5 cm) on each side, giving 52″ (132.1 cm) by 82″ (208.3 cm).
Tabs (Make 11, worked onto the top edge)
The top edge has 256 sc after Border Round 3. Lay out the tabs in this order:
- 5 sts at the start
- 11 tabs of 6 sts each, with 10 gaps of 18 sts between them
- 5 sts at the end
Check: 5 + 66 + 180 + 5 = 256. Mark the tab positions before you start.
Row 1: With RS facing, join burgundy in the first marked st. Ch 1, sc in same st and in next 5 sts, turn. (6 sc)
Rows 2–30: Ch 1, sc in each sc across, turn. (6 sc)
Fasten off, leaving a 12″ (30.5 cm) tail. Fold the tab to the WS and sew the last row to the WS of Border Round 1, directly behind Row 1. Each tab is 1.2″ (3.0 cm) wide and about 6″ (15.2 cm) long. Folded, it makes a 3″ (7.6 cm) loop that fits a rod up to 1.5″ (3.8 cm) across.
Final Blocking
- Weave in all remaining tails.
- Soak the panel in cool water with a little gentle wash for 15 minutes.
- Press out the water and roll the panel in towels. Do not wring it.
- Lay it flat, RS up.
- Pin the corners to 52″ x 82″ (132.1 cm x 208.3 cm).
- Pin along each edge every 5″ (12.7 cm), at each motif seam.
- Pin the petal tips outward and smooth the mesh square.
- Let it dry completely before you unpin it.
Final Quality-Control Checklist
- Every motif measures 5″ x 5″ (12.7 cm x 12.7 cm), with 25 sc per side.
- All flowers face the same direction.
- Every seam joins 25 sc to 25 sc, plus the corner sps.
- The joined panel measures 50″ x 80″ (127.0 cm x 203.2 cm).
- Border Round 3 has 256 sc on the top and bottom and 406 sc on each side.
- There are 11 evenly spaced tabs, each 30 rows long.
- The finished panel measures 52″ x 82″ (132.1 cm x 208.3 cm).
- No tails show on the RS.
Troubleshooting
Petals cup: The ch-9 loops are too tight. Chain more loosely, or use a 4 mm (US G-6) hook for Round 3 only.
Petal slits are closed: You worked into the chains. Insert the hook under the whole ch-9 loop instead.
Motif isn’t square: Check that Round 6 starts on a corner anchor and that the sides alternate A, B, A, B.
Corners pull in: Your trtr are short. Pull up the first loop to full height before working off the loops.
Seams pucker: Redo the join with looser sl sts.
Border ruffles: Recount. Each side should gain exactly 2 sts per round.
Care
Hand wash, or machine wash cool on a gentle cycle in a mesh bag. Dry flat and re-pin if needed. Don’t hang the panel while it’s wet, because the weight will stretch the lace.
Final Notes
The whole curtain depends on one chain of measurements:
- One motif is 5″ (12.7 cm), with 25 sc per side.
- 10 motifs across give 250 sc and 50″ (127.0 cm).
- 16 motifs down give 400 sc and 80″ (203.2 cm).
- The border adds 1″ (2.5 cm) per side, for a finished panel of 52″ x 82″ (132.1 cm x 208.3 cm).
- The tab loops add 3″ (7.6 cm) above the top edge.
Get your first motif right and the rest will follow.
Happy crocheting!