

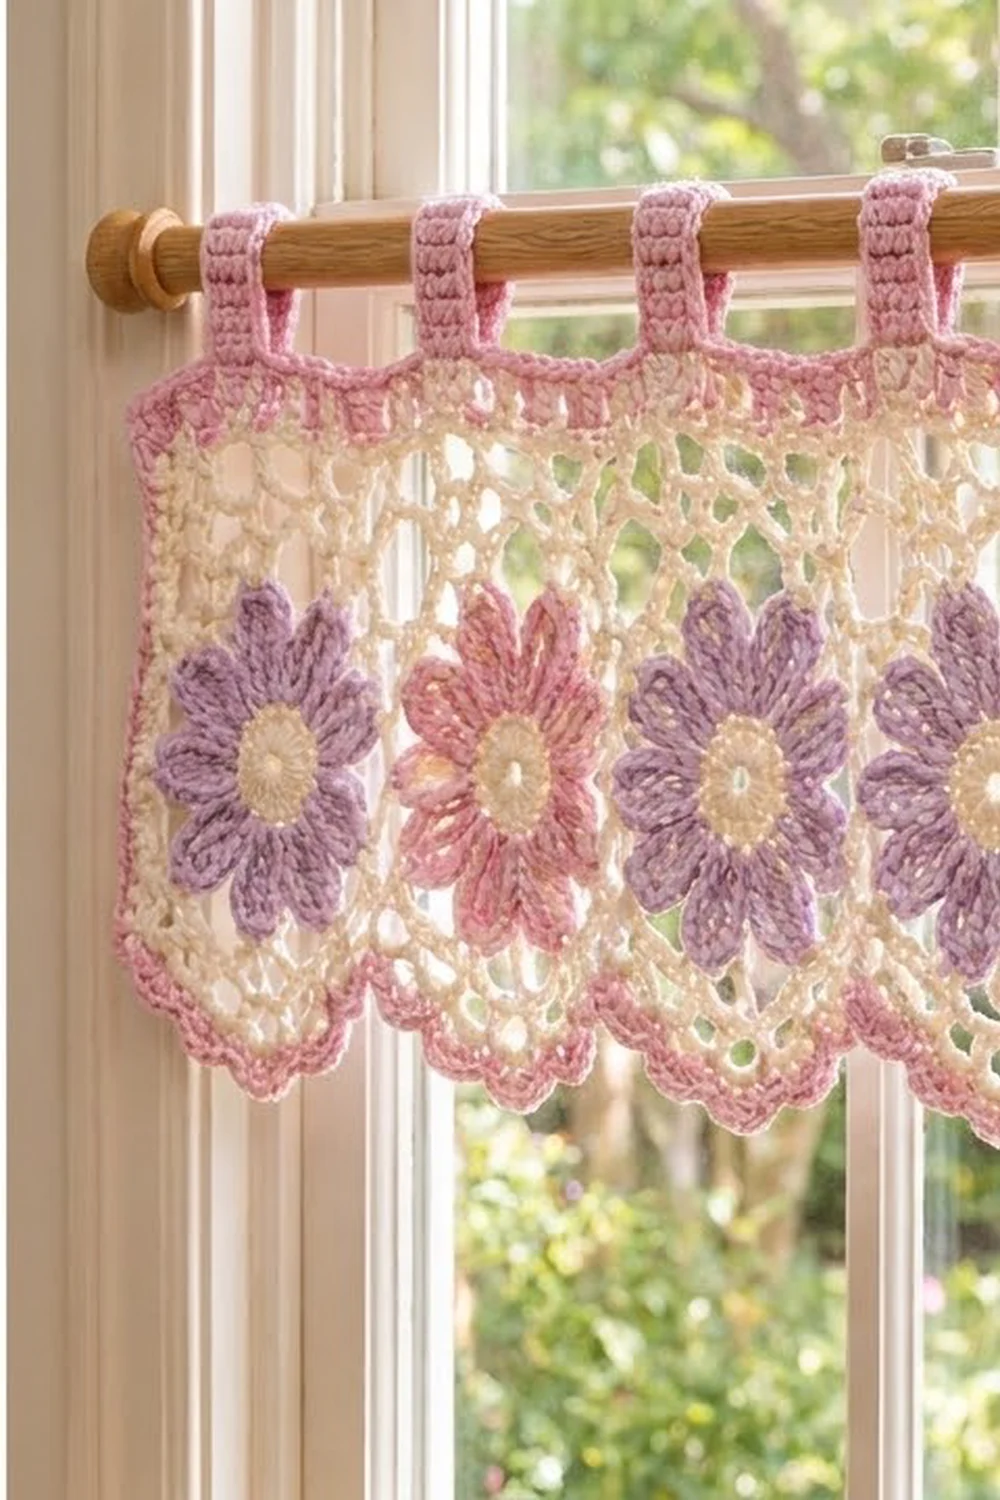
The Lilac Garden Flower Valance is a light, cottage-style window topper. Nine eight-petal daisies sit in a row of airy cream mesh, alternating lilac and pink. A soft pink tab-top band runs along the top, and cream shell scallops with a pink trim finish the bottom edge.
The palette is cream, pink, and lilac, so it looks fresh in a kitchen, nursery, or sunroom. Light comes through the open mesh, and the flowers keep the color visible from across the room.
This pattern uses US crochet terms. Without the tabs, the finished valance is about 55 in (139.7 cm) wide and 8.75 in (22.2 cm) deep. With the tabs, it is about 10.75 in (27.3 cm) from the top of the tabs to the scallop tips.
You make nine identical 6 in (15.2 cm) square flower motifs and join them into one strip with slip stitches. Then you work a border round all the way around, add a pink band and tabs along the top, and add a scalloped trim along the bottom.
Finished Size and Construction
- Finished size: about 55 in x 8.75 in (139.7 cm x 22.2 cm), plus about 2 in (5.1 cm) of tab loops
- Skill level: Intermediate
- Terminology: US crochet terms
- Yarn weight: Worsted (#4) cotton
- Hook: 5.0 mm (H-8)
- Number of pieces: 9 flower squares
- Layout: 1 row of 9 squares (1 x 9)
- Piece size: 6 in x 6 in (15.2 cm x 15.2 cm)
- Size before border: 54 in x 6 in (137.2 cm x 15.2 cm)
- Border depth: 1 in (2.5 cm) top band; 1.75 in (4.4 cm) bottom scallop
Materials
Use a smooth worsted-weight cotton or cotton blend. Cotton holds its shape on a window, keeps the petals crisp, and handles sunlight and washing better than most acrylics. The amounts below assume about 1.54 m per gram, which is typical for worsted cotton (50 g = about 77 m).
- Cream: 200 g, about 308 m (flower centers, mesh, border round, scallops)
- Pink: 150 g, about 231 m (4 flowers, top band, tabs, bottom trim, side edging)
- Lilac: 60 g, about 92 m (5 flowers)
Tools:
- 5.0 mm (H-8) crochet hook
- Tapestry needle
- Scissors
- Stitch markers
- Rust-proof pins and a blocking surface at least 56 in (142.2 cm) long
- Measuring tape
All quantities include a margin of about 20% for gauge differences and the test square.
Abbreviations (US Terms)
- ch – chain
- sl st – slip stitch
- sc – single crochet
- hdc – half double crochet
- dc – double crochet
- tr – treble crochet (yarn over twice)
- sk – skip
- sp – space
- st(s) – stitch(es)
- RS / WS – right side / wrong side
Petal (special stitch): In the same ch-3 sp, work (sc, hdc, dc, 3 tr, dc, hdc, sc). That makes 9 sts per petal. The 2nd tr of the 3 is the center tip.
Gauge and Checkpoints
Base gauge: 14 sc x 16 rows = 4 in (10.2 cm) in cream.
Before you make all nine squares, make one complete square and block it. Measure it at each stage:
- After Round 1: the center ring is about 1.5 in (3.8 cm) across.
- After Round 3: the flower is about 4.5 in (11.4 cm) from petal tip to petal tip.
- After Round 5: about 5 in (12.7 cm) square.
- After Round 6: about 5.5 in (14.0 cm) square.
- After Round 7: 6 in (15.2 cm) square, with 21 sts per side.
If the square is larger than 6 in (15.2 cm), go down to a 4.5 mm (US 7) hook. If it is smaller, go up to a 5.5 mm (I-9) hook. Being off by 0.25 in (0.6 cm) on one square adds up to 2.25 in (5.7 cm) across nine squares, so fix your gauge before you go on.
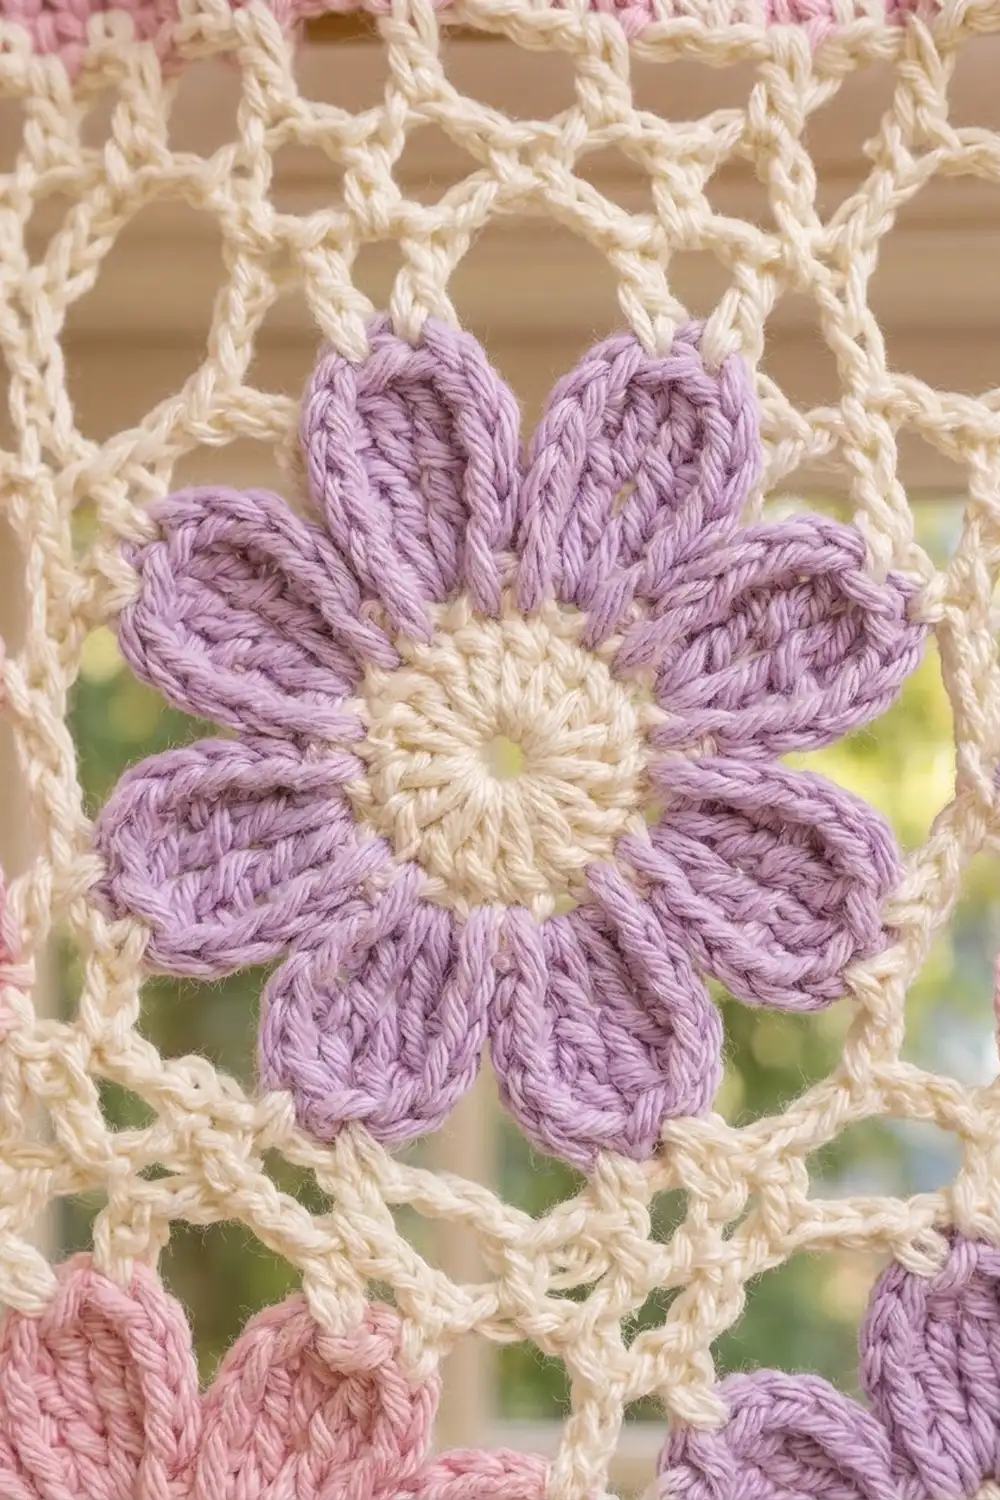
Flower Square (Make 9)
Round 1 and Rounds 4–7 are cream. Rounds 2–3 are the petal color.
Round 1 (cream): Make a magic ring. Ch 3 (counts as dc), then work 15 dc into the ring. Join with a sl st to the top of the beginning ch-3. (16 dc) Pull the ring closed and fasten off.
Round 2 (petal color): Join the petal color in any dc. Ch 1, sc in the same st, ch 3, sk next dc. Sc in next dc, ch 3, sk next dc; repeat from * 6 more times. Join to the first sc. (8 sc, 8 ch-3 sps)*
Round 3 (petal color): Sl st into the first ch-3 sp. Work 1 Petal in each ch-3 sp around. Join to the first sc and fasten off. (8 petals, 72 sts) This gives the long, rounded petals with a raised tip.
Round 4 (cream): Join cream in the center tr of any petal. Ch 1, sc in the same st, ch 5. Sc in the center tr of the next petal, ch 5; repeat from * 6 more times. Join to the first sc. (8 sc, 8 ch-5 sps)*
Round 5 (cream, squaring): Sl st into the first ch-5 sp. Ch 3 (counts as dc), then work (2 dc, ch 3, 3 dc) in the same sp for the first corner. Ch 3, sc in next ch-5 sp, ch 3. *Work (3 dc, ch 3, 3 dc) in next ch-5 sp, ch 3, sc in next ch-5 sp, ch 3; repeat from * 2 more times. Join to the top of the ch-3.
Each side, between corner ch-3 sps, has 3 dc + 3 ch + 1 sc + 3 ch + 3 dc = 13 sts. The round total is 4 x 13 + 12 corner ch = 64 sts including chains.
Round 6 (cream, mesh): Sl st in the next 2 dc and into the corner ch-3 sp. Ch 3 (counts as dc), then work (dc, ch 2, 2 dc) in the same sp. Work across the 13 side sts as follows: ch 1, sk next st, dc in next st; repeat from * 5 more times. Then ch 1 and sk the last st. When a dc lands on a chain, work it into that chain. This gives 6 dc and 7 ch-1 sps on the side. Work (2 dc, ch 2, 2 dc) in the next corner sp, then work the side mesh; repeat from * 2 more times. Join to the top of the ch-3.
Each side, between corner ch-2 sps, has 2 dc + 13 mesh sts + 2 dc = 17 sts. The round total is 4 x 17 + 8 corner ch = 76 sts including chains.
Round 7 (cream, edge): Ch 1. Sc in each dc and each ch-1 sp around, and work 3 sc in each corner ch-2 sp. Join and fasten off.
This is a conversion round: (68 side sts worked 1 per existing st) + (4 corners x 3 sc = 12) = 80 sc.
Per side: The middle sc of each 3-sc corner is the corner stitch. Each side has 19 sc between corners, plus 2 corner sts, for 21 sts per side including both corners. To check: 4 x 19 + 4 = 80.
Make All Pieces
- Lilac flower squares: 5
- Pink flower squares: 4
All centers and backgrounds are cream. Lay the squares out in one row:
[ L ][ P ][ L ][ P ][ L ][ P ][ L ][ P ][ L ]
L = lilac, P = pink. Weave in the ends, then lightly steam-block each square to 6 in (15.2 cm).
Joining
Method: Slip-stitch join through back loops, in cream.
- Place two neighboring squares RS together, corner to corner.
- Join cream through the back loops of both corner sts.
- Sl st through the back loop of each matching pair of sts across the side, ending in the opposite corner sts.
That’s 21 sl sts per seam, matching stitch 1 to stitch 1 and stitch 21 to stitch 21, with no extra stitches. Repeat for all 8 seams.
Tension: Keep the sl sts as loose as the sc beneath them. Tight seams pucker and make the strip come out short. If you tend to slip stitch tightly, go up one hook size for joining.
Size checkpoint: The strip should measure 54 in x 6 in (137.2 cm x 15.2 cm) and lie flat.
Border
Border gauge: 14 sc = 4 in (10.2 cm).
Starting counts:
– Long sides: 9 squares x 21 sts = 189 sts each.
– Short sides: 1 x 21 = 21 sts each.
– Seams: Work each square’s corner st as an ordinary st, 1 sc each.
– Outer corners: These are the corner sts of squares 1 and 9.
Border Round 1 (cream): With RS facing, join cream in the st after any outer corner. Ch 1. Sc in each st around, and work 3 sc in each of the 4 outer corner sts. Join and fasten off.
- Long side: 187 sc between corner groups. Counting the new corner sc at each end: 1 + 187 + 1 + 2 = 191 sts.
- Short side: 19 + 1 + 1 + 2 = 23 sts.
- Total: 2 x 187 + 2 x 19 + 12 = 424 sc.
Top Band (pink)
Work across one long side, from corner sc to corner sc (191 sts).
Row 1 (RS): Join pink in the corner sc. Ch 2 (does not count), hdc in each st across. (191 hdc)
Row 2: Ch 2, turn, hdc in each st across. (191 hdc)
Row 3: Ch 1, turn, sc in each st across. (191 sc) Fasten off.
Including the cream round, the band is about 1 in (2.5 cm) deep.
Tabs (make 9): There’s one tab centered over each flower. Each tab is 7 sts wide, with 14 sts between tabs and 8 sts at each end: 8 + 63 + 112 + 8 = 191.
- Join pink in st 9 of Row 3.
- Ch 1, sc in the same st and the next 6 sts. (7 sc)
- Rows 2–20: Ch 1, turn, sc in each st. (7 sc)
- Fasten off, leaving a 12 in (30.5 cm) tail.
Start the tabs in sts 9, 30, 51, 72, 93, 114, 135, 156, and 177.
Each tab is about 5 in (12.7 cm) long. Fold it to the WS and sew the last row to the back of band Row 1. The finished loop stands about 2 in (5.1 cm) high and fits a rod up to 1.25 in (3.2 cm) thick.
Bottom Scallop
Work across the other long side (191 sts), from corner to corner.
Row A (cream, RS): Join cream in the corner sc. Ch 1, sc in the first st. Ch 4, sk 4 sts, sc in next st; repeat from * across. (39 sc, 38 ch-4 sps)* To check: 1 + 38 x 5 = 191.
Row B (cream): Ch 1, turn, sc in the first sc. Ch 1, 9 dc in next sc, ch 1, sc in next sc; repeat from * across. (19 shells) The count is 1 + 19 x 12 = 229 sts including ch-1 sps*. Fasten off.
Row C (pink): With RS facing, join pink in the first sc. Ch 1, sc in the first sc. *Sc in ch-1 sp, sc in next 4 dc, 3 sc in next dc, sc in next 4 dc, sc in ch-1 sp, sc in next sc; repeat from * across. Fasten off.
This is a trim row: (229 sts worked 1 per existing st) + (19 x 2 extra) = 267 sc.
Including the cream round, the bottom border is about 1.75 in (4.4 cm) deep.
Side Edging (pink)
Starting at the lower corner of one short end, work 32 sc up to the top:
- 1 sc in the Row C end
- 2 sc in the Row B end
- 1 sc in the Row A end
- 23 sc along the cream side
- 1 sc in the Row 3 end
- 2 sc in each hdc row end
Repeat on the other end.
Why the math works: Each long edge starts at 9 x 21 = 189 sts. Border Round 1 adds exactly 2 corner sts, giving 191. That number divides evenly for both the tabs (8 + 63 + 112 + 8) and the scallops (19 repeats of 10, plus 1). No stitches are added at the seams, so the border lies flat.
Final Blocking
- Weave in all remaining ends, each into its own color.
- Soak the valance in cool water for 10 minutes. Press out the water (don’t wring) and roll it in a towel.
- Lay it RS up on the blocking surface.
- Pin the top band straight to 55 in (139.7 cm).
- Pin the depth to 8.75 in (22.2 cm) at every seam and at both ends.
- Pin each of the 19 scallop points evenly.
- Open the petals and pin each center tip outward.
- Let it dry completely, then stand the tabs straight up.
Final Quality-Control Checklist
- 9 squares, each 6 in (15.2 cm), with 21 sts per side
- Lilac and pink alternate, with lilac at both ends
- 8 seams of 21 sl sts each, all lying flat
- Strip measures 54 in x 6 in (137.2 cm x 15.2 cm) before the border
- Border Round 1 = 424 sc; every top band row = 191 sts
- 9 tabs, each centered over a flower
- Row C = 267 sc, with 19 matching scallops
- Finished size about 55 in x 8.75 in (139.7 cm x 22.2 cm)
Troubleshooting
- Petals curl forward: Go up a hook size for Round 3 only.
- Square ruffles: Your Round 5 chains are too loose. Keep them snug.
- Square cups: In Round 4, ch 6 instead of ch 5. The counts stay the same.
- Strip shorter than 54 in (137.2 cm): Your seams are too tight. Rejoin with a larger hook.
- Scallops flare: Work 8 dc per shell, and only 2 sc at each scallop center in Row C.
- Tabs twist: Sew down both edges of each tab, not just the middle.
Care
Hand wash in cool water with mild soap and dry flat, re-pinning the scallops. Keep the valance out of harsh direct sun so the lilac and pink don’t fade.
Final Notes
Here’s the measurement chain:
– Each square is 6 in (15.2 cm), with 21 sts per side.
– Nine squares make a 54 in (137.2 cm) strip with 189 sts per long edge.
– Border Round 1 brings each long edge to 191 sts.
– The band adds 1 in (2.5 cm) and the scallops add 1.75 in (4.4 cm).
That gives a finished valance of about 55 in x 8.75 in (139.7 cm x 22.2 cm). Check your first square, confirm each count, and the valance will hang straight.
Happy crocheting!