

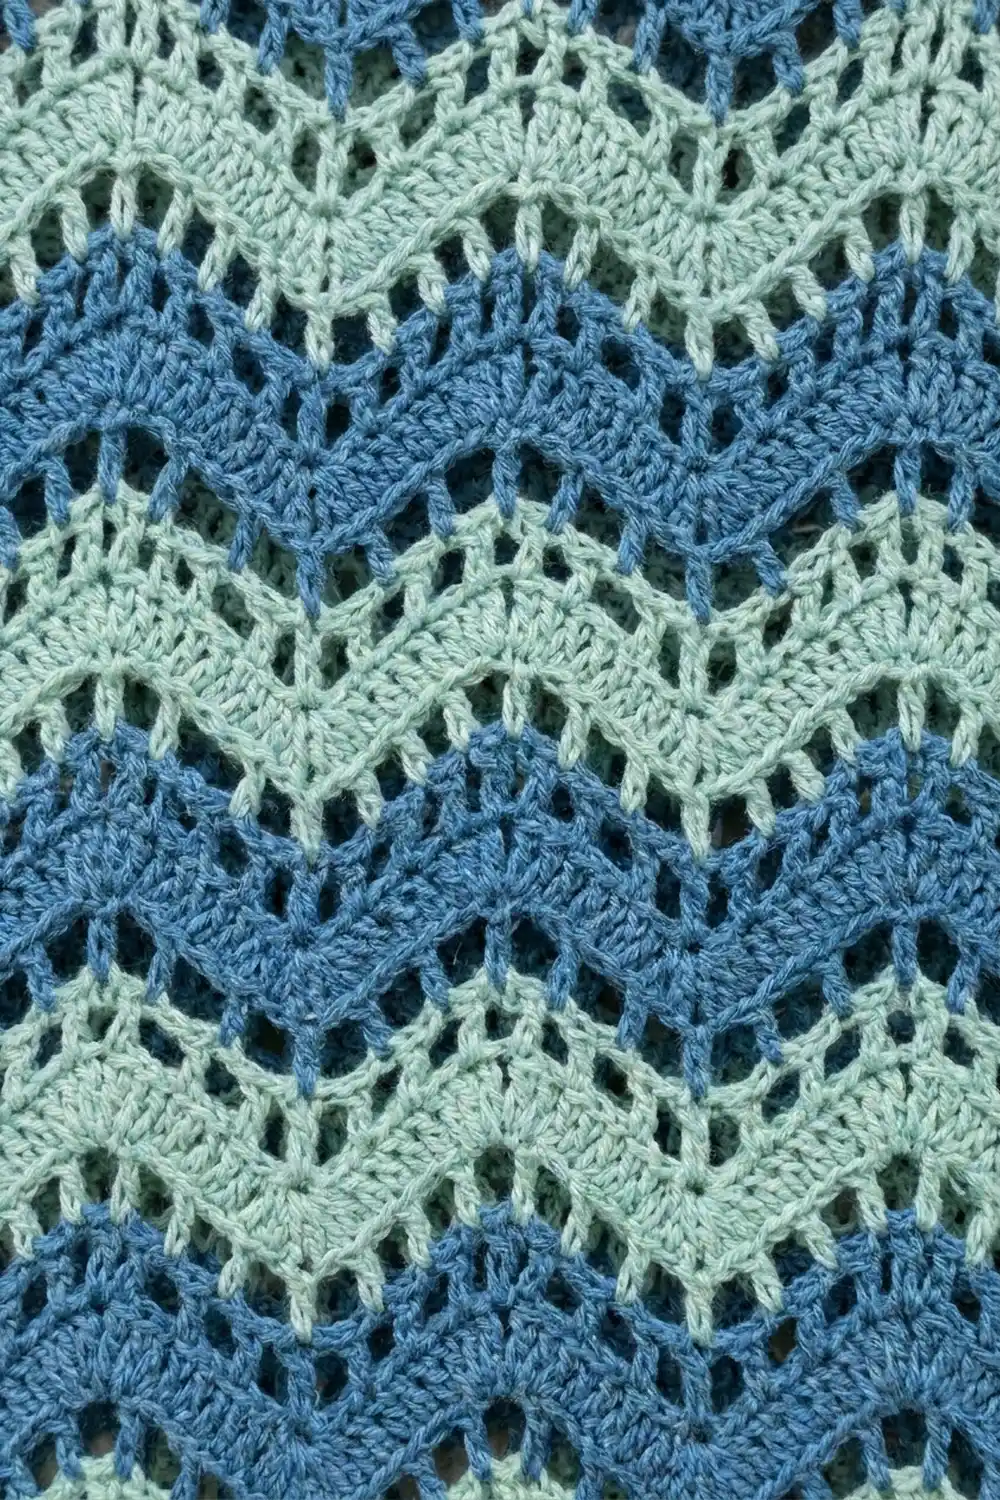
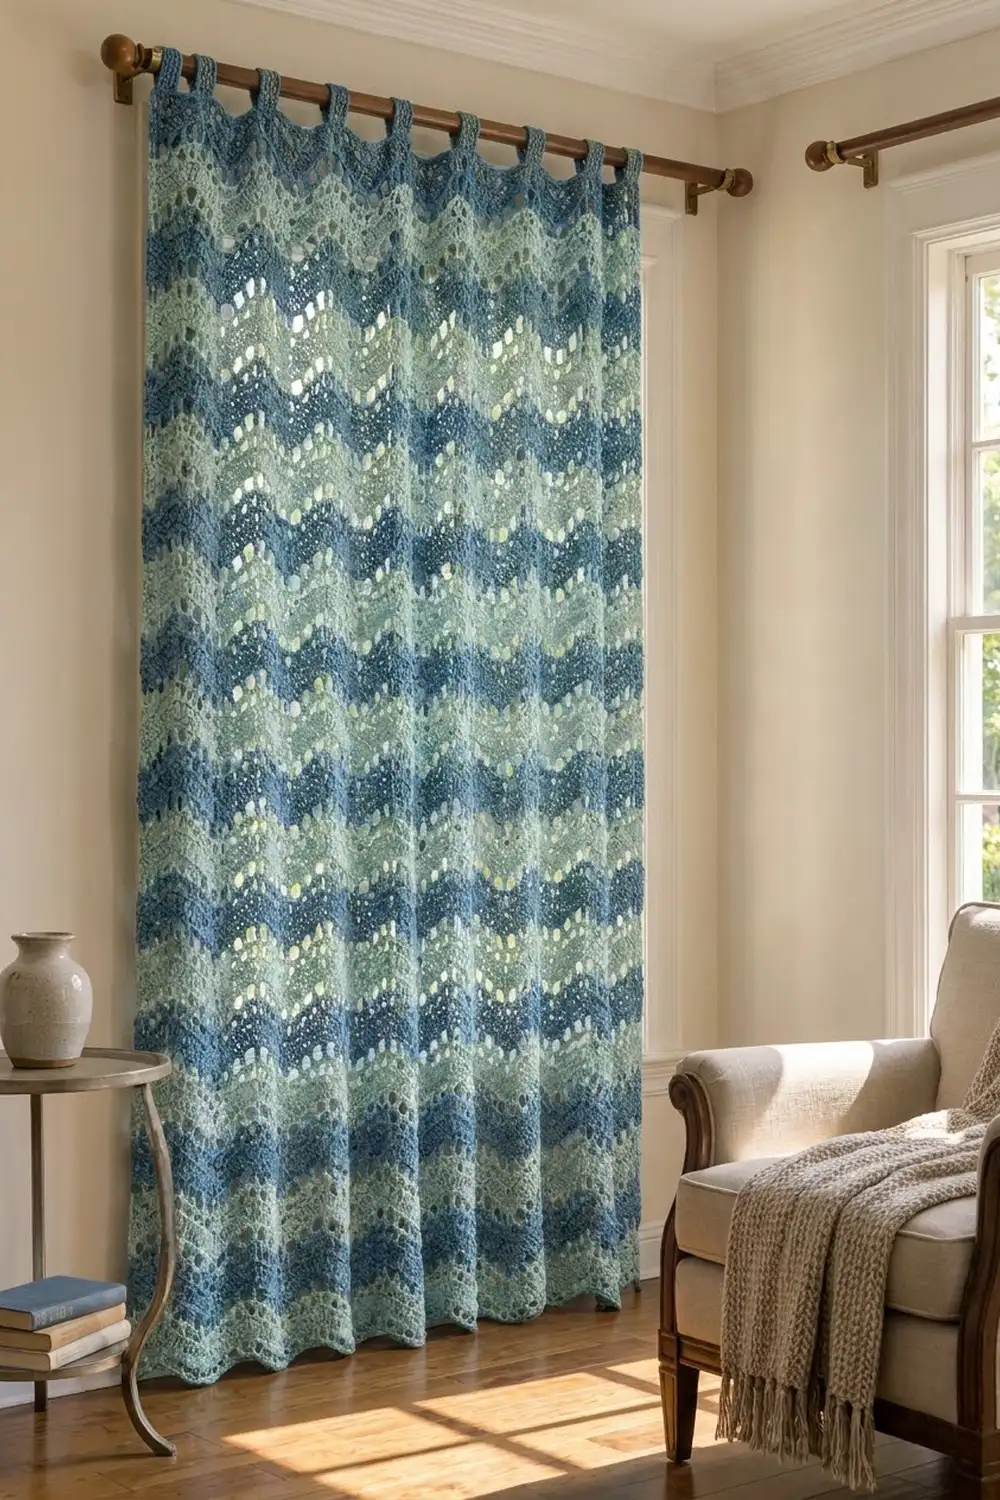
This floor-length curtain panel is worked in a soft ripple lace in two cool, coastal colors. Denim blue and seafoam green take turns in three-row stripes. Each stripe has two solid double-crochet wave rows with an eyelet mesh row between them, so light filters through in gentle zigzag lines.
The pattern uses US crochet terms throughout. The finished panel is 49 in (124.5 cm) wide and 85½ in (217.2 cm) long from the top edge to the bottom points. The tab loops add about 2½ in (6.4 cm) above the top edge, so the hanging length from the top of the rod is about 88 in (223.5 cm).
The panel is one single piece, worked from the bottom up in rows. The bottom edge forms natural scallops as the ripple pulls the foundation into waves. After the last stripe, two leveling rows give a straight top edge. Thirteen tabs are then worked straight up from that edge, folded to the back and sewn down. A two-row single crochet border finishes the sides and the bottom.
You only need two stitch shapes for the ripple: a solid wave row and a mesh wave row. Every row has the same stitch count, so checking your count is easy.
Finished Size and Construction
- Finished size: 49 in × 85½ in (124.5 cm × 217.2 cm), not counting the tabs
- Skill level: Intermediate (long project, simple repeats)
- Terminology: US crochet terms
- Yarn weight: DK (#3 light)
- Hook: 4.0 mm (G-6)
- Number of pieces: 1 (one panel; the tabs are worked onto it)
- Layout: one panel, 16 ripple repeats wide and 28 stripe repeats tall
- Piece size before border: 48 in × 85 in (121.9 cm × 215.9 cm)
- Border depth: 2 rows of sc, ½ in (1.3 cm) on each side and along the bottom
- Tabs: 13 tabs, each 1¾ in (4.4 cm) wide, with 2 in (5.1 cm) gaps between them
Materials
Use a DK cotton or a cotton-linen blend. These drape well, keep their shape in sunlight and wash easily. Avoid very stretchy acrylics, because a heavy curtain will grow in length as it hangs.
- Color A, Denim Blue: 1,000 g, about 2,300 m (2,515 yd)
- Color B, Seafoam Green: 800 g, about 1,840 m (2,012 yd)
These quantities include a margin of about 10% for your swatch and tension differences.
Tools:
– 4.0 mm (G-6) crochet hook
– Tapestry needle
– 2 locking stitch markers
– Measuring tape
– Rust-proof pins and a large blocking surface (a clean floor with towels works)
– Scissors
Abbreviations (US Terms)
- ch: chain
- sc: single crochet
- hdc: half double crochet
- dc: double crochet
- tr: treble crochet
- sk: skip
- sp: space
- st(s): stitch(es)
- RS / WS: right side / wrong side
- dc2tog: (yo, insert in next st, pull up a loop, yo, pull through 2) twice, yo, pull through all 3 loops
- dc3tog: like dc2tog but worked over 3 sts; pull through all 4 loops at the end
- dc5tog: like dc2tog but worked over 5 sts; pull through all 6 loops at the end
Special stitch: Mesh Peak. Work (dc, ch 1, dc, ch 1, dc) all in the same st. This makes 5 sts: 3 dc and 2 ch-1 sps.
Counting rule: In this pattern, every ch-1 sp counts as 1 st. A beginning ch-2 counts as 1 st when the pattern says so.
Gauge and Checkpoints
Gauge in ripple pattern: One 12-st repeat measures 3 in (7.6 cm) from peak to peak. Six pattern rows (one full stripe) measure 3 in (7.6 cm) tall. Single crochet works at 4 sts and 4 rows per 1 in (2.5 cm).
Test swatch: Ch 38. Work Row 1, then Rows 2–13 as written below (two stripe repeats) over 37 sts. The swatch has 3 ripple repeats.
– Width checkpoint: 9 in (22.9 cm) from edge to edge
– Height checkpoint: 6 in (15.2 cm) for Rows 2–13
Steam-block the swatch lightly before you measure it. If it’s too big, go down a hook size. If it’s too small, go up a hook size. Don’t change the stitch count: a width error of ¼ in (0.6 cm) per repeat turns into 4 in (10.2 cm) across the whole panel.
Panel checkpoints:
– After Row 2: 48 in (121.9 cm) wide, measured gently from point to point
– After Row 37: about 18 in (45.7 cm) from the top of Row 1
– After Row 85: about 42 in (106.7 cm)
– After Row 169: about 84 in (213.4 cm)
The Panel
The panel is worked over 193 sts. That is 16 repeats of 12 sts, plus 1 st, so it starts and ends with a half-valley. Every row ends with 193 sts.
Change colors on the last yo of the final stitch of the previous row. The stripes are 3 rows deep, so each new color starts at the opposite edge from where it was dropped. Cut the yarn at every color change, leave 6 in (15.2 cm) tails, and weave them into the same color band later.
Foundation (A): Ch 194.
Row 1 (WS): Sc in 2nd ch from hook and in each ch across. Turn. (193 sc)
Row Types
Solid Row: Ch 2, dc in next st (the ch-2 and dc together count as a dc2tog). Dc in next 4 sts, 3 dc in next st (peak), dc in next 4 sts, dc3tog over next 3 sts (valley). Repeat from * to * 15 more times, ending the last repeat after the second “dc in next 4 sts”. Then dc2tog over the last 2 sts. Turn.
The row has 16 peaks, 15 valley dc3tog, and a half-valley at each edge.
Count: 1 + (16 × 4) + (16 × 3) + (16 × 4) + (15 × 1) + 1 = 193 sts
Mesh Row: Ch 2, dc2tog over next 2 sts (counts as dc3tog). Ch 1, sk 1 st, dc in next st, ch 1, sk 1 st, Mesh Peak in next st (the center dc of the peak below), ch 1, sk 1 st, dc in next st, ch 1, sk 1 st, dc5tog over next 5 sts. Repeat from * to * 15 more times, but in the final repeat replace the dc5tog with dc3tog over the last 3 sts. Turn.
Count: 1 + (16 × 3) + (16 × 5) + (16 × 3) + (15 × 1) + 1 = 193 sts
Alignment check: Each Mesh Peak sits on top of a peak, and each dc5tog sits centered over a valley. In the next Solid Row, the 3-dc peak goes into the center dc of the Mesh Peak, and each dc3tog is centered on the top of a dc5tog. Work into every dc and every ch-1 sp.
Stripe Sequence
- Row 2 (RS): A, Solid Row
- Row 3: A, Mesh Row
- Row 4: A, Solid Row
- Row 5: B, Solid Row
- Row 6: B, Mesh Row
- Row 7: B, Solid Row
Rows 8–169: Repeat Rows 2–7 twenty-seven more times, for 28 stripe repeats in total. Row 169 is a B Solid Row.
Count check: 193 sts in every row; 168 pattern rows; about 84 in (213.4 cm) from the top of Row 1.
Leveling Rows
These rows fill the valleys so the top edge is straight. They work 1 stitch into each stitch, so the count stays at 193.
Row 170 (RS, A): Ch 4 (counts as tr), tr in next st, dc in next 2 sts, hdc in next st, sc in next st, sc in peak st, sc in next st, hdc in next st, dc in next 2 sts, tr in next st, tr in valley st, tr in next st, dc in next 2 sts, hdc in next st, sc in next st, sc in peak st. Repeat from * to * 14 more times. Then sc in next st, hdc in next st, dc in next 2 sts, tr in last 2 sts. Turn.
Count: 6 + (15 × 12) + 7 = 193 sts. Each repeat is 12 sts, worked 1-per-stitch.
Row 171 (WS, A): Ch 1, sc in each st across. Turn. (193 sc)
The panel now measures 48 in × 85 in (121.9 cm × 215.9 cm). Do not fasten off yet if you’re starting the tabs right away.
Tabs
The tabs are placed like this across the 193 sts:
3 edge sts + (13 tabs × 7 sts) + (12 gaps × 8 sts) + 3 edge sts = 3 + 91 + 96 + 3 = 193 ✓
Count the sts from the right-hand edge with the RS facing. Tab k starts at st 4 + 15 × (k − 1). So the tabs start at sts 4, 19, 34 … 184, and the last tab ends at st 190.
Each tab (A):
– Row 1 (RS): Join A in the first st of the tab, ch 1, sc in the same st and in the next 6 sts. Turn. (7 sc)
– Rows 2–20: Ch 1, sc in each st across. Turn. (7 sc)
– Fasten off, leaving a 12 in (30.5 cm) tail.
Each tab is 1¾ in (4.4 cm) wide and 5 in (12.7 cm) long. Fold each tab to the WS and whipstitch Row 20 to the WS of Row 170, directly behind the base of the tab. This makes a loop about 2½ in (6.4 cm) tall, which fits a rod up to 1½ in (3.8 cm) in diameter.
Checkpoint: All 13 loops should be the same height within ⅛ in (0.3 cm).
Border
Border gauge: 4 sc per 1 in (2.5 cm), worked into the row ends along the sides and 1 sc per stitch along the bottom.
Side count math: Each side edge is made of these row ends:
– 1 sc row end (Row 1): 1 sc
– 168 dc row ends (Rows 2–169): 2 sc each = 336 sc
– 1 tr row end (Row 170): 3 sc
– 1 sc row end (Row 171): 1 sc
– Total: 341 sc per side
At 4 sc per inch, 341 sc covers 85¼ in, which matches the 85 in (215.9 cm) side edge almost exactly. That keeps the side flat with no ruffling or cupping.
In this border, the side and bottom counts do not include the corners. Each corner is worked separately as shown.
Border Row 1 (RS, A): Join A at the top of the left side edge (the Row 171 end).
– Side 1: 341 sc down the side
– Corner: ch 2
– Bottom: 193 sc, 1 sc into each loop on the underside of the foundation chain, following the scallops
– Corner: ch 2
– Side 2: 341 sc up the other side
Turn. (875 sc and 2 ch-2 corner sps)
Border Row 2 (WS, A): Ch 1.
– Side 2: sc in each of the 341 sc
– Corner: 3 sc in the ch-2 sp
– Bottom: sc in each of the 193 sc
– Corner: 3 sc in the ch-2 sp
– Side 1: sc in each of the 341 sc
Fasten off. (881 sc: 341 + 3 + 193 + 3 + 341)
The bottom is worked 1-per-stitch, so the scallops keep their shape. The 3-sc corners turn the corners neatly without pulling them in. With the border added, the panel is 49 in (124.5 cm) wide and 85½ in (217.2 cm) long.
Final Blocking
- Weave in all the color tails inside their matching stripe bands, running each one about 2 in (5.1 cm) along the stitches of the same color.
- Soak the panel in cool water for 15 minutes. Gently squeeze the water out; don’t wring it.
- Roll the panel in large towels to remove extra water.
- Lay it flat with the RS up. Measure the width first: 49 in (124.5 cm).
- Pin the side edges straight, checking the 85½ in (217.2 cm) length every 12 in (30.5 cm).
- Pin each bottom point so the scallops are even, about 3 in (7.6 cm) apart from point to point.
- Lay the tabs flat and pin them straight up.
- Let the panel dry completely, which takes 24–48 hours. Hang it for one day before you decide whether to hem it.
Final Quality-Control Checklist
- Every row has 193 sts. Spot-check one row out of every five stripe repeats.
- There are 16 peaks across, all lined up vertically.
- There are 28 stripe repeats, and Row 169 ends in Color B.
- The top edge is straight after Rows 170–171.
- There are 13 tabs, each 7 sts wide, with 8-st gaps and 3 edge sts on each side.
- The side borders have 341 sc each, and the bottom has 193 sc.
- The finished size is 49 in × 85½ in (124.5 cm × 217.2 cm).
- All tails are secure, with none showing on the RS.
Troubleshooting
The peaks drift sideways: You missed or added a stitch. Count back to the last row with 193 sts and rip back to it.
The edges slant in: Make sure the beginning ch-2 counts as a stitch and that you’re working the edge decrease into the last 2 or 3 sts.
The mesh row looks crowded: Check that every ch-1 skips exactly one stitch, and that the dc5tog is centered on the valley.
The panel is wider than 48 in (121.9 cm): Your tension has relaxed over the length of the project. Check your gauge again against your swatch.
The sides ruffle: Work 3 sc per 2 dc row ends (instead of 4) along the affected section.
The top is wavy: In Row 170, check that the tr sts are over the valleys and the sc sts are over the peaks.
The panel grows when hung: Block it again and let it dry flat. Cotton-linen blends resist sagging better.
Care
Hand wash or machine wash in a mesh bag on a cool, gentle cycle. Dry flat, then rehang while it’s slightly damp so it settles evenly.
Final Notes
This panel comes down to one measurement chain. Each 12-st repeat is 3 in (7.6 cm), so 16 repeats make 48 in (121.9 cm). Each 6-row stripe is 3 in (7.6 cm), so 28 stripes make 84 in (213.4 cm). The leveling rows bring the length to 85 in (215.9 cm), and the 2-row border brings the panel to 49 in × 85½ in (124.5 cm × 217.2 cm). The tabs add about 2½ in (6.4 cm) above the top edge for a hanging length of about 88 in (223.5 cm). If your swatch matches, the rest of the panel will too.
Happy crocheting!