

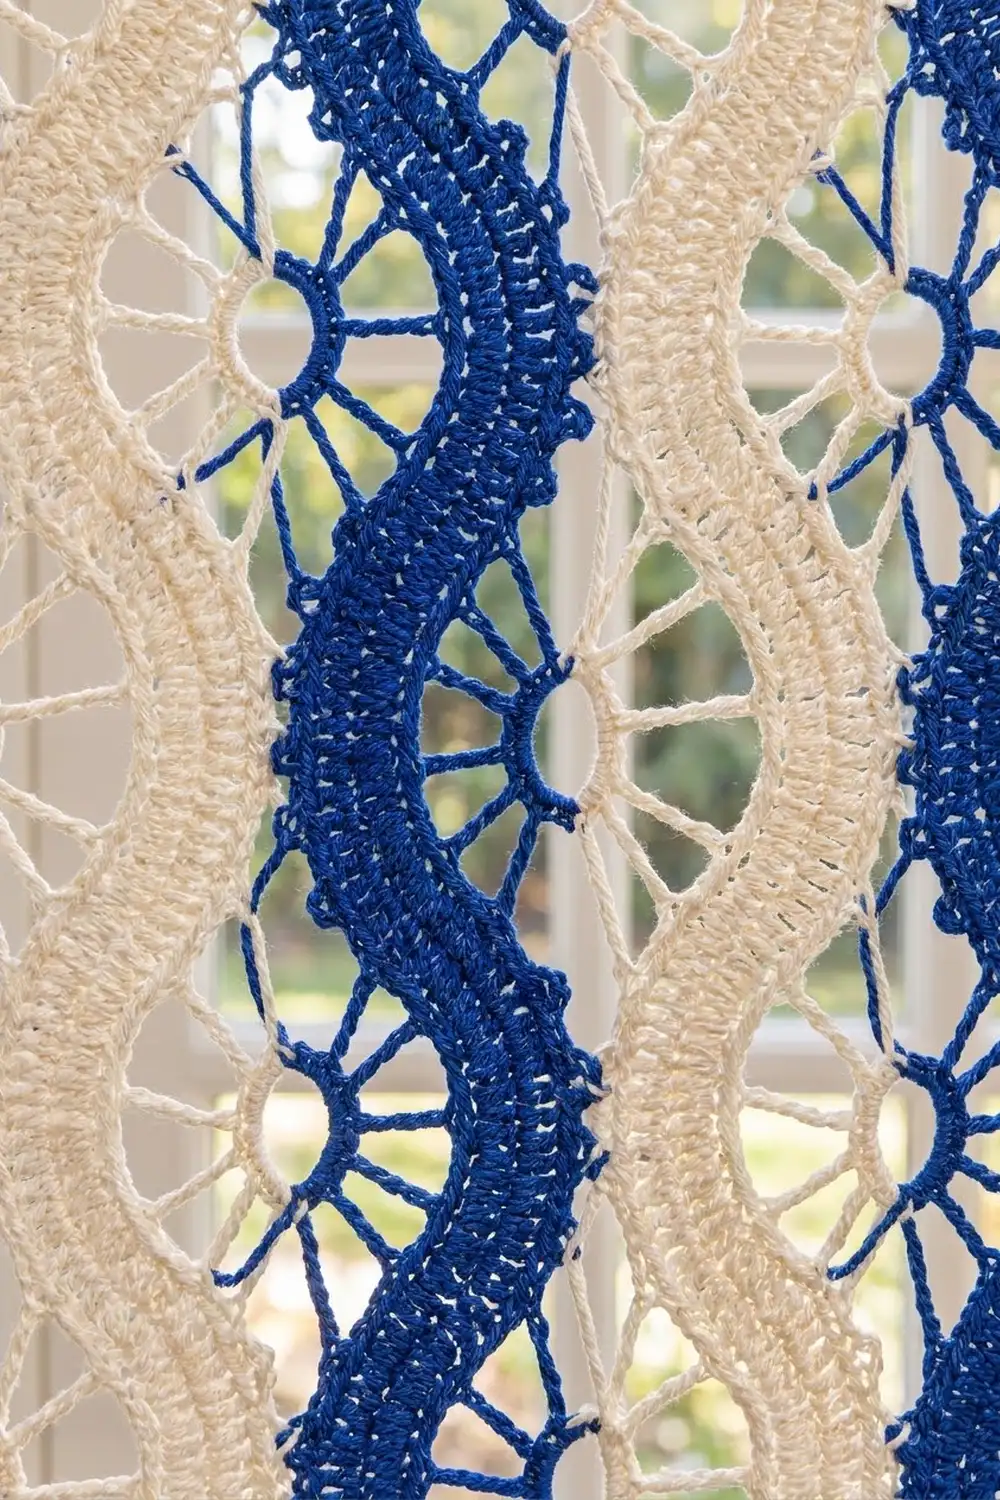
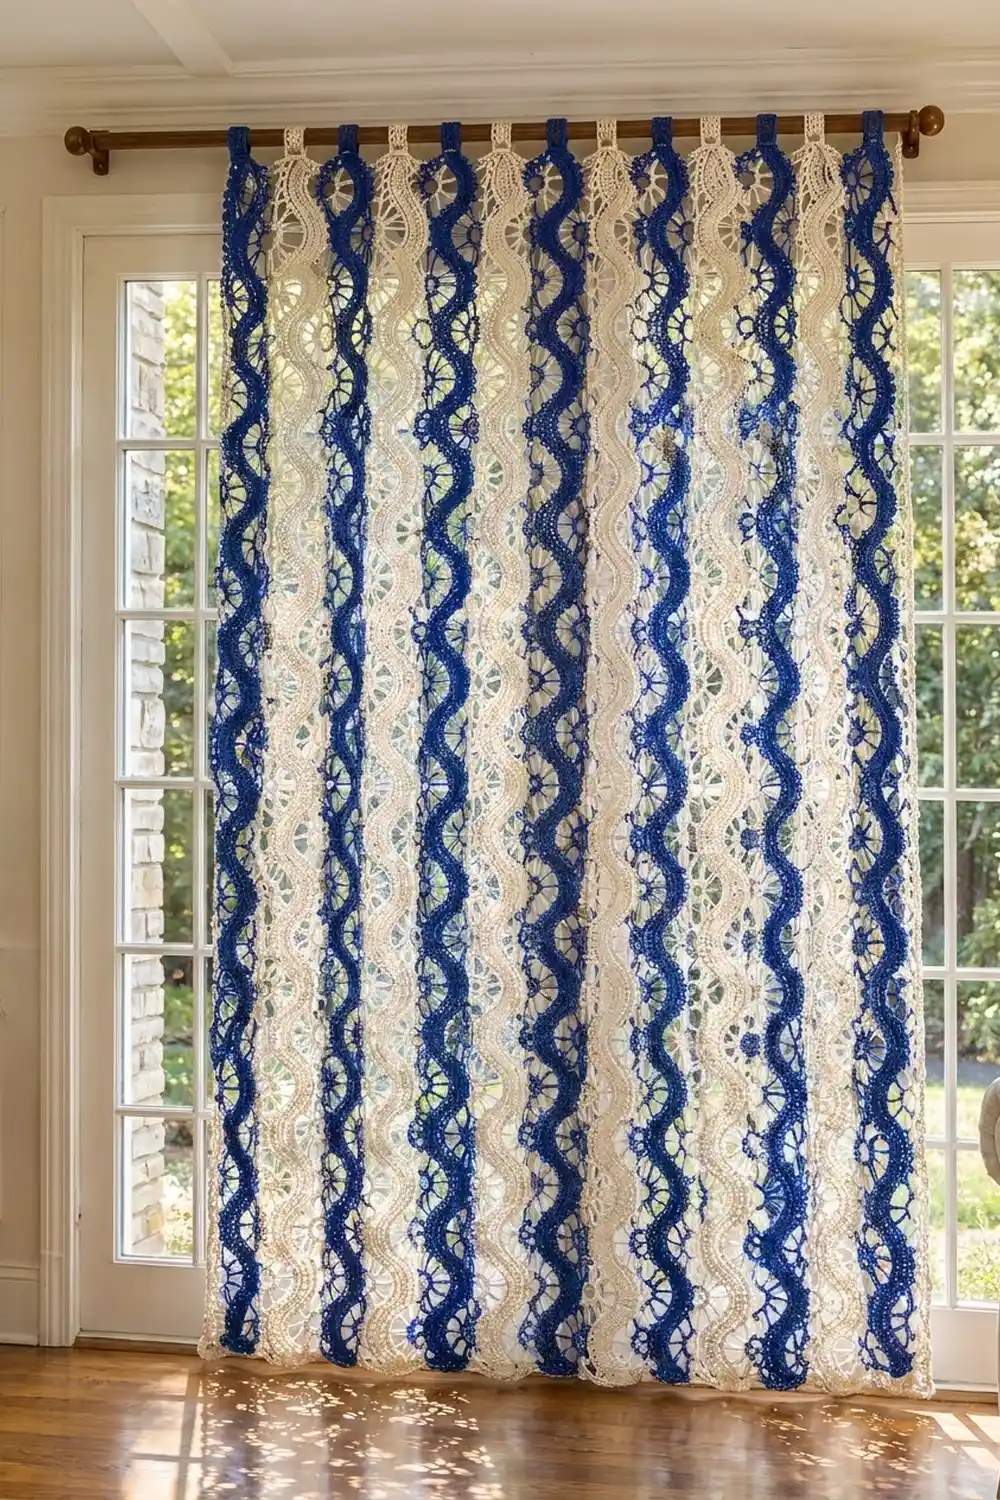
The Delft Ripple Lace Curtain is a tab-top door panel made from twelve narrow lace strips. Each strip is a wavy Bruges-style tape that snakes from top to bottom. Small spoked wheels fill the hollows of every bend, and picots finish the outer curves. Hung in a sunny window, the open lace lets soft, patterned light into the room.
The colors alternate royal blue and soft cream, one strip of each in turn, so the panel reads as twelve vertical ripples in a classic blue-and-white look. All instructions use US crochet terms.
The finished curtain body measures 48 in wide x 82.5 in long (121.9 x 209.6 cm). Twelve tab loops sit above it, each 2 in (5.1 cm) tall.
The curtain is built in sections. You start each strip from a small end bar and work the tape row by row, using longer loops on the outer side of each bend and shorter loops on the inner side. Next you edge each side in one pass, making wheels in the hollows and picots on the crests, and join each new strip to the last one at its crests. A one-row border runs across the top and bottom, and the tabs are worked from the top border.
Finished Size and Construction
- Finished size: 48 x 82.5 in (121.9 x 209.6 cm), plus 2 in (5.1 cm) tabs
- Skill level: Experienced
- Terminology: US
- Yarn weight: Sport (2), mercerized cotton
- Hook: 3.5 mm (E-4)
- Number of pieces: 12 strips (6 blue, 6 cream)
- Layout: 12 strips side by side in a single row, colors alternating
- Piece size: 4 x 82 in (10.2 x 208.3 cm) per strip
- Size before border: 48 x 82 in (121.9 x 208.3 cm)
- Border depth: 0.25 in (0.6 cm) at top and bottom; the strip edging finishes the long sides
Materials
Use a smooth mercerized cotton in sport weight. Cotton gives crisp picots and clear spokes, and it holds its shape on a hanging panel. Avoid fuzzy or very stretchy fibers: they blur the lace and sag over 82 in (208.3 cm). The amounts below assume 150 m (164 yd) per 50 g ball.
- Color A, royal blue: 450 g, about 1,350 m (1,476 yd)
- Color B, cream: 500 g, about 1,500 m (1,640 yd); cream also works both borders
Each strip uses about 60 g (180 m / 197 yd). The quantities include a margin of about 20–35 percent for swatching, tabs and borders.
Tools:
- 3.5 mm (E-4) hook
- Tapestry needle
- Locking stitch markers (at least 4)
- Rustproof pins and a large blocking surface
- Tape measure
- Spray bottle
Abbreviations (US Terms)
- ch – chain
- sl st – slip stitch
- sc – single crochet
- dc – double crochet
- sk – skip
- st(s) – stitch(es)
- RS / WS – right side / wrong side
Special stitches and terms
- Picot: ch 3, sl st in 3rd ch from hook.
- Joining picot: ch 1, sl st in the matching picot of the neighbor strip, ch 1, sl st in 1st ch of this picot.
- Inner loop: the ch-1 loop at the start of a row on the hollow side of a bend.
- Outer loop: the ch-3 loop at the start of a row on the crest side of a bend.
- Side A / Side B: with the RS of End Bar 1 facing you, Side A lies over sc 1–7 and Side B lies over sc 14–20.
Gauge and Checkpoints
Gauge: 20 sc = 4 in (10.2 cm) and 4 sc rows = 1 in (2.5 cm). The 6-dc tape measures 1.25 in (3.2 cm) wide. Each blocked bend (one curve) adds 2.25 in (5.7 cm) of strip length.
Test one piece first. Make End Bar 1, the set-up row and 4 curves. Then edge both sides and pin the piece out.
- Checkpoint 1: End bar = 4 in (10.2 cm) wide.
- Checkpoint 2: Tape = 1.25 in (3.2 cm) wide.
- Checkpoint 3: After 4 curves, the strip measures 9.5 in (24.1 cm) from the bottom of the end bar.
- Checkpoint 4: After edging, the width from crest to crest is 4 in (10.2 cm), matching the end bar.
If your piece is too big, go down a hook size. If it is too small, go up one. If the width is right but the curves come out too long, tighten your turning chains, because they control the curve. If your gauge is right, keep the test section as the start of Strip 1.
Strip Pattern
Make 12 strips: 6 in blue and 6 in cream. The strips are identical except for the curve order. Cream strips use the mirror-image order so the crests of neighboring strips line up.
End Bar (make 2 per strip, in the strip color)
Ch 21.
Row 1: Sc in 2nd ch from hook and in each ch across, turn. (20 sc)
Row 2: Ch 1, sc in each sc across. (20 sc) Fasten off.
End Bar 1 forms the bottom of the strip. Set End Bar 2 aside for the top.
Tape Set-Up Row
With the RS of End Bar 1 facing, join the strip color with a sl st in sc 8.
Set-up row: Ch 3 (counts as dc), dc in next 5 sc (sc 9–13). (6 dc)
This leaves 7 free sc on each side of the tape. The row ends at Side B.
Curve Rows
Every curve is 8 rows. Work each row as: turning chain (counts as the first dc), sk first dc, dc in next 4 dc, dc in top of turning ch. (6 dc)
Rows 1, 3, 5 and 7 of every curve start at Side B. Rows 2, 4, 6 and 8 start at Side A. That gives each curve 4 loops on each side.
The turning chain controls the curve:
- Inner side: ch 4 (ch-1 inner loop + ch 3 counting as dc).
- Outer side: ch 6 (ch-3 outer loop + ch 3 counting as dc).
A-inner curve (hollow on Side A):
- Rows 1, 3, 5, 7: ch 6, turn, work across. (6 dc)
- Rows 2, 4, 6, 8: ch 4, turn, work across. (6 dc)
B-inner curve (hollow on Side B):
- Rows 1, 3, 5, 7: ch 4, turn, work across. (6 dc)
- Rows 2, 4, 6, 8: ch 6, turn, work across. (6 dc)
Curve order:
- Blue strips: odd curves (1, 3, 5 … 35) are A-inner; even curves (2, 4, 6 … 36) are B-inner.
- Cream strips: odd curves are B-inner; even curves are A-inner.
Work 36 curves in total: 18 A-inner and 18 B-inner. That makes 1 set-up row + 288 curve rows = 289 tape rows. Place a marker at the end of every 4th curve to keep your place.
Lay the strip flat as you go. The short ch-1 loops draw in the inner edge, so the tape bends toward that side. The next curve bends back the other way, which creates the ripple.
Checkpoint: After 8 curves, the strip measures about 18.5 in (47.0 cm) when gently stretched; it hasn’t been blocked yet. After 18 curves, it measures about 41 in (104.1 cm).
Attach End Bar 2
Curve 36 ends at Side B. Fasten off, leaving a 12 in (30.5 cm) tail. Place End Bar 2 above the last row, RS up, with sc 8–13 lined up with the 6 dc. Whipstitch the 6 dc to sc 8–13. Weave in all ends.
Side Edging
Edge Side A, then Side B, each in one continuous pass in the strip color. Each side has 36 segments of 4 loops. Inner segments (hollows) alternate with outer segments (crests).
Join with a sl st in the first loop of the side, at the End Bar 1 end.
Inner segment (spoked wheel):
- Sl st in inner loop 1. Skip this step on the first segment if you just joined there. Ch 3, then ch 1 more and mark that ch as the hub.
- Ch 3, sl st in next inner loop, sl st in each of the 3 ch back to the hub, sl st in hub. Repeat this step once more.
- Ch 3, sl st in inner loop 4. (4 spokes)
Outer segment (picot crest):
- In each of the 4 outer loops: (2 sc, picot, 2 sc). (16 sc, 4 picots)
Move straight from the last loop of one segment into the first loop of the next. At the end of the side, fasten off.
Per side: 18 wheels (72 spokes) and 18 crests (288 sc, 72 picots).
On blue strips, Side A starts with a wheel. On cream strips, Side A starts with a crest.
Make All Pieces
- Blue (Color A): 6 strips
- Cream (Color B): 6 strips
Layout seen from the RS, with End Bar 2 at the top (B = blue, C = cream):
| B | C | B | C | B | C | B | C | B | C | B | C |
  1   2   3   4   5   6   7   8   9  10  11  12
Strip 1 is blue, at the far left. Strip 12 is cream, at the far right.
Joining
You join each new strip as you work its Side A edging.
- Make Strip 1 completely, edging both sides with no joins.
- Work the tape of Strip 2. Edge its Side B normally first. Then edge its Side A alongside Side B of Strip 1.
- On every outer segment of the joining side, replace the picots in loops 2 and 3 with joining picots. These are the two picots at the top of each crest.
- Repeat for Strips 3–12, joining each one to the strip on its left.
Stitch-to-stitch logic: On blue Side B the crests fall on odd curves, and on cream Side A they also fall on odd curves. Cream Side B and blue Side A both have their crests on even curves. Every crest therefore meets a crest, curve for curve: 18 crests x 2 joining picots = 36 joins per seam, across 11 seams.
If the crests don’t meet, check your curve order before you join.
Tension: Keep the joining ch 1 loose enough that the strips lie side by side without pulling. Pin the two strips flat next to each other before you start each seam.
Finally, whipstitch the 2-row ends of neighboring end bars together, at both top and bottom: 11 seams at each end.
Size checkpoint: 2 joined strips = 8 in (20.3 cm) wide. 6 strips = 24 in (61.0 cm). All 12 strips = 48 in (121.9 cm) wide x 82 in (208.3 cm) long.
Border
Border gauge: 5 sc = 1 in (2.5 cm); 1 sc row = 0.25 in (0.6 cm). Work the border in cream.
Top Border and Tabs
Row 1: With the RS facing and the End Bar 2 edges at the top, join cream in the first sc at the right corner. Ch 1, sc in each sc across all 12 end bars. (12 x 20 = 240 sc) Fasten off.
Tabs (make 12): Each strip has 20 border sts above it. Find sts 8–13 of each strip’s section, directly above its tape. Join that strip’s own color in st 8.
- Tab Row 1: Ch 1, sc in sts 8–13. (6 sc)
- Tab Rows 2–16: Ch 1, turn, sc in each sc. (6 sc)
Fasten off, leaving a long tail. Fold the tab to the WS and whipstitch Row 16 to the back of Row 1. Each loop is about 2 in (5.1 cm) tall and fits a rod up to 1.25 in (3.2 cm) in diameter.
Bottom Border
Row 1: With the RS facing and the bottom edge at the top, join cream in the first sc of End Bar 1 on Strip 1. Ch 1, sc in first 2 sc, picot, sc in next 4 sc; repeat from * 59 times total, picot, sc in last 2 sc. (240 sc, 60 picots)
Long Sides
The left and right edges need no added stitches. Strip 1 Side A and Strip 12 Side B already have 18 crests each, with 72 picots per side.
Why the math works: Each strip’s end bar is 20 sc = 4 in (10.2 cm), so 12 strips give 240 sc = 48 in (121.9 cm). The border places one sc in each end-bar sc and adds nothing at the seams, so it lies flat. The picot repeat (2 + 59 x 4 + 2) uses exactly 240 sc.
Final Blocking
- Soak the curtain in cool water for 15 minutes. Press out the water; don’t wring it.
- Roll it in towels to remove most of the moisture.
- Lay it flat on a clean floor over towels or blocking mats.
- Pin the top border in a straight line at 48 in (121.9 cm).
- Pin each strip’s center line straight down to 82 in (208.3 cm), then pin the bottom border.
- Pin each wheel hub so its spokes spread evenly.
- Pin out the picots along both long sides.
- Mist any areas that have dried and let the curtain dry fully, about 24 hours.
Final Quality-Control Checklist
- 12 strips in alternating blue and cream
- Each strip has 36 curves and 289 tape rows
- 6 dc in every tape row
- 18 wheels and 18 crests per side
- 36 joining picots per seam, 11 seams
- Top border has 240 sc; bottom border has 240 sc and 60 picots
- 12 tabs, each 6 sc x 16 rows, centered on its strip
- Finished body 48 x 82.5 in (121.9 x 209.6 cm)
- All ends woven in securely
Troubleshooting
- Tape won’t curve: Make sure the inner side uses ch 4 and the outer side uses ch 6.
- Two curves in a row bend the same way: The curve order is off. Rip back to the last correct curve.
- Crests don’t line up: One strip has the wrong curve order or a different number of curves.
- Wheels pucker: The spoke chains are too tight. Loosen them slightly.
- Picots curl: Block with a pin in every picot.
- Strip too long: Remove curves in pairs (2 curves = 4.5 in / 11.4 cm), and remove the same number from every strip.
- Panel too wide: The end bars are too wide. Check your sc gauge.
Care
Hand wash in cool water with a mild detergent and dry flat, pinning the picots back into shape. Take the panel off the rod to dry so the wet lace doesn’t stretch.
Final Notes
The measurement chain is simple. One end bar is 20 sc = 4 in (10.2 cm). Each curve adds 2.25 in (5.7 cm), so 36 curves = 81 in (205.7 cm). Two end bars add 1 in (2.5 cm), making each strip 82 in (208.3 cm). Twelve strips = 48 in (121.9 cm). The top and bottom borders add 0.25 in (0.6 cm) each, giving a finished body of 48 x 82.5 in (121.9 x 209.6 cm).
Check each measurement as you go and the curtain will come together evenly. Happy crocheting!