

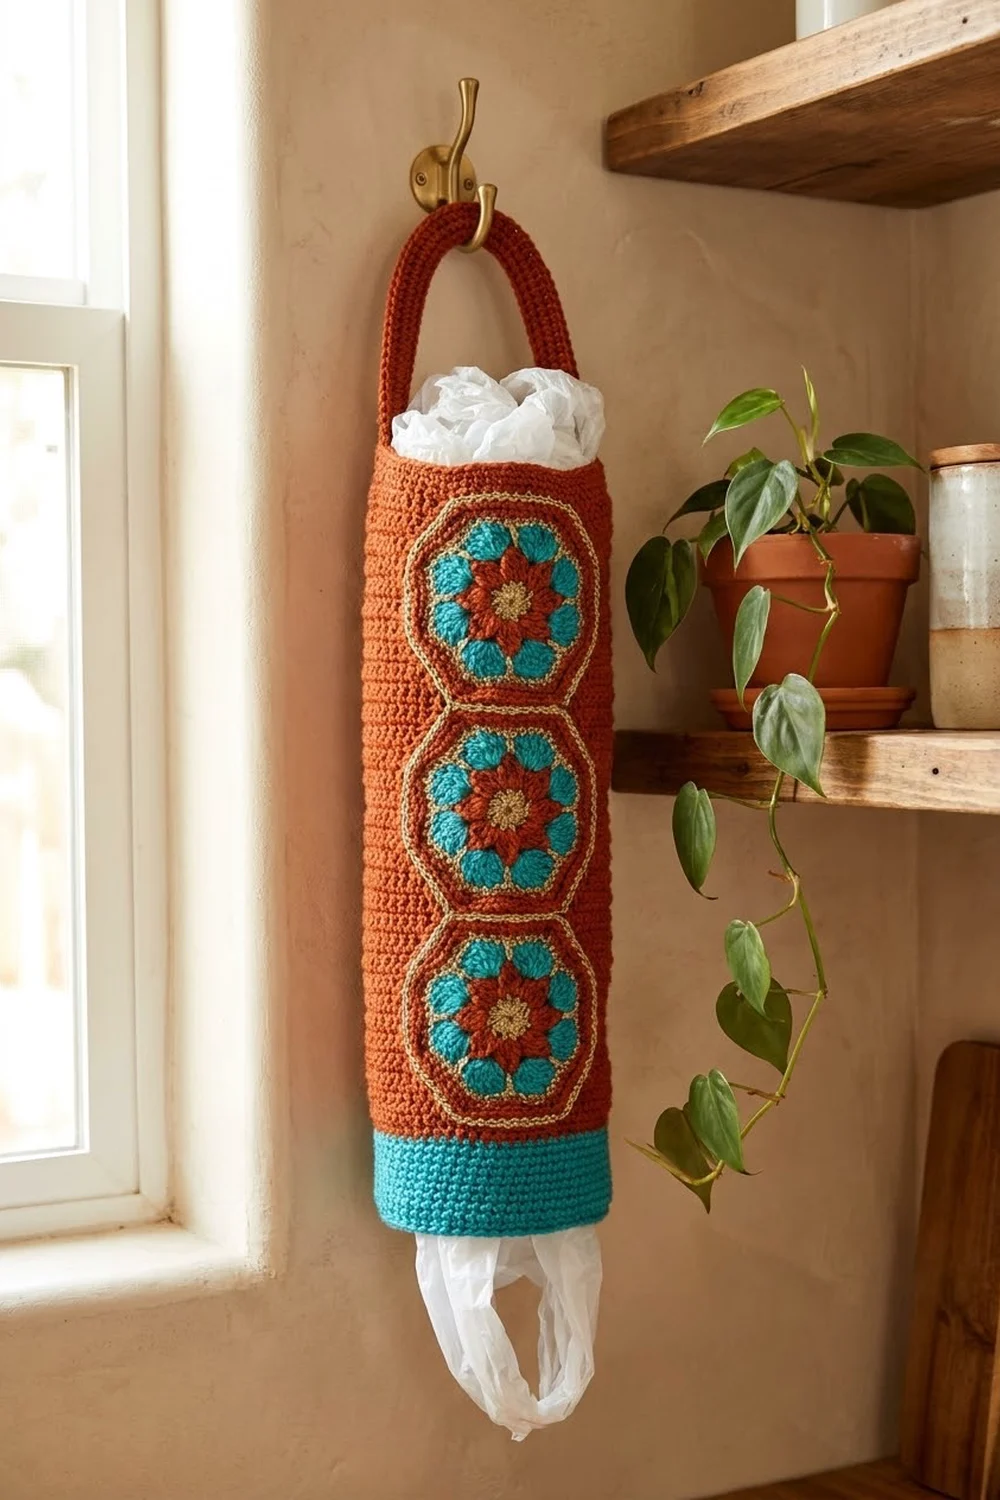
The Terracotta Tile Plastic Bag Holder puts a column of bright hexagon “tiles” on a sturdy rust-orange tube. You stuff bags in through the open top and pull them out one at a time through the cuffed opening at the bottom. It hangs from a simple arched loop, so any wall hook or cabinet knob will hold it.
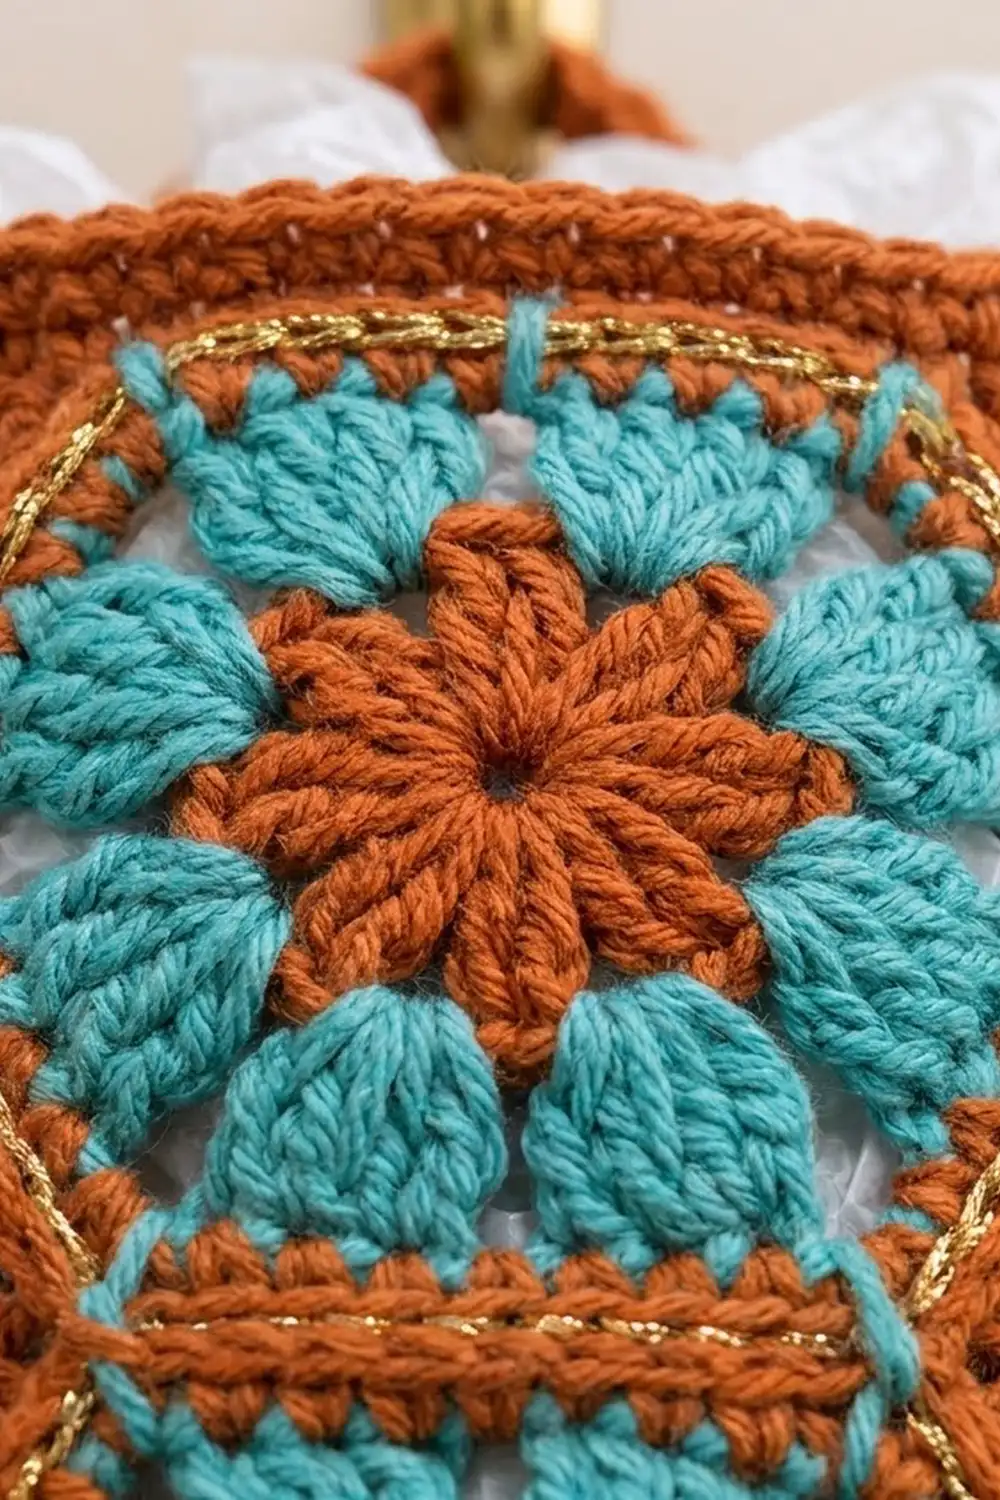
The palette is warm rust with turquoise, plus a thin glint of gold metallic thread around each motif. Each hexagon has a rust star-like center, twelve turquoise cluster petals, and a crisp rust outline. The bottom cuff repeats the turquoise so the dispensing hole stands out.
This pattern uses US crochet terms. The finished holder measures 6 in (15.2 cm) wide when flat and 18 in (45.7 cm) tall. With the hanging loop it is about 21.5 in (54.6 cm) long.
Construction is simple. You make three hexagons, join them into a vertical strip, and add one border round. Next you crochet the body in continuous rounds from the bottom cuff up and work the handle onto the rim. Last, you sew the strip to the front.
Finished Size and Construction
- Finished size: 6 in (15.2 cm) wide flat × 18 in (45.7 cm) tall, plus a loop about 3.5 in (8.9 cm) high
- Skill level: Easy-intermediate
- Terminology: US
- Yarn weight: Worsted (#4)
- Hook: 5.0 mm (H-8)
- Number of pieces: 3 hexagons + 1 body tube (the handle is worked onto the body)
- Layout: 1 × 3 vertical strip, hexagons joined flat side to flat side
- Piece size: each hexagon 4.25 in (10.8 cm) flat to flat, 4.9 in (12.4 cm) point to point
- Strip size before border: 4.9 in (12.4 cm) wide × 12.75 in (32.4 cm) tall
- Border depth: 0.25 in (0.6 cm) on every edge
- Strip size after border: 5.4 in (13.7 cm) × 13.25 in (33.7 cm)
Materials
Choose a smooth worsted cotton or cotton blend. Cotton holds its shape when the tube is packed with bags and is less likely to stretch out at the bottom opening. Acrylic also works, but it will be a little softer.
- Rust (main color): 110 g, about 200 m (219 yd)
- Turquoise (contrast): 35 g, about 64 m (70 yd)
- Gold metallic thread or fine metallic yarn: about 10 m (11 yd)
- 5.0 mm (H-8) crochet hook
- Tapestry needle
- 4 stitch markers
- Scissors
- Blocking mat, rust-proof pins, and a spray bottle
These quantities include a margin of about 10–15%. You will have enough for one gauge swatch, a few re-dos, and a slightly loose tension.
Abbreviations (US Terms)
- ch – chain
- sl st – slip stitch
- sc – single crochet
- dc – double crochet
- sc2tog – single crochet 2 together
- blo – back loop only
- sp – space
- st(s) – stitch(es)
- RS / WS – right side / wrong side
- Rnd – round
Special stitches
- Cluster (cl): [Yarn over, insert hook in the stitch, pull up a loop, yarn over, pull through 2 loops] twice. Then yarn over and pull through all 3 loops on the hook.
- Beginning cluster (beg cl): Ch 2, then work the first half of a cluster in the same stitch: yarn over, insert hook, pull up a loop, yarn over, pull through 2. Yarn over and pull through both loops on the hook.
- Surface slip stitch: Hold the working yarn behind the fabric. Insert the hook from the front, pull up a loop, and draw it through the loop on the hook.
Gauge and Checkpoints
Body gauge: 16 sc and 18 rounds = 4 in (10.2 cm) in continuous single crochet rounds.
Make one hexagon before anything else and use it as your gauge test. Measure it flat, from one straight side to the opposite straight side:
- After Rnd 1: 1.5 in (3.8 cm) across
- After Rnd 2: 2.5 in (6.4 cm) across
- After Rnd 3: 3.75 in (9.5 cm) across
- After Rnd 4: 4.25 in (10.8 cm) flat to flat, 4.9 in (12.4 cm) point to point
If the hexagon is too big (more than 4.5 in / 11.4 cm), go down to a 4.5 mm hook. If it is too small (under 4 in / 10.2 cm), go up to a 5.5 mm hook. Hexagon size matters because the bordered strip must fit within the 6 in (15.2 cm) front of the tube.
Check the body twice:
- After Rnd 7, it should measure 6 in (15.2 cm) wide when flat.
- At Rnd 45, it should measure 10 in (25.4 cm) from the bottom edge.
Hexagon Motif (Make 3)
Rnd 1 (rust): Make a magic ring. Ch 3 (counts as dc), then work 11 dc into the ring. Pull the ring closed and join with a sl st to the top of the beginning ch-3. (12 dc) Fasten off.
Rnd 2 (turquoise): Join turquoise in any dc. Beg cl in the same st, ch 2. *Cl in the next dc, ch 2.* Repeat from * 10 more times. Join to the top of the beg cl. (12 clusters, 12 ch-2 sps)
Rnd 3 (turquoise): Sl st into the first ch-2 sp. Ch 3 (counts as dc). Work (2 dc, ch 2, 3 dc) in the same sp for the first corner, then 3 dc in the next ch-2 sp. *(3 dc, ch 2, 3 dc) in the next ch-2 sp, 3 dc in the next ch-2 sp.* Repeat from * 4 more times. Join to the top of the ch-3. (54 dc, 6 corner ch-2 sps; 9 dc per side) Fasten off.
Rnd 3 turns the round circle into a hexagon. Every second space becomes a corner, so each side has 3 + 3 + 3 = 9 dc.
Rnd 4 (rust): Join rust in any corner ch-2 sp. Ch 1, then (sc, ch 2, sc) in the same sp. *Sc in each of the next 9 dc, then (sc, ch 2, sc) in the next corner sp.* Repeat from * 4 more times. Sc in each of the last 9 dc and join to the first sc. (66 sc, 6 ch-2 sps)
Counting per side, each side has 9 sc worked into the dc plus 1 corner sc at each end, so 11 sc per side, corner sc included. Six sides × 11 = 66. Fasten off.
Gold line: With the RS facing, attach the gold thread at any corner. Work a surface slip stitch around the hexagon in the groove between Rnd 3 and Rnd 4. Make 1 sl st at the base of each Rnd 4 sc, skipping the corner chains, and 1 sl st into each corner ch-2 sp. (66 sl sts – 12 corner sc + 6 corner sps = 60 sl sts) Keep the line relaxed; a tight line will cup the hexagon. Fasten off and weave in all ends.
Make All Pieces
- Hexagons: Make 3. Each uses rust for Rnds 1 and 4, turquoise for Rnds 2–3, and gold for the surface line.
- Body: Make 1, using turquoise for the cuff and rust for the rest.
Strip layout, read top to bottom, with each hexagon flat side up:
[ Hex 1 ]
[ Hex 2 ]
[ Hex 3 ]
Joining the Hexagons
Lay each hexagon with one flat side at the top and one at the bottom. The bottom side of Hex 1 joins the top side of Hex 2, and the bottom side of Hex 2 joins the top side of Hex 3.
Method: Hold two hexagons RS together and line up the matching sides. With rust, sl st through the back loops of both layers:
- 1 sl st in the corner ch-2 sps (both layers)
- 1 sl st in each of the 11 matching sc pairs
- 1 sl st in the next corner ch-2 sps
That is 13 sl sts per seam. Fasten off and make the second seam the same way.
Stitch-to-stitch logic: Each side has exactly 11 sc, so the stitches pair 1-to-1 with no skips and no extras.
Tension: Your slip stitches should be about as loose as your sc. If the seam puckers, pull out the seam and redo it with a hook one size larger.
Size checkpoint: The joined strip should measure 4.9 in (12.4 cm) wide at the side points and 12.75 in (32.4 cm) tall (3 × 4.25 in).
Body
The body is worked in continuous spiral rounds; do not join and do not turn. Move a marker up to the first stitch of each round.
Foundation (turquoise): Ch 24 and join with a sl st to form a ring, taking care not to twist the chain.
Rnd 1: Ch 1, then sc in each ch. (24 sc)
Rnds 2–4: Sc in each st around. (24 sc)
The cuff is now about 0.9 in (2.3 cm) deep. The opening is 6 in (15.2 cm) around, or about 1.9 in (4.8 cm) across. That is just big enough to pull one bag through at a time. Change to rust on the last stitch of Rnd 4 and fasten off the turquoise.
Rnd 5 (increase round): *Sc in the next 2 sts, 2 sc in the next st.* Repeat 8 times. (32 sc)
Rnd 6 (increase round): *Sc in the next 3 sts, 2 sc in the next st.* Repeat 8 times. (40 sc)
Rnd 7 (increase round): *Sc in the next 4 sts, 2 sc in the next st.* Repeat 8 times. (48 sc)
Checkpoint: The body should measure 6 in (15.2 cm) wide when flat. Flatten the tube so the start-of-round marker sits on the left fold. Stitches 1–24 are the front and stitches 25–48 are the back. Keep this orientation for the rest of the body.
Rnds 8–79: Sc in each st around. (48 sc)
That is 72 straight rounds, or 16 in (40.6 cm). At Rnd 45, the body should measure 10 in (25.4 cm) from the bottom edge.
Rnd 80: Sc blo in each st. (48 sc) The back-loop round forms a crisp fold line for the rim.
Rnd 81: Sc in each st. (48 sc) Sl st to the next st to smooth out the spiral step. Do not fasten off.
The body now has 81 rounds. At 18 rounds per 4 in, that is 18 in (45.7 cm) tall.
Handle: Make sure the beginning of Rnd 81 sits on the left fold. Sl st into st 47 so you can start straddling the fold.
- Row 1: Ch 1, then sc in sts 47, 48, 1, and 2. Turn. (4 sc)
- Rows 2–36: Ch 1, sc in each st across, turn. (4 sc)
The strap is 1 in (2.5 cm) wide and 8 in (20.3 cm) long. Bring the strap over the top without twisting it. Line it up with sts 23–26, which straddle the right fold. Sl st through the strap’s last row and those 4 rim sts together. Fasten off.
The strap forms an arch about 3.5 in (8.9 cm) high.
Border (Hexagon Strip)
Border gauge: One round of sc adds 0.25 in (0.6 cm) on every edge.
Starting count: The strip shows 14 open sides: 5 on Hex 1 (top + 4 slanted sides), 4 on Hex 2, and 5 on Hex 3. Each side has 11 sc, so 14 × 11 = 154 edge stitches.
The strip also has two kinds of corners:
- 10 outer corners: 2 at the top, 2 at the bottom, and 1 on each side point of each hexagon (6)
- 4 inner notches: where two hexagons meet, on the left and right of each seam
Border Rnd (rust): With the RS facing, join in the top-right corner sp of Hex 1. Work around the whole strip:
- 3 sc in each outer corner ch-2 sp
- sc in each sc along every open side (11 per side)
- at each inner notch, sc2tog: work the first leg in the corner sp of the upper hexagon and the second leg in the corner sp of the lower hexagon
Join to the first sc.
Count: 154 + (10 × 3) + (4 × 1) = 188 sc. Each straight side now has 11 sc between its corner groups.
Why the math works: The 3 sc at each outer corner turn the 120° point without pulling. The single sc2tog at each notch closes the inward angle without leaving a gap. Along the sides, you work exactly 1 sc per existing sc, so nothing ruffles or tightens. The bordered strip measures 5.4 in (13.7 cm) × 13.25 in (33.7 cm). Fasten off and weave in the ends.
Attaching the Strip
Lay the body flat with the front (sts 1–24) facing up. Center the strip side to side, so its center line sits between front sts 12 and 13.
Place the bottom edge of the strip at Rnd 9, which is 2 in (5.1 cm) above the bottom edge. The top edge then lands near Rnd 69, leaving about 2.75 in (7.0 cm) of plain rust below the rim.
Pin all around the strip. Slide a book or a piece of cardboard inside the tube so you don’t catch the back layer.
With rust, whipstitch through the outer loop of each border sc and into the body fabric directly underneath. Make 1 stitch per border sc, 188 whipstitches in all. Keep the stitches snug but not tight.
Final Blocking
- Weave in every remaining end along a seam or inside the tube.
- Lightly spray the whole holder with water until it is damp, not soaked.
- Roll a towel into a firm cylinder and slide it inside the tube.
- Smooth the hexagon strip flat and nudge each hexagon’s points into sharp angles.
- Pat the bottom cuff into a round opening.
- Lay the handle flat so it isn’t twisted.
- Let it dry completely. Acrylic can instead be steamed lightly with the iron held above the fabric, never touching it.
- Remove the towel and check that the holder still measures 6 in (15.2 cm) wide and 18 in (45.7 cm) tall.
Final Quality-Control Checklist
- Each hexagon has 66 sc in Rnd 4, with 11 per side.
- The gold line lies flat and sits evenly between the turquoise and the rust outline.
- Both strip seams are flat, with 13 sl sts each.
- The border has 188 sc, with 3 at each outer corner and an sc2tog at each notch.
- The body has 48 sts from Rnd 7 up and measures 6 in (15.2 cm) flat.
- The cuff has 24 sts and the opening is about 1.9 in (4.8 cm) across.
- The handle is 4 sts wide and attached straddling both side folds.
- The strip is centered and sewn on without puckers, with the bottom at Rnd 9.
Troubleshooting
- Hexagon cups: Rnd 3 or the gold line is too tight. Loosen your tension, or work Rnd 3 one hook size up.
- Hexagon ruffles: You may have added a dc. Recount 9 dc per side in Rnd 3.
- Gaps at the strip notches: Make sure each sc2tog catches both corner spaces.
- Strip wider than the front: Remake the hexagons with a smaller hook, or add 4 sc to the body (52 sts) and keep that count for all straight rounds.
- Spiral jog at the rim: The final sl st in Rnd 81 smooths it. Work one more sl st if the step is still visible.
- Bags fall out of the bottom: Work Rnd 1 into the back bumps of the chain for a firmer cuff, or go down one hook size for the cuff only.
- Handle stretches: Use cotton, or work the handle rows with a 4.5 mm hook.
Care
Hand wash in cool water, press out the water in a towel, and dry flat over a rolled towel to keep the tube shape. Do not wring it or tumble dry it, because that can distort the hexagons.
Final Notes
The measurement chain is simple. Each hexagon measures 4.25 in (10.8 cm) across, and three in a row make a 12.75 in (32.4 cm) strip. The border brings the strip to 5.4 in (13.7 cm) × 13.25 in (33.7 cm), which fits the 6 in (15.2 cm) front of a 48-stitch tube. Eighty-one rounds give the body its 18 in (45.7 cm) height, and the 8 in (20.3 cm) strap arches 3.5 in (8.9 cm) above the rim. Check your gauge at each stage and the holder will hang straight, dispense smoothly, and keep your plastic bags neatly in one place.
Happy crocheting!