

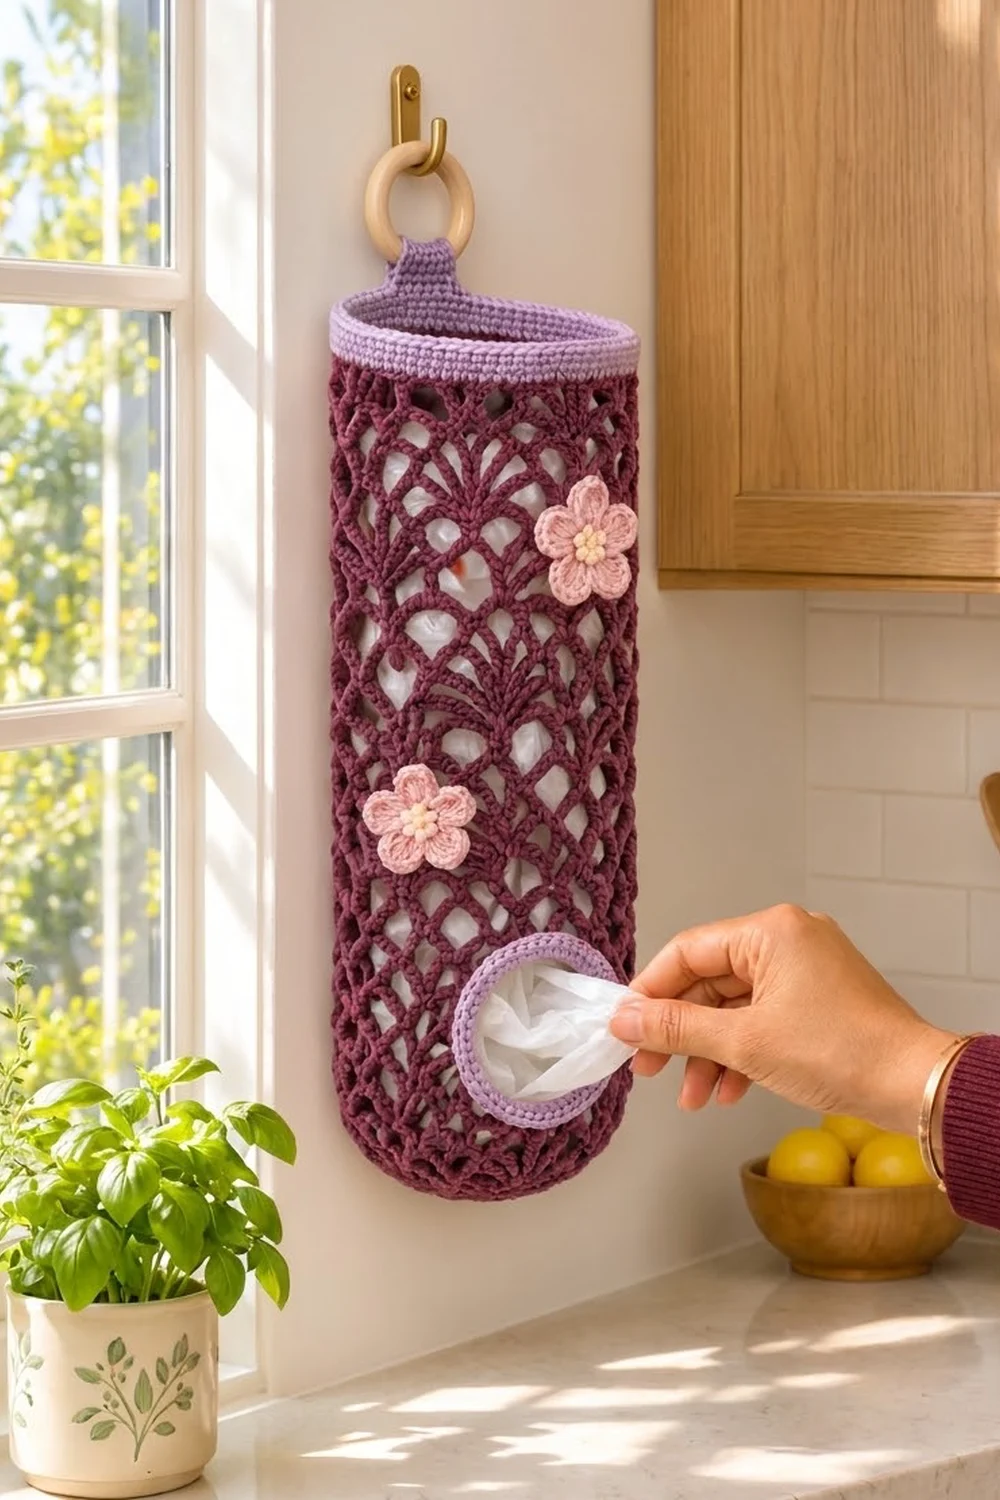
This bag holder turns a drawer full of loose grocery bags into a neat kitchen accent. You stuff bags in through the top and pull them out, one at a time, through a round opening near the bottom.
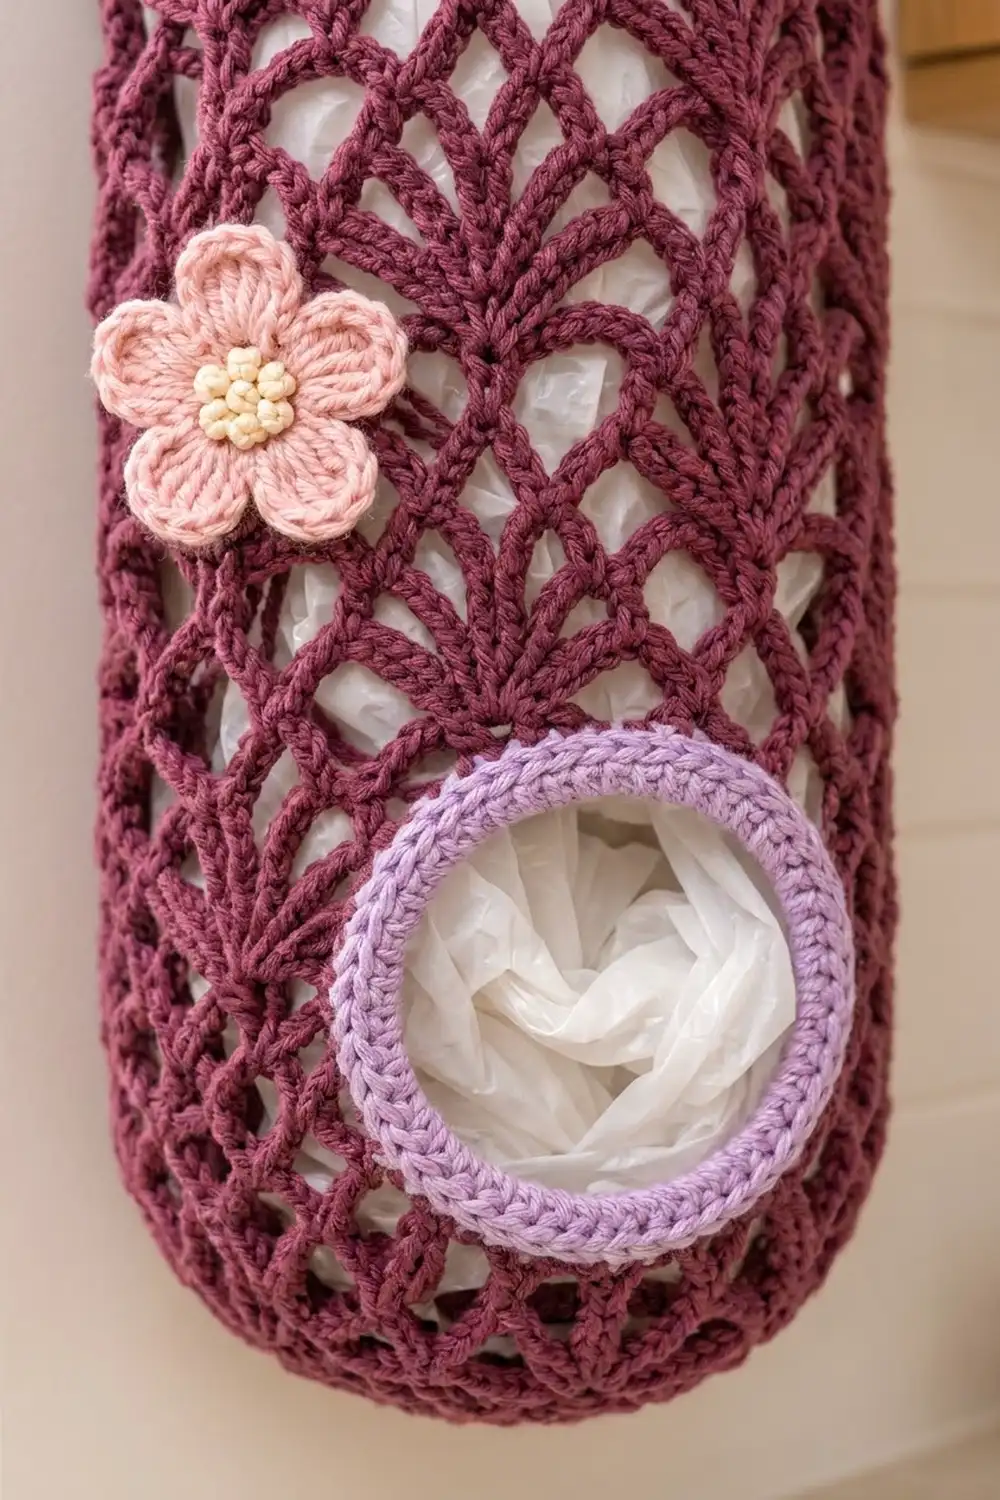
The body is deep plum fan mesh. Columns of seven-double-crochet fans alternate with chain-loop net rounds, so the diamond-shaped holes let the white bags show through. A solid lavender band finishes the top, a matching lavender rim frames the dispensing hole, and two soft pink flowers with cream knot centers add a cottage touch.
The pattern uses US crochet terms. The finished holder measures about 6 in (15.2 cm) wide laid flat and 19.5 in (49.5 cm) long, not counting the hanging tab. The tab loop adds about 1.5 in (3.8 cm).
You work the holder top-down in joined rounds as one tube. You start with the lavender band and switch to plum for the mesh. For three short rows you work back and forth to leave the dispensing hole open, then return to rounds and gather the bottom closed. Finally you add the hole rim, the hanging tab, and the flowers.
Finished Size and Construction
- Finished size: 6 in (15.2 cm) wide flat × 19.5 in (49.5 cm) long
- Skill level: Intermediate
- Terminology: US
- Yarn weight: DK (weight 3) cotton or cotton blend
- Hook: 4 mm (G-6)
- Number of pieces: 1 main tube (band and tab worked on), plus 2 small flower appliqués
- Layout: Single vertical tube with the hole centered on the lower front
- Circumference: 12 in (30.5 cm), 60 stitches
- Opening before rim: about 3.5 in (8.9 cm) wide × 2 in (5.1 cm) tall
- Rim depth: about 0.4 in (1.0 cm), 3 rounds
- Finished opening: about 3.25 in (8.3 cm) outer diameter, 2.5 in (6.4 cm) inner diameter
Materials
Use a smooth, firm cotton or cotton blend. Cotton holds the fan shapes crisply and doesn’t stretch out much once the tube is full of bags. Avoid fuzzy yarns, which blur the mesh.
- Plum (Color A): about 120 g / 276 m
- Lavender (Color B): about 20 g / 46 m
- Pale pink (Color C): about 5 g / 12 m
- Cream (Color D): about 3 g / 7 m
Tools:
– 4 mm (G-6) crochet hook
– 1 wooden ring, 2 in (5.1 cm) diameter
– Tapestry needle
– 4 locking stitch markers
– Scissors
– Rust-proof pins and a rolled towel for blocking
All quantities include a margin of about 15% for swatching and small tension differences.
Abbreviations (US Terms)
- ch: chain
- sl st: slip stitch
- sc: single crochet
- hdc: half double crochet
- dc: double crochet
- tr: treble crochet
- sk: skip
- sp: space
- sc2tog: single crochet 2 together
- RS / WS: right side / wrong side
- st(s): stitch(es)
Fan: 7 dc worked into the same chain space or stitch. The center of a fan is its 4th dc.
Standing sc: with a slipknot on the hook, insert the hook into the stitch and complete a sc without chaining first.
Gauge and Checkpoints
Solid gauge: 20 sc × 24 rounds = 4 in (10.2 cm) in sc.
Mesh gauge: one pattern repeat (1 fan round plus 1 net round) is 1.2 in (3.0 cm) wide and 1.25 in (3.2 cm) tall.
Test first: work Rnds 1–9 below as your swatch. Lay the tube flat and check the measurements before going on. The swatch becomes the start of the holder, so nothing is wasted.
Checkpoints, measured from the top edge with the tube laid flat:
– After Rnd 6: band is 1 in (2.5 cm) deep and 6 in (15.2 cm) wide.
– After Rnd 27: 14 in (35.6 cm) long.
– After Rnd 31: 16.5 in (41.9 cm) long.
– After Rnd 34: 18.5 in (47.0 cm) long.
– After Rnd 38: 19.5 in (49.5 cm) long.
If it’s too big: go down to a 3.75 mm hook. If only the mesh runs long, crochet the chains a little more firmly.
If it’s too small: go up to a 4.5 mm hook. Small length differences in the mesh are fine, because cotton mesh relaxes once the holder is filled.
Pattern
Top Band (Color B)
Ch 60 and join with a sl st to form a ring, taking care not to twist the chain. This join marks the center back.
Rnd 1: Ch 1, sc in each ch around, sl st to first sc. (60 sts)
Rnds 2–6: Ch 1, sc in each st around, sl st to first sc. (60 sts per round)
Fasten off Color B. The band should be 1 in (2.5 cm) deep.
Mesh Body (Color A)
Rnd 7 (set-up net): Join Color A at the center-back join. Ch 1, sc in same st, ch 5, sk 5 sts, sc in next st 9 times, ch 5, sk last 5 sts, sl st to first sc. (10 sc, 10 ch-5 loops)
Rnd 8 (fan): Ch 1, sc in first sc, 7 dc in next ch-5 sp, sc in next sc 9 times, 7 dc in last ch-5 sp, sl st to first sc. (80 sts: 10 fans and 10 sc)
Rnd 9 (net): Sl st in next 4 dc to reach the center of the first fan. Ch 1, sc in same dc, ch 5, sc in 4th dc of next fan 9 times, ch 5, sl st to first sc. (10 sc, 10 ch-5 loops)
Each fan sits in a loop, and each net sc sits at a fan center. This is what staggers the fans and creates the diamond holes.
Rnds 10–27: Repeat Rnds 8–9 nine more times. Rnd 27 is a net round. (10 sc, 10 ch-5 loops)
Checkpoint: the piece should be 14 in (35.6 cm) long.
Dispensing Hole Rows
Flatten the tube with the band’s join at the center back. On the front of Rnd 27, find the ch-5 loop that sits exactly at center front. Mark it and the loop on each side of it, for 3 marked loops in total. These 3 loops and the 2 sc between them form the top edge of the hole. Fasten off Color A.
Row 28 (RS, fan): Join Color A with a standing sc in the first sc after the marked loops, working in the usual round direction. Then work 7 dc in next ch-5 sp, sc in next sc 7 times. You should finish in the sc just before the marked loops. Turn. (57 sts: 7 fans and 8 sc)
Row 29 (WS, net): Ch 1, sc in first sc, ch 3, sc in 4th dc of next fan, ch 5, sc in 4th dc of next fan 6 times, ch 3, sc in last sc. Turn. (9 sc, 6 ch-5 loops, 2 ch-3 sps)
Row 30 (RS, fan): Ch 3 (counts as dc), 3 dc in first ch-3 sp, sc in next sc, 7 dc in next ch-5 sp, sc in next sc 6 times, 3 dc in last ch-3 sp, dc in last sc. (57 sts: 6 full fans, 2 half-fans of 4 sts each, 7 sc) Do not turn.
Closing the Hole
Rnd 31 (net): Ch 17 to cross the gap, then sc in the top of the turning ch-3 at the start of Row 30. Work ch 5, sc in 4th dc of next full fan 6 times, then ch 5, sl st in the last dc of Row 30 (at the base of the ch-17). (7 ch-5 loops plus the ch-17, which stands in for 3 loops: 10 loop positions)
The ch-17 math: across 3 loop positions you would normally have ch 5, sc, ch 5, sc, ch 5, which is 17 stitches.
Rnd 32 (fan): Ch 1, sc in the same dc. Work the following into the ch-17:
– 7 dc in 3rd ch
– sc in 6th ch
– 7 dc in 9th ch
– sc in 12th ch
– 7 dc in 15th ch
Then sc in next sc, 7 dc in next ch-5 sp, sc in next sc 6 times, 7 dc in last ch-5 sp, sl st to first sc. (80 sts: 10 fans and 10 sc)
Checkpoint: the piece should be 16.5 in (41.9 cm) long, measured to the top of Rnd 31.
Rnd 33: Work as Rnd 9. (10 sc, 10 ch-5 loops)
Rnd 34: Work as Rnd 8. (80 sts)
Checkpoint: the piece should be 18.5 in (47.0 cm) long.
Rounded Bottom
Rnd 35 (small net): Sl st in next 4 dc, ch 1, sc in same dc, ch 3, sc in 4th dc of next fan 9 times, ch 3, sl st to first sc. (40 sts: 10 sc and 10 ch-3 loops)
Rnd 36 (small fan): Ch 1, sc in first sc, 5 dc in next ch-3 sp, sc in next sc 9 times, 5 dc in last sp, sl st to first sc. (60 sts: 10 five-dc fans and 10 sc)
Rnd 37: Sl st in next 3 dc, ch 1, sc in same dc, ch 1, sc in 3rd dc of next fan 9 times, ch 1, sl st to first sc. (20 sts)
Rnd 38: Ch 1, sc2tog over next sc and ch-1 sp 10 times, sl st to first st. (10 sts)
Fasten off, leaving a 10 in (25.4 cm) tail. Weave the tail through the front loops of all 10 stitches, pull tight, and secure on the inside. The small fans curve the bottom into a soft U shape.
Hanging Tab (Color B)
With the band’s RS facing, find the 8 stitches of Rnd 6 centered over the center-back join. Join Color B in the first of them.
Row 1: Ch 1, sc in each of the 8 sts. Turn. (8 sts)
Rows 2–18: Ch 1, sc in each st, turn. (8 sts per row)
The tab measures 1.6 in (4.1 cm) wide and 3 in (7.6 cm) long. Fold it through the wooden ring, bring Row 18 down to the inside of the band, and whipstitch it in place.
Flowers (Make 2)
Rnd 1: With Color D, make a magic ring. Ch 1, 5 sc in ring, sl st to first sc. (5 sts) Fasten off.
Rnd 2: Join Color C in any sc. Ch 1, 2 sc in each st, sl st to first sc. (10 sts)
Rnd 3: Sl st in next st, (hdc, 2 dc, tr, 2 dc, hdc) in next st 5 times, ending with a sl st in the first sl st. (5 petals, 40 sts)
Fasten off. With Color D, add 4 French knots to the center for a clustered look. Each flower is about 1.75 in (4.4 cm) across.
Border: Dispensing Hole Rim (Color B)
The rim uses the solid gauge: 5 sc per 1 in (2.5 cm).
Rnd 1: Join Color B in the free loop of the 1st ch of the ch-17. Work sc around the opening as follows:
– Bottom edge: 1 sc in the free loop of each ch along the ch-17 (17 sc)
– First side edge: 3 sc over the Row 30 edge, 2 sc over the Row 29 edge, and 3 sc over the Row 28 edge (8 sc)
– Top edge: 5 sc in each of the 3 Rnd 27 loops and 1 sc in each of the 2 sc between them (17 sc)
– Second side edge: 3 sc over Row 28, 2 sc over Row 29, and 3 sc over Row 30 (8 sc)
Sl st to first sc. (50 sts: 17 + 8 + 17 + 8)
Rnd 2: Ch 1, [sc in next 10 sts, sc2tog, sc in next 11 sts, sc2tog] twice, sl st to first sc. (46 sts)
Rnd 3: Sl st in each st around. (46 sts) Fasten off and weave in the end.
Why the math works: the open gap spans 3 repeats of 1.2 in (3.0 cm), so it is 3.5 in (8.9 cm) wide, and 17 sc matches that span. The side edges are 2 in (5.1 cm) tall, and 8 sc fills them without flaring. Rnd 2’s 4 decreases sit at the corners, which turns the rectangle into a circle. The 46 stitches give an inner perimeter that settles into an opening about 2.5 in (6.4 cm) across.
Final Blocking
- Weave in all ends along solid stitches. Avoid weaving through the open chains.
- Soak the holder in cool water for 10 minutes, then gently press out the water in a towel. Do not wring it.
- Slide a rolled towel inside the tube so it lies 6 in (15.2 cm) wide.
- Pin the hole rim into a circle 3.25 in (8.3 cm) across.
- Open each fan evenly with your fingers, and line up the diamond holes in straight vertical columns.
- Pin the flowers flat on a separate surface, opening each petal.
- Let everything dry completely.
- Sew the upper flower 3 in (7.6 cm) below the band and 1.5 in (3.8 cm) right of center. Sew the lower flower 8 in (20.3 cm) below the band and 1 in (2.5 cm) left of center.
Final Quality-Control Checklist
- The band has 60 sts and measures 6 in (15.2 cm) flat.
- Every fan round has 10 fans, and every net round has 10 loops.
- The hole is centered on the front, directly below the center front.
- The rim lies flat and round, with no ruffling.
- The bottom is fully closed with no gap.
- The tab is centered at the back and firmly sewn.
- Both flowers are secured at every petal tip.
- The total length is about 19.5 in (49.5 cm).
Troubleshooting
- The fans are crowded or cupping: your chain loops are too tight. Loosen them, or chain with a hook one size larger.
- The tube is wider than the band: the fans are flaring. Work them with a smaller hook.
- The hole sits off-center: recount the Rnd 27 loops with the tab at the back before you start Row 28.
- The rim ruffles: you have too many sc along the sides. Rework Rnd 1 with 2 sc per row edge.
- The rim pulls inward: add 1 sc to each of the 4 sides in Rnd 1, then keep the 4 sc2tog in Rnd 2.
- There’s a hole at the bottom: run the tail through the stitches a second time and pull firmly.
Care
Hand wash in cool water and lay flat to dry. Reshape the hole rim while the holder is damp.
Final Notes
The whole holder grows from one number: 60 stitches at 5 sc per inch gives a 12 in (30.5 cm) circumference and a 6 in (15.2 cm) flat width. Those 60 stitches become 10 fan repeats of 1.2 in (3.0 cm) each, and 3 of those repeats set the 3.5 in (8.9 cm) hole width. The 50-stitch rim then pulls the hole into a tidy circle.
Check your gauge, check each length checkpoint, and the holder will hang neatly and dispense bags smoothly.
Happy crocheting!