

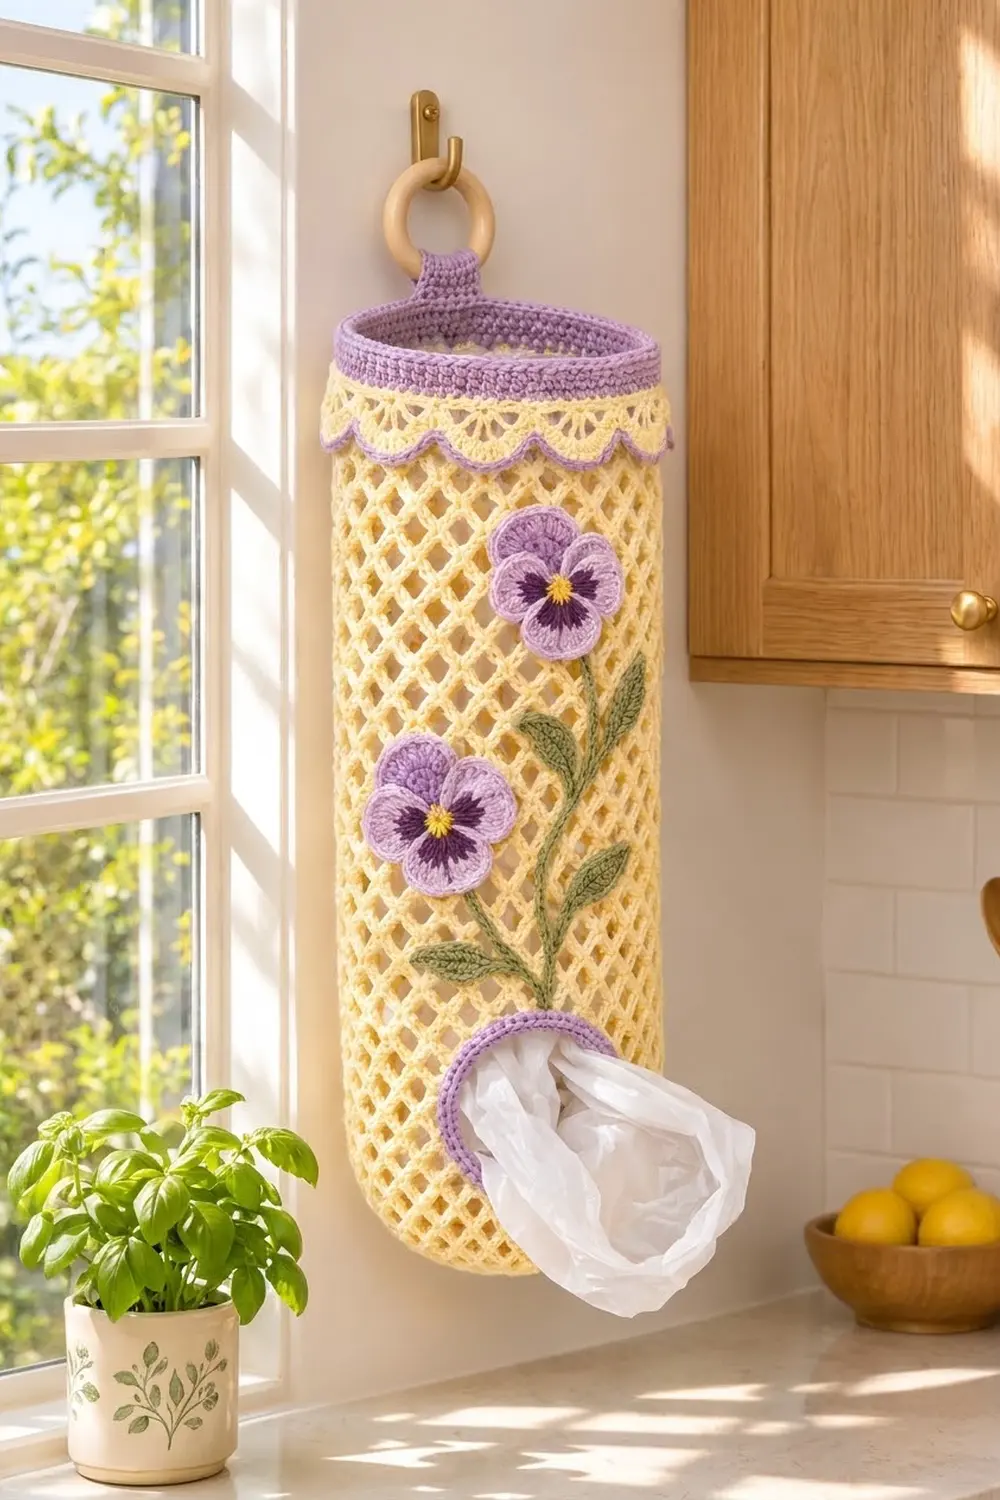
This bag holder is a soft, airy tube of butter-yellow diamond mesh. A lilac band and a scalloped lace collar finish the top, and two pansies on a curving green stem decorate the front. You push bags in at the top and pull them out through a rounded lilac-trimmed opening near the bottom.
The colors are lilac, deep purple, golden yellow, and sage green on a pale yellow body. It’s a cottage-kitchen piece: practical, but pretty enough to leave on display.
The pattern uses US crochet terms. The finished holder measures 8 in (20.3 cm) wide when flat and 21 in (53.3 cm) tall, not counting the hanging loop.
You work the body top-down in one piece. First comes a solid band, then mesh rounds. A few turned rows leave a gap for the dispenser opening, and shorter chain loops close the bottom. The collar, opening trim, hanging loop, and appliqués are added afterward.
Finished Size and Construction
- Finished size: 8 in (20.3 cm) wide flat × 21 in (53.3 cm) tall
- Skill level: Intermediate
- Terminology: US
- Yarn weight: Worsted (#4) cotton
- Hook: 5.0 mm (H-8)
- Number of pieces: 1 body, plus 2 pansies, 4 leaves, and 2 stems (appliqués)
- Layout: Single tube; the opening and flowers are on the front, the hanging loop is at the center back
- Circumference: 16 in (40.6 cm)
- Size before border: 8 in × 21 in (20.3 × 53.3 cm); the collar overlaps the body and doesn’t add height
- Border depth: Collar 1.4 in (3.6 cm); opening trim 0.6 in (1.5 cm)
Materials
Use a smooth, mercerized or combed worsted-weight cotton. It holds the mesh shape and resists stretching when the holder is full of bags.
- Butter yellow (MC): 150 g / 270 m
- Lilac (A): 50 g / 90 m
- Dark purple (B): 10 g / 18 m
- Sage green (C): 15 g / 27 m
- Golden yellow (D): 5 g / 9 m
Tools: 5.0 mm (H-8) hook, a wooden ring 3 in (7.6 cm) across, a tapestry needle, 4 removable markers, scissors, a tape measure, and blocking pins.
All quantities include about a 15% margin.
Abbreviations (US Terms)
- ch – chain
- sl st – slip stitch
- sc – single crochet
- hdc – half double crochet
- dc – double crochet
- tr – treble crochet
- sc2tog – single crochet 2 together
- sk – skip
- sp – space
- st(s) – stitch(es)
- BLO / FL – back loop only / front loop
- MR – magic ring
- rnd – round
Fan: [(dc, ch 1) 3 times, dc] all in the same space. That’s 4 dc and 3 ch-1 spaces.
Gauge and Checkpoints
- Sc gauge: 16 sc and 20 rnds = 4 in (10.2 cm)
- Mesh gauge: 4 ch-5 loops = 4 in (10.2 cm) wide, and 8 mesh rnds = 4 in (10.2 cm) tall, measured relaxed
Test first: make the band (Rnds 1–6) and 4 mesh rounds, then measure.
Checkpoints:
- After Rnd 6: 16 in (40.6 cm) around, 1.2 in (3.0 cm) tall
- After Rnd 34: 15.2 in (38.6 cm) from the top edge
- After Row 41: 18.7 in (47.5 cm)
- After Rnd 42: 19.2 in (48.8 cm)
- Finished: 21 in (53.3 cm)
If your band is too big, go down a hook size. If it’s too small, go up one. If the mesh is too tall but the width is right, keep your chains snug rather than changing hooks.

Body
Start with MC set aside and A on your hook.
Foundation: With A, ch 64 and join with a sl st to form a ring, taking care not to twist the chain. This edge is the top of the holder.
Rnd 1: Ch 1, sc in each ch around, then sl st to the first sc. (64 sc)
Rnds 2–5: Ch 1, sc in each st around, then sl st to the first sc. (64 sc each round) Fasten off A.
Rnd 6: Join MC. Ch 1, then sc in the BLO of each st around and sl st to the first sc. (64 sc) The free front loops of Rnd 5 are where you’ll add the collar later.
Rnd 7: Ch 1, sc in the first st, ch 5, sk 3, sc in next st 15 times. Then ch 2, sk 3, and dc in the first sc. (16 ch-5 loops; the ch 2 + dc counts as the last loop.)
Place a marker at the start of this round. Looking at the outside, this column becomes the left edge of the opening, and it marks the front.
Rnds 8–34: Ch 5, sc in next ch-5 sp 15 times, then ch 2 and dc in the top of the dc. (16 loops each round)
Checkpoint: The piece measures 15.2 in (38.6 cm).
Dispenser opening rows
Now work back and forth over loops 1–12 only. Loops 13–16 of Rnd 34 stay unworked, which leaves a gap 4 in (10.2 cm) wide.
Row 35 (RS): Ch 5, sc in next ch-5 sp 12 times, then turn. (12 loops)
Row 36 (WS): Ch 6 (counts as tr + ch 2). Sc in the first ch-5 loop, ch 5, sc in next loop 11 times, then ch 2 and tr in the last st. Turn. (11 full loops + 2 edge half-loops)
Row 37: Ch 1, sc in the tr, ch 5, sc in next ch-5 loop 11 times, then ch 5 and sc in the 4th ch of the turning ch-6. Turn. (12 loops)
Rows 38–41: Repeat Rows 36 and 37 twice. Don’t turn after Row 41.
Checkpoint: The piece measures 18.7 in (47.5 cm). The gap is 3.5 in (8.9 cm) tall.
Bridge: Ch 16, then sl st to the first sc of Row 41. This closes the bottom edge of the opening.
Rnd 42: Ch 5, sc in next ch-5 loop 12 times. Then ch 5, sk 3 ch, sc in next ch 4 times across the bridge, and sl st to the beginning sl st. (16 loops) The piece now measures 19.2 in (48.8 cm).
Bottom shaping
Rnd 43: [Ch 5, sc in next sp] twice, ch 5, sk next sp, sc in next sp 4 times. (12 loops)
Rnd 44: Ch 4, sc in next sp 11 times, then ch 1 and dc in the first sc. (12 loops)
Rnd 45: Ch 4, sc in next sp, ch 4, sk next sp, sc in next sp 4 times. (8 loops)
Rnd 46: Ch 3, sc in next sp 7 times, then ch 1 and hdc in the first sc. (8 loops)
Rnd 47: Ch 1, work 2 sc in each ch-3 sp around, then sl st to the first sc. (16 sc)
Rnd 48: Ch 1, sc2tog around. (8 sc) Fasten off. Weave the tail through the front loops, pull it tight to close the hole, and secure it.
The bottom shaping adds 1.8 in (4.6 cm), so the body now measures 21 in (53.3 cm).
Hanging Loop
- Count from the beginning of the round on the foundation edge. With A, join in foundation ch 22 and sc in chs 22–27. (6 sc, 1.5 in / 3.8 cm wide)
- Rows 2–16: Ch 1, turn, sc in each st. (6 sc each row) The strip is now 3.2 in (8.1 cm) long.
- Fold the strip over the wooden ring toward the inside.
- Whipstitch Row 16 to the inside of band Rnd 2.
The loop sits about 1.2 in (3.0 cm) above the top edge.
Pansies (make 2)
Rnd 1: With D, work 10 sc into a MR and sl st to the first sc. (10 sc) Fasten off.
Rnd 2: Join B. Sc in next st, ch 3, sk 1 5 times, then sl st to the first sc. (5 ch-3 loops)
Rnd 3: In each ch-3 loop work (sc, hdc, 3 dc, hdc, sc), then sl st to join. (5 small petals, 35 sts) Fasten off.
Rnd 4: Join A in the first sc of any petal. This petal and the next one are the upper petals.
- Upper petals (2): sc in sc, dc in hdc, 2 tr in each of next 3 dc, dc in hdc, sc in sc. (10 sts each)
- Lower petals (3): sc in sc, hdc in hdc, 2 dc in each of next 3 dc, hdc in hdc, sc in sc. (10 sts each)
Sl st to join. (50 sts) Fasten off.
Each pansy measures about 2.5 in (6.4 cm) across, with the dark purple “face” framed in lilac.
Leaves and Stems
Leaf (make 4): With C, ch 8.
- Starting in the 2nd ch from the hook: sc, hdc, dc, dc, hdc, sc, then 3 sc in the last ch.
- Working along the other side of the chain: sc, hdc, dc, dc, hdc, sc.
- Sl st to the first sc. (15 sts) Each leaf is about 1.8 in (4.6 cm) long.
Main stem: With C, ch 36. Sl st in the back bump of each ch, starting in the 2nd ch from the hook. (35 sl sts) The stem is about 7.2 in (18.3 cm) long.
Branch: Ch 14, then sl st back along the chain the same way. (13 sl sts) The branch is about 2.8 in (7.1 cm) long.
Border: Scallop Collar and Opening Trim
Border gauge: 16 sc = 4 in (10.2 cm). The collar has 72 sts, so it measures 18 in (45.7 cm) around. That’s 2 in (5.1 cm) more than the 16 in (40.6 cm) body, which gives the slight flare.
Collar
Hold the holder upside down so the free FL of Rnd 5 face you.
Rnd 1: Join MC in the FL of st 1. Sc in next 7 FL, 2 sc in next FL 8 times, then sl st to the first sc. This is a conversion round: 64 sts worked once each, plus 8 increases, for 72 sc (36 per side).
Rnd 2: Ch 1, sc in the first st. Ch 3, sk 2, sc in next st 23 times. Then ch 3, sk 2, and sl st to the first sc. (24 ch-3 loops, 12 per side)
Rnd 3: Sl st into the first ch-3 sp, ch 1, sc in the same sp. Fan in next sp, sc in next sp 11 times. Then work a fan in the last sp and sl st to the first sc. (12 fans, 6 per side)
Rnd 4: Join A in any sc. Sc in the sc, then [sc in next dc, sc in next ch-1 sp] 3 times, sc in the last dc of the fan 12 times, then sl st to join. (96 sc, 48 per side)
Why the math works:
- 72 ÷ 3 = 24 loops
- 24 ÷ 2 = 12 fans
- Each fan plus its sc gives 8 edge stitches: 12 × 8 = 96
- 6 scallops land on the front and 6 on the back
The collar is 1.4 in (3.6 cm) deep.
Opening Trim
Rnd 1: Join A at the top-left corner of the opening. Work around the opening:
- 4 sc in each of the 4 top loops: 16 sc
- 2 sc in each row end down the side: 14 sc
- 1 sc in each bridge ch: 16 sc
- 2 sc in each row end up the other side: 14 sc
Sl st to join. (60 sc) Mark the 4 corners.
Rnd 2: Sc2tog at the corner, sc in next 13 4 times. (56 sc)
Rnd 3: Sc2tog at the corner, sc in next 12 4 times. (52 sc) Fasten off.
Why the math works:
- The opening is 4 in × 3.5 in (10.2 × 8.9 cm), about 15 in (38.1 cm) around.
- 15 in × 16 sc per 4 in = 60 sc, so the first round lies flat.
- The corner decreases round the opening off. The finished inner opening is about 3.2 × 2.7 in (8.1 × 6.9 cm).
Final Blocking
- Weave in all ends except the appliqué sewing tails.
- Mist the body. Slip a rolled towel or a cardboard tube 5 in (12.7 cm) across inside it.
- Ease the mesh into even diamonds. The width should be 8 in (20.3 cm) flat and the length 21 in (53.3 cm).
- Pin the collar scallops so they point down evenly, and let everything dry.
- Steam the pansies and leaves flat and pin the petals open.
- Placement: Start the main stem 0.5 in (1.3 cm) above the left of the opening and curve it up to the right. Put the upper pansy 3 in (7.6 cm) below the collar edge, right of center. Sew the branch from the stem’s midpoint to the lower pansy, placed left of center.
- Sew 2 leaves along each stem. Catch the mesh strands only, with small stitches from the inside.
Final Quality-Control Checklist
- All 64 stitches are in the band, and the 16 mesh loops are consistent.
- The opening is centered on the front, opposite the hanging loop.
- The collar has 12 even scallops.
- The trim lies flat, with no ruffling.
- The appliqués are secure and the petals aren’t curling.
- The ring is stitched firmly, and the bottom is fully closed.
- The final size is 8 × 21 in (20.3 × 53.3 cm).
Troubleshooting
- Mesh is slanting: Make sure every sc goes into the center of a loop, not into the chain.
- Collar cups: Your 2-stitch increase isn’t enough for your tension. Go up a hook size for the collar only.
- Collar ruffles too much: Work 6 increases instead of 8 (70 sc), and space the fans by eye.
- Opening puckers: Add 2 sc to Rnd 1 on each side.
- Bottom has a gap: Pull the closing tail tighter and stitch across it.
- Holder sags when full: Use firmer cotton or a smaller hook.
Care
Hand wash in cool water, press out the water in a towel, and dry flat. Reshape the scallops while the piece is damp.
Final Notes
The measurement chain:
- The band is 16 in (40.6 cm) around, and 16 mesh loops of 1 in (2.5 cm) each match it.
- The mesh reaches 15.2 in (38.6 cm), then 18.7 in (47.5 cm) after the opening rows and 19.2 in (48.8 cm) after the bridge.
- The bottom shaping finishes the piece at 21 in (53.3 cm).
- The 72-stitch collar flares just enough, and the 60-stitch opening trim closes in to a neat oval.
Happy crocheting!