

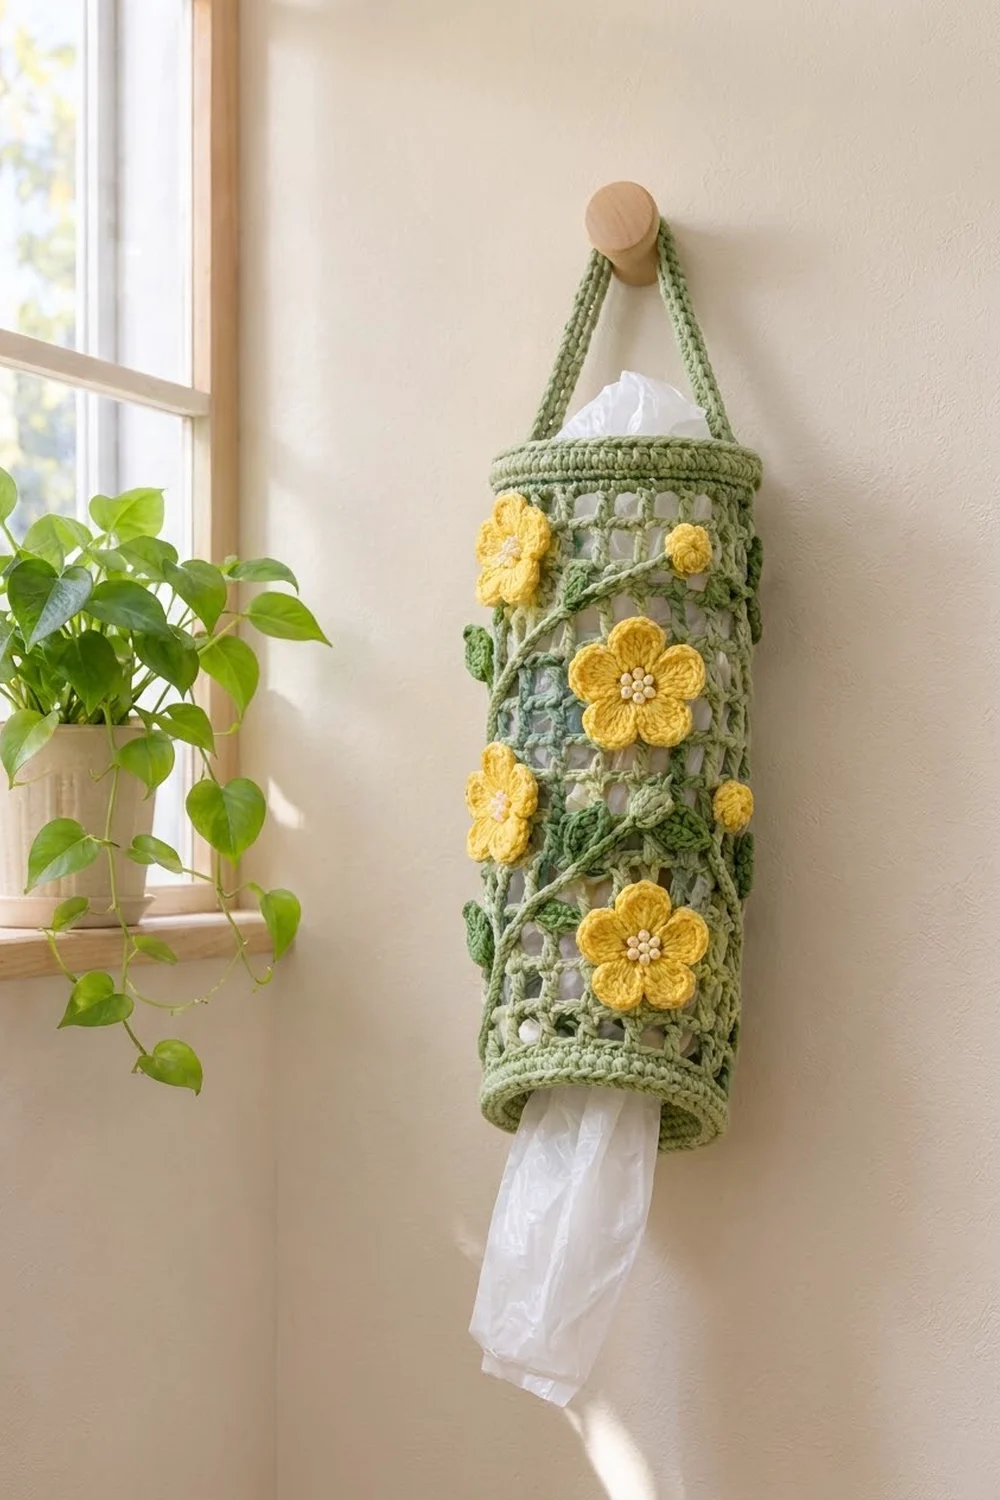
The Buttercup Vine Plastic Bag Holder is a tall, open-ended tube that hangs from a wall peg. You stuff loose grocery bags in the top and pull them out of the bottom one at a time. The open mesh shows how many bags are left, and the solid bands keep both openings firm.
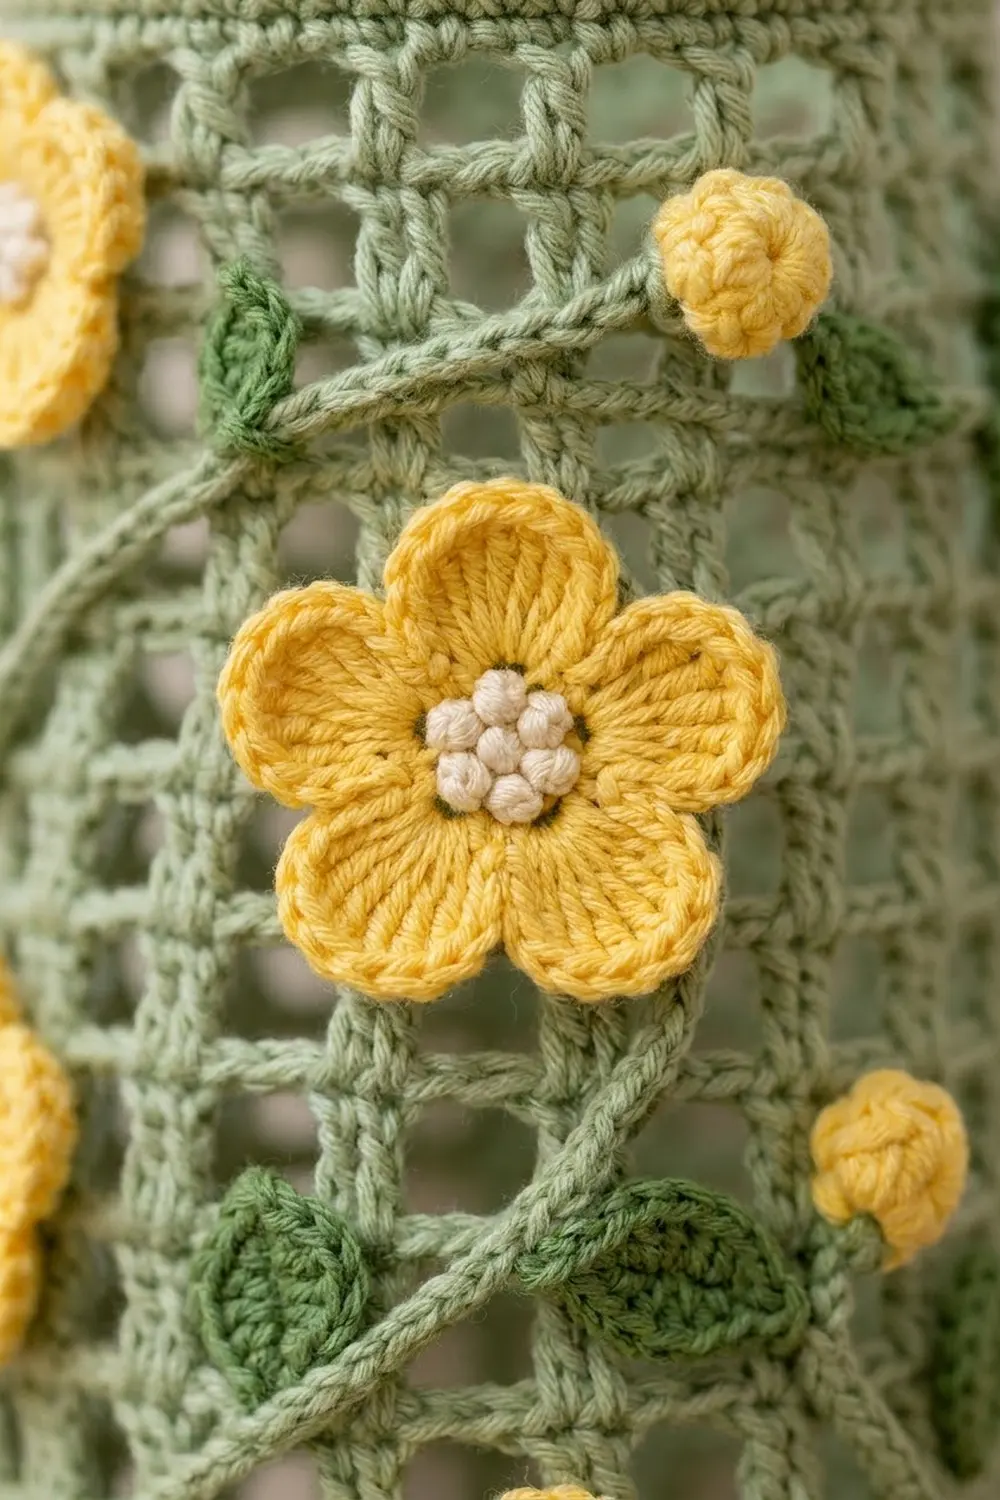
The body is worked in soft sage green cotton. Five buttercup-yellow flowers with cream knot centers climb the front on a thin green vine. Small yellow buds and pointed leaves are tucked in between. The look is fresh and cottage-style, and it suits a kitchen or laundry room.
This pattern uses US crochet terms. The finished holder measures 13.5 in (34.3 cm) around, about 4.3 in (10.9 cm) across and 14 in (35.6 cm) tall, not counting the strap.
You crochet one tube in joined rounds: a solid single crochet band, a mesh body and a solid top band. Then you make a separate strap and sew on the vine, leaves, buds and flowers.
Finished Size and Construction
- Finished size: 13.5 in (34.3 cm) around, 6.75 in (17.1 cm) wide laid flat, 14 in (35.6 cm) tall
- Skill level: Easy (advanced beginner)
- Terminology: US
- Yarn weight: Worsted (#4), cotton or cotton blend
- Hook: 4.5 mm (US G-7)
- Number of pieces: One tube, plus one strap and small sewn-on appliqués (5 flowers, 3 buds, 8 leaves, 1 vine)
- Layout: One upright tube, with the seam line at the back and the flowers on the front
- Piece size: 54 stitches around (27 per side when flattened)
- Size before border: 13 in (33.0 cm) tall (bottom band plus mesh body)
- Border depth: 1 in (2.5 cm) top band, plus a slip stitch edge on both openings
Materials
Choose a smooth worsted-weight cotton or cotton blend. Cotton holds the tube shape, shows the mesh clearly and survives washing. Acrylic works too, but the tube will be softer and may sag more.
- Color A, Sage Green: 70 g, about 120 m (tube, strap, leaves, vine)
- Color B, Buttercup Yellow: 20 g, about 34 m (flowers and buds)
- Color C, Cream: 5 g, about 8 m (flower centers)
Tools:
- 4.5 mm (US G-7) crochet hook
- Tapestry needle
- Stitch marker
- Scissors
- Pins
- Measuring tape
- Spray bottle for blocking
- A rolled towel, or a jar or bottle about 4 in (10.2 cm) wide, to block the tube on
All quantities include a margin of about 15 percent for gauge swatches and sewing tails.
Abbreviations (US Terms)
- ch – chain
- sl st – slip stitch
- sc – single crochet
- hdc – half double crochet
- dc – double crochet
- sc2tog – single crochet 2 together
- sp – space
- st(s) – stitch(es)
- rnd(s) – round(s)
Mesh square: One dc plus the ch-2 space next to it. Each mesh square covers 3 stitches of the round below.
French knot: Wrap the yarn twice around the needle close to the fabric. Insert the needle back next to where it came out and pull it through.
Gauge and Checkpoints
- Single crochet: 16 sc and 20 rnds = 4 in (10.2 cm)
- Mesh: 4 mesh squares (12 sts) = 3 in (7.6 cm) wide; 5 mesh rnds = 3 in (7.6 cm) tall
Test on the tube itself. Work Rnds 1 to 10 (the bottom band and 5 mesh rounds), then flatten the tube and measure it.
Checkpoints:
- After Rnd 1: the ring measures 13.5 in (34.3 cm) around.
- After Rnd 5: the band is 1 in (2.5 cm) tall.
- After Rnd 10: the piece is 4 in (10.2 cm) tall and 6.75 in (17.1 cm) wide flat.
- After Rnd 25: the piece is 13 in (33.0 cm) tall.
- After Rnd 31: the piece is 14 in (35.6 cm) tall.
If your tube is too wide, go down one hook size. If it is too narrow, go up one hook size. If the width is right but the mesh rounds are too short, pull up the dc loops slightly taller instead of changing hooks. Always keep 54 stitches, because the mesh repeat depends on that count.
The Tube
Bottom Band
With Color A, ch 54. Sl st to the first ch to form a ring. Make sure the chain is not twisted.
Rnd 1: Ch 1, sc in each ch around, sl st to first sc. (54 sc)
Rnds 2–5: Ch 1, sc in each st around, sl st to first sc. (54 sc)
Place a marker at the join. The joins line up into a seam, and this seam becomes the back of the holder.
Mesh Body
Rnd 6: Ch 5 (counts as dc and ch 2), skip next 2 sts, *dc in next st, ch 2, skip next 2 sts; repeat from * 16 more times, sl st to 3rd ch of beginning ch-5. (18 dc and 18 ch-2 sps; 54 sts total)
The dc stitches sit in stitches 1, 4, 7 and so on up to 52. The repeat closes neatly, with 2 skipped stitches at the end.
Rnds 7–25: Ch 5 (counts as dc and ch 2), *dc in next dc, ch 2; repeat from * 16 more times, sl st to 3rd ch of beginning ch-5. (18 dc and 18 ch-2 sps per round)
Each dc stacks straight above the dc below it, which makes square open windows. You now have 20 mesh rounds measuring 12 in (30.5 cm), and the piece is 13 in (33.0 cm) tall. Don’t fasten off; continue with the border.
Border: Top Band and Edge Finish
The top band uses the same gauge as the bottom band: 16 sc = 4 in (10.2 cm). The last mesh round has 18 dc and 18 ch-2 spaces, so it converts back to exactly 54 sc.
Rnd 26 (conversion round): Ch 1, sc in same st as join, 2 sc in next ch-2 sp, *sc in next dc, 2 sc in next ch-2 sp; repeat from * 16 more times, sl st to first sc. (18 sc in the dc stitches + 36 sc in the spaces = 54 sc)
Rnds 27–30: Ch 1, sc in each st around, sl st to first sc. (54 sc)
Rnd 31: Sl st loosely in each st around. (54 sl st) Fasten off.
Bottom edge: Join Color A to the free loops of the foundation chain at the seam. Sl st loosely in each ch around. (54 sl st) Fasten off.
When you flatten the tube, each edge shows 27 stitches per side. A tube has no corners, so no corner stitches are added.
The math works because each mesh square covers exactly 3 stitches (1 dc plus 2 ch), and 18 squares x 3 = 54. The top band matches the bottom band stitch for stitch, so both openings stay 13.5 in (34.3 cm) around.
Strap
With Color A, ch 4.
Row 1: Sc in 2nd ch from hook and in each of next 2 ch, turn. (3 sc)
Rows 2–40: Ch 1, sc in each st across, turn. (3 sc)
Fasten off, leaving a 12 in (30.5 cm) tail. The strap is 0.75 in (1.9 cm) wide and 8 in (20.3 cm) long. For a rounded, corded look, work a sl st along each long edge.
Attach the Strap
Flatten the tube with the seam centered at the back. The two side folds fall at stitches 14 and 41 of Rnd 30, which are 27 stitches apart.
Pin one strap end inside the top band over stitches 13–15, so that it overlaps Rnds 26–30 by 1 in (2.5 cm). Pin the other end over stitches 40–42 the same way. Whipstitch each end firmly on all four sides. The visible arch is 6 in (15.2 cm) long.
Appliqués
Flowers (make 5)
With Color B, make a magic ring.
Rnd 1: Ch 1, 10 sc in ring, sl st to first sc. Pull the ring closed. (10 sc)
Rnd 2: *Sl st in next st, (hdc, 3 dc, hdc) in next st; repeat from * 4 more times, sl st to first sl st. (5 petals; 5 sl st + 25 petal sts = 30 sts)
Fasten off, leaving a 12 in (30.5 cm) tail. Each flower is about 1.75 in (4.4 cm) across.
With Color C, work 6 French knots in the center of each flower: 5 in a small circle and 1 in the middle.
Buds (make 3)
With Color B, make a magic ring.
Rnd 1: 6 sc in ring. (6 sc)
Rnd 2: 2 sc in each st around. (12 sc)
Rnd 3: Sc2tog 6 times. (6 sc)
Tuck the starting tail inside, pull the hole closed and keep the working tail for sewing. Each bud is about 0.5 in (1.3 cm) across.
Leaves (make 8)
With Color A, ch 7.
Leaf: Sc in 2nd ch from hook, hdc in next ch, dc in next 2 ch, hdc in next ch, sc in last ch. (6 sts) Ch 2 for the tip. Working along the other side of the foundation chain: sc in first ch, hdc in next ch, dc in next 2 ch, hdc in next ch, sc in last ch. (6 sts) Sl st to first sc. (12 sts plus the ch-2 tip)
Fasten off, leaving a tail. Each leaf is about 1.5 in (3.8 cm) long.
Vine (make 1)
With Color A, ch 80. Sl st in the back bump of the 2nd ch from hook and in each ch across. (79 sl st)
The vine is about 20 in (50.8 cm) long.
Attach the Appliqués
Pin the vine on the front in a gentle S-curve. Start just above the bottom band and end just below the top band. Whipstitch it to the mesh bars every 0.5 in (1.3 cm).
Tuck the leaves along the vine, alone or in pairs, with their stem ends under the vine. Place the 5 flowers on top of the vine, covering the leaf stems. Space them about 2 in (5.1 cm) apart vertically, alternating left and right. Add the 3 buds between the flowers.
Sew each piece around its outer edge. Catch only the mesh bars so the stitches don’t show inside.
Final Blocking
- Weave in all remaining ends.
- Slide the tube over a rolled towel or a jar about 4 in (10.2 cm) wide.
- Mist the tube until it is damp but not soaking.
- Gently tug the mesh so every window is square and every dc column runs straight up.
- Pat the top and bottom bands into even, round openings.
- Press the petals flat with your fingers and shape each leaf tip into a point.
- Let the tube dry completely before you remove the form.
- Measure it: 13.5 in (34.3 cm) around and 14 in (35.6 cm) tall.
Final Quality-Control Checklist
- 54 stitches in every sc round
- 18 mesh squares in every mesh round
- 20 mesh rounds, with all dc columns lined up
- Seam line straight and centered at the back
- Top and bottom openings both 13.5 in (34.3 cm) around
- Strap ends 27 stitches apart and firmly sewn
- 5 flowers with 6 cream knots each, 3 buds, 8 leaves and 1 vine
- No sewing stitches visible inside the mesh
- All ends woven in and trimmed
Troubleshooting
The tube is twisted. The foundation chain was twisted when you joined it. Start over, because a twist can’t be fixed later.
The mesh slants to one side. You are working the dc into a chain space instead of on top of the dc. Work each dc into the top of the dc below.
I have 17 or 19 mesh squares. Recount Rnd 5. It must have 54 stitches before you begin Rnd 6.
The top band flares. The 2 sc in each space are too loose. Go down one hook size for the band only.
The top band pulls in. Use a hook one size larger for Rnds 26–30, and keep 54 stitches.
The bags won’t come out. The bottom edge is too tight. Rework the bottom slip stitch edge with a larger hook.
The strap stretches. Cotton relaxes under weight. Remake the strap with a hook one size smaller.
Care
Hand wash in cool water with mild soap, press out the water in a towel and dry the holder flat over a form. Don’t hang it while it’s wet, or the strap will stretch.
Final Notes
Here is the measurement chain. A 54-stitch ring gives 13.5 in (34.3 cm) around. Five sc rounds make a 1 in (2.5 cm) bottom band. Twenty mesh rounds of 18 squares add 12 in (30.5 cm), which brings you to 13 in (33.0 cm). The conversion round returns to 54 sc, and the top band adds the last 1 in (2.5 cm), for a total of 14 in (35.6 cm). Check each stage, and the holder will hang straight, release bags easily and show off its buttercup vine.
Happy crocheting!