

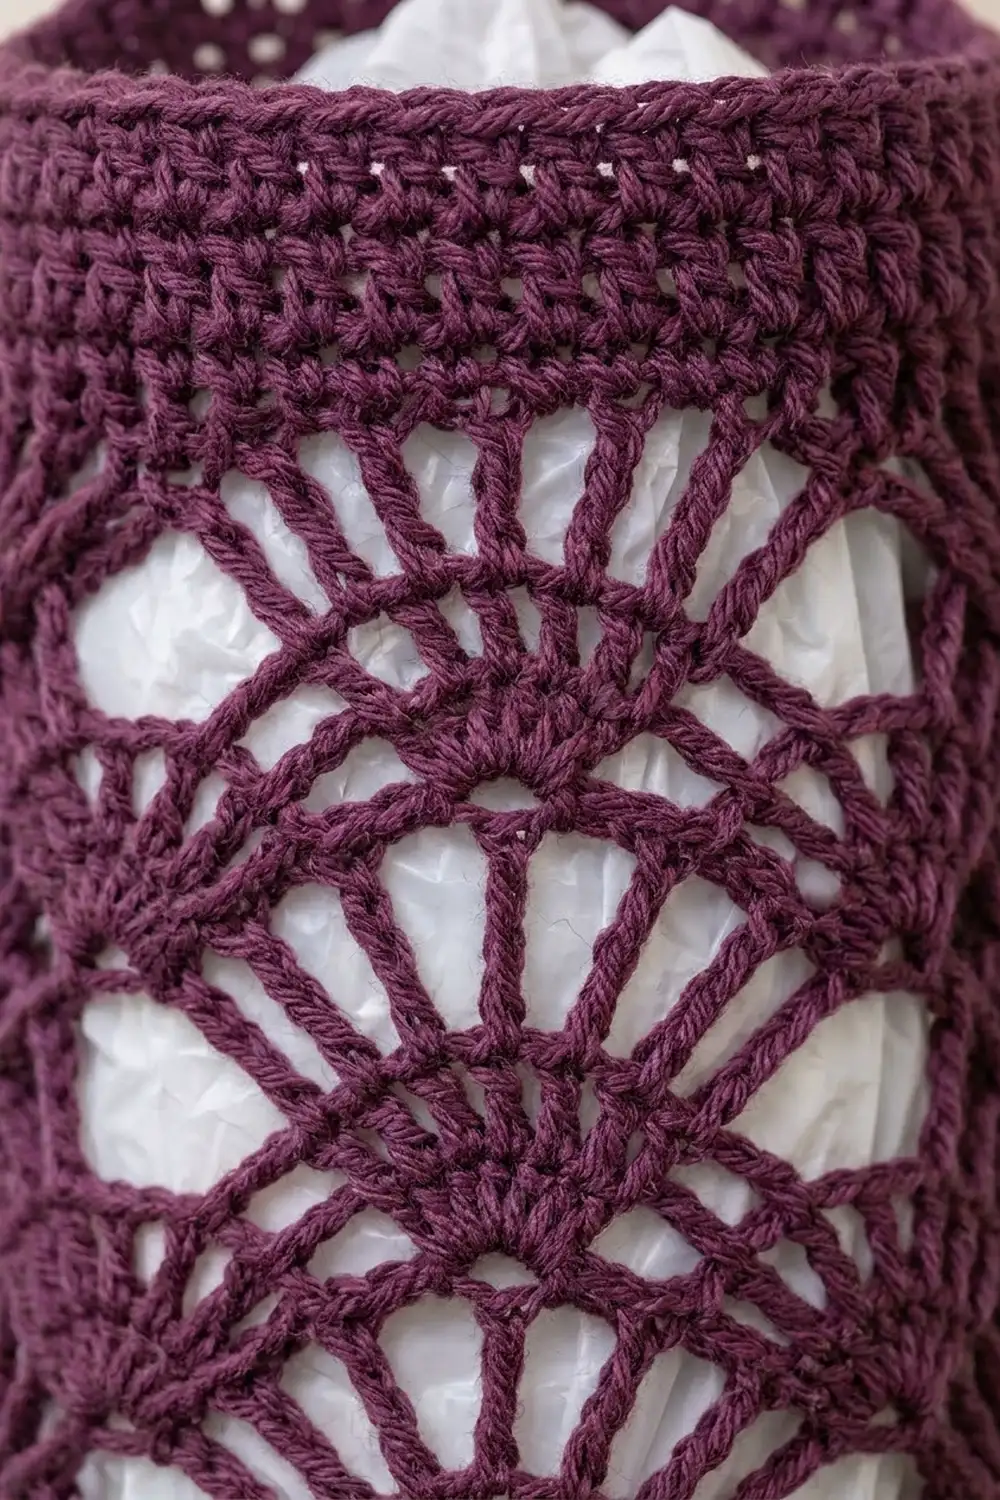
The Fanlight Lace Plastic Bag Holder is a tall, airy tube that keeps grocery bags tidy and in view. Staggered rows of open fans run the full length of the body, and solid bands at the top and bottom keep the shape firm. A drawstring with small ball ends gathers the bottom opening so you can pull out one bag at a time.
The sample is shown in deep plum and in heather gray. Each holder uses one color only, so make one in each shade if you want a matching pair. The style is simple and a little vintage, and it suits a kitchen, laundry room, or pantry door.
This pattern uses US crochet terms. The finished holder measures 17 in (43.2 cm) tall and 7.5 in (19.1 cm) wide when flattened, which is a circumference of 15 in (38.1 cm). The hanging strap adds about 4 in (10.2 cm) above the rim.
You work the body in joined rounds from the bottom up: a solid bottom band with an eyelet round, 18 rounds of offset fans, one transition round, and a solid top band. Then you add a strap across the top, a chained drawstring, and two small balls for the drawstring ends.
Finished Size and Construction
- Finished size: 17 in (43.2 cm) tall x 7.5 in (19.1 cm) wide, flattened
- Circumference: 15 in (38.1 cm)
- Skill level: Easy intermediate
- Terminology: US crochet terms
- Yarn weight: Worsted (#4)
- Hook: 5.0 mm (US H-8)
- Number of pieces: 1 tube body (strap worked onto it), plus 1 drawstring and 2 small ball ends
- Layout: Seamless tube worked in joined rounds, bottom to top
- Stitch count per round: 60 stitches (30 per flattened side)
- Size before top border: 15 in (38.1 cm) tall
- Top border depth: 2 in (5.1 cm), including the transition round
Materials
Choose a smooth worsted-weight cotton or acrylic. Cotton holds its shape well and washes easily. Acrylic is lighter and a bit stretchier. Avoid fuzzy yarns, since they hide the fan spokes.
Yarn, per holder:
– Plum (or your chosen color): 100 g / 180 m (197 yd)
Optional second holder:
– Heather gray: 100 g / 180 m (197 yd)
These amounts include a margin of about 15 percent for gauge checks and differences between yarn brands.
Tools:
– 5.0 mm (US H-8) crochet hook
– Stitch marker
– Tapestry needle
– Scissors
– Measuring tape
– Rust-proof pins and a towel for blocking
Abbreviations (US Terms)
- ch – chain
- sl st – slip stitch
- sc – single crochet
- hdc – half double crochet
- dc – double crochet
- tr – treble crochet
- sk – skip
- sp – space
- sc2tog – single crochet 2 together
- MR – magic ring
- st(s) – stitch(es)
- rep – repeat
Special stitch – Fan: In the same stitch, work (tr, ch 1) 4 times, tr. One fan has 5 tr and 4 ch-1 spaces. For counting, each fan equals 9 stitch positions. The 3rd tr is the “center tr.”
Gauge and Checkpoints
- Solid gauge: 16 sc and 16 sc rounds = 4 in (10.2 cm)
- Lace gauge: 2 fan repeats (20 sts) = 5 in (12.7 cm) wide; 4 fan rounds = 3 in (7.6 cm) tall
The holder is its own swatch. Work Rounds 1–5 and check the size before you continue.
Checkpoints:
– After Round 5: flattened width 7.5 in (19.1 cm); height 1.5 in (3.8 cm)
– After Round 13: height 7.5 in (19.1 cm)
– After Round 23: height 15 in (38.1 cm)
– After Round 28: height 17 in (43.2 cm)
If the band is wider than 7.5 in (19.1 cm), go down half a hook size. If it is narrower, go up half a size. A difference of 0.25 in (0.6 cm) is fine. Do not change the stitch count, because the fan repeat depends on 60 stitches.
If each fan round is shorter than 0.75 in (1.9 cm), add 2 more fan rounds before the transition round. If they are taller, remove 2. Always add or remove fan rounds in pairs so the pattern stays balanced.
Pattern
Bottom Band
Ch 60 and join with a sl st to the first ch to form a ring. Take care not to twist the chain.
Round 1: Ch 1, sc in each ch around, join with a sl st to the first sc. (60 sc)
Round 2: Ch 1, sc in each st around, join. (60 sc)
Round 3 (eyelet round): Ch 4 (counts as dc and ch 1), sk next st, [dc in next st, ch 1, sk next st] 29 times, join with a sl st to the 3rd ch of the beginning ch-4. (30 dc and 30 ch-1 sps = 60 sts)
Round 4: Ch 1, sc in each dc and in each ch-1 sp around, join. (60 sc)
Round 5: Ch 1, sc in each st around, join. (60 sc)
Checkpoint: the band measures 1.5 in (3.8 cm) tall and 7.5 in (19.1 cm) wide when flattened.
Fan Lace Body
Round 6 (first fan round): Ch 1, sc in first st, [sk 4 sts, fan in next st, sk 4 sts, sc in next st] 5 times, sk 4 sts, fan in next st, sk 4 sts, join with a sl st to the first sc. (6 fans and 6 sc = 60 st positions)
Each repeat uses exactly 10 stitches of Round 5: 1 sc, 4 skipped, 1 fan, 4 skipped. Six repeats use all 60 stitches.
Round 7: Sl st in next 5 sts (tr, ch-1 sp, tr, ch-1 sp, center tr). Ch 1, sc in the same center tr, [fan in next sc, sc in center tr of next fan] 5 times, fan in next sc, join with a sl st to the first sc. (6 fans and 6 sc = 60 st positions)
This round puts each new fan into the valley sc between two fans below, and each new sc into the center of a fan below. That offset creates the staggered fans.
Rounds 8–23: Rep Round 7. (6 fans and 6 sc in every round)
You now have 18 fan rounds (Rounds 6–23). Checkpoint: the holder measures 15 in (38.1 cm) tall. The lace section alone is 13.5 in (34.3 cm).
Transition Round
Round 23 ended at an sc that sits in a valley between fan tops. This round fills the valleys to give a level edge.
Round 24 (conversion round): Ch 4 (counts as tr), [dc in next tr, hdc in next ch-1 sp, sc in next 5 sts, hdc in next ch-1 sp, dc in next tr, tr in next sc] 5 times, dc in next tr, hdc in next ch-1 sp, sc in next 5 sts, hdc in next ch-1 sp, dc in next tr, join with a sl st to the top of the ch-4.
Count: 60 sts worked 1 per existing st position + 0 extra sts added = 60 sts.
The tall stitches fill the low valleys and the short stitches run across the fan tops, so the edge comes out straight.
Drawstring Cord
Ch 90. Sl st in the back bump of the 2nd ch from the hook and in each ch across. (89 sl sts) Fasten off.
The cord should measure 23 in (58.4 cm). That covers 15 in (38.1 cm) around the holder plus about 4 in (10.2 cm) for each hanging end. If it is shorter, make a new one with more chains.
Ball Ends (make 2)
Round 1: 6 sc in MR. (6 sc)
Round 2: 2 sc in each st around. (12 sc)
Round 3: Sc in each st around. (12 sc)
Round 4: Sc2tog 6 times. (6 sts)
Stuff lightly with yarn scraps. Leave a 6 in (15.2 cm) tail and fasten off. Each ball is about 0.75 in (1.9 cm) across.
Top Border and Hanging Strap
Border gauge: 16 sc = 4 in (10.2 cm). With 60 sts in every round, the circumference is 60 ÷ 16 x 4 = 15 in (38.1 cm). Each flattened side is 30 sts, or 7.5 in (19.1 cm). A tube has no corners, so there are no corner stitches to add. The two side folds fall between stitches.
Round 25: Ch 1, sc in each st around, join. (60 sc; 30 per flattened side)
Round 26: Ch 3 (counts as dc), dc in each remaining st around, join to the top of the ch-3. (60 dc; 30 per side)
Round 27: Ch 1, sc in each st around, join. (60 sc; 30 per side)
Round 28: Ch 1, sc in each st around, join. (60 sc; 30 per side) Fasten off.
Why the math works: The bottom band, the lace body, and the top border all count 60 sts. That keeps the walls straight, and the top opening matches the bottom before you gather it. The border adds 2 in (5.1 cm), counting Round 24, so the holder grows from 15 in (38.1 cm) to 17 in (43.2 cm).
Hanging Strap
Flatten the holder so the round joins line up along one side fold. On Round 28, that fold falls between st 60 and st 1. The opposite fold falls between st 30 and st 31.
Row 1: Join yarn in st 59 of Round 28. Ch 1, sc in sts 59, 60, 1, and 2. (4 sc)
Rows 2–44: Ch 1, turn, sc in each st across. (4 sc)
The strap is 1 in (2.5 cm) wide and 11 in (27.9 cm) long. Bring the end across the top opening without twisting it. Sl st the last row to sts 29, 30, 31, and 32 of Round 28, working through the strap and rim stitches together. Fasten off. The strap forms an arch about 4 in (10.2 cm) above the rim.
Adding the Drawstring
Start at the center front of Round 3. Weave the cord over and under the dc posts all the way around. Bring both ends out through 2 neighboring ch-1 spaces at the front. Slide one cord end into the opening of each ball. Pull the ball’s tail tight to close it around the cord, then sew a few stitches through the cord to secure it. Weave in all ends.
Final Blocking
- Weave in all remaining ends before blocking.
- Wet the holder in cool water. Squeeze gently; do not wring.
- Roll it in a towel to remove extra water.
- Slip a rolled towel or a cardboard tube inside to hold the round shape.
- Lay it flat. Ease it to 17 in (43.2 cm) tall and 7.5 in (19.1 cm) wide.
- Open each fan with your fingers so the spokes spread evenly.
- Pin the top and bottom bands straight. Pin the strap flat.
- Let it dry completely before you remove the pins.
For acrylic yarn, you can steam block instead. Hold the iron above the fabric and never press it down.
Final Quality-Control Checklist
- Every round has 60 sts, or 6 fans and 6 sc in the fan rounds.
- Each fan has 5 tr and 4 ch-1 spaces.
- Each fan sits in the valley between 2 fans below.
- The holder measures 17 in (43.2 cm) tall and 7.5 in (19.1 cm) wide.
- The top edge is level after Round 24.
- The strap is centered on both side folds and not twisted.
- The drawstring slides freely and both ends come out at the front.
- Both balls are firmly attached.
- All ends are woven in securely.
Troubleshooting
The fans lean in a spiral. You may be starting rounds in the wrong place. Always sl st exactly 5 sts to reach the center tr.
Fans look crowded or ruffled. Your tr stitches are too loose. Go down half a hook size, or check that you skipped 4 sts on each side of every fan in Round 6.
The tube narrows toward the top. Your tension got tighter during the lace. Relax your grip, or use a slightly larger hook for the fan rounds only.
The top edge is wavy. Recheck Round 24. Each repeat needs a tr in the valley sc and sc across the fan top.
The drawstring won’t slide. The eyelet round may be tight. Use a thinner cord, or redo Round 3 with ch 2 instead of ch 1. Then work Round 4 as written, with 1 sc in each ch-2 sp, so you still have 60 sts.
The strap twists. Undo the final sl sts and attach the strap again. Make sure Row 44 lies flat before you join it.
Care
Hand wash or machine wash on a gentle cycle in cool water, then lay flat to dry. Reshape the fans while damp.

Final Notes
Here is how the measurements add up. Sixty sts at 16 sts per 4 in (10.2 cm) give a 15 in (38.1 cm) circumference and a 7.5 in (19.1 cm) flat width. The bottom band adds 1.5 in (3.8 cm). Eighteen fan rounds at 0.75 in (1.9 cm) each add 13.5 in (34.3 cm). The transition round and top border add 2 in (5.1 cm), for a total of 17 in (43.2 cm). The strap adds about 4 in (10.2 cm) for hanging.
Check your size at each checkpoint and keep 60 sts in every round. Your holder will hang straight and neat.
Happy crocheting!