

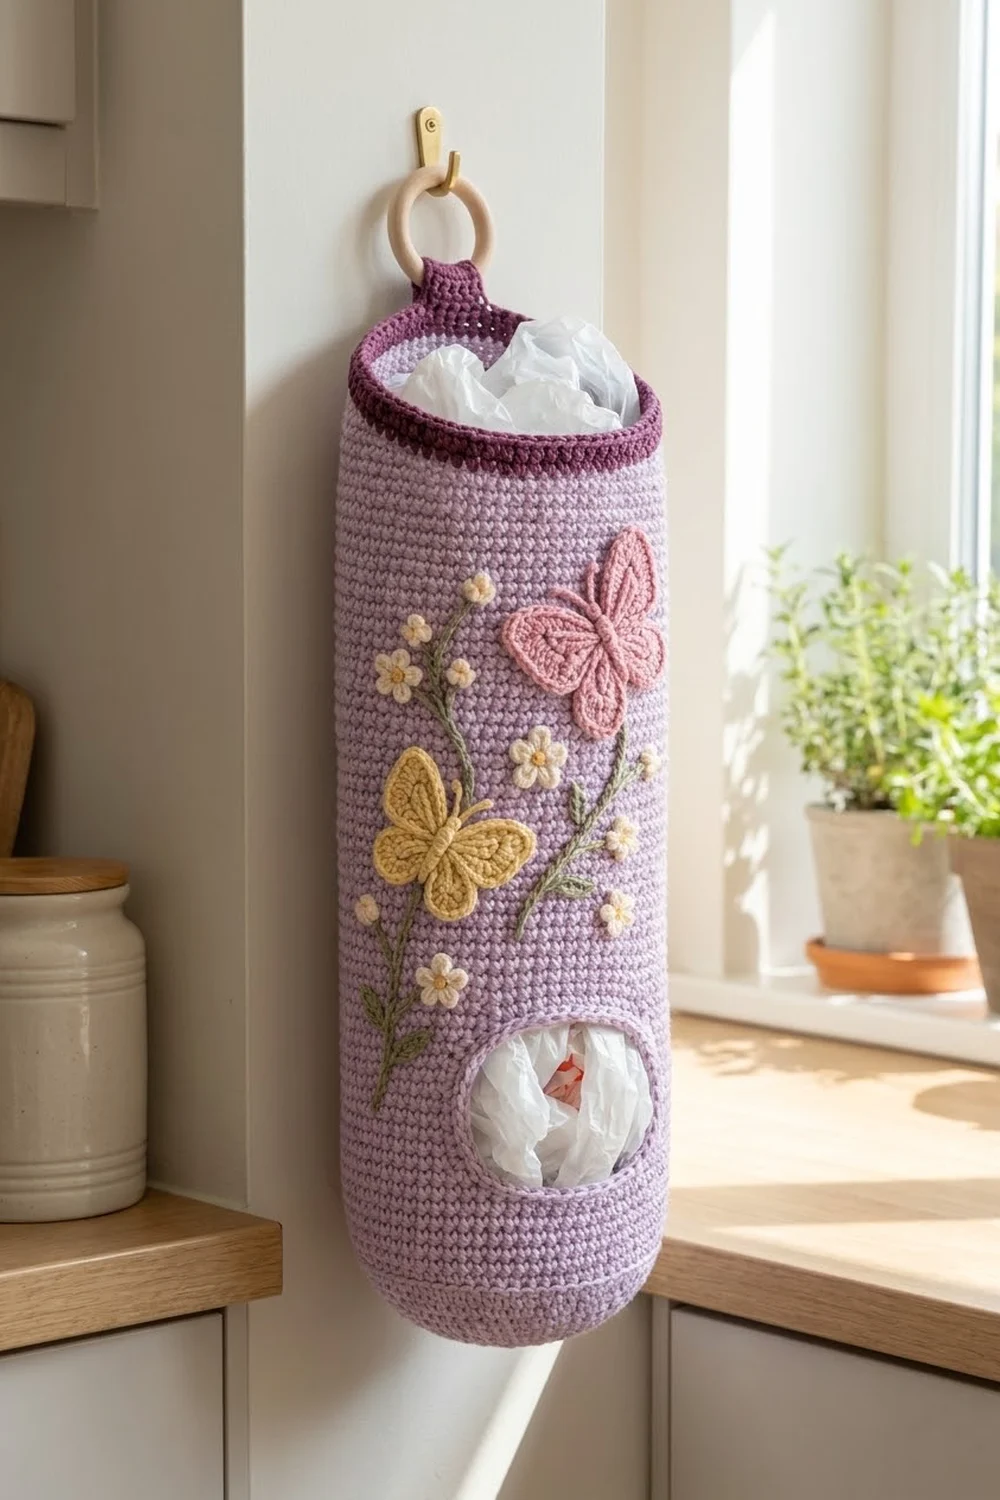
This hanging plastic bag holder is a long lavender tube with a rounded bottom. A plum band finishes the top, and a plum tab hangs it from a wooden ring. You stuff bags in through the open top and pull them out one at a time through an oval opening near the bottom.
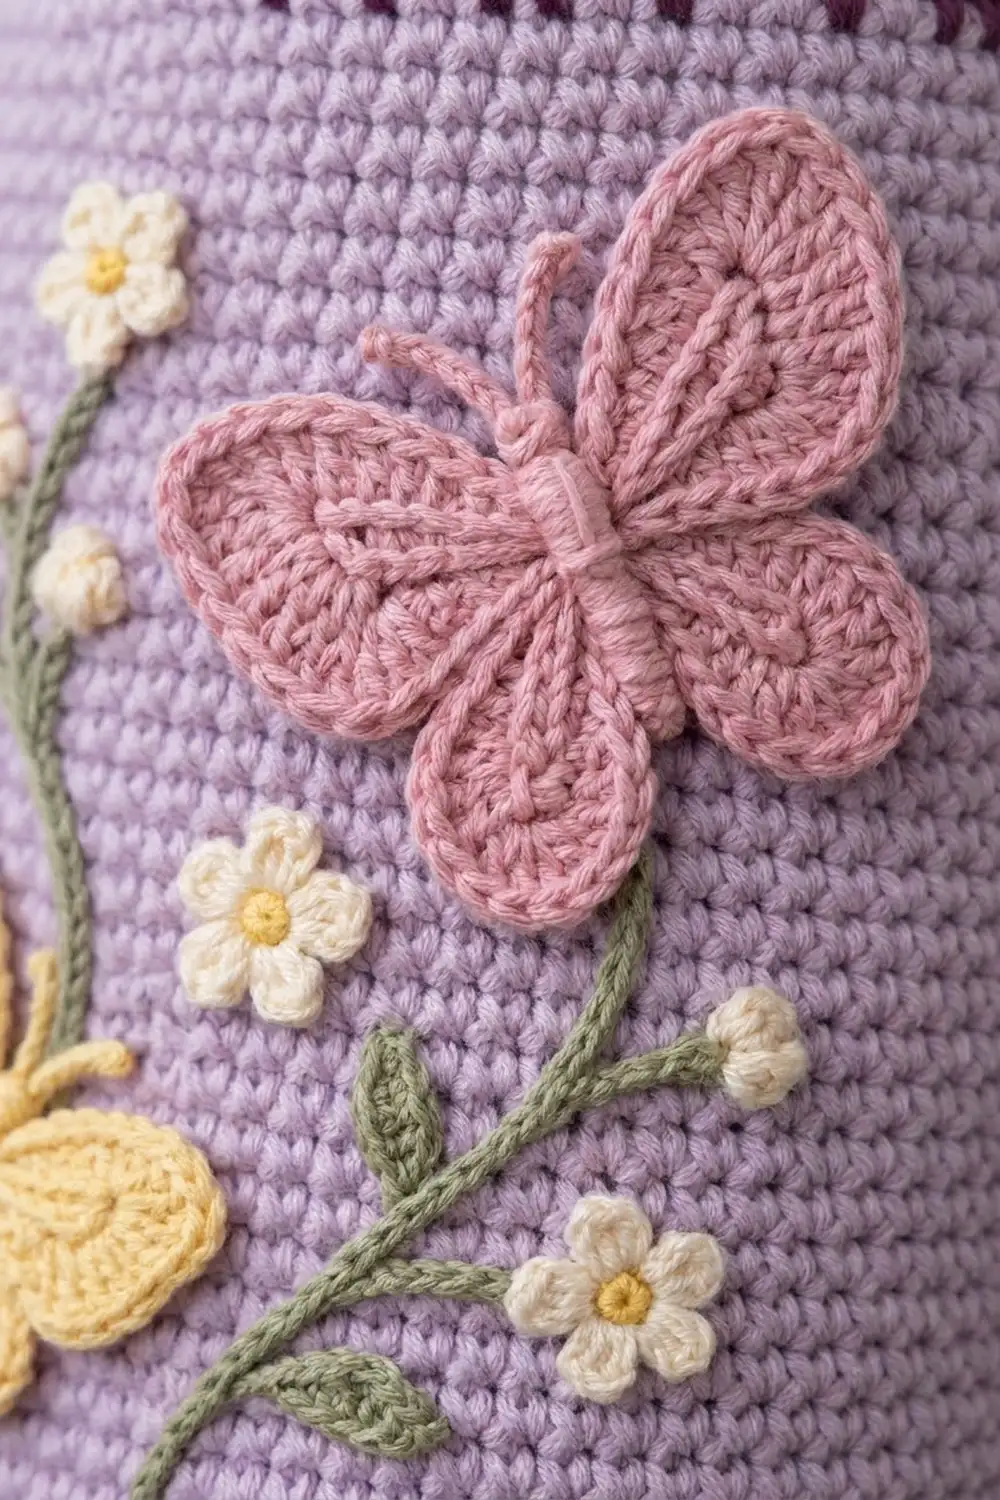
The front is decorated like a small spring garden. A pink butterfly sits at the upper right and a butterfly in soft butter yellow sits lower left. Sage green stems with leaves curve between them, and eight tiny cream flowers with yellow centers grow along the stems. The colors are calm and pastel, so the holder suits a kitchen, laundry room, or pantry door.
The pattern uses US crochet terms. Hanging flat, the finished holder measures 7.5 in (19.1 cm) wide and 18 in (45.7 cm) tall, not counting the hanging tab. The circumference is 15 in (38.1 cm).
The body is worked from the bottom up in joined rounds of single crochet. A dome base comes first, then the straight tube. You work the dispenser opening in turned rows partway up, then rejoin in the round and finish with the plum band and tab. The butterflies and flowers are crocheted separately, and the stems and leaves are embroidered.
Finished Size and Construction
- Finished size: 7.5 in (19.1 cm) wide flat × 18 in (45.7 cm) tall
- Circumference: 15 in (38.1 cm), 60 stitches
- Skill level: Intermediate
- Terminology: US crochet terms
- Yarn weight: Worsted (#4)
- Hook: 5.0 mm (H-8) for the body, 4.0 mm (G-6) for the appliqués
- Number of pieces: 1 tube-shaped body; 2 butterflies and 8 flowers are sewn onto it
- Layout: Opening at center front near the bottom; butterflies and flowers on the front above it
- Dispenser opening: 3 in (7.6 cm) wide at the top and bottom edges, 4 in (10.2 cm) at its widest, and 3.1 in (7.9 cm) tall
- Size before top band: 7.5 in (19.1 cm) × 16.7 in (42.4 cm)
- Top band depth: 1.3 in (3.3 cm), 6 rounds
Materials
Use a smooth worsted-weight cotton or cotton blend for crisp stitches that hold their shape. Acrylic also works, but it will be slightly softer and stretchier. All quantities assume about 180 m per 100 g and include a margin of roughly 15 percent.
- Lavender (Color A, body): 160 g / 288 m
- Plum (Color B, top band and tab): 25 g / 45 m
- Pink (Color C, butterfly): 10 g / 18 m
- Butter yellow (Color D, butterfly and flower centers): 10 g / 18 m
- Cream (Color E, flowers): 5 g / 9 m
- Sage green (Color F, stems and leaves): 5 g / 9 m
Tools
- 5.0 mm (H-8) crochet hook
- 4.0 mm (G-6) crochet hook
- Wooden ring, 2 in (5.1 cm) across
- Tapestry needle
- 4 locking stitch markers
- Rust-proof pins
- Measuring tape
- A rolled towel or a 4.75 in (12.1 cm) cardboard tube for blocking
Abbreviations (US Terms)
- ch – chain
- sl st – slip stitch
- sc – single crochet
- dc – double crochet
- tr – treble crochet
- sc2tog – single crochet 2 together
- inc – 2 sc in the same stitch
- BLO – back loop only
- st(s) – stitch(es)
- rnd(s) – round(s)
- sp – space
Special stitch – surface slip stitch: Hold the yarn behind the fabric. Insert the hook from front to back between stitches, pull up a loop, then pull it through the loop on the hook. This makes a raised chain line on the front.
Gauge and Checkpoints
Gauge: 16 sc and 18 rnds = 4 in (10.2 cm) with the 5.0 mm hook, worked in joined rounds.
Make a swatch tube first: ch 40, join in a ring, and work 18 rnds of sc. Lay it flat. It should measure 5 in (12.7 cm) wide and 4 in (10.2 cm) tall.
Checkpoints:
- After Rnd 15 (base): 60 sts. The rim of the dome is a circle about 4.8 in (12.2 cm) across, and the dome is about 2 in (5.1 cm) deep.
- After Rnd 19: The straight section is 0.9 in (2.3 cm) tall, and the tube is 7.5 in (19.1 cm) wide flat.
- After Rnd 35: The opening measures 3.1 in (7.9 cm) tall.
- After Rnd 81: The tube measures 16.7 in (42.4 cm) from the bottom.
- After Rnd 87: The finished height is 18 in (45.7 cm).
If your piece is too big, go down a hook size (to 4.5 mm). If it is too small, go up a hook size (to 5.5 mm). Don’t change the stitch counts. Every edging count depends on them.
Body
The body is worked in Color A with the 5.0 mm hook. Join each round with a sl st to the first sc, then ch 1. The ch 1 never counts as a stitch.
Dome Base
Spreading the increases out over every other round makes the base cup into a soft dome instead of lying flat.
- Rnd 1: Make a magic ring, ch 1, work 6 sc in the ring, and join. (6 sts)
- Rnd 2: Inc in each st. (12 sts)
- Rnd 3: Sc 1, inc 6 times. (18 sts)
- Rnd 4: Sc 2, inc 6 times. (24 sts)
- Rnd 5: Sc 3, inc 6 times. (30 sts)
- Rnd 6: Sc in each st. (30 sts)
- Rnd 7: Sc 4, inc 6 times. (36 sts)
- Rnd 8: Sc in each st. (36 sts)
- Rnd 9: Sc 5, inc 6 times. (42 sts)
- Rnd 10: Sc in each st. (42 sts)
- Rnd 11: Sc 6, inc 6 times. (48 sts)
- Rnd 12: Sc in each st. (48 sts)
- Rnd 13: Sc 7, inc 6 times. (54 sts)
- Rnd 14: Sc in each st. (54 sts)
- Rnd 15: Sc 8, inc 6 times. (60 sts)
Lower Tube
- Rnds 16–19: Sc in each st. (60 sts per rnd)
Dispenser Opening
From here you work in turned rows on 48 sts. The 12 sts you leave unworked form the bottom edge of the opening, and that spot becomes the center front. The sc2tog and inc at the row ends shape the sides of the opening into an oval.
- Rnd 20 (Row 1): Ch 1, sc in the next 48 sts and turn. Leave the last 12 sts unworked. (48 sts)
- Row 2: Ch 1, sc across, turn. (48 sts)
- Row 3: Ch 1, sc2tog, sc 44, sc2tog, turn. (46 sts)
- Row 4: Ch 1, sc across, turn. (46 sts)
- Row 5: Ch 1, sc2tog, sc 42, sc2tog, turn. (44 sts)
- Rows 6–9: Ch 1, sc across, turn. (44 sts)
- Row 10: Ch 1, inc, sc 42, inc, turn. (46 sts)
- Row 11: Ch 1, sc across, turn. (46 sts)
- Row 12: Ch 1, inc, sc 44, inc, turn. (48 sts)
- Rows 13–14: Ch 1, sc across, turn. (48 sts)
The opening is now 12 sts (3 in / 7.6 cm) wide at the top and bottom edges and 16 sts (4 in / 10.2 cm) wide at Rows 5–9.
- Rnd 34 (closing round): Ch 1, sc in each of the 48 sts, ch 12 across the gap, then sl st into the first sc to close the round. This round is 48 sc plus 12 new ch. (60 sts)
- Rnd 35: Ch 1, then sc in each of the 48 sc and each of the 12 ch, and join. (60 sts)
Upper Tube
- Rnds 36–81: Sc in each st. (60 sts per rnd)
Stop at the checkpoint: the tube should measure 16.7 in (42.4 cm) from the bottom. Fasten off Color A.
Appliqués
Use the 4.0 mm hook throughout this section. Leave a 12 in (30.5 cm) tail on each piece for sewing.
Butterflies (make 1 in Color C and 1 in Color D)
Rnd 1: Make a magic ring and work all four wings into it:
- Upper wing: Ch 4, 5 tr, ch 4, sl st in ring.
- Lower wing: Ch 3, 4 dc, ch 3, sl st in ring.
- Lower wing: Ch 3, 4 dc, ch 3, sl st in ring.
- Upper wing: Ch 4, 5 tr, ch 4, sl st in ring.
Pull the ring tight. (4 wings)
Rnd 2 (outline): Work this round around each wing in order:
- Upper wing: 3 sc in ch-4 sp, 2 sc in each tr, 3 sc in ch-4 sp, sl st in ring. (16 sc)
- Lower wing: 2 sc in ch-3 sp, 2 sc in each dc, 2 sc in ch-3 sp, sl st in ring. (12 sc)
Each butterfly has 56 sc in Rnd 2 (16 + 12 + 12 + 16) and measures about 3.25 in (8.3 cm) wide and 2.75 in (7.0 cm) tall.
Body: With the same color, wrap the yarn 6 times vertically over the center, between the upper and lower wings, so the body sits raised. Then work two straight stitches in a V above the body for antennae.
Flowers (make 8)
Rnd 1: Using Color E, make a magic ring and work ch 2, dc, ch 2, sl st in ring 5 times. Pull the ring tight. (5 petals)
Each flower measures 0.75 in (1.9 cm) across. Using Color D, work a French knot in the center of each flower.
Placing the Appliqués and Embroidery
Lay the holder flat with the opening at the bottom front.
- Pink butterfly: Pin it at the upper right, with its top edge 1.5 in (3.8 cm) below the top of the lavender section and its right wing 0.5 in (1.3 cm) from the side fold.
- Yellow butterfly: Pin it at the lower left, centered about 6 in (15.2 cm) above the top of the opening.
- Stems: Using Color F, work surface slip stitch to make two curving stems. The left stem starts just above the left side of the opening, passes beside the yellow butterfly, and ends under the pink butterfly. The right stem starts near the right side of the opening and climbs toward the pink butterfly.
- Leaves: Using Color F, work 3 or 4 lazy daisy stitches along each stem.
- Flowers: Pin 5 flowers along the left stem and 3 along the right stem, including one at each stem tip.
- Sew: Whipstitch each piece around its outline. Catch only the front layer of the tube so the inside stays open.
Top Band, Hanging Tab, and Opening Edging
Edging gauge: These sections use the same 16 sc = 4 in (10.2 cm) gauge as the body. The plum band adds 6 rnds, which is 1.3 in (3.3 cm).
Top Band (Color B, 5.0 mm hook)
- Rnds 82–86: Join Color B at the back, then sc in each st. (60 sts per rnd)
- Rnd 87: Sc in each st in BLO. (60 sts) The unworked front loops of Rnd 86 make a neat, rolled ridge along the rim.
Fasten off. The band holds 60 sts in every round, matching the body, so it neither flares nor pulls in.
Hanging Tab (Color B)
Lay the holder flat with the opening centered on the front. Count to the center 6 sts of Rnd 87 on the back.
- Row 1: Join Color B in the first of those 6 sts, ch 1, sc 6, turn. (6 sts)
- Rows 2–20: Ch 1, sc 6, turn. (6 sts per row)
The tab measures 1.5 in (3.8 cm) wide and 4.4 in (11.2 cm) long. Pass it through the wooden ring from front to back, fold it down inside the holder, and whipstitch Row 20 to the inside of Rnd 82.
Opening Edging (Color A, 5.0 mm hook)
- Rnd 1: Join Color A at the bottom corner of the opening. Work 12 sc across the 12 unworked sts of Rnd 19, 14 sc along the row ends of the first side (1 per row), 12 sc in the back loops of the 12 ch of Rnd 34, and 14 sc along the row ends of the second side. Join. (52 sts: 12 + 14 + 12 + 14)
- Rnd 2: Sl st in BLO of each st. (52 sts)
Why the math works: The top and bottom edges match their stitch sources one to one. The sides use one sc per row, and because the shaped edge curves outward, it is longer than its 3.1 in (7.9 cm) height. Fourteen sc fill that curve without ruffling. The slip-stitch round firms the edge into a smooth rim that holds the oval shape.
Final Blocking
- Weave in all ends on the inside.
- Slide the rolled towel or cardboard tube inside the holder.
- Spray the holder lightly with water until it is damp but not soaked.
- Shape the opening into a smooth oval and pat the dome base round.
- Pat the butterflies flat and spread their wings evenly.
- Check the measurements: 7.5 in (19.1 cm) wide flat and 18 in (45.7 cm) tall.
- Let it dry completely before removing the form.
Final Quality-Control Checklist
- [ ] Every body round has 60 sts.
- [ ] The opening is centered on the front and measures 3.1 in (7.9 cm) tall.
- [ ] The opening edging has 52 sts and lies flat.
- [ ] The plum band is 6 rnds deep with a visible ridge at the rim.
- [ ] The tab is centered on the back and securely sewn inside.
- [ ] All appliqués are stitched down all the way around their edges.
- [ ] The stems flow between the flowers without gaps.
- [ ] All ends are woven in on the inside.
Troubleshooting
- Base lies flat instead of doming: You probably skipped the plain rounds between increases. Rework Rnds 6–15 exactly as written.
- Visible seam line: This is normal with joined rounds. Keep the join at the back.
- Opening looks square: Check that the decreases and increases in Rows 3, 5, 10, and 12 are at both ends of the row.
- Opening edge ruffles: Work Rnd 2 of the edging more tightly, or go down a hook size for that round.
- Tube is twisting: Make sure you are working into the correct first stitch after each join.
- Appliqués curl: Steam them flat before sewing them on.
Care
Hand wash in cool water with mild soap, press out the water in a towel, and dry flat around a form. Don’t tumble dry, because the dryer can distort the appliqués.
Final Notes
Every measurement follows from the gauge of 16 sc = 4 in (10.2 cm). The 60-stitch rounds make a 15 in (38.1 cm) tube that is 7.5 in (19.1 cm) wide flat. The 12-stitch gap and the shaping rows make a 3 in (7.6 cm) to 4 in (10.2 cm) oval opening that is 3.1 in (7.9 cm) tall. Rnds 1–81 bring the tube to 16.7 in (42.4 cm), and the 6-round plum band brings it to 18 in (45.7 cm). Check your gauge first, and the holder will finish at the right size.
Happy crocheting!