

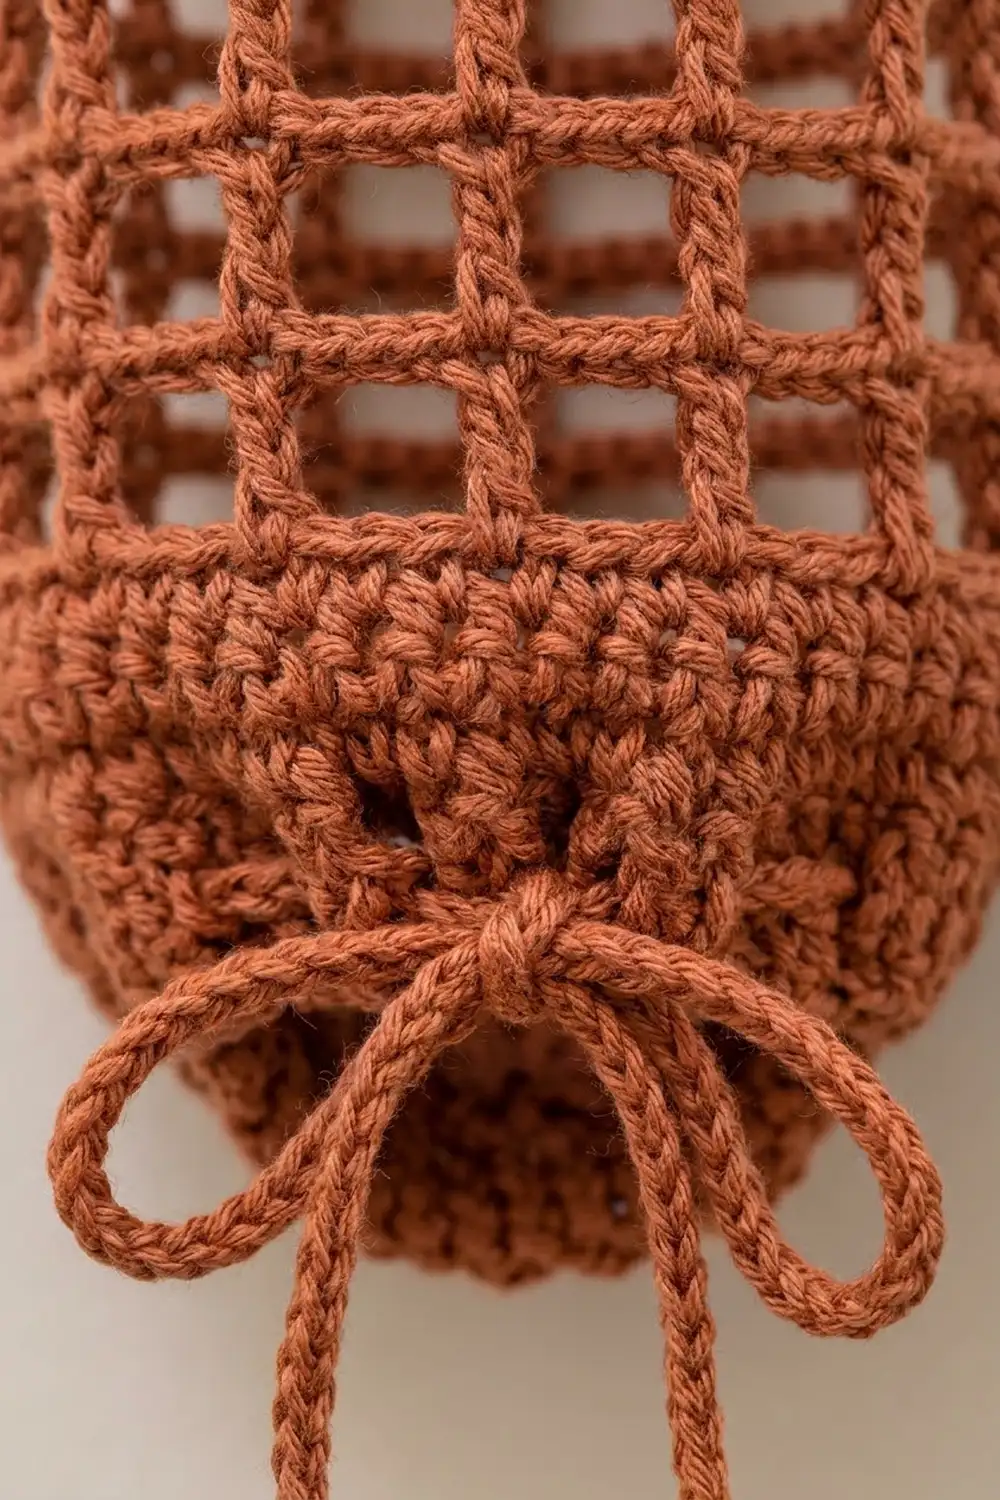
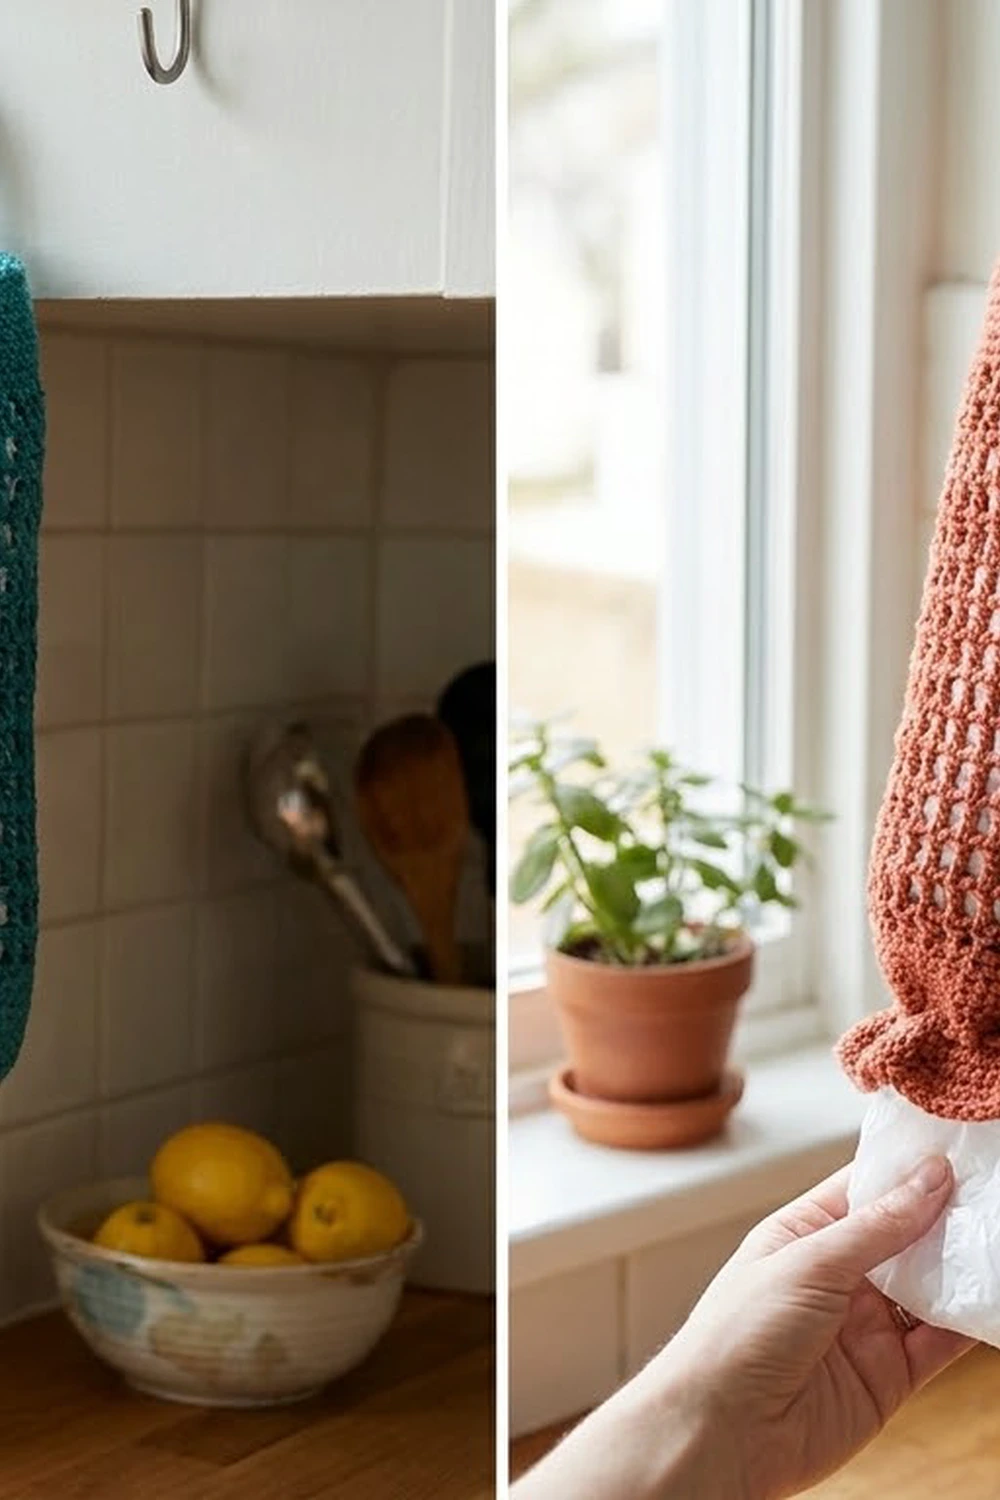
The Market Grid Bag Holder is a tall, open-mesh tube that keeps plastic grocery bags neat and easy to see. You stuff bags in at the top and pull them out one at a time through a cinched opening at the bottom. A solid single crochet band frames each end, a sturdy strap loop hangs it from a hook, and a knotted drawstring tied in a bow closes the base.
The photos show the holder in two colorways: a warm terracotta rust and a bright teal. Each holder uses one solid color. The grid is crisp and even, so the white bags inside show through as a soft background. It suits a farmhouse kitchen, a laundry room, or the back of a pantry door, and it makes a quick, practical gift.
This pattern uses US crochet terms. The finished holder is one seamless piece. It measures 6 in (15.2 cm) wide when flat and 18.75 in (47.6 cm) tall, plus a hanging loop of about 2.5 in (6.4 cm).
Construction is simple. You start at the bottom with a chain ring and work a solid band that includes an eyelet round. Then you switch to a double crochet filet mesh and finish with a solid top band. A short strap is worked straight off the top and folded into a loop, and a slip-stitch cord is woven through the eyelets.
Finished Size and Construction
- Finished size: 6 in (15.2 cm) wide flat, 12 in (30.5 cm) around, 18.75 in (47.6 cm) tall without the loop
- Skill level: Easy
- Terminology: US crochet terms
- Yarn weight: Worsted (#4) cotton or cotton blend
- Hook: US H-8 (5.0 mm)
- Number of pieces: 1 tube plus 1 drawstring cord
- Layout: Worked in joined rounds from the bottom up, with no seams
- Piece size: 48 stitches in every round
- Size before border: The bottom band and mesh measure 17.5 in (44.5 cm) tall before the top band
- Border depth: The top band is 5 rounds, 1.25 in (3.2 cm) deep
Materials
Choose a smooth worsted-weight cotton or cotton blend. Cotton holds the grid shape well, doesn’t stretch much under the weight of a full load of bags, and washes easily. Acrylic works too, but it’s springier, so the mesh may sag a little over time. Avoid fuzzy or very textured yarns, because they blur the square openings.
Pick one color per holder:
- Terracotta/rust: 90 g, about 155 m (170 yd)
- Teal (alternative colorway): 90 g, about 155 m (170 yd)
These quantities include a margin of about 15% for gauge checks and the drawstring. To make both colorways, buy one amount of each color.
Tools:
- US H-8 (5.0 mm) crochet hook
- Tapestry needle
- Stitch marker
- Scissors
- Measuring tape
- Rustproof pins and a towel for blocking
Abbreviations (US Terms)
- ch: chain
- sl st: slip stitch
- sc: single crochet
- dc: double crochet
- sk: skip
- sp(s): space(s)
- st(s): stitch(es)
- rep: repeat
- rnd(s): round(s)
Special stitch, the mesh square: (dc, ch 2) worked over 3 stitches. One mesh square is 1 dc plus its ch-2 space, so it always counts as 3 stitches.
Slip-stitch cord: Chain the required length, then sl st in the back bump of each chain back to the start.
Gauge and Checkpoints
Gauge matters here, because the 48-stitch count is what makes the holder 12 in (30.5 cm) around.
- Single crochet: 16 sts and 16 rnds = 4 in (10.2 cm)
- Mesh: 4 mesh squares (12 sts) = 3 in (7.6 cm) wide, and 6 mesh rnds = 4 in (10.2 cm) tall
Use the holder itself as your test piece. Work Rnds 1–6, then lay the tube flat with no stretching and measure across the middle.
- After Rnd 1: 12 in (30.5 cm) around, 6 in (15.2 cm) flat
- After Rnd 6: bottom band 1.5 in (3.8 cm) tall
- After Rnd 12: total height 5.5 in (14.0 cm)
- After Rnd 18: total height 9.5 in (24.1 cm)
- After Rnd 30: total height 17.5 in (44.5 cm)
- After Rnd 35: total height 18.75 in (47.6 cm)
If the band is too wide, rip back and go down to a 4.5 mm hook. If it’s too narrow, go up to a 5.5 mm hook. Don’t change the stitch count, because the mesh repeat needs a multiple of 3. If only the mesh height is off, add or remove mesh rounds to reach the target length.
Bottom Band
Foundation: Ch 48. Join with a sl st to the first ch to form a ring, taking care not to twist the chain. The join sits at the center back.
Rnd 1: Ch 1, sc in each ch around, join with a sl st to the first sc. (48 sc)
Place a marker in the first stitch of each round and move it up as you go.
Rnd 2: Ch 1, sc in each st around, join. (48 sc)
Rnd 3 (eyelet round): Ch 1, *sc in next st, ch 1, sk next st, sc in next st; rep from * 15 more times, join. (32 sc + 16 ch-1 sps = 48 sts, 16 eyelets)
Rnd 4 (conversion round): Ch 1, sc in each sc and 1 sc in each ch-1 sp around, join. (32 sc worked into sc + 16 sc worked into sps = 48 sc)
Rnds 5–6: Ch 1, sc in each st around, join. (48 sc)
Checkpoint: The band is 1.5 in (3.8 cm) tall and 6 in (15.2 cm) wide when flat. The eyelets sit two rounds above the bottom edge.
Mesh Body
The body is a classic filet grid. Every dc stacks directly on the dc below it, which builds the straight vertical bars you see in the photos.
Rnd 7 (setup mesh round): Ch 5 (counts as dc + ch 2), sk next 2 sts, *dc in next st, ch 2, sk next 2 sts; rep from * 14 more times, join with a sl st to the 3rd ch of the beginning ch-5. (16 dc + 16 ch-2 sps = 48 sts, 16 mesh squares)
Rnd 8: Ch 5 (counts as dc + ch 2), *dc in next dc, ch 2; rep from * 14 more times, join to the 3rd ch of the beginning ch-5. (16 dc + 16 ch-2 sps = 48 sts, 16 mesh squares)
Rnds 9–30: Rep Rnd 8. (48 sts, 16 mesh squares in each round)
That’s 24 mesh rounds in total, Rnds 7 through 30.
Checkpoints:
- After Rnd 12 (6 mesh rnds): the mesh is 4 in (10.2 cm) tall
- After Rnd 30 (24 mesh rnds): the mesh is 16 in (40.6 cm) tall, and the total height is 17.5 in (44.5 cm)
Tension tips: Keep your ch-2 spaces relaxed but not loose. Each mesh square should be about 0.75 in (1.9 cm) wide and close to square. Work each dc under both loops of the dc below, not into the chain space, so the columns stay vertical. Pull each join snug, because a loose join opens a wider gap at the center back.
Top Band (Border)
The top band frames the opening, keeps the mesh from stretching, and gives the hanging strap a firm base.
Border gauge: 16 sc = 4 in (10.2 cm), the same as the bottom band. When you flatten the tube with the join at the center back, each side shows 24 sts.
Rnd 31 (conversion round): Ch 1, sc in each dc and 2 sc in each ch-2 sp around, join. (16 sc worked into dc + 32 sc worked into sps = 48 sc; 24 per flattened side)
Rnds 32–35: Ch 1, sc in each st around, join. (48 sc; 24 per flattened side)
Checkpoint: The top band is 1.25 in (3.2 cm) deep, and the total height is 18.75 in (47.6 cm).
Why the math works: Each mesh square is 3 sts wide (1 dc + 2 ch). Working 1 sc into each dc and 2 sc into each space gives back exactly 3 sc per square. Sixteen squares × 3 sts = 48 sc, which matches the bottom band. Both bands measure 12 in (30.5 cm) around, so the opening doesn’t flare or pucker.
When you work into the ch-2 spaces, insert the hook under the chain, not into the chain stitches. This keeps the band smooth and even.
Don’t fasten off. Go straight on to the strap.
Hanging Loop
You work the strap in rows straight off the top band, at the center back.
Row 1: Ch 1, sc in the same st as the join and in the next 3 sts, turn. (4 sc)
Rows 2–24: Ch 1, sc in each st across, turn. (4 sc)
The strap is 1 in (2.5 cm) wide and 6 in (15.2 cm) long.
Fasten off, leaving a 12 in (30.5 cm) tail. Fold the strap back on itself toward the inside of the holder. Sew Row 24 to the inside of Rnds 33–35, directly behind the strap base. Whipstitch both side edges of the overlap as well. The loop stands about 2.5 in (6.4 cm) above the rim.
A full holder can be heavy, so sew through both loops of each stitch and go over the overlap twice.
Drawstring
Cord: Ch 112, leaving a 4 in (10.2 cm) starting tail. Sl st in the back bump of the 2nd ch from the hook and in each ch to the end. Fasten off. (111 sl sts)
The cord is about 28 in (71.1 cm) long. Tie an overhand knot near each end and trim the tails to about 0.5 in (1.3 cm).
Weaving: Start at the center front of Rnd 3. Weave the cord in and out through all 16 eyelets so it passes outside, inside, outside, and so on. Because 16 is an even number, both ends come out on the outside, next to each other.
Pull the cord until the bottom opening is about 1.5 in (3.8 cm) across, then tie a bow. Rnds 1–2 gather into a small ruffle below the drawstring, as in the photos.
Final Blocking
- Weave in all ends securely, following the direction of the stitches.
- Soak the holder in cool water with a little mild soap for 15 minutes.
- Press out the water gently. Don’t wring it.
- Roll it in a towel to remove excess moisture.
- Lay it flat with the join at the center back.
- Pin the width to 6 in (15.2 cm) along the full length.
- Pin the height to 18.75 in (47.6 cm), keeping the mesh columns straight.
- Use your fingers to square up each mesh opening.
- Pin the loop flat so it dries straight.
- Let it dry completely before you add the drawstring and bags.
Final Quality-Control Checklist
- Every round has 48 sts
- Every mesh round has 16 mesh squares
- The dc columns run straight up the tube with no spiral
- Rnd 3 has 16 eyelets
- The width is 6 in (15.2 cm) at the bottom band, the mesh, and the top band
- The total height is 18.75 in (47.6 cm)
- The strap sits centered over the round join
- The loop is sewn securely and holds weight without stretching
- The drawstring knots are tight and the bow closes the base
- All ends are woven in and hidden
Troubleshooting
The mesh spirals or leans. You’re probably working into a ch-2 space instead of the dc, or joining to the wrong chain. Always join to the 3rd ch of the beginning ch-5.
The top band flares. Check Rnd 31. You need exactly 2 sc per ch-2 space, not 3.
The top band pulls in. You may have skipped a space. Count to 48 before you continue.
The mesh squares look tall and narrow. Your dc stitches are tall compared to your chains. Try a slightly firmer yarn-over, or chain a little more loosely.
The bottom band ripples. Your foundation chain is tighter than your sc. Remake the chain with a hook one size larger, then switch back.
Bags fall out of the bottom. Tighten the drawstring until the opening is about 1.5 in (3.8 cm) across.
The loop stretches. Add a second line of whipstitch across the overlap, or rework the strap with a 4.5 mm hook.
The tube is too short. Add mesh rounds. Every 3 extra mesh rounds add about 2 in (5.1 cm).
Care
Machine wash cool in a mesh laundry bag, then reshape and lay flat to dry. Take out the drawstring first so it doesn’t tangle.
Final Notes
The measurement chain is short and easy to follow:
- Chain 48 for a 12 in (30.5 cm) ring, which lies flat at 6 in (15.2 cm).
- Six solid rounds make a 1.5 in (3.8 cm) bottom band with eyelets.
- Twenty-four mesh rounds of 16 squares add 16 in (40.6 cm).
- The conversion round gives back exactly 48 sc, and the 5 band rounds add 1.25 in (3.2 cm), for a total height of 18.75 in (47.6 cm).
- A 6 in (15.2 cm) strap folds into a loop about 2.5 in (6.4 cm) tall, and a 28 in (71.1 cm) cord closes the base.
Check your numbers at each step and the holder will come out the right size. Make one in rust and one in teal and hang them side by side.
Happy crocheting!