
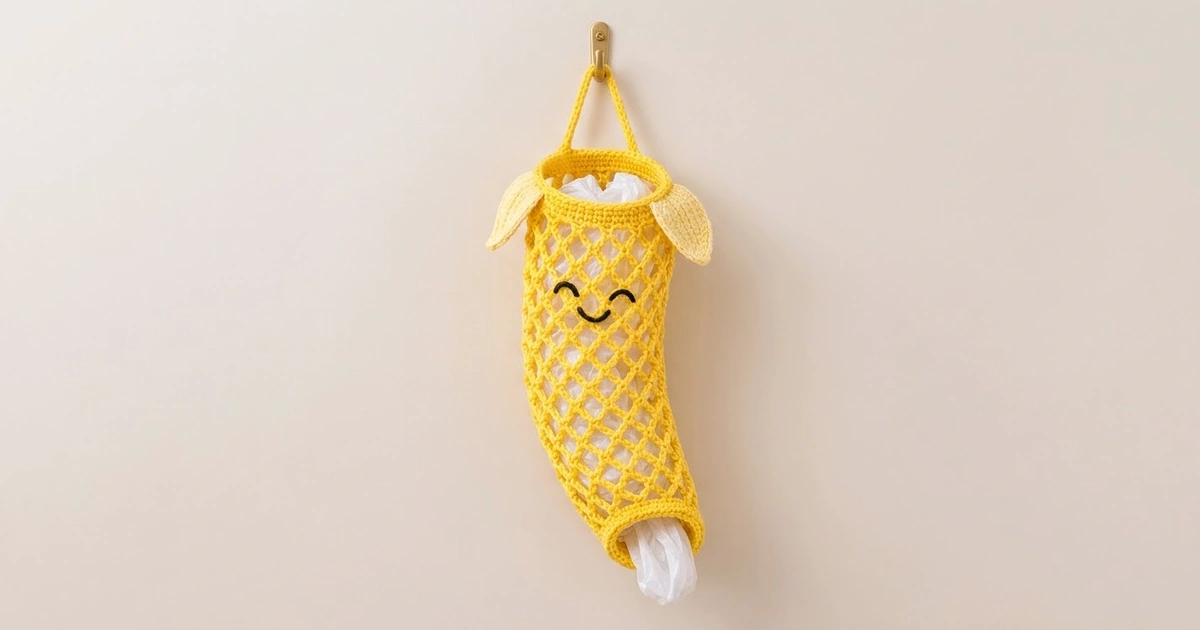
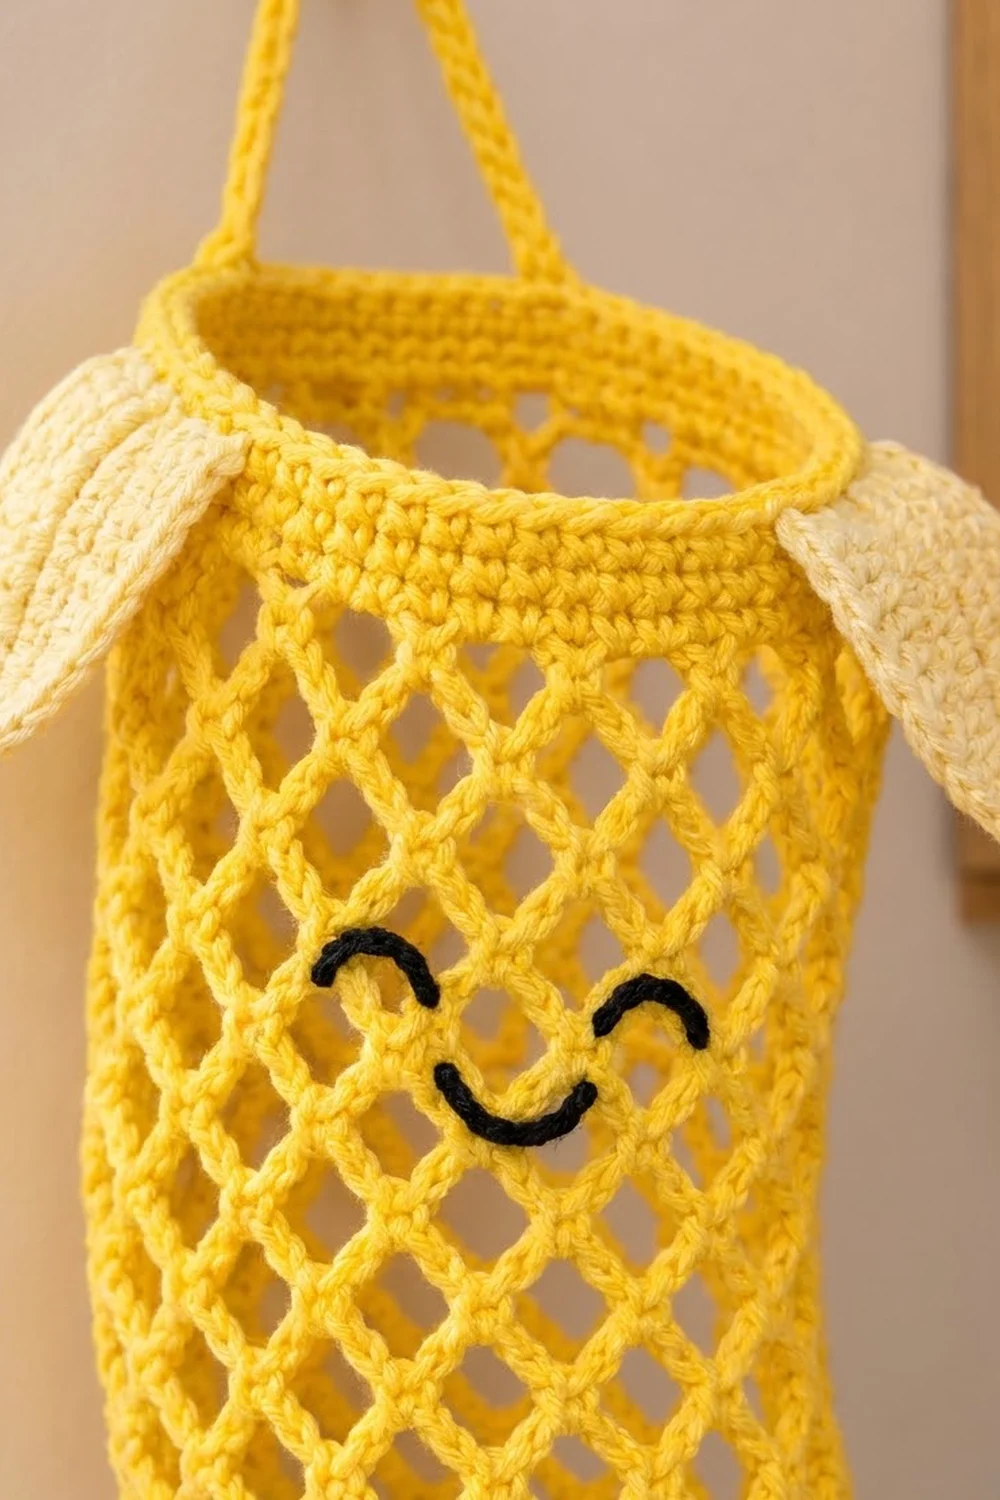
This cheerful banana keeps loose plastic grocery bags in one place. It has a bright yellow open diamond-mesh body, a solid band at the top and bottom, two pale yellow peel flaps at the rim, and a little smiling face embroidered in black. You stuff bags in at the top and pull them out one at a time through the narrow band at the bottom.
The look is simple and friendly. The mesh lets you see the bags inside, and the tube narrows toward the bottom like a real banana. A gentle curve is shaped during blocking. The finished body measures about 17 in (43.2 cm) long and 6 in (15.2 cm) wide across the top when laid flat. With the hanging strap, it hangs about 20 in (50.8 cm) from the hook.
This pattern uses US crochet terms throughout.
Construction is top-down and all in one piece. You start with a solid single crochet band, switch to a spiral diamond mesh, shorten the mesh loops to taper the tube, and finish with a solid bottom band. The strap is worked straight off the top band. The two peel flaps are small appliqués sewn on afterward, and the face is embroidered last.
Finished Size and Construction
- Finished size: 17 in (43.2 cm) body length; 6 in (15.2 cm) flat width at the top; 4 in (10.2 cm) flat width at the bottom band
- Hanging height with strap: about 20 in (50.8 cm)
- Skill level: Easy
- Terminology: US
- Yarn weight: Medium / worsted (#4), cotton or cotton blend
- Hook: 5.0 mm (H-8)
- Number of pieces: 1 tubular body with a built-in strap, plus 2 small peel appliqués
- Layout: Hangs vertically; strap on the sides, face and peels on the front
- Piece size: 17 in x 6 in (43.2 cm x 15.2 cm) flat
- Size before border (top band + mesh): 15.75 in (40.0 cm) long
- Border (bottom band) depth: 1.25 in (3.2 cm)
Materials
Choose a smooth worsted cotton. Cotton holds its shape when the holder is full and does not stretch out like acrylic can. A light, bright yellow gives the best banana look. The peel flaps use a soft butter or cream-yellow, and the face uses black.
- Color A, bright yellow (body and strap): 90 g, about 155 m
- Color B, pale yellow (peel flaps): 10 g, about 17 m
- Color C, black (face embroidery): 3 g, about 5 m
All quantities include a margin of about 15 percent for your gauge swatch and small differences in tension.
Tools:
- 5.0 mm (H-8) crochet hook
- Tapestry needle
- 2 stitch markers
- Scissors
- Measuring tape
- Rustproof pins and a rolled towel for blocking
Abbreviations (US Terms)
- ch – chain
- sl st – slip stitch
- sc – single crochet
- hdc – half double crochet
- dc – double crochet
- tr – treble crochet
- sk – skip
- sp – space
- st(s) – stitch(es)
- rnd(s) – round(s)
Special stitch – Mesh loop: ch 5 (or ch 4 where stated), then sc in the next chain space of the previous round. Each mesh loop counts as one loop in the stitch counts.
Gauge and Checkpoints
Solid gauge: 14 sc and 16 rnds = 4 in (10.2 cm).
Mesh gauge: 4 rnds of ch-5 mesh = 3 in (7.6 cm) when hanging, so one ch-5 round adds about 0.75 in (1.9 cm). One ch-4 round adds about 0.6 in (1.5 cm).
Test your gauge first by working the top band (Rnds 1–5). It is only a few minutes of work and tells you almost everything.
Checkpoints:
- After Rnd 5: circumference 12 in (30.5 cm), flat width 6 in (15.2 cm), band height 1.25 in (3.2 cm).
- After Rnd 13: mesh 6 in (15.2 cm) long.
- After Rnd 25: mesh 14.5 in (36.8 cm) long; piece 15.75 in (40.0 cm) total.
- After Rnd 30: body 17 in (43.2 cm) long; bottom flat width 4 in (10.2 cm).
If your band is too big (more than 6.25 in / 15.9 cm flat), go down half a hook size. If it is too small (under 5.75 in / 14.6 cm flat), go up half a hook size. Mesh length is forgiving: if your mesh runs short, add one ch-5 round before the taper; if it runs long, skip one.
Pattern
Top Band
With Color A, ch 42. Join with a sl st to the first ch, taking care not to twist the chain.
Rnd 1: Ch 1, sc in each ch around, sl st to first sc. (42 sc)
Rnds 2–5: Ch 1, sc in each st around, sl st to first sc. (42 sc)
The join sits at st 1. This is the left side of the holder. Sts 1–3 and sts 22–24 will hold the strap ends, sts 4–21 are the front, and sts 25–42 are the back. Place a marker in st 12 to mark the front center.
Checkpoint: band 12 in (30.5 cm) around and 1.25 in (3.2 cm) tall.
Mesh Body
Rnd 6 (mesh setup): Ch 1, sc in first st, ch 5, sk 2 sts, sc in next st; repeat from * 12 more times, ch 5, sk last 2 sts, sl st to first sc.
Count: 14 sc worked 1 per every third stitch + 14 ch-5 loops added. (14 sc + 14 ch-5 loops; 42 ÷ 3 = 14)
From here the mesh is worked in a continuous spiral. Do not join rounds. Move a marker to the sc that ends each round.
Rnd 7: Ch 5, sc in first ch-5 sp of Rnd 6, ch 5, sc in next ch-5 sp; repeat from * 12 more times. (14 ch-5 loops)
Rnds 8–21: Ch 5, sc in next ch-5 sp; repeat from * 13 more times. (14 ch-5 loops per rnd)
Each sc lands in the center of a loop below, so the loops form neat diamonds. Keep the chains even. Do not pull the sc tight, or the diamonds will close up.
Checkpoint after Rnd 13: mesh 6 in (15.2 cm) long. After Rnd 21: mesh 12 in (30.5 cm) long.
Taper Rnds 22–25: Ch 4, sc in next sp; repeat from * 13 more times. (14 ch-4 loops per rnd)
The shorter loops pull the tube in gently toward the bottom. Do not decrease the loop count. The taper comes from loop length alone, which keeps the diamonds lined up.
Checkpoint after Rnd 25: mesh 14.5 in (36.8 cm) long, which is 12 in (30.5 cm) of ch-5 mesh plus 2.4 in (6.1 cm) of ch-4 mesh, rounded. The piece measures 15.75 in (40.0 cm) from the top edge.
Hanging Strap
Hold the body with the front facing you and the top band upward. Join Color A in st 1 of Rnd 5.
Row 1: Ch 1, sc in sts 1–3. (3 sc)
Rows 2–36: Ch 1, turn, sc in each st across. (3 sc)
The strap measures 9 in (22.9 cm) long and about 7/8 in (2.2 cm) wide. Make sure it is not twisted, then sew the last row to sts 22–24 of Rnd 5 with the tapestry needle. Sew through both layers twice for strength. The strap forms an arch that rises about 3 in (7.6 cm) above the rim.
Peel Flaps (Make 2)
With Color B, ch 11.
Rnd 1: Sc in 2nd ch from hook, hdc in next ch, dc in next 2 chs, tr in next 3 chs, dc in next 2 chs, 3 sc in last ch. Rotate and work along the opposite side of the foundation: dc in next 2 chs, tr in next 3 chs, dc in next 2 chs, hdc in next ch, sc in next ch, ch 2, sl st to first sc.
Count: 9 sts on the first side + 3 sc at the base + 9 sts on the second side = 21 sts, plus the ch-2 tip.
Rnd 2: Ch 1, sl st loosely in each of the next 20 sts, (sl st, ch 2, sl st) in the ch-2 tip sp, sl st in the joining sc. Fasten off, leaving a 10 in (25.4 cm) tail. (23 sl st + ch-2 tip)
The slip stitch round gives the flap a defined, slightly raised outline and sharpens the point. Each flap is a pointed leaf shape about 3 in (7.6 cm) long and 1.5 in (3.8 cm) wide, with the rounded 3-sc end as the base.
Attach the flaps: Center one flap base over sts 7–8 and the other over sts 17–18 of the top band. That places each flap 5 stitches out from the front center. Sew the base across Rnds 4 and 5 so it sits right at the rim. Tack the flap about 0.5 in (1.3 cm) up from the base, then let the pointed tips flare outward and slightly down. They should look like peel strips opening from the top of the banana.
Smiling Face
With Color C and a tapestry needle, embroider the face on the front, centered under the front-center marker. Work it in chain-stitch embroidery, catching the mesh strands as you go so the lines stay smooth across the open spaces.
- Eyes: Two closed, happy eye arcs that curve upward like a rainbow shape. Each is 0.75 in (1.9 cm) wide, with centers 1.25 in (3.2 cm) apart. Place them about 1 in (2.5 cm) below the top band.
- Smile: One U-shaped curve 1 in (2.5 cm) wide, centered 0.75 in (1.9 cm) below the eyes.
Weave all ends inside the tube and trim.
Border (Bottom Band)
The bottom band is the border of this piece. It forms the dispensing opening, so it must be solid, firm, and slightly snug.
Border gauge: 14 sc = 4 in (10.2 cm), the same as the top band.
Rnd 26 (conversion round): Continuing from Rnd 25 with Color A, 2 sc in next ch-4 sp; repeat from * 13 more times, sl st to first sc. Skip the sc between loops and work only into the spaces.
Count: 0 sts worked 1-per-existing-stitch + 28 sc added (2 in each of 14 spaces). (28 sc)
Rnds 27–30: Ch 1, sc in each st around, sl st to first sc. (28 sc)
Fasten off and weave in the end.
Counts per side: Laid flat, the band has 14 sc on the front and 14 sc on the back. There are no corners, so no stitch is shared between sides.
Why the math works: 14 loops x 2 sc = 28 sc. At 14 sc per 4 in (10.2 cm), 28 sc gives an 8 in (20.3 cm) circumference, or a 4 in (10.2 cm) flat width. That is snug enough to hold the bag stash in, but wide enough to pull out one crumpled bag. Five rounds at 16 rnds per 4 in (10.2 cm) give the 1.25 in (3.2 cm) depth. The full length works out to 1.25 in + 14.5 in + 1.25 in = 17 in (3.2 cm + 36.8 cm + 3.2 cm = 43.2 cm).
Final Blocking
- Fill a basin with cool water and soak the holder for 10 minutes.
- Gently squeeze out the water. Do not wring. Roll it in a dry towel and press.
- Roll a second towel into a tube about 17 in (43.2 cm) long and slide it inside the holder.
- Bend the towel into a soft curve so the bottom swings about 2 in (5.1 cm) to one side. This sets the banana shape.
- Lay it flat with the face up. Even out the diamonds with your fingers so all the loops look the same size.
- Pin the top band to 6 in (15.2 cm) flat and the bottom band to 4 in (10.2 cm) flat.
- Pin each peel flap open so the tips point outward and slightly down.
- Let it dry completely, then remove the towel.
Final Quality-Control Checklist
- Body length is 17 in (43.2 cm), give or take 0.5 in (1.3 cm).
- Top band is 6 in (15.2 cm) flat; bottom band is 4 in (10.2 cm) flat.
- Every mesh round has 14 loops.
- The strap is untwisted and sewn securely at both ends.
- The peel flaps sit evenly, 5 stitches from front center on each side.
- The face is centered, and both eyes are the same size.
- All ends are woven in on the inside.
- A crumpled bag pulls through the bottom band without stretching it out of shape.
Troubleshooting
The mesh twists around the tube. This is normal in a spiral. Blocking straightens most of it. Keep your chain tension even so it does not get worse.
The diamonds look crooked or closed. Your sc are too tight. Loosen them and make sure each sc goes into the center of the space, not around a chain.
The tube is too short. Add one or two ch-5 rounds before the taper. Each adds about 0.75 in (1.9 cm).
The bottom band is too tight to dispense. Rework Rnd 26 with a hook one size larger, or add 1 sc in every other space (35 sc).
The peel flaps curl. Wet-block them flat and pin. The slip stitch edge should relax after drying.
The strap stretches. Sew a second line through both ends, or work the strap with a hook one size smaller.
Care
Hand wash in cool water and lay flat to dry, reshaping over a rolled towel. Avoid the dryer, which can shrink cotton and distort the mesh.

Final Notes
The measurement chain is short and easy to check. The 42-stitch top band sets a 6 in (15.2 cm) flat width. The 14 mesh loops come from 42 ÷ 3 and stay at 14 all the way down. Sixteen ch-5 rounds and four ch-4 rounds build 14.5 in (36.8 cm) of tapered mesh. Then 14 spaces x 2 sc gives the 28-stitch bottom band, 4 in (10.2 cm) wide. Altogether, that is a 17 in (43.2 cm) banana with a happy face and peels ready to flap open.
Happy crocheting!