

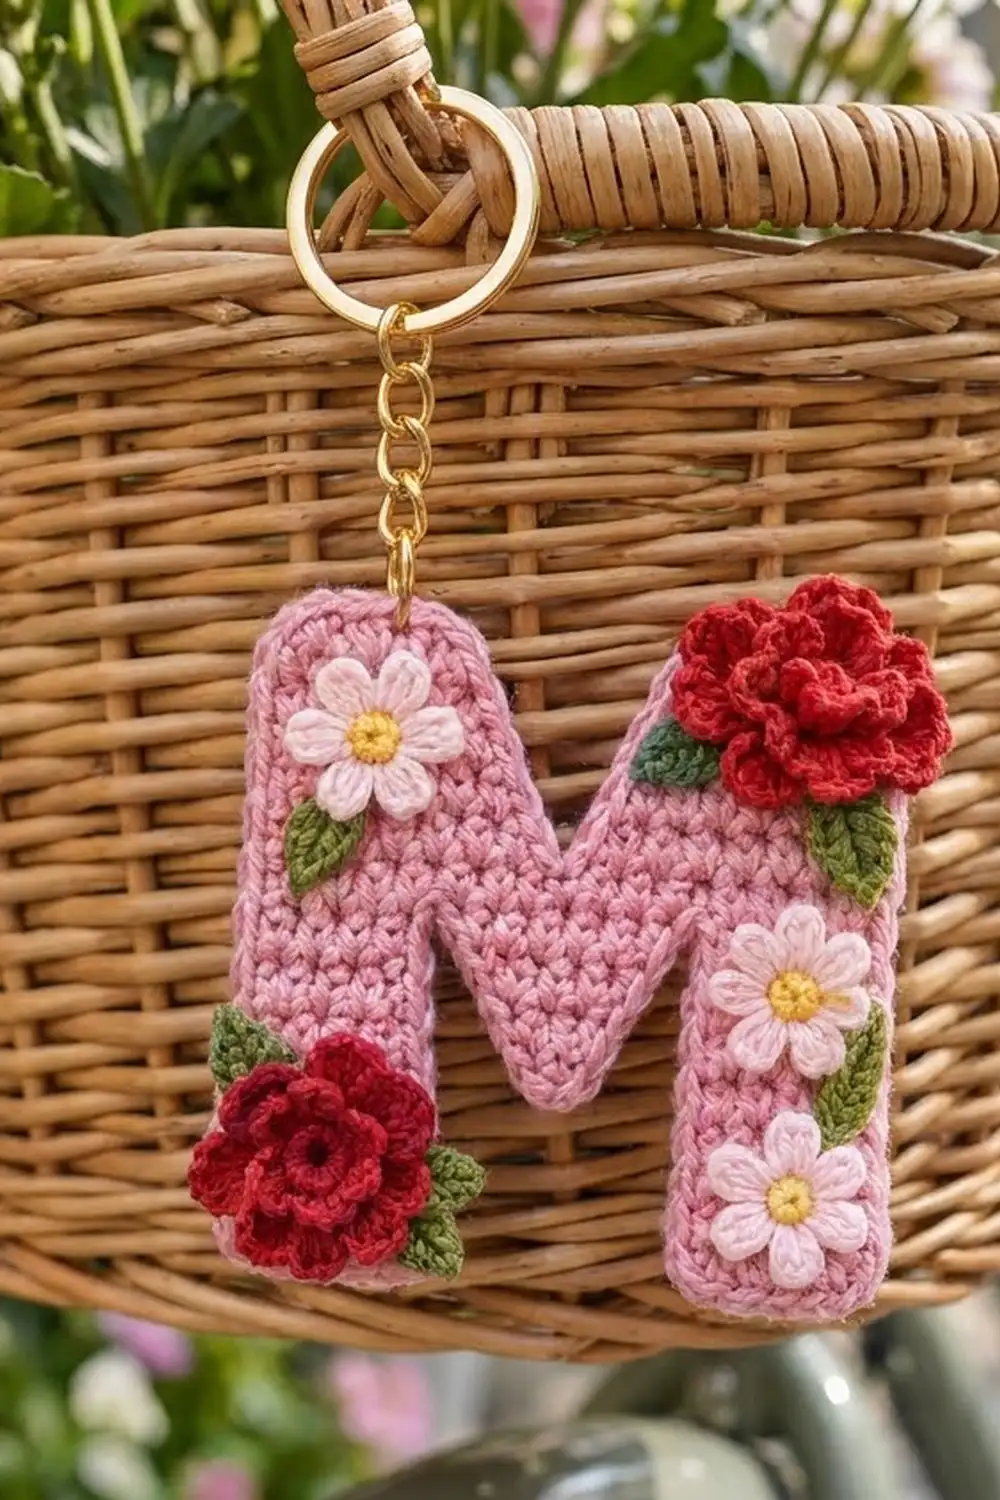
This little letter “M” keychain is a soft pink initial covered with a small garden of flowers. Two deep-red rolled roses sit at opposite corners. Three pale-pink daisies with sunny yellow centers fill the rest of the letter, and small green leaves peek out from under the blooms. A gold split ring and chain finish it as a bag charm or key fob.
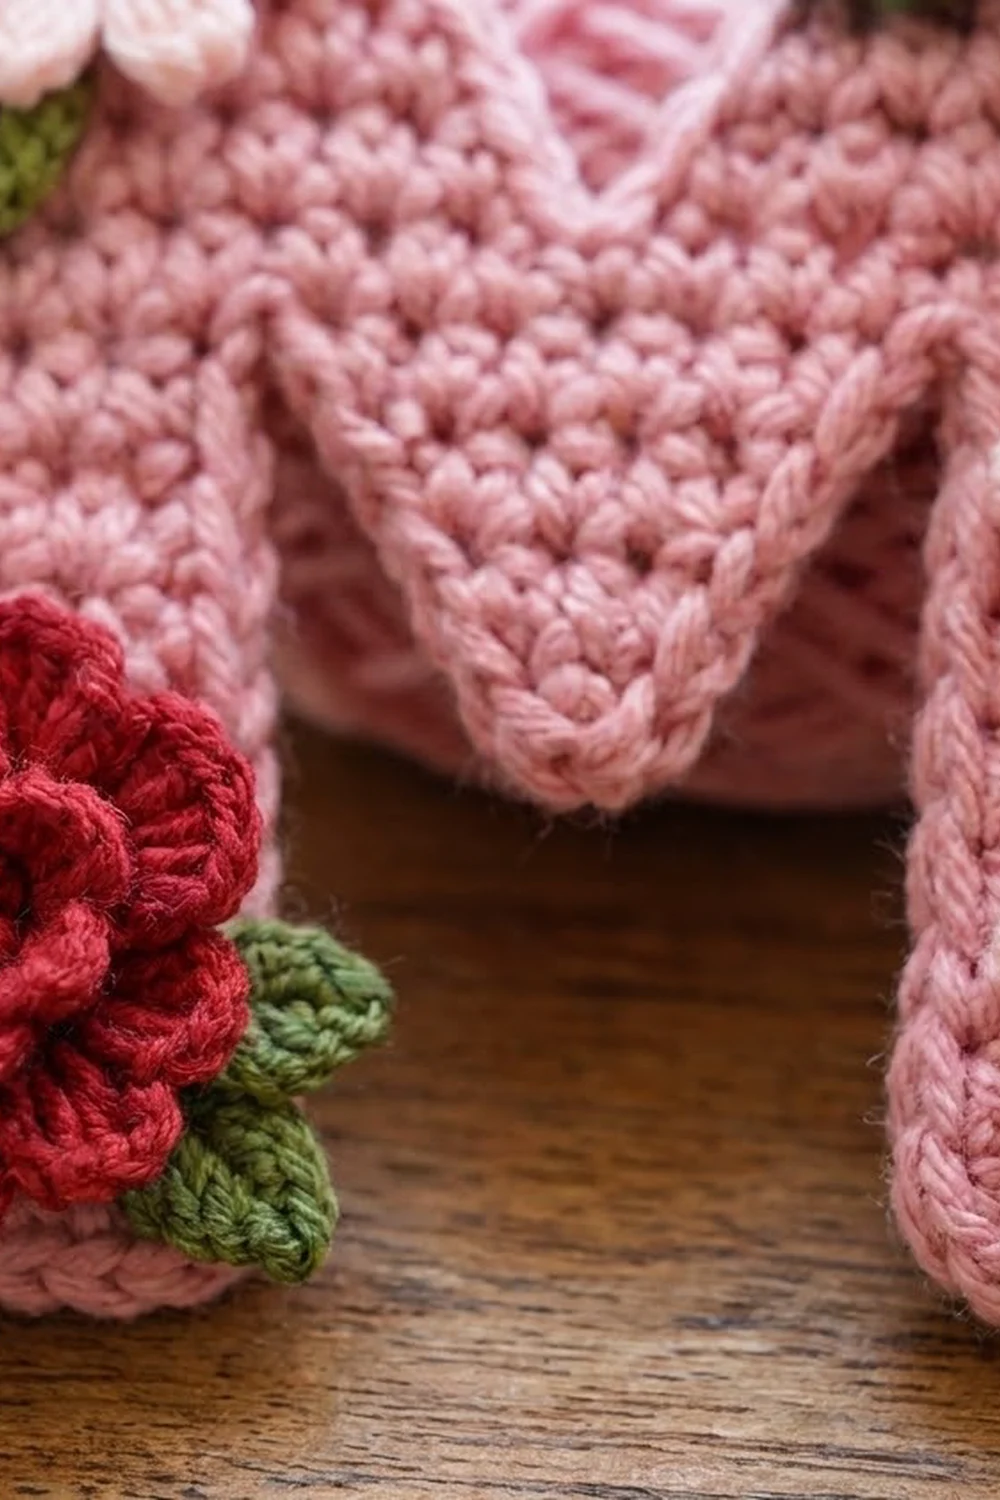
The style is sweet and cottage-inspired. The letter is dense single crochet with a crisp rope-like edge, so the flowers stand out clearly against it. All colors are cotton: medium pink, deep red, pale pink, yellow and leaf green.
The pattern uses US crochet terms. The finished letter measures 3.6 in (9.1 cm) wide by 4.4 in (11.2 cm) tall, not counting the hardware.
You crochet the letter flat in rows from the bottom up. You make the two legs separately, join them with a chain, and work a solid middle band. Then you split the work again to form the top V. A two-round edging tidies the outline. Finally you make the roses, daisies and leaves separately and sew them on.
Finished Size and Construction
- Finished size: 3.6 in (9.1 cm) wide x 4.4 in (11.2 cm) tall
- Skill level: Easy
- Terminology: US crochet terms
- Yarn weight: DK (weight 3) cotton
- Hook: 3.0 mm
- Number of pieces: 1 letter body, plus 11 small appliqués (2 roses, 3 daisies, 6 leaves)
- Layout: single letter M, flowers sewn to the front
- Body size before border: 17 sts x 21 rows = 3.4 in (8.6 cm) x 4.2 in (10.7 cm)
- Border depth: 0.1 in (0.3 cm) per side, adding 0.2 in (0.5 cm) to each dimension
- Top V opening: 7 sts = 1.4 in (3.6 cm)
Materials
Use a smooth, mercerized DK cotton of about 125 m per 50 g (roughly 2.5 m per gram). Cotton gives crisp stitch definition, holds the letter shape, and survives being handled daily as a keychain.
- Medium pink (letter body): 8 g / 20 m
- Deep red (roses): 4 g / 10 m
- Pale pink (daisy petals): 3 g / 7 m
- Yellow (daisy centers): 1 g / 3 m
- Leaf green (leaves): 2 g / 5 m
These quantities include a margin for swatching and sewing tails.
Tools:
– 3.0 mm crochet hook
– Tapestry needle
– Sharp sewing needle and pink or red sewing thread (optional, for secure appliqué)
– 1 in (2.5 cm) gold split ring with a short gold chain
– 0.25 in (0.6 cm) gold jump ring and two pairs of flat-nose pliers
– Stitch markers
– Blocking board, rust-proof pins, spray bottle
– Ruler or tape measure
Abbreviations (US Terms)
- ch: chain
- sl st: slip stitch
- sc: single crochet
- hdc: half double crochet
- dc: double crochet
- sc2tog: single crochet 2 together (insert hook in next st, pull up a loop, insert hook in following st, pull up a loop, yarn over and draw through all 3 loops)
- st(s): stitch(es)
- RS: right side
- inc: 2 sc in the same st
Special stitch: shell. 5 dc worked into the same stitch.
The turning ch 1 at the start of each row never counts as a stitch.
Gauge and Checkpoints
Gauge: 20 sc and 20 rows = 4 in (10.2 cm), which is 5 sts and 5 rows per inch.
Before starting, test with a small swatch. Ch 11 and work 10 rows of 10 sc. The swatch should measure 2 in (5.1 cm) square. Square stitches matter here because the border places 1 sc in each row end.
Checkpoints:
– After Row 6 of each leg: 1 in (2.5 cm) wide x 1.2 in (3.0 cm) tall
– After Row 9 of each leg: 1.6 in (4.1 cm) wide at the top x 1.8 in (4.6 cm) tall
– After Row 12: 3.4 in (8.6 cm) wide x 2.4 in (6.1 cm) tall
– After Row 21: 3.4 in (8.6 cm) x 4.2 in (10.7 cm)
– After the border: 3.6 in (9.1 cm) x 4.4 in (11.2 cm)
If your work is too big, go down to a 2.75 mm hook. If it is too small, go up to a 3.25 mm hook. If your width is right but your rows are too tall, tighten your yarn-over before you complete each sc.
Letter Body
Use medium pink throughout. Work Leg 1 and Leg 2 from their own foundation chains, keeping the Row 1 side as the RS for both.
Leg 1 (right leg)
Leg 1’s inner edge falls at the end of odd rows.
Row 1: Ch 6, sc in 2nd ch from hook and in each ch across. (5 sts)
Rows 2–6: Ch 1, turn, sc in each st across. (5 sts)
Row 7: Ch 1, turn, sc in next 4 sts, inc in last st. (6 sts)
Row 8: Ch 1, turn, inc in first st, sc in next 5 sts. (7 sts)
Row 9: Ch 1, turn, sc in next 6 sts, inc in last st. (8 sts)
Fasten off.
Leg 2 (left leg)
Leg 2’s inner edge falls at the start of odd rows.
Row 1: Ch 6, sc in 2nd ch from hook and in each ch across. (5 sts)
Rows 2–6: Ch 1, turn, sc in each st across. (5 sts)
Row 7: Ch 1, turn, inc in first st, sc in next 4 sts. (6 sts)
Row 8: Ch 1, turn, sc in next 6 sts, inc in last st. (7 sts)
Row 9: Ch 1, turn, inc in first st, sc in next 6 sts. (8 sts)
Do not fasten off.
The increases on the inner edges form a stepped, pointed notch between the legs. The gap narrows from 7 sts to 5, then 3, then 1.
Joining and Middle Band
Row 10: Ch 1, turn. Sc in the 8 sts of Leg 2, ending at its inner edge. Ch 1. With the RS of Leg 1 facing the same way, sc in the 8 sts of Row 9 of Leg 1, starting at its inner edge. (8 + 1 ch + 8 = 17 sts)
Row 11: Ch 1, turn, sc in each st across, including the ch. (17 sts)
Row 12: Ch 1, turn, sc in each st across. (17 sts)
Check: 3.4 in (8.6 cm) wide.
Right Upright
Row 13: Ch 1, turn, sc in next 8 sts. Leave the remaining 9 sts unworked. (8 sts)
Row 14: Ch 1, turn, sc2tog, sc in next 6 sts. (7 sts)
Row 15: Ch 1, turn, sc in each st across. (7 sts)
Row 16: Ch 1, turn, sc2tog, sc in next 5 sts. (6 sts)
Row 17: Ch 1, turn, sc in each st across. (6 sts)
Row 18: Ch 1, turn, sc2tog, sc in next 4 sts. (5 sts)
Rows 19–21: Ch 1, turn, sc in each st across. (5 sts)
Fasten off.
Left Upright
Row 13: Return to Row 12. Skip the next unworked st (the 9th st, which is the center). Join yarn in the 10th st, ch 1, and sc in that st and the next 7 sts. (8 sts)
Row 14: Ch 1, turn, sc in next 6 sts, sc2tog. (7 sts)
Row 15: Ch 1, turn, sc in each st across. (7 sts)
Row 16: Ch 1, turn, sc in next 5 sts, sc2tog. (6 sts)
Row 17: Ch 1, turn, sc in each st across. (6 sts)
Row 18: Ch 1, turn, sc in next 4 sts, sc2tog. (5 sts)
Rows 19–21: Ch 1, turn, sc in each st across. (5 sts)
Fasten off.
The top V opens from 1 skipped st at Row 13 to 7 sts at Row 21: 17 − 5 − 5 = 7. The body now measures 3.4 in (8.6 cm) x 4.2 in (10.7 cm). Weave in all ends on the wrong side.
Flowers and Leaves
Rolled Rose (make 2, deep red)
Row 1: Ch 30, sc in 2nd ch from hook and in each ch across. (29 sts)
Row 2: Ch 1, turn, sl st in first st, skip 1 st, shell in next st, skip 1 st, sl st in next st 7 times. (7 shells: 1 + 7 x 4 = 29 sts worked into)
Fasten off, leaving a 10 in (25.4 cm) tail. Starting from the end without the tail, roll the strip tightly for the first two shells to form the bud. Then roll more loosely so the outer petals flare. Stitch back and forth through the base with the tail to lock the layers in place. The finished rose measures 1.2 in (3.0 cm) across.
Daisy (make 3)
Round 1 (yellow): Make a magic ring, ch 1, 5 sc in ring, sl st to first sc. (5 sts) Pull the ring closed and fasten off.
Round 2 (pale pink): Join in any st. In the same st work (sl st, ch 2, 2 dc, ch 2, sl st) in each of the 5 sts. (5 petals)
Fasten off, leaving a 8 in (20.3 cm) tail. The daisy measures 1 in (2.5 cm) across.
Leaf (make 6, green)
Ch 6. Sc in 2nd ch from hook, hdc in next ch, dc in next ch, hdc in next ch, 3 sc in last ch. Working along the opposite side of the foundation chain: hdc in next ch, dc in next ch, hdc in next ch, sc in last ch, sl st to first sc. (11 sts)
Fasten off, leaving a tail. The leaf measures 0.6 in (1.5 cm) long.
Border
The border uses the same gauge as the body: 5 sc per inch along stitch edges, and 1 sc per row end along the sides.
Round 1 (medium pink): With the RS facing, join at the outer bottom corner of Leg 2 (the left leg). Work counterclockwise:
- Leg 2 bottom (5 sts): 3 sc in first st, sc in next 3 sts, 3 sc in last st. (9 sc)
- Leg 2 inner edge: 1 sc in each of 9 row ends. (9 sc)
- Lower apex: sc in the underside of the Row 10 ch. (1 sc)
- Leg 1 inner edge: 9 sc down the row ends. (9 sc)
- Leg 1 bottom (5 sts): 3 sc in first st, sc in next 3, 3 sc in last st. (9 sc)
- Right outer side: 21 sc up the row ends. (21 sc)
- Right upright top: 3 sc in first st, sc in next 3, 3 sc in last st. (9 sc)
- Right upright inner edge: 9 sc down the row ends. (9 sc)
- Upper apex: sc in the skipped center st of Row 12. (1 sc)
- Left upright inner edge: 9 sc up the row ends. (9 sc)
- Left upright top: 3 sc in first st, sc in next 3, 3 sc in last st. (9 sc)
- Left outer side: 21 sc down the row ends. (21 sc)
Sl st to the first sc to join.
Round 1 count: 100 sts worked 1 per existing stitch or row end, plus 16 extra corner stitches (8 corners x 2), for 116 sc total. The 100 base stitches break down as:
– 20 top and bottom stitches
– 78 row ends (21 + 21 + 9 + 9 + 9 + 9)
– 2 apex stitches
Round 2: Sl st in each st around, keeping the loops relaxed. (116 sl sts) Fasten off and weave in the end.
Why the math works: The swatch has square stitches (5 sts and 5 rows per inch). That means 1 sc per row end lies flat, with no cupping or ruffling. Each convex corner gets 3 sc so it turns cleanly. The two concave apexes get only 1 sc each so the notches stay sharp. One round of sc adds 0.1 in (0.3 cm) per side, and the slip-stitch round adds height without adding width. The result is 3.6 in (9.1 cm) x 4.4 in (11.2 cm).
Final Blocking
- Block the letter before you sew on any flowers.
- Pin the letter RS up on the blocking board to 3.6 in (9.1 cm) x 4.4 in (11.2 cm).
- Pin the 8 outer corners first, then the two apex points. The lower apex should sit 2 in (5.1 cm) above the bottom edge.
- Check that the outer sides are straight and parallel.
- Mist the piece until damp, then let it dry completely. This takes about 2–3 hours.
- Unpin the letter and arrange the appliqués:
- one daisy at the top left
- one rose overlapping the top right corner
- two daisies stacked down the right leg
- one rose overlapping the outer edge at the bottom left
- Slide the leaves under the edges of the flowers: 2 for each rose, 1 for the top daisy, and 1 for the middle daisy on the right leg.
- Sew each leaf by its base. Sew each flower around its center and under the petal tips so nothing snags.
- Open the jump ring sideways with the pliers. Thread it through 2 border sts at the middle of the left upright’s top edge, hook on the chain and split ring, and close it fully.
Final Quality-Control Checklist
- Body stitch counts: Rows 1–6 have 5 sts per leg, Row 9 has 8, Rows 10–12 have 17, and Rows 19–21 have 5 per upright.
- Border Round 1 has 116 sc.
- The letter measures 3.6 in (9.1 cm) x 4.4 in (11.2 cm).
- The top V is 1.4 in (3.6 cm) wide plus the border, and both uprights are the same width.
- Each rose has 7 shells and is stitched solidly through its base.
- Each daisy has 5 even petals around a yellow center.
- No sewing stitches show on the front.
- The jump ring is fully closed.
- All ends are woven in on the wrong side.
Troubleshooting
- The legs are different heights. Recount the rows on both legs. Each leg needs exactly 9 rows before Row 10.
- The joined row is twisted. Before working Row 10, check that both legs have their Row 1 side facing you.
- The uprights slant. Check that every sc2tog sits on the inner edge, never the outer edge.
- The border ruffles. Your rows are shorter than your stitches. Skip 1 row end on each long side, or block more firmly.
- The border pulls in. Loosen your tension, or go up a hook size for the border only.
- The rose is floppy. Roll the first shells tighter and add more stitches through the base.
- The daisy petals curl. Steam-block the petals flat before sewing.
Care
Hand wash in cool water with mild soap and press out the water in a towel. Reshape the letter and dry it flat. Keep the metal hardware out of long soaks.
Final Notes
The measurement chain is simple:
– A 5-per-inch gauge gives a 17-st x 21-row body of 3.4 in (8.6 cm) x 4.2 in (10.7 cm).
– A 116-st border adds 0.1 in (0.3 cm) per side, for a finished letter of 3.6 in (9.1 cm) x 4.4 in (11.2 cm).
– Two 1.2 in (3.0 cm) roses, three 1 in (2.5 cm) daisies and six 0.6 in (1.5 cm) leaves fit comfortably on that surface.
Check your gauge, count at each checkpoint, and block before you sew. Your little garden letter will come out crisp and even.
Happy crocheting!