

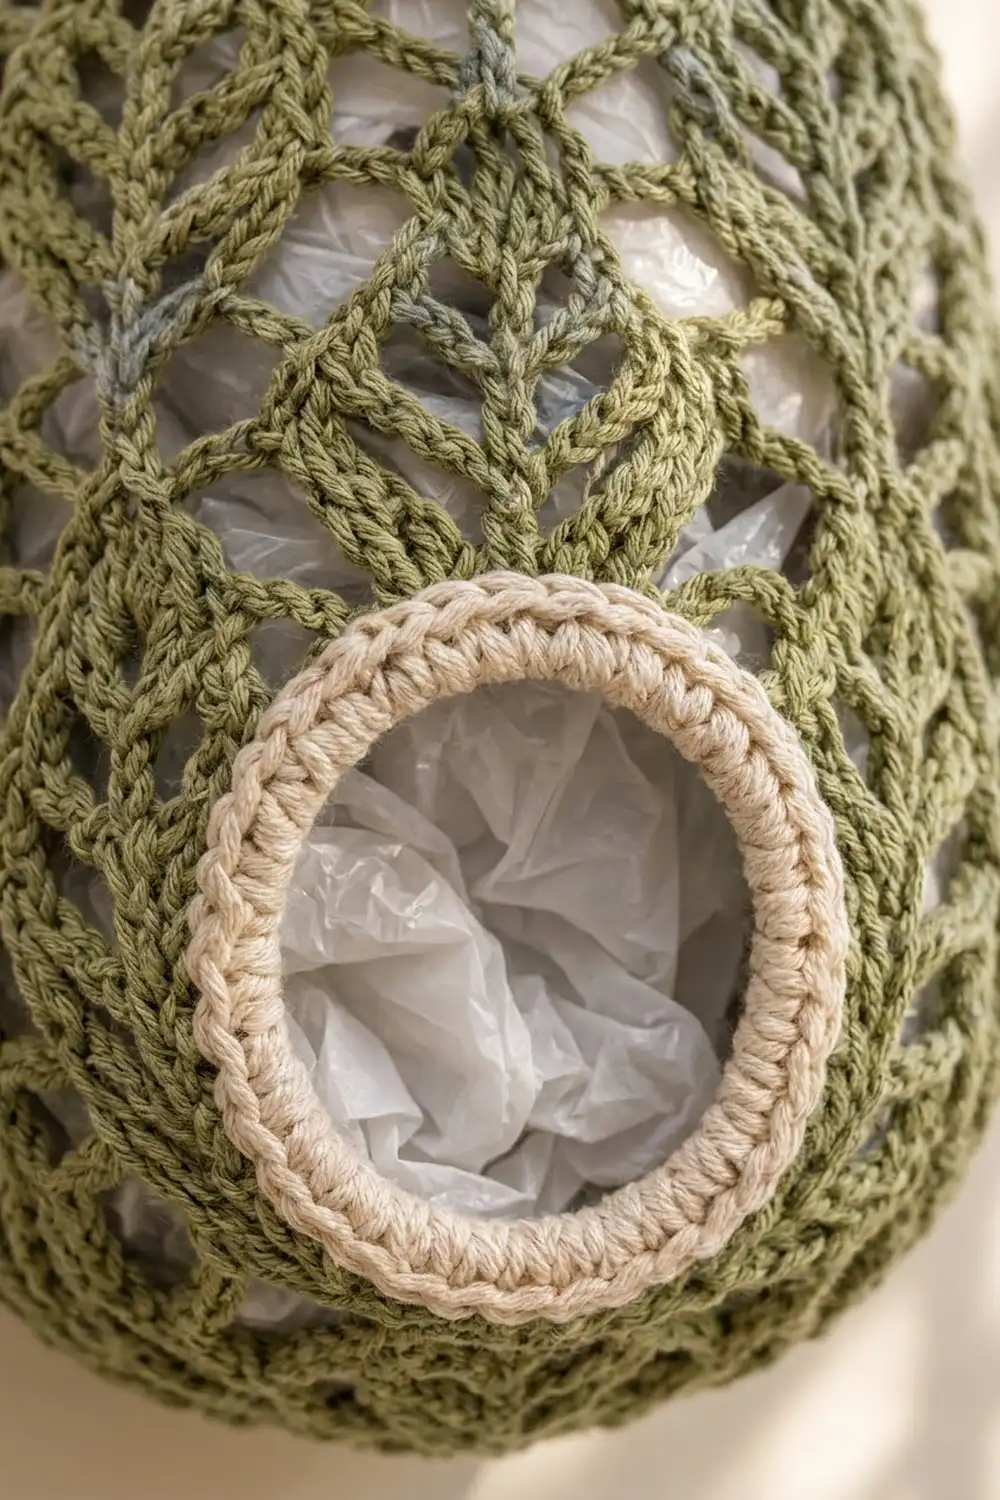
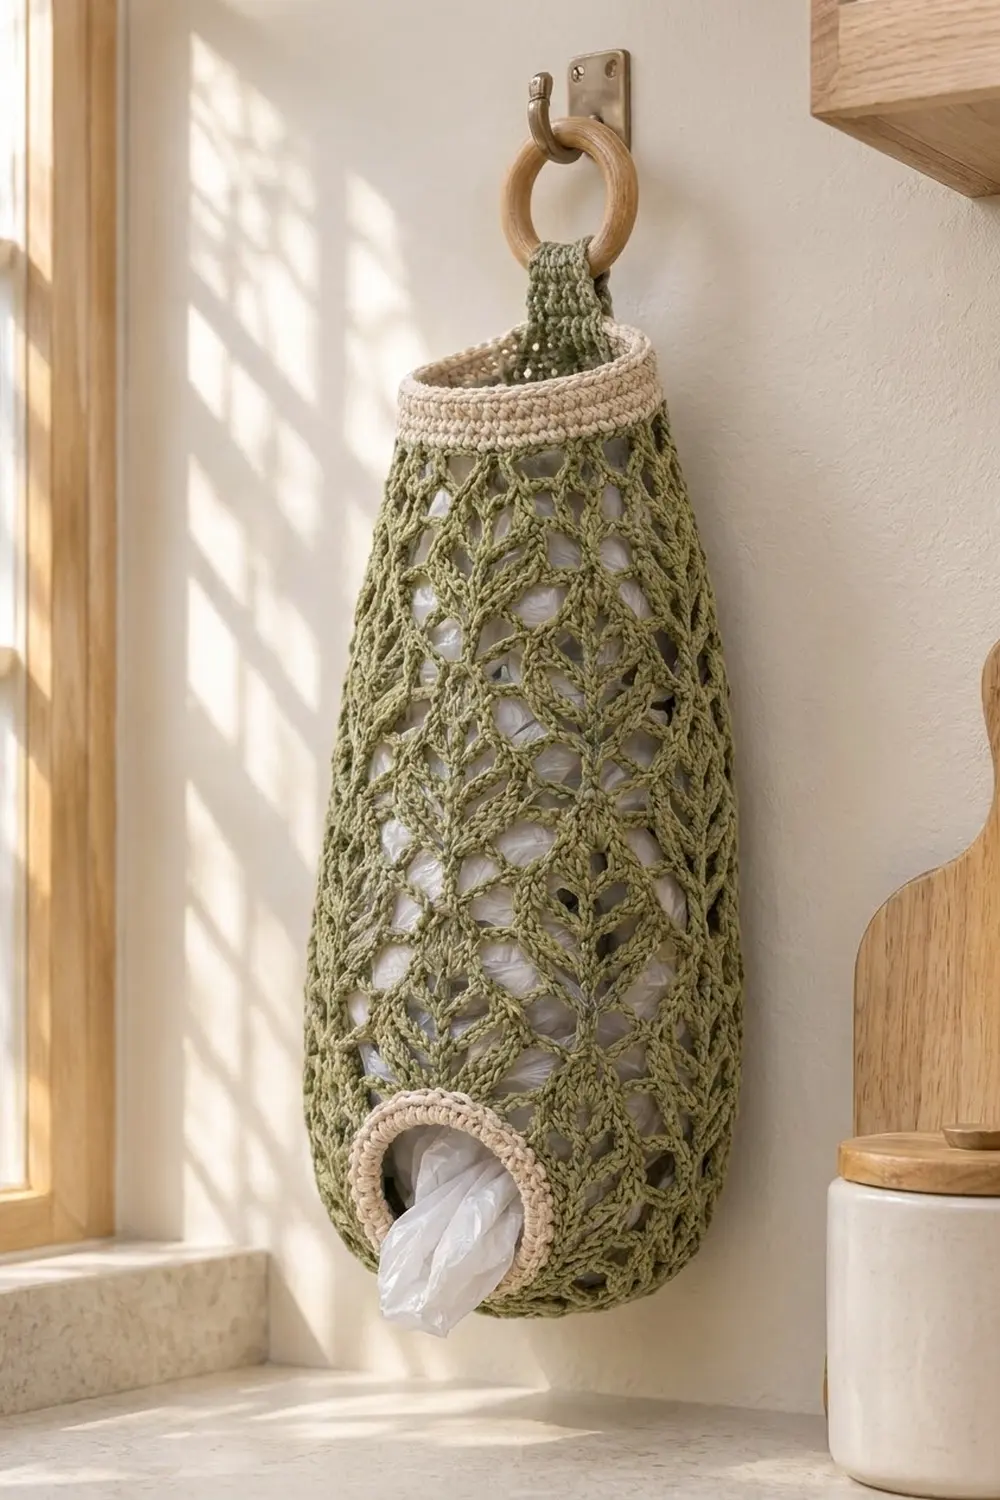
This hanging bag holder is a calm, practical piece for a kitchen wall. It is a long teardrop of sage green leaf lace, with a neat cream band at the top and a cream-ringed dispenser opening low on the front. You stuff loose plastic bags in through the top and pull them out one at a time through the round opening near the bottom.
The palette is just two colors. Sage (olive) green makes the lace body, the solid lower cup, and the hanging strap. Cream makes the top band and the collar around the dispenser opening. The lace is a lattice of small leaf-shaped shells lined up in offset diagonals, so the bags show softly through the openings.
The pattern uses US crochet terms. The finished holder is about 17.75 in (45.1 cm) tall without the strap. Laid flat, it is about 7.75 in (19.7 cm) wide at the widest point of the lace and 6 in (15.2 cm) wide across the top band.
The holder is worked in one piece from the bottom up. You make a flat circle base, then build a short solid cup with a gap for the dispenser opening. Next you switch to the leaf lace and finish with the cream top band. A short green strap is worked off the back of the band and folded through a wooden ring for hanging.
Finished Size and Construction
- Finished size: about 17.75 in (45.1 cm) tall, plus a strap loop of about 2.25 in (5.7 cm) above the band
- Skill level: Intermediate (lace rounds, working into row ends)
- Terminology: US crochet terms
- Yarn weight: Worsted (#4), cotton or cotton blend
- Hook: 5 mm (US H-8)
- Number of pieces: 1 (the body, collar, and strap are all worked onto the same piece)
- Layout: a single vertical teardrop, hung from a ring
- Base diameter: about 4.4 in (11.2 cm), 48 stitches around
- Size before top band: about 16.65 in (42.3 cm) tall
- Top band depth: about 1.1 in (2.8 cm)
- Dispenser collar depth: about 0.75 in (1.9 cm)
Materials
Choose a smooth, firm worsted-weight cotton or cotton blend. Cotton holds the lace shape well, doesn’t stretch much under the weight of the bags, and washes easily. Avoid very soft or splitty acrylics, because the shells lose their definition.
- Sage green (Color A): about 130 g (approx. 234 m / 256 yd)
- Cream (Color B): about 30 g (approx. 54 m / 59 yd)
- 5 mm (US H-8) crochet hook
- 1 wooden ring, about 2 in (5.1 cm) across
- 4 stitch markers
- Tapestry needle
- Scissors
- Pins and a spray bottle for blocking
These quantities include a margin of about 15 percent to cover your gauge check and differences in tension.
Abbreviations (US Terms)
- ch – chain
- sl st – slip stitch
- sc – single crochet
- dc – double crochet
- sk – skip
- sp(s) – space(s)
- st(s) – stitch(es)
- rnd(s) – round(s)
- beg – beginning
Special stitch – Shell: (2 dc, ch 3, 2 dc) in the same space. When a shell begins a round, ch 3 (counts as the first dc), then work (dc, ch 3, 2 dc) in the same space.
Gauge and Checkpoints
- Dc gauge: 14 dc and 8 rnds = 4 in (10.2 cm)
- Sc gauge: 16 sc and 18 rows = 4 in (10.2 cm)
Because the holder is one piece, the base is your test piece. Work Rnds 1–4 and measure before going further.
- After Rnd 4: a circle about 4.4 in (11.2 cm) across, with 48 dc and a circumference of about 13.7 in (34.8 cm).
- After Rnd 10: cup walls (Rnds 5–10) about 3 in (7.6 cm) tall. The dispenser gap is about 2.25 in (5.7 cm) wide and 1.5 in (3.8 cm) tall.
- After Rnd 29: lace section (Rnds 11–29) about 11 in (27.9 cm) tall, measured flat without stretching.
- After the top band: the whole holder is about 17.75 in (45.1 cm) tall, and the band is 6 in (15.2 cm) wide flat.
If your base is too big, go down half a hook size. If it’s too small or feels stiff, go up half a size. Don’t change any stitch counts. The lace is built on 48 stitches, so the hook size is your only adjustment.
Pattern
Base (Color A)
Rnd 1: Make a magic ring. Ch 3 (counts as dc throughout), 11 dc in ring. Join with sl st to top of beg ch-3. Pull the ring closed. (12 dc)
Rnd 2: Ch 3, dc in same st, 2 dc in each st around. Join. (24 dc)
Rnd 3: Ch 3, 2 dc in next st, dc in next st, 2 dc in next st; repeat from * around. Join. (36 dc)
Rnd 4: Ch 3, dc in next st, 2 dc in next st, dc in next 2 sts, 2 dc in next st; repeat from * around. Join. (48 dc)
Checkpoint: 4.4 in (11.2 cm) across.
Cup Walls and Dispenser Gap (Color A)
Rnds 5–6: Ch 3, dc in each st around. Join. (48 dc each rnd)
The base now starts to cup upward.
Row 7: Ch 3, dc in next 39 sts, leaving the last 8 sts unworked. Turn. (40 dc)
Row 8: Ch 3, dc in next 39 sts. Turn. (40 dc)
Row 9: Ch 3, dc in next 39 sts. Ch 8, then sl st to top of the beg ch-3 of this row to close the gap. Don’t turn. (40 dc + ch-8)
Rnd 10: Ch 3, dc in next 39 dc, dc in each of next 8 ch. Join. (48 dc)
The 8 unworked stitches of Rnd 6, the row ends of Rows 7–9, and the ch-8 now frame a clean opening. This side of the holder is the front. Checkpoint: the gap is 2.25 in (5.7 cm) wide and 1.5 in (3.8 cm) tall.
Leaf Lace Body (Color A)
The lace alternates two types of round. Every Leaf Round uses the same instructions, and so does every Arch Round. The offset happens on its own, because each arch sits centered over either a shell or a sc of the round below.
Rnd 11 (set-up Arch Round): Ch 1, sc in first st, ch 5, sk 2 sts, sc in next st; repeat from * until 2 sts remain, ch 5, sk 2 sts, join with sl st to first sc. (16 sc, 16 ch-5 arches)
Leaf Round: Sl st into first arch. Ch 3, (dc, ch 3, 2 dc) in same arch (first shell made), ch 2, sc in next arch, ch 2, shell in next arch, ch 2, sc in next arch, ch 2; repeat from * 6 more times. Join to top of beg ch-3. (8 shells, 8 sc, 16 ch-2 sps)
Arch Round (ch-X): Sl st in next dc, in ch-3 sp, in next 2 dc, and into the first ch-2 sp. Ch 1, sc in same sp, ch X, sc in next ch-2 sp, ch X; repeat from * around. Join to first sc. (16 sc, 16 ch-X arches)
The arches skip over the shells, so one arch lands over each shell and one over each sc. The next Leaf Round then places its shells over the previous sc, which creates the diagonal leaf lattice.
Work the body in this order:
| Rnd | Type | Count |
|---|---|---|
| 12 | Leaf Round | 8 shells, 8 sc |
| 13 | Arch Round, ch 5 | 16 sc, 16 arches |
| 14 | Leaf Round | 8 shells, 8 sc |
| 15 | Arch Round, ch 6 | 16 sc, 16 arches |
| 16 | Leaf Round | 8 shells, 8 sc |
| 17 | Arch Round, ch 6 | 16 sc, 16 arches |
| 18 | Leaf Round | 8 shells, 8 sc |
| 19 | Arch Round, ch 6 | 16 sc, 16 arches |
| 20 | Leaf Round | 8 shells, 8 sc |
| 21 | Arch Round, ch 6 | 16 sc, 16 arches |
| 22 | Leaf Round | 8 shells, 8 sc |
| 23 | Arch Round, ch 5 | 16 sc, 16 arches |
| 24 | Leaf Round | 8 shells, 8 sc |
| 25 | Arch Round, ch 5 | 16 sc, 16 arches |
| 26 | Leaf Round | 8 shells, 8 sc |
| 27 | Arch Round, ch 4 | 16 sc, 16 arches |
| 28 | Leaf Round | 8 shells, 8 sc |
| 29 | Arch Round, ch 4 | 16 sc, 16 arches |
The ch-6 arches in Rnds 15–21 form the belly of the teardrop, about 7.75 in (19.7 cm) wide flat. The ch-4 arches in Rnds 27–29 draw the top in. The stitch counts never change; only the arch length does.
Checkpoint after Rnd 29: the lace section is about 11 in (27.9 cm) tall. Fasten off Color A.
Border: Top Band and Dispenser Collar
On this piece, the top band and the dispenser collar act as the border. Both are worked in Color B in sc, at the sc gauge of 16 sc = 4 in (10.2 cm).
Top Band (Color B)
Rnd 1 (conversion round): Join Color B in any sc of Rnd 29. Ch 1, sc in sc, 2 sc in next ch-4 arch; repeat from * around. Join. (16 sc worked 1 per existing sc + 32 sc worked 2 per arch = 48 sc)
Rnds 2–5: Ch 1, sc in each st around. Join. (48 sc each rnd)
Fasten off after Rnd 5. Band depth: 1.1 in (2.8 cm).
Why the math works: At 16 sc per 4 in, 48 sc give a circumference of 12 in (30.5 cm), or 6 in (15.2 cm) flat. That’s narrower than the lace belly but still wide enough to push a hand in. The ch-4 arches are short, so 2 sc per arch fills them without ruffling.
Dispenser Collar (Color B)
Rnd 1: Join Color B in the first unworked st of Rnd 6 at the bottom of the gap. Ch 1, then work:
- sc in each of the 8 unworked sts (8 sc)
- 2 sc in each of the 3 row ends of Rows 7–9 (6 sc)
- sc in the free loop of each of the 8 ch (8 sc)
- 2 sc in each of the 3 row ends on the other side (6 sc)
Join. (8 + 6 + 8 + 6 = 28 sc)
Rnds 2–3: Ch 1, sc in each st around. Join. (28 sc each rnd)
Fasten off. Collar depth: 0.75 in (1.9 cm).
Why the math works: The edge of the gap measures 2.25 + 1.5 + 2.25 + 1.5 = 7.5 in (19.1 cm). At 16 sc per 4 in, 28 sc measure 7 in (17.8 cm), which is slightly shorter. That small difference pulls the rectangle into a round ring that stands out a little from the body. The inner opening ends up about 2 in (5.1 cm) across.
Hanging Strap (Color A)
Flatten the holder with the collar centered on the front. On Rnd 5 of the top band, mark the 6 sts centered on the back.
Row 1: Join Color A in the first marked st. Ch 1, sc in same st and in next 5 sts. Turn. (6 sc)
Rows 2–26: Ch 1, sc in each st across. Turn. (6 sc each row)
The strap is about 1.5 in (3.8 cm) wide and 5.8 in (14.7 cm) long. Thread it through the wooden ring and fold the end down to the inside of the band. Using Color A, sew Row 26 to the inside of band Rnd 2. The visible loop is about 2.25 in (5.7 cm).
Final Blocking
- Weave in all ends on the inside, running each one through at least 2 in (5.1 cm) of solid stitches.
- Stuff the holder loosely with a clean towel or a bag full of bags so it takes its teardrop shape.
- Spray it evenly until it’s damp but not dripping.
- Use your fingers to open each shell and straighten the diagonal lines of the lattice.
- Push a small round jar or a rolled cardboard tube into the dispenser collar so it dries as a circle about 2 in (5.1 cm) across.
- Check that the top band is 6 in (15.2 cm) flat and the belly is about 7.75 in (19.7 cm) flat.
- Let it dry completely, for at least 24 hours, before removing the stuffing.
Final Quality-Control Checklist
- The base has 48 dc and lies smooth with no ripples.
- The dispenser opening sits low on the front, just above the base.
- Every Leaf Round has 8 shells and 8 sc.
- Every Arch Round has 16 arches.
- The shells line up on diagonals with no skipped repeat.
- The top band has 48 sc in every round.
- The collar has 28 sc in every round and looks round.
- The strap is centered on the back, opposite the opening, and firmly sewn.
- All ends are woven in on the inside.
Troubleshooting
The base ruffles. Your dc are tall or loose. Go down half a hook size and redo Rnds 1–4.
A Leaf Round ends with an extra or missing shell. Count the arches in the previous Arch Round. There must be exactly 16, so fix the Arch Round first.
The lattice spirals. Make sure each Arch Round starts in the first ch-2 sp after the first shell, exactly as written.
The collar flares outward. Your sc are loose. Rework Rnds 2–3 with a hook half a size smaller.
The collar pulls the opening into an oval. Check that you worked 2 sc in every row end. Working only 1 sc per row end leaves too few stitches on the sides.
The holder is too long. Leave out one pair of rounds from the middle: one ch-6 Arch Round and one Leaf Round. This removes about 1.25 in (3.2 cm).
Care
Hand wash in cool water with mild soap and press the water out in a towel. Dry it flat around stuffing to keep the shape, and don’t tumble dry.
Final Notes
The measurement chain is short:
- The base gives 48 dc and a 4.4 in (11.2 cm) circle.
- The cup walls add 3 in (7.6 cm) and leave a gap of 2.25 by 1.5 in (5.7 by 3.8 cm).
- The lace keeps 16 arches and 8 shells per round for 11 in (27.9 cm). Only the arch length changes, which shapes the teardrop.
- The top band converts 16 sc plus 32 arch sc into 48 sc, for a 6 in (15.2 cm) opening.
- The collar’s 28 sc pull the gap into a neat ring.
If each checkpoint matches, your finished holder will be about 17.75 in (45.1 cm) tall.
Happy crocheting!