

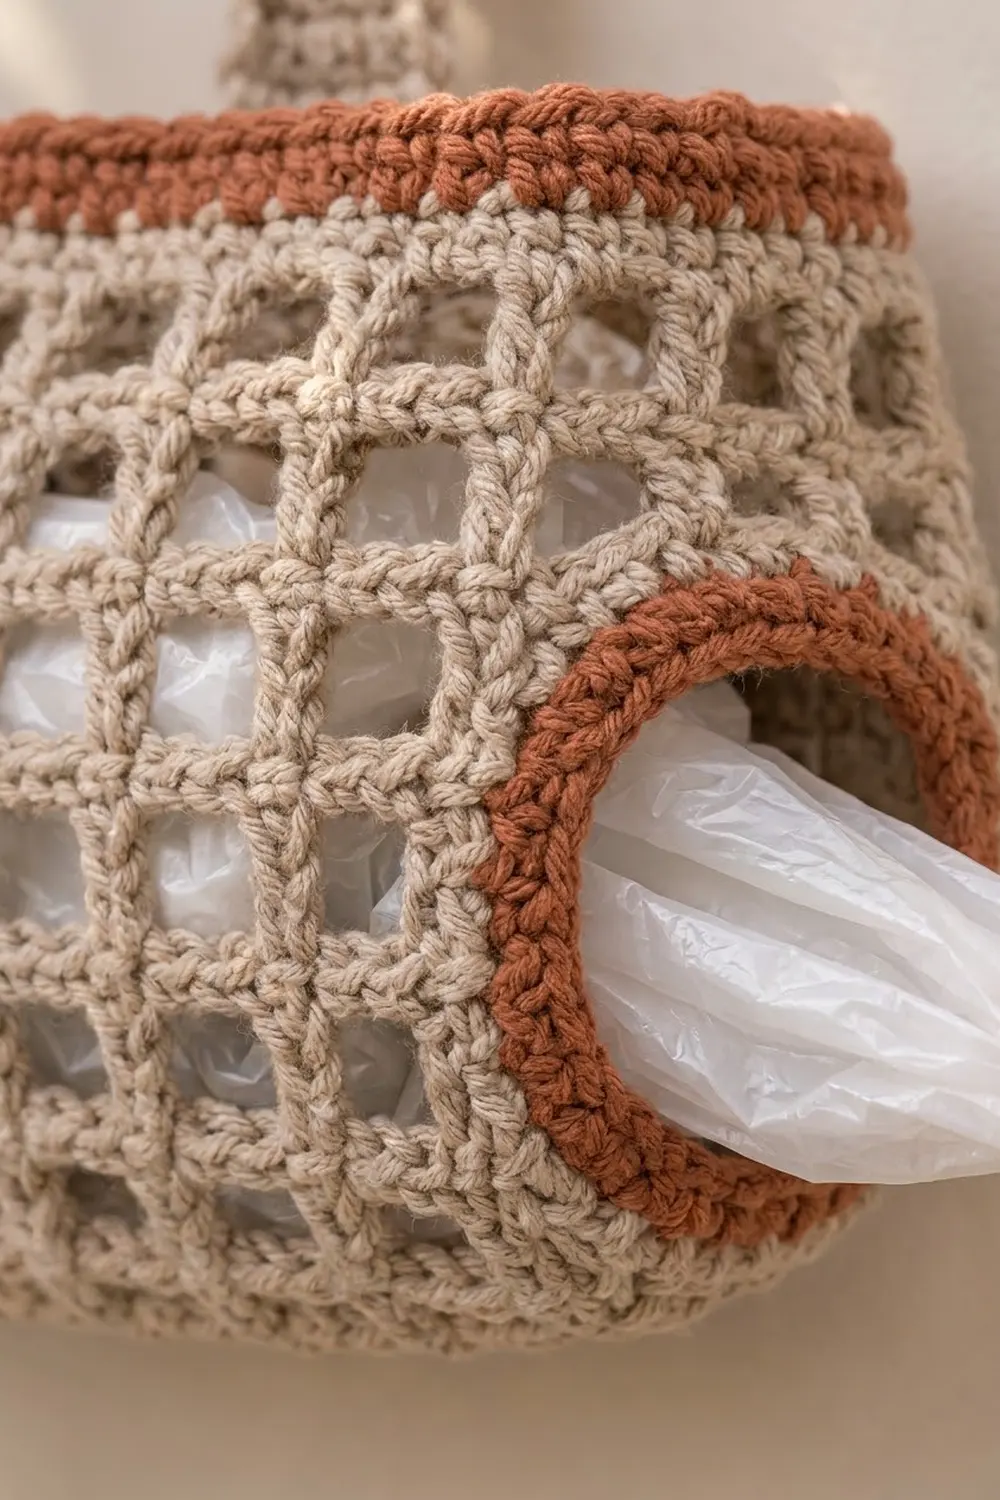
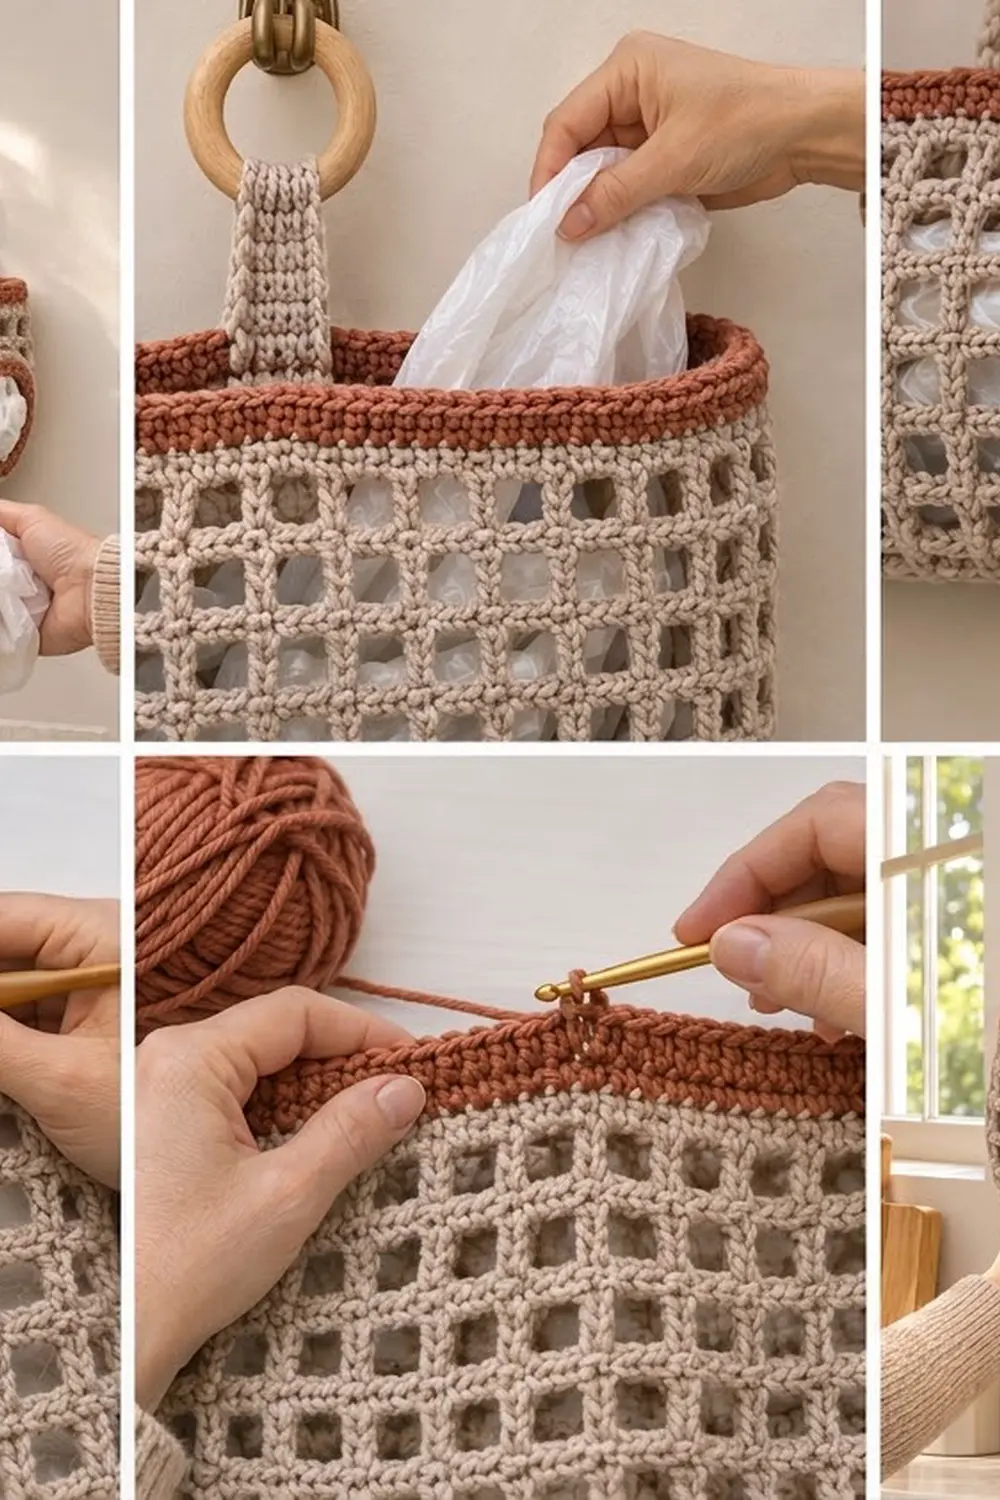
This hanging bag holder gives your kitchen a tidy place for plastic grocery bags. It also looks good enough to leave on show. The body is an open grid of square holes in warm oatmeal beige, finished with a solid terracotta rim and a matching terracotta ring around the dispenser hole.
You push bags in at the top and pull them out one at a time through the round opening at the side. Two short straps loop through wooden rings, so the basket hangs from a pair of wall hooks.
The pattern uses US crochet terms. The finished basket measures about 14 in (35.6 cm) long, 4 in (10.2 cm) deep and 6.4 in (16.3 cm) tall, not counting the straps.
You start with an oval single crochet base worked in rounds. Next comes one back-loop round that turns the edge up into a wall. The grid walls follow, with four turned rows in the middle that leave a gap for the dispenser hole. Then you add the terracotta rim, edge the hole, make two straps and sew them on.
Finished Size and Construction
- Finished size: about 14 in (35.6 cm) long × 4 in (10.2 cm) deep × 6.4 in (16.3 cm) tall
- Skill level: Intermediate (simple stitches, but you need to count carefully)
- Terminology: US crochet terms
- Yarn weight: Worsted weight (#4), cotton or cotton blend
- Hook: 5.0 mm (H-8)
- Number of pieces: 1 basket body + 2 straps, sewn into one item
- Layout: Single oval basket with the dispenser hole on one rounded end
- Base size: 13.6 in × 3.5 in (34.5 cm × 8.9 cm)
- Wall height before rim: 5.65 in (14.4 cm)
- Rim (border) depth: 0.75 in (1.9 cm); the hole ring is 0.5 in (1.3 cm) wide
Materials
Use a smooth worsted-weight cotton or cotton blend. Cotton holds the grid squares crisply and doesn’t stretch much under the weight of the bags. Acrylic works too, but the basket will be a little softer.
- Color A, oatmeal beige: 100 g, about 170 m (186 yd)
- Color B, terracotta/rust: 30 g, about 50 m (55 yd)
These amounts include a safety margin of roughly 30%.
Tools:
– 5.0 mm (H-8) crochet hook
– Two wooden rings, 2.5 in (6.4 cm) across
– 4 locking stitch markers
– Tapestry needle
– Scissors
– Tape measure
– Two wall hooks
Abbreviations (US Terms)
- ch – chain
- sl st – slip stitch
- sc – single crochet
- dc – double crochet
- sc2tog – single crochet 2 together
- BLO – back loop only
- st(s) – stitch(es)
- sp – space
- RS / WS – right side / wrong side
Grid square (special stitch): a square is one dc followed by ch 1. Each square uses 2 stitches of width: the dc, plus the ch-1 that bridges a skipped stitch.
Beginning ch-4: at the start of a grid round or row, ch 4 counts as 1 dc plus ch 1.
Gauge and Checkpoints
- Single crochet: 14 sc and 16 rounds = 4 in (10.2 cm). One sc round is about 0.25 in (0.6 cm) tall.
- Grid: 7 squares (14 sts) = 4 in (10.2 cm) wide, and 5 grid rounds = 3 in (7.6 cm) tall. One grid round is about 0.6 in (1.5 cm) tall.
Test first: work Rounds 1–3 of the base and measure before you go further.
Checkpoints:
– After Round 1: about 10.6 in (26.9 cm) long
– After Round 3: about 11.6 in × 1.5 in (29.5 cm × 3.8 cm)
– After Round 7: 13.6 in × 3.5 in (34.5 cm × 8.9 cm)
– After Round 10: wall about 1.45 in (3.7 cm) tall
– After Round 15: wall about 4.45 in (11.3 cm) tall
– After Round 17: wall 5.65 in (14.4 cm) tall
– After the rim: wall 6.4 in (16.3 cm) tall
If your base is too big, go down to a 4.5 mm hook. If it’s too small, go up to a 5.5 mm hook. If your grid rounds come out taller than 0.6 in (1.5 cm), wrap the yarn more firmly when you make the dc. Don’t change the stitch counts, because the grid depends on 112 stitches.
Base (Color A)
Rnd 1: Ch 38. Sc in 2nd ch from hook, sc in next 35 ch, 3 sc in last ch. Rotate and work along the bottom loops of the chain: sc in next 35 ch, 2 sc in the same ch as the first sc. Join with sl st to first sc. (76 sts)
Rounds 2–7 add 6 stitches each: 3 on each curved end.
Rnd 2: Ch 1. 2 sc in first st, sc in next 35, 2 sc in each of next 3, sc in next 35, 2 sc in each of last 2. Join. (82 sts)
Rnd 3: Ch 1. Sc in first st, 2 sc in next, sc in next 35, (sc in next, 2 sc in next) 3 times, sc in next 35, (sc in next, 2 sc in next) 2 times. Join. (88 sts)
Rnd 4: Ch 1. (Sc in next 2, 2 sc in next) once, sc in next 35, (sc in next 2, 2 sc in next) 3 times, sc in next 35, (sc in next 2, 2 sc in next) 2 times. Join. (94 sts)
Rnd 5: Ch 1. (Sc in next 3, 2 sc in next) once, sc in next 35, (sc in next 3, 2 sc in next) 3 times, sc in next 35, (sc in next 3, 2 sc in next) 2 times. Join. (100 sts)
Rnd 6: Ch 1. (Sc in next 4, 2 sc in next) once, sc in next 35, (sc in next 4, 2 sc in next) 3 times, sc in next 35, (sc in next 4, 2 sc in next) 2 times. Join. (106 sts)
Rnd 7: Ch 1. (Sc in next 5, 2 sc in next) once, sc in next 35, (sc in next 5, 2 sc in next) 3 times, sc in next 35, (sc in next 5, 2 sc in next) 2 times. Join. (112 sts)
After Round 7 the stitches split into 35 on each long side and 21 on each curved end (35 + 35 + 21 + 21 = 112). The base should lie flat at 13.6 in × 3.5 in (34.5 cm × 8.9 cm).
Walls (Color A)
Rnd 8 (turning round): Ch 1, sc BLO in each st around. Join. (112 sts) The unused front loops make a crisp fold where the base meets the wall.
Rnd 9 (conversion to grid): Ch 4 (counts as dc + ch 1), skip next st. Dc in next st, ch 1, skip next st; repeat from * 54 more times. Join with sl st to 3rd ch of beginning ch-4.
Count: 56 dc worked into existing stitches, plus 56 ch-1 spaces over the skipped stitches, makes 112 sts (56 squares).
Rnd 10: Ch 4, dc in next dc, ch 1; repeat from * 54 more times. Join to 3rd ch of ch-4. (56 squares)
Number the dc posts of Round 10 from 1 to 56, starting with the beginning ch-4 as dc 1. The hole will sit over dc 55, 56, 1 and 2, which is on the curved end where your rounds join.
Dispenser Hole Rows
For the next four rows you turn your work so that a 9-stitch gap stays open.
Row 11 (RS): Sl st in next ch-1 sp, sl st in dc 2, sl st in next ch-1 sp, sl st in dc 3. Ch 4 (counts as dc + ch 1). (Dc in next dc, ch 1) 50 times, then dc in next dc (dc 54). Turn.
That gives 52 dc + 51 ch-1 = 103 sts. Leave 9 sts open: 5 ch-1 spaces plus dc 55, 56, 1 and 2. The slip stitches sit along the bottom edge of the hole and will be hidden under the terracotta edging.
Row 12 (WS): Ch 4, skip ch-1 sp. (Dc in next dc, ch 1) 50 times, then dc in 3rd ch of turning ch-4. Turn. (103 sts)
Rows 13–14: Repeat Row 12. Row 14 ends at the dc 3 column. (103 sts each)
Rnd 15 (closing round, RS): Ch 4. (Dc in next dc, ch 1) 50 times, dc in next dc (dc 54 column), ch 9. Join with sl st to 3rd ch of beginning ch-4.
Count: 52 dc + 51 ch-1 + 9 ch = 112 sts. The ch-9 forms the top edge of the hole. Your new start of round is at the dc 3 column.
Rnd 16: Ch 4. (Dc in next dc, ch 1) 50 times, dc in next dc, ch 1, skip first ch of ch-9. (Dc in next ch, ch 1, skip next ch) 4 times. Join to 3rd ch of ch-4.
This puts dc into chains 2, 4, 6 and 8 of the ch-9: 1 + 50 + 1 + 4 = 56 squares in all.
Rnd 17: Ch 4, (dc in next dc, ch 1) 55 times. Join. (56 squares) Fasten off Color A.
Checkpoint: the wall should now be 5.65 in (14.4 cm) tall, and the hole about 2.6 in (6.6 cm) wide × 2.4 in (6.1 cm) tall.
Border: Terracotta Rim and Hole Ring (Color B)
Border gauge: 14 sc = 4 in (10.2 cm), and 4 rounds = 1 in (2.5 cm), the same as the base.
Rim
Rnd 18 (conversion): Join Color B in any ch-1 sp on the back long side. Ch 1. Work 1 sc in each dc and 1 sc in each ch-1 sp around: 56 + 56 = 112 sc. Join.
Per section, that’s 35 sc on the front long side, 35 sc on the back long side and 21 sc on each curved end.
Rnds 19–20: Ch 1, sc in each st around. Join. (112 sts; same split of 35/35/21/21)
Fasten off. The rim is 0.75 in (1.9 cm) deep.
Why the math works: the base ends at 112 stitches, and every grid round keeps 112 stitches (56 dc + 56 ch). The rim places exactly one sc on each of those stitches, so the top edge has the same circumference as the base, about 32 in (81.3 cm). It won’t flare or pull in.
Hole Ring
Rnd 1: Join Color B at the bottom-right corner of the hole.
– Bottom edge: 9 sc, one in each ch-1 sp and dc along the Round 10 edge.
– First side: 8 sc up the side, 2 sc around each of the four row-end dc posts.
– Top edge: 9 sc around the ch-9.
– Second side: 8 sc down the other side.
Join. 9 + 8 + 9 + 8 = 34 sc
Rnd 2: Ch 1. Sc in each st, but at each of the 4 corners work sc2tog over the last st of one side and the first st of the next. Join. (34 − 4 = 30 sts)
The decreases round off the corners so the opening looks circular. The ring is 0.5 in (1.3 cm) wide, and the opening that’s left is about 1.6 in × 1.4 in (4.1 cm × 3.6 cm). That’s snug enough to hold bags in but easy to pull them through. Fasten off and weave in the ends.
Straps (make 2, Color A)
Row 1: Ch 6, sc in 2nd ch from hook and in each ch across. (5 sc)
Rows 2–22: Ch 1, turn, sc across. (5 sc)
Each strap measures 1.4 in × 5.5 in (3.6 cm × 14.0 cm). Fasten off, leaving a 12 in (30.5 cm) tail.
Attaching:
1. Fold 1.25 in (3.2 cm) of one end around a wooden ring and whipstitch it down.
2. On the back long wall, mark two points 3 in (7.6 cm) in from each end of the basket, so they’re 8 in (20.3 cm) apart.
3. Overlap the other end of each strap 1 in (2.5 cm) inside the rim, centered on a marker, and sew it through all three rim rounds.
About 3.25 in (8.3 cm) of strap shows above the rim.
Final Blocking
- Weave in all ends along the dc posts so they stay hidden in the grid.
- Mist the basket evenly with water until it’s damp, not soaking.
- Stuff it firmly with plastic bags or a folded towel to shape the oval.
- Straighten the grid with your fingers so every square sits square, with the posts vertical and the chains horizontal.
- Roll a small towel and slide it into the hole ring to round it out.
- Check the measurements: 14 in (35.6 cm) long and 6.4 in (16.3 cm) tall.
- Let it dry completely, then remove the stuffing.
Final Quality-Control Checklist
- [ ] Base Round 7 has 112 sts and lies flat
- [ ] Every grid round has 56 squares
- [ ] The hole is centered on one curved end
- [ ] The rim has 112 sc on every round
- [ ] The hole ring has 30 sts and looks round
- [ ] The straps are 8 in (20.3 cm) apart and sewn through all rim rounds
- [ ] The wooden rings are firmly stitched in
- [ ] The finished height is 6.4 in (16.3 cm)
Troubleshooting
The base ripples. Your stitches are too loose, or you added extra increases. Recount Round 7 and go down a hook size if needed.
The base cups upward. You’re working too tightly, or you skipped increases. Go up a hook size.
The grid squares lean diagonally. This is normal with rounds that spiral slightly. Firm blocking straightens them.
The hole is off-center. The round join drifted. Before Row 11, count dc posts from the middle of the curved end and adjust where you start the sl sts.
The rim flares. Check that you worked only 1 sc in each ch-1 sp, not 2.
The straps stretch. Sew through both the rim and the top grid round, or use a slightly smaller hook for the straps.
Care
Hand wash in cool water and lay flat to dry, reshaping it with a towel inside. Take the basket off its hooks before washing.
Final Notes
Everything in this pattern follows from one number: 112 stitches.
- The oval base grows to 112 sts and 13.6 in × 3.5 in (34.5 cm × 8.9 cm).
- Nine grid rounds of 56 squares add 5.4 in (13.7 cm), including the four turned rows that leave a 2.6 in × 2.4 in (6.6 cm × 6.1 cm) hole.
- The rim’s 112 sc add 0.75 in (1.9 cm), for a total height of 6.4 in (16.3 cm).
- The 30-stitch ring frames the dispenser opening.
If your base checkpoint matches, everything above it will line up.
Happy crocheting!