

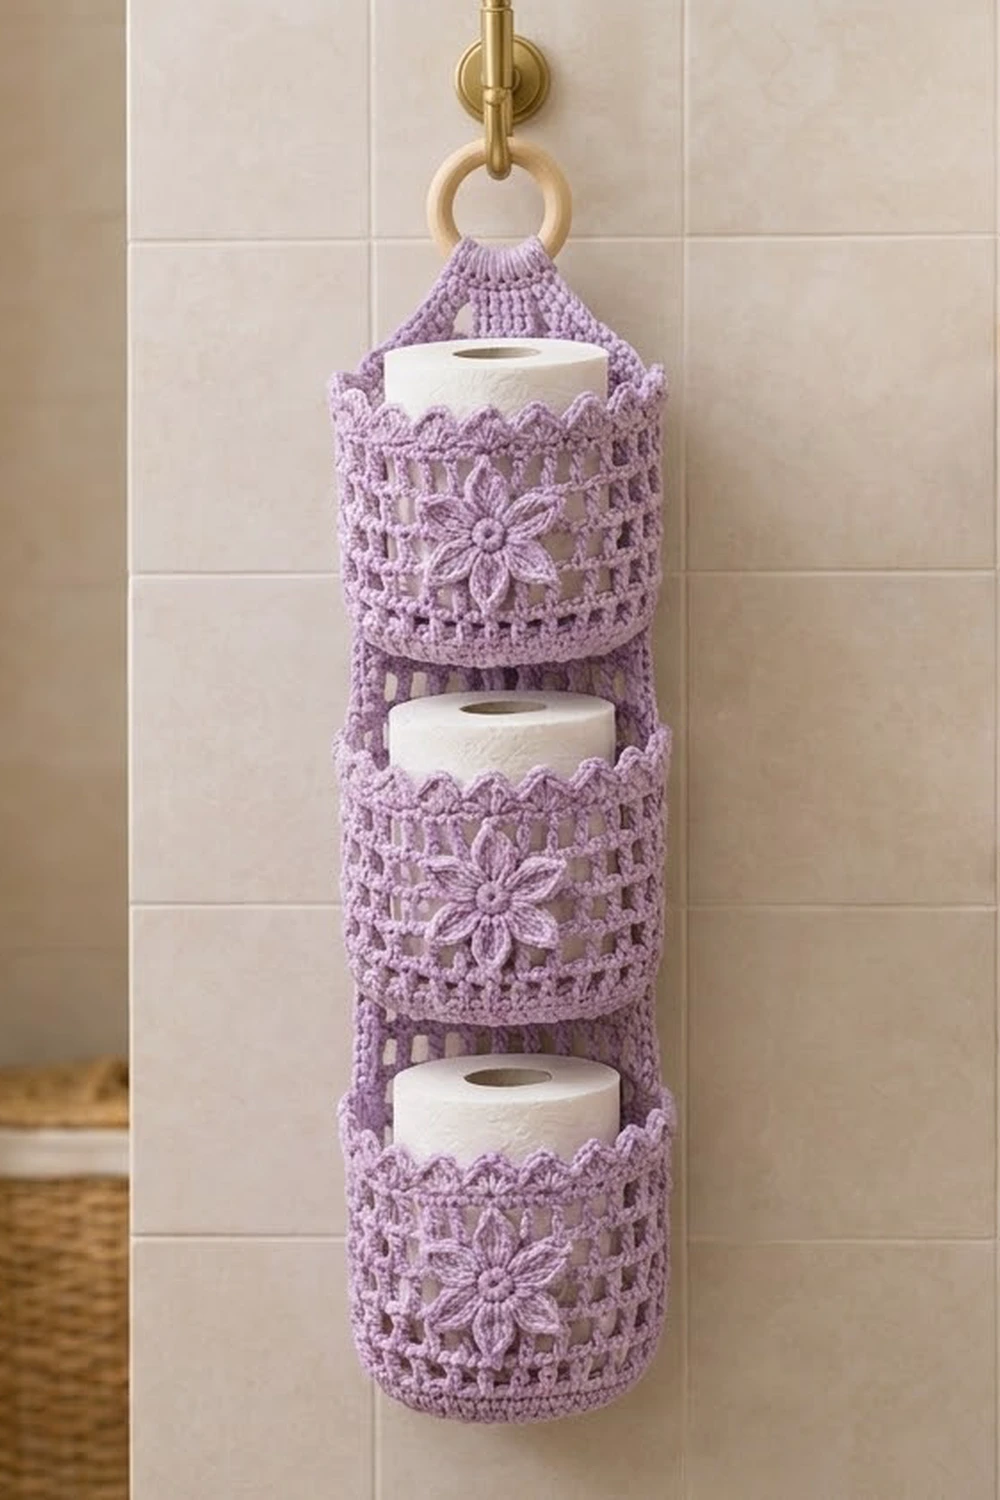
This hanging toilet paper holder keeps three spare rolls in view and within reach. Three round pockets are stacked down a narrow back panel, and the panel tapers into a strap that wraps around a wooden ring. You hang the ring on any towel hook or door hook.
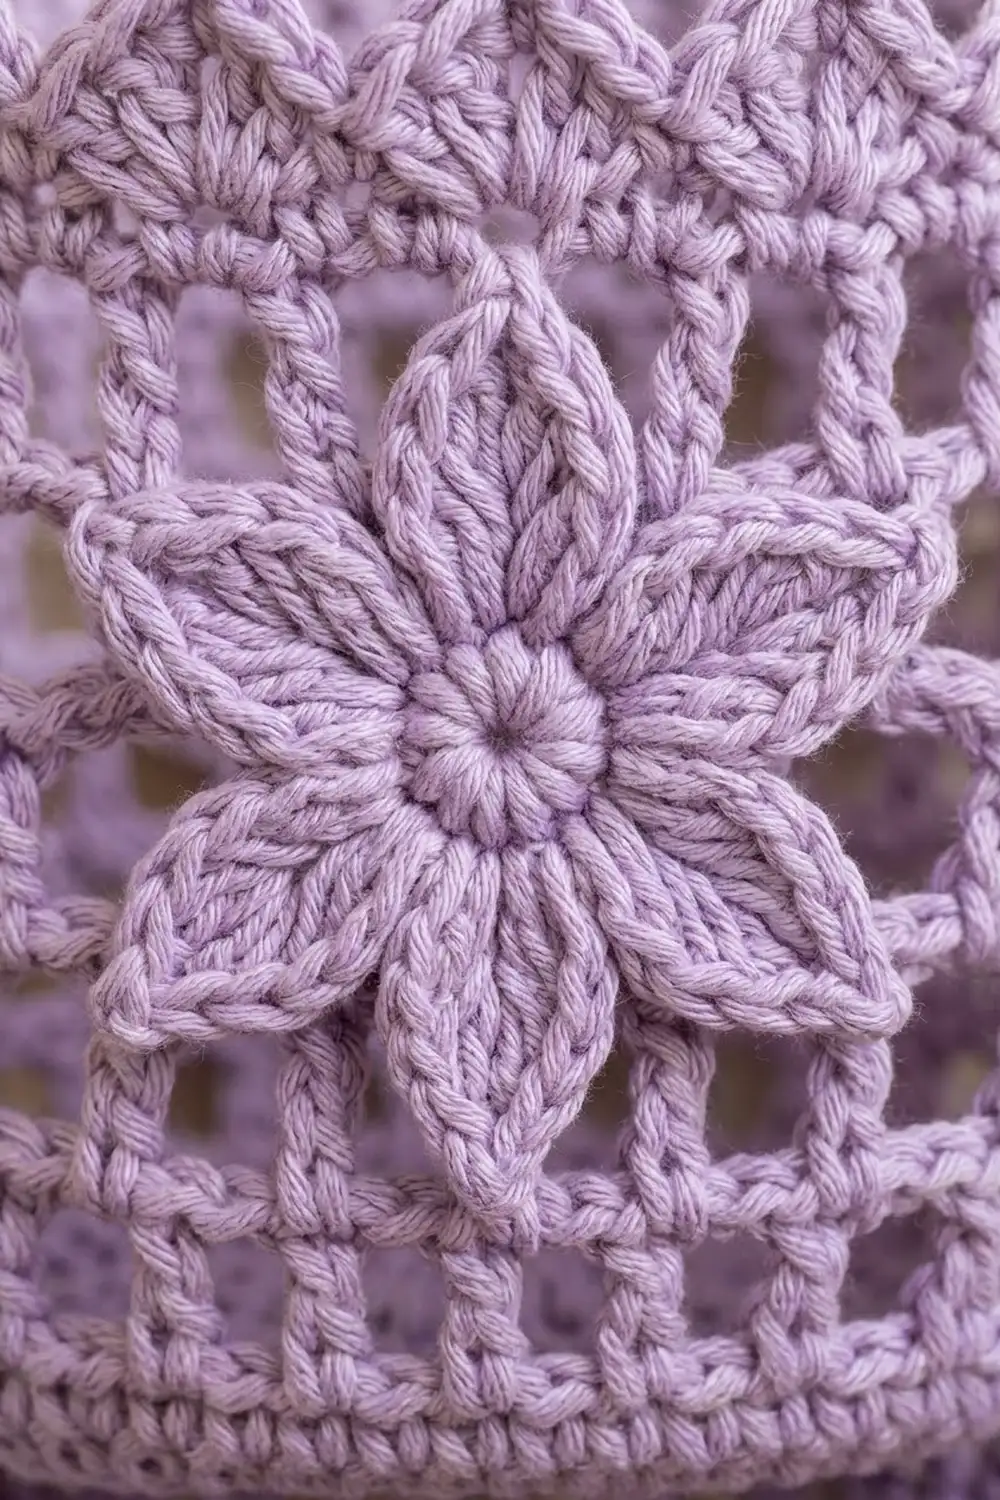
Each pocket has a solid base, open filet mesh sides, a pointed scalloped rim, and a six-petal flower appliqué on the front. The sample is one soft lavender, which looks calm and slightly vintage next to cream tiles, brass fixtures, and green plants.
The pattern uses US crochet terms. The finished holder is about 4.75 in (12.1 cm) wide at the pockets and 20.5 in (52.1 cm) long from the top of the folded strap to the bottom edge, not counting the ring.
Construction is simple. You crochet three pockets in the round from the base up, a flat back panel in rows, and three flowers. Then you sew the flowers to the pockets and the pockets to the panel, add a two-round border around the panel, and fold the strap over the ring.
Finished Size and Construction
- Finished size: 4.75 in (12.1 cm) wide x 20.5 in (52.1 cm) long, excluding the ring
- Skill level: Easy to Intermediate
- Terminology: US crochet terms
- Yarn weight: Worsted (#4), cotton or cotton blend
- Hook: 5.0 mm (H-8)
- Number of pieces: 7 (1 back panel, 3 pockets, 3 flowers)
- Layout: 3 pockets stacked vertically on 1 panel
- Pocket size: 4.75 in (12.1 cm) diameter x 4 in (10.2 cm) tall
- Panel size before border: 4 in (10.2 cm) wide x 21.5 in (54.6 cm) long
- Border depth: 0.25 in (0.6 cm) per side
- Flower size: about 3 in (7.6 cm) across
Materials
Yarn: Use a smooth worsted-weight cotton or cotton blend. Cotton holds its shape under the weight of a roll and shows the mesh and petals clearly. Avoid fuzzy acrylic, because it hides the scallop points.
- Lavender: 200 g / about 340 m (372 yd) total
- Back panel and border: about 55 g / 94 m
- Pockets: about 35 g / 60 m each (105 g / 180 m for three)
- Flowers: about 5 g / 9 m each (15 g / 27 m for three)
These quantities include a margin of about 15%, so you won’t run short if your tension is a little loose.
Tools:
- 5.0 mm (H-8) crochet hook
- Wooden ring, 3 in (7.6 cm) diameter
- Tapestry needle
- 6 locking stitch markers
- Scissors
- Measuring tape
- Blocking mat and rust-proof pins
- Spray bottle
Abbreviations (US Terms)
- ch – chain
- sl st – slip stitch
- sc – single crochet
- hdc – half double crochet
- dc – double crochet
- tr – treble crochet
- sc2tog – single crochet 2 together
- BLO – back loop only
- MR – magic ring
- st(s) – stitch(es)
- sp – space
- sk – skip
Special stitch – Pointed shell: (2 dc, ch 2, 2 dc) all in the same stitch. The ch-2 forms the tip of each scallop.
Gauge and Checkpoints
Single crochet gauge: 16 sc x 16 rows = 4 in (10.2 cm).
Mesh gauge: 8 mesh squares (16 sts) = 4 in (10.2 cm) wide, and 2 mesh rounds = 1 in (2.5 cm) tall.
Make one complete pocket first. It is your gauge swatch, and every measurement in this pattern depends on it.
Checkpoints:
- After Round 10 of the pocket, the base measures 4.75 in (12.1 cm) across.
- After Round 17 (end of the mesh), the side measures 3 in (7.6 cm) from the base ridge.
- The finished pocket stands 4 in (10.2 cm) tall from the base ridge to the scallop tips.
- After 16 rows, the panel measures 4 in (10.2 cm) wide x 4 in (10.2 cm) tall.
If your piece is too big, go down 0.5 mm in hook size. If it is too small, go up 0.5 mm. If the base ripples, your increases are too tight for your gauge, so go up a hook size for the base only. If the base cups, go down a size.
Pocket (Make 3)
Worked in joined rounds with the right side always facing. The ch 1 at the start of a round does not count as a stitch.
Round 1: Make an MR. Ch 1, 6 sc in ring, sl st to first sc. (6)
Round 2: Ch 1, 2 sc in each st around, sl st to first sc. (12)
Round 3: Ch 1, sc in next st, 2 sc in next st 6 times, sl st to first sc. (18)
Round 4: Ch 1, sc in next 2 sts, 2 sc in next st 6 times, sl st to first sc. (24)
Round 5: Ch 1, sc in next 3 sts, 2 sc in next st 6 times, sl st to first sc. (30)
Round 6: Ch 1, sc in next 4 sts, 2 sc in next st 6 times, sl st to first sc. (36)
Round 7: Ch 1, sc in next 5 sts, 2 sc in next st 6 times, sl st to first sc. (42)
Round 8: Ch 1, sc in next 6 sts, 2 sc in next st 6 times, sl st to first sc. (48)
Round 9: Ch 1, sc in next 7 sts, 2 sc in next st 6 times, sl st to first sc. (54)
Round 10: Ch 1, sc in next 8 sts, 2 sc in next st 6 times, sl st to first sc. (60)
Checkpoint: the flat base measures 4.75 in (12.1 cm) across. This gives about 0.25 in (0.6 cm) of ease around a standard roll.
Round 11 (turning ridge): Ch 1, sc in BLO of each st around, sl st to first sc. (60) The unworked front loops form the ridge along the bottom edge, and the sides start to rise.
Round 12: Ch 1, sc in each st around, sl st to first sc. (60)
Round 13 (mesh set-up): Ch 4 (counts as dc + ch 1), sk next st, dc in next st, ch 1, sk next st 29 times, sl st to 3rd ch of starting ch-4. (30 dc + 30 ch-1 sps = 60 sts)
Rounds 14–17: Ch 4 (counts as dc + ch 1), sk ch-1 sp, dc in next dc, ch 1, sk ch-1 sp 29 times, sl st to 3rd ch of starting ch-4. (30 dc + 30 ch-1 sps each round)
You now have 5 mesh rounds, which make 30 open squares around and 5 squares high.
Checkpoint: the side measures 3 in (7.6 cm) from the turning ridge.
Round 18 (conversion round): Ch 1, sc in each dc and in each ch-1 sp around, sl st to first sc. (30 sc in dc + 30 sc in ch-1 sps = 60)
Round 19: Ch 1, sc in each st around, sl st to first sc. (60)
Round 20 (scallop rim): Ch 1, sc in next st, sk next st, pointed shell in next st, sk next st 15 times, sl st to first sc. (15 sc + 15 pointed shells)
The repeat uses 4 stitches, and 60 / 4 = 15, so the scallops meet evenly at the join. Fasten off, leaving an 18 in (45.7 cm) tail for sewing.
Checkpoint: the pocket is 4 in (10.2 cm) tall from the ridge to the scallop tips. That is 0.5 in (1.3 cm) for Rounds 11–12, 2.5 in (6.4 cm) for the mesh, 0.5 in (1.3 cm) for Rounds 18–19, and 0.5 in (1.3 cm) for the scallops.
Flower Appliqué (Make 3)
Round 1: Make an MR. Ch 1, 6 sc in ring, sl st to first sc. (6)
Round 2: Ch 1, 2 sc in each st around, sl st to first sc. (12)
Round 3: Ch 1, sc in next st, ch 3, sk next st 6 times, sl st to first sc. (6 sc + 6 ch-3 sps)
Round 4 (petals): In each ch-3 sp work (sc, hdc, dc, tr, ch 2, tr, dc, hdc, sc), then sl st in the next sc. Repeat 6 times. (6 pointed petals)
Fasten off, leaving a 12 in (30.5 cm) tail. The 12-stitch center sits slightly raised inside the ring of petals, and the ch-2 at each petal tip makes the sharp point.
Checkpoint: the flower measures about 3 in (7.6 cm) from petal tip to opposite petal tip.
Back Panel (Make 1)
Worked flat in rows. The ch 1 at the start of a row does not count as a stitch.
Foundation: Ch 17.
Row 1: Sc in 2nd ch from hook and in each ch across. (16)
Rows 2–64: Ch 1, turn, sc in each st across. (16)
Checkpoint: the panel measures 4 in (10.2 cm) wide x 16 in (40.6 cm) long.
Taper:
- Row 65: Ch 1, turn, sc2tog, sc in next 12 sts, sc2tog. (14)
- Row 66: Ch 1, turn, sc across. (14)
- Row 67: Ch 1, turn, sc2tog, sc in next 10 sts, sc2tog. (12)
- Row 68: Ch 1, turn, sc across. (12)
- Row 69: Ch 1, turn, sc2tog, sc in next 8 sts, sc2tog. (10)
- Row 70: Ch 1, turn, sc across. (10)
- Row 71: Ch 1, turn, sc2tog, sc in next 6 sts, sc2tog. (8)
- Row 72: Ch 1, turn, sc across. (8)
- Row 73: Ch 1, turn, sc2tog, sc in next 4 sts, sc2tog. (6)
- Row 74: Ch 1, turn, sc across. (6)
Strap, Rows 75–86: Ch 1, turn, sc in each st across. (6) Fasten off.
Checkpoint: the panel measures 21.5 in (54.6 cm) in total. That is 16 in (40.6 cm) of body, 2.5 in (6.4 cm) of taper, and 3 in (7.6 cm) of strap.
Make All Pieces
All pieces are lavender.
- Pockets: 3
- Flowers: 3
- Back panel: 1
Layout (front view, top to bottom):
        [ ring ]
        [ strap ]
       /  taper  \
      | panel 2 in |
      | POCKET 3   |  panel rows 41–56
      | gap 1 in   |  rows 37–40
      | POCKET 2   |  panel rows 21–36
      | gap 1 in   |  rows 17–20
      | POCKET 1   |  panel rows 1–16
Joining
Flowers to pockets: Each pocket’s join seam goes at the center back. Count 15 sts around from the seam on Round 19 to find the center front. Center the flower on the mesh at that point, so the top petal reaches into the Round 18–19 band. Pin it, then use the tail to whipstitch the back loops of the Round 3 sc and a few stitches under each petal tip. Keep the petals free so they lift slightly.
Pockets to panel: Lay the panel right side up. Place stitch markers at the bottom and top of each pocket position, using the row numbers in the layout. Each pocket attaches across the 12 center columns of the panel, sts 3–14. That leaves 2 columns free at each edge for the border.
- Bottom seam: Flatten the back of the pocket. Whipstitch 12 unworked front loops of the Round 11 ridge, centered on the back seam, to sts 3–14 of the pocket’s first panel row (Row 1, 21, or 41). That is one pocket stitch to one panel stitch.
- Top seam: Whipstitch the matching 12 back stitches of Round 19 to sts 3–14 of the pocket’s top row (Row 16, 36, or 56). Again, work one pocket stitch to one panel stitch.
- Center line: Tack the back mesh column at the center seam to the panel at each mesh round, with 5 small stitches.
Tension: Pull each whipstitch only until the yarn lies flat. If you pull harder, the panel puckers and the pocket tips forward.
Checkpoint: the panel still measures 4 in (10.2 cm) wide, and each pocket rim sits level.
Border
Border gauge: One sc per row-end along the sides and one sc per stitch along the top and bottom. With square gauge (16 sts and 16 rows = 4 in / 10.2 cm), one row-end is as tall as one stitch is wide. That makes this ratio lie flat with no added or missing stitches. Fold the pocket edges aside as you work behind them.
Round 1: With the right side facing, join yarn at the bottom right corner. Ch 1, then work:
- Bottom edge: 16 sc (1 per st), ch 1 at corner
- Left side: 86 sc (1 per row-end, including the taper and strap rows), ch 1 at corner
- Top of strap: 6 sc (1 per st), ch 1 at corner
- Right side: 86 sc (1 per row-end), ch 1 at corner
Sl st to first sc. (194 sc + 4 corner ch-1 sps)
Round 2: Sl st loosely in each sc and in each corner ch-1 sp around.
- Bottom: 16
- Left side: 86
- Top: 6
- Right side: 86
- Corners: 4
(198 sl sts) Fasten off and weave in the ends.
Why the math works: The panel has 16 sts and 86 rows, and the border uses exactly one stitch for each. The corner chains turn the corners without adding stitches to any side. The border adds 0.125 in (0.3 cm) per round on every side, which makes the panel 4.5 in (11.4 cm) wide x 22 in (55.9 cm) long.
Attach the ring: Pass the strap through the ring from front to back. Fold the top 1.5 in (3.8 cm), or 6 rows, onto the back of the panel and whipstitch it in place. Finished length: 22 in − 1.5 in = 20.5 in (52.1 cm).
Final Blocking
- Mist the whole holder until it is damp but not dripping.
- Lay the panel flat and pin it to 4.5 in (11.4 cm) wide x 20.5 in (52.1 cm) long.
- Stand a roll in each pocket, or a 4.5 in (11.4 cm) jar wrapped in plastic.
- Open each scallop tip with a pin so it makes a point.
- Shape each flower’s petals to points and press the center up slightly.
- Let it dry completely, at least 24 hours, before you remove the pins.
Final Quality-Control Checklist
- Every pocket has 60 sts in Rounds 10–12 and 18–19.
- Every pocket has 30 mesh squares around in all 5 mesh rounds.
- Every pocket has 15 scallops, evenly spaced.
- Each flower has 6 petals with sharp tips.
- The panel is 16 sts wide for 64 rows and tapers to 6 sts.
- Border Round 1 has 194 sc and 4 corner chains.
- Pockets start at panel Rows 1, 21, and 41.
- The ring strap is folded 1.5 in (3.8 cm) and stitched securely.
- All ends are woven in and none are visible from the front.
Troubleshooting
- The base ruffles: Your increases are too tight for your gauge. Redo the base with a hook 0.5 mm smaller.
- The mesh squares lean: Make sure each dc goes into the dc below, not into the ch-1 sp.
- The scallops don’t meet at the join: Recount Round 19. It must be exactly 60 sts.
- The pocket tips forward: Add more tacking stitches along the back center line.
- The panel puckers under the pockets: Your whipstitches are too tight. Unpick them and resew with looser tension.
- The border waves: Use a smaller hook for the border only.
- The roll won’t fit: Add Round 10a: sc in next 9 sts, 2 sc in next st 6 times, for 66 sts. Then work the mesh with 33 dc. You need a scallop count divisible by 4, so add or remove sts in Round 18 to reach 64 (16 scallops).
Care
Hand wash in cool water with mild soap, press out the water in a towel, and dry flat. Reshape the pockets around a roll while they are damp.
Final Notes
The measurement chain is simple:
- A 60-stitch base gives a 4.75 in (12.1 cm) pocket.
- 5 mesh rounds plus the solid bands and scallops give a 4 in (10.2 cm) pocket height.
- A 16-stitch panel is 4 in (10.2 cm) wide, and the border makes it 4.5 in (11.4 cm).
- 86 rows plus the border make 22 in (55.9 cm), and folding the strap brings it to 20.5 in (52.1 cm).
Check each of these numbers as you go and the finished holder will hang straight and hold its rolls neatly.
Happy crocheting!